Cosmonautics Day on April 12 has been celebrated all over the world for many years. This year marks 60 years since Yuri Gagarin first flew around the Earth. This is where the history of space exploration began.
On the eve of the anniversary, thematic exhibitions and events will traditionally be held in kindergartens and schools. Surely your child was also given the task of creating crafts for Cosmonautics Day with their own hands. We offer you a selection of ideas for inspiration, both from improvised means and from unusual materials. Children can do most of the crafts on their own. The task of parents is to organize, advise and unobtrusively help if necessary.
Crafts for Cosmonautics Day in kindergarten
The first manned flight around the Earth has long been history. However, the topic of space exploration has been of interest to children of all ages for several decades.
Constellation
Image source
This easy-to-make craft is suitable for little ones. In addition to the fact that the baby can easily create his own masterpiece, this is a great activity for developing fine motor skills. From a very young age, children can begin to talk about space during the creative process.
In this case, you will need a minimal set for creativity:
- plasticine and stack;
- colored cardboard.
Progress:
- Choose the constellation you will make.
- Count the number of stars in it and mold the same number of small balls from yellow plasticine.
- Flatten the balls with your finger, turning them into a cake. Cut out stars from them using a stack.
- Also make thin strings from yellow plasticine to connect the stars into a constellation.
- Lay out a constellation figure from the prepared materials on a sheet of colored cardboard.
Rocket
One of the most popular and easy-to-make crafts for Cosmonautics Day in kindergarten. This craft is sure to awaken a child’s interest in studying astronomy.
You will need:
- toilet paper roll;
- colored paper or paints;
- glue;
- pencil.
Progress:
- Make a large circle out of colored paper and cut a triangle out of it.
- Roll the resulting shape into a cone and glue the edges. This is the “top” of the future rocket.
- Glue it to one end of the sleeve.
- Cut out 2-3 small circles from colored paper and glue them onto the rocket. These are portholes.
- At the end of the sleeve, make symmetrical cuts of 4-5 cm opposite each other.
- Cut a wide strip of colored paper and fold both corners to form triangles.
- Insert this strip into the slots. The rocket is ready to launch.
solar system
Crafts for Cosmonautics Day are not only about rockets and airplanes. Try inviting your child to create a real solar system with his own hands. This will keep the child busy for a long time and will help him remember the names, colors and locations of the planets.
You will need:
- plasticine;
- empty box;
- toothpicks;
- scotch;
- scissors;
- sponge;
- a jar of water;
- needle and thread.
Step-by-step instruction
First, draw a month on cardboard and cut it out. Since we will be making a volumetric month, we will make two such parts. We also cut out strips for the side parts of the Moon. We assemble the structure using tape.
Now we cut the paper into strips. We cut each strip across, getting shaggy parts. We make a large number of such strips and glue them from bottom to top for a month, each next one overlapping the previous one. The more such stripes there are, and the stripes have cuts, the more fluffy and beautiful the month will turn out to be.
Most likely, a child will be bored listening to the monotonous story of adults about space, about scientific achievements in this area, about the prospects that the study of the endless expanses of the Universe opens up for humanity. But the situation can be corrected and the educational activity can be turned into an exciting game. All kids are curious naturalists. They will, of course, be interested in space objects, but words alone are not enough to hold their attention - visualization is needed. And even more so, they will be interested in participating in the creative process themselves.
From such a soft material as plasticine, you can mold absolutely anything, even the integral satellite of planet Earth - the Moon. Usually, kids notice a bright luminous spot in the evening sky and ask their parents about its origin. While doing exciting modeling, you will have the chance to tell your child in detail what the Moon is, where it is and why it changes its shape and location every night.
1. Make the little Moon from a mixture of yellow and orange plasticine, but a small amount of brown will also work. Matches, a ballpoint pen or a pencil will help create miniature craters on the surface of the Earth's satellite. It all depends on the size of the craft.
2. Take pieces of plasticine of prepared shades in arbitrary quantities.
3. Knead them separately in your hands, then combine, but do not mix until the color averages.
4. Roll the resulting mass into a round Moon. This will be a miniature copy of a familiar space object. If you look at the surface of the Moon through a telescope, you can see shadows and spots of different shapes.
5. To sculpt craters, roll out a long thin sausage.
6. Cut it into small portions with a knife.
7. Make holes in the craters using a match or rod.
9. The child must be told why the Moon changes its shape when we observe it in the night sky every day. For this you will need a dark cake.
Read also: How to make a dressing room with your own hands, doors to the dressing room.
10. Place a black shadow on one side of the glowing object. Now the Moon in the sky has become a new moon.
These are the kind of interesting lessons you can practice with children, thanks to the familiar plasticine. From this bright mass it is not difficult to mold even the planets of the solar system.
Space crafts for school
When we hear about space-themed crafts, rockets, airplanes and stars immediately come to mind. We invite you to bring more original ideas to life.
UFO
Even though building a UFO seems like a very difficult task, we offer a simple and easy way. Such a craft will surprise school teachers and will definitely not go unnoticed at an exhibition of creative works.
You will need:
- 2 plastic bottles blue or green;
- 2 disposable plates;
- scissors;
- Styrofoam;
- hot glue;
- skewers;
- large beads;
- white cocktail tube;
- battery-powered garland (preferably with white light).
Progress:
- Trim the bottom of the bottles.
- In one of the plastic plates, cut a large circle in the center, slightly smaller than the diameter of the cut bottom of the bottle. Cut out a small circle in another plate.
- It is advisable to heat the edges of the cut bottom of a plastic bottle with an iron to even out the edges. This way the part will stick better to the craft.
- Apply glue to the edges of the cut bottom of the bottle and glue it to the plate where you cut out a large circle.
- Cut the foam into thin squares.
- Cut a strip from the remains of a plastic bottle and straighten it as much as possible.
- Glue the foam squares with a small distance from each other along the entire length of the strip.
- On a plate where a small circle is cut out, carefully poke 3 holes around it with scissors.
- Insert skewers into these holes, securing them with glue and beads. The skewers need to be attached not evenly, but so that they look slightly to the sides. These will be the legs of our UFO.
- Cut the white cocktail tube into 3 equal parts. Place each one on the “leg” of the UFO. If you don’t have a tube of the desired color on hand, you can paint the legs with white paint.
- Grease the tips of the legs with glue and put beads on them.
- Glue one of the strips of foam plastic along the diameter to the plate on which the legs were made.
- Place the garland inside, leaving the “tail” with batteries outside. Glue the top part - a plate with a bottle bottom.
The craft is ready. All that remains is to turn on the lights and go on a space adventure.
Saturn
To create a real planet with your own hands, you will need available tools. It should be noted that the craft will take a lot of time: in total, it will take about 2 days for the model of the planet to dry. Therefore, you need to take care of its production in advance.
You will need:
- PVA glue;
- brush;
- balloon;
- paper towel or white napkins;
- cardboard;
- paints.
Progress:
- Inflate the balloon.
- Using PVA glue, cover it with napkins, leaving a small space free at the “tail” (in order to later remove the ball from it).
- Let dry (about a day). Carefully burst the ball and remove it through the remaining hole.
- Cover the resulting void with paper. Let dry thoroughly (also about a day).
- Color the ball in the appropriate colors (yellow and orange shades). Leave to dry for 10-15 minutes.
- Make a ring out of cardboard (use a compass to measure the exact diameter).
- Attach the ring to the planet and color it.
Origami
Material for these crafts can be found in every home where there are small children.
Application
A simple craft for kids aged 3-4 years, which will allow children to give free rein to their imagination: create a solar system or launch a rocket into space, and maybe even meet aliens.
Required:
- whatman;
- paints and brush;
- colored paper;
- PVA glue;
- scissors.
Progress:
- Paint whatman paper with dark paint.
- Constellations can be depicted with splashes.
- Cut out shapes and elements for our panel from colored paper. These could be rockets, the sun, stars, comets, astronauts, flying saucers, etc.
- Using glue, place the elements of the composition on whatman paper.
You can additionally decorate the “space” with sparkles or rhinestones.
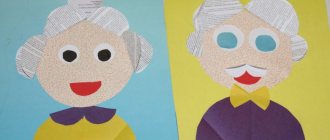
Volumetric applique “Paper astronaut”
Image source
What would Cosmonautics Day be without astronauts? This simple and fun craft can be an excellent gift for a child to give to grandparents.
You will need:
- PVA glue;
- colored paper;
- White paper;
- scissors;
- pencil or felt-tip pen.
Progress:
- Cut out a large circle from blue paper - this is planet Earth. Glue simple shapes onto the “base” of our planet made of blue and green paper (imitation of land and water).
- Cut strips measuring 2 cm by 25 cm from white paper. These are the future legs of the astronaut.
- Using glue, fasten the 2 strips together with the letter “G” and then fold them as shown in the video instructions below. Repeat the same with the other two strips.
- To create the astronaut's hands, cut out 4 strips of white paper measuring 2 cm by 18 cm. Do the same manipulations with them as with the legs.
- Cut out 4 small circles and glue them to the base of the astronaut's arms and legs.
- For the body, cut out 1 strip of white paper measuring 4 cm by 15 cm. Connect its ends and glue them together.
- Cut 2 strips from white paper: one measuring 2 cm by 15 cm, the other 2 cm by 10 cm. Also glue both together in the shape of rings. Connect them to form a helmet.
- Cut out a circle with a diameter of 3 cm from light-colored paper. Draw the eyes and mouth of the astronaut on it. You can use decorative “eyes” if available.
- Make a ring from a white strip measuring 2 cm by 10 cm and glue the astronaut’s face onto it.
- Next, glue the body to the middle of the “planet”.
- Decorate the astronaut with colored circles or stickers.
- Glue the head to the body, then the helmet, arms and legs.
More details in the video:
Sky map
You will need: cardboard base for the layout, acrylic paints in black, purple, blue and silver, brushes, sheets of A4 paper, corrugated paper in yellow and orange, scissors, glue, gouache, water, liquid soap, cocktail tube, white egg shell , rope for hanging.
Master Class
- Paint the cardboard base of the mockup with black acrylic paint.
- Spray blue, purple and silver acrylic paint.
- Draw the orbits of the planets with silver paint.
- Make the sun disk by "cutting" - cut the corrugated paper into small pieces, then glue them tightly together so that they are raised up.
- Paint sheets of paper with gouache to match the colors of the planets.
- To make craters and mottled surfaces for some planets, pour gouache, water and liquid soap into a plate. Take a cocktail tube, blow bubbles and transfer them to paper.
- Wait for the paper to dry, then cut out the planets.
- Glue the shells as ice floes onto Pluto.
- Glue the planets in order to the layout.
- Attach rope for further hanging.
The sky map is ready! I recommend watching this video!
Model of the solar system Planetarium. Solar system planetarium model.
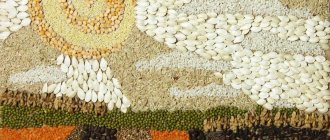
Salt painting
Simple table salt is an unusual material for painting. You can offer this craft to both kids and primary schoolchildren.
You will need:
- cardboard;
- paints;
- sponge;
- pin;
- PVA glue;
- pipette;
- colored water;
- salt.
Progress:
- Use a sponge to paint a sheet of cardboard to your liking.
- Make splashes - constellations (using a brush or toothbrush).
- Use PVA glue to draw the outline of future cosmic figures (planets, rockets, etc.) and fill them inside with glue.
- Sprinkle the picture with salt. Let the glue dry.
- Shake off excess salt from the painting.
- Pour water into several glasses, paint it in each container a different color.
- Use a pipette to collect colorful water and use it to paint the shapes made of salt. Let dry.
More details in the video:
Scops owl moon
As a gift for a baby or even an adult, you can sew a Scops Owls moon from textile materials.
We prepare everything you need:
- orange, blue and yellow fabric;
- red braid to decorate the mouth;
- matching threads for sewing, red and black for decorating the face;
- sewing supplies, a button or a ready-made eye.
In addition, you will need paper for patterns. You can make the cutting details yourself or use ready-made templates.
It is better to make the sides different - one yellow, the other orange. Cut out the parts from the fabric. We sew seams by machine or by hand, leaving a hole for stuffing. We stuff the figurine tightly and sew up the hole with a hidden seam.
We decorate the eyes and mouth of the pillow. It's better to embroider the eyes. Store-ready crafts can come off at night and get lost. We denote the mouth using red tape.
All that remains is to “put” the cap on the pillow. We cut it out of blue fabric, sew the elements together, put it on and secure it with threads.
The original pillow in the shape of a month is ready. The baby will surely like it, and he will be happy to fall asleep with it.
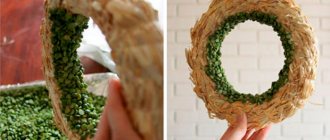
From salt dough
Image source
Salt dough is a favorite material for creativity among both children and mothers. The main thing is to start preparing the craft from it in advance so that it can dry well.
The dough recipe is simple: 2 tbsp. spoons of flour, 2 tbsp. spoons of salt, 2 tbsp. spoons of water. For this craft, in addition to the dough, you will need a stack, a brush and watercolor paints.
How to make a surprisingly simple and beautiful craft for Cosmonautics Day from salt dough:
- After standing in the refrigerator for at least 30 minutes, roll out the salted dough into a flat cake with your hands and cut out the desired shapes: for example, a rocket and a planet.
- You need to smooth the edges with water so that they are perfectly even.
- Stack along the edges to make a border, cut through the necessary parts until the dough dries.
- Using a brush and water, attach the rocket to the planet.
- Place it on the radiator to dry for 3 days.
- Using watercolors and a brush, paint the craft and decorate it (for example, with pasta in the shape of stars).
- Allow to dry thoroughly.
Preparation
Pick up a popular science movie about the mysteries of near space and watch it all together. For example, BBC broadcasts about the Voyager and Cassini probes are suitable. These programs will help both you and your child figure out what needs to be done and correctly visualize space objects. Colorful films will captivate the child and make the creative process more exciting.
Wire solar system
This is an ideal craft for younger students. At the age of 6-8 years, children become more diligent and will be able to build such a craft without difficulty. While working, you can tell your child about space or fantasize about space adventures together.
You will need:
- foam balls;
- plasticine;
- wire;
- fishing line;
- scissors:
- gouache, brush;
Progress:
- Color the planets with paint of a suitable color.
- Small planets can be created using plasticine.
- Using flexible fishing line, make orbits and string planets on them.
- Connect the orbits together with fishing line, leaving the last free tip.
- Make a loop from the tip on which you can hang the solar system.
Space theme coloring book for children to print
Invite children to color a ready-made drawing template. Don't limit yourself to just pencils or paints. You can decorate the image with plasticine or apply pieces of paper using the mosaic technique. Or maybe you want to use several techniques at once to create a holiday drawing. Fantasize, make your wildest ideas come true!
Imagine how bright and juicy these drawings can become:
- Aliens
- Flight to the sun
- Rockets
And here are your favorite children's cartoon characters:
- Parrot Kesha
- Wolf and Hare
- Smeshariki
Use these coloring pages about space or find any others. Children love to add color to black and white images.
Crafts from plasticine
We offer ideas for modeling that will not leave anyone indifferent.
Astronaut made of plasticine and foil
This astronaut can become either an independent craft or part of a larger composition on the theme of an expedition to the moon or the conquest of space.
You will need:
- plasticine;
- foil;
- toothpicks;
- hot glue;
- black paper.
Progress:
- Roll from plasticine:
- 8 balls of the same size (legs);
- 8 balls slightly smaller in size (hands);
- oval (torso);
- ball (head);
- square (knapsack);
- 2 small balls (headphones on the spacesuit);
- oval base for the body and head.
- Wrap each piece tightly with foil.
- Place balls in foil for arms and legs on a toothpick so that the tip on one side remains free.
- Using the free end of a toothpick and using hot glue, attach the legs and arms to the astronaut’s body. Glue the backpack and headphones.
- Twist a long hose from foil to supply oxygen and glue it with one end to the helmet and the other to the backpack.
- Cut an oval out of black paper and glue it to the front side of the helmet - this will be the viewing glass.
The astronaut is ready!
Expedition to the Moon
Image source
We recommend this craft for both 4-year-old children and 40-year-olds. After all, even an adult will be interested in making the surface of the Moon with craters with his own hands and installing the Russian tricolor on it!
You can sculpt anything you have enough imagination for - from humanoids to a lunar rover. Don’t forget to tell your children interesting facts about our planet’s satellite while sculpting. Kids will especially love the fact that the first living creature to orbit the moon was a turtle.
Ursa Major Rotating model Country of Masters
My son’s “world around us” (1st grade) had an assignment - to observe and sketch how the position of the constellation Ursa Major changes in the sky at different times of the year.
Of course, you can use a very convenient and simple program for constructing a star map https://www.astronet.ru/db/map/ You enter the observation point, date, time, part of the sky (south, north) and forward - all that remains is to draw the desired constellation . But a child cannot understand this. It’s stupid to redraw or copy it - no, learning is not interesting, you need to UNDERSTAND. As a result of searching for explanations accessible to children, I came across a very useful site https://www.astrogalaxy.ru/kind11.html I recommend it! As a result, the idea arose to make a rotating model of the Big Dipper. Here's how we got it. Now all my son has to do is set the constellation in the desired sector (in the photo in the “spring” position) and draw it. Which he naturally dealt with on his own. The explanations for why it still spins also became clear - after all, everything is clear, beautiful, and therefore INTERESTING, creating the impression of independent work and astronomical discoveries.
And here is “winter” and poems, they were taken from the above-mentioned site, I redid them a little (may the authors forgive me).
Our mother planet (We, of course, know this!) Every day and every year makes a revolution.
And from the Earth, when observed, one gets the impression that it is not she who is spinning, but all the stars and the Moon.
Only the POLAR STAR does not strive anywhere! And at any time of the year, in the very center of the round dance, you can find it, If you suddenly lose your way.
The earth's axis directs its tip towards it. You can be sure: Where it is - there is NORTH!
That star is not just a dot, It’s the tail of the BEAR-daughter! The star “nose” of the BEAR-mother will point directly at her!
This is “autumn”. At the very bottom there is an explanation for the child: Due to the rotation of the Earth around the Sun, the night sky also seems to rotate around the pole throughout the year. Therefore, the Big Dipper's bucket turns and changes its position in the sky.
All that remains is to arrange everything. On the left are the myths about the Big Dipper. Now at least I myself have learned the answers to the questions that have been tormenting me for a long time: why did they even see a bear in the bucket, why is she so scary on ancient star maps, and even with a long tail. Who is Ursa Minor? The story, of course, is beautiful, but tragic...
This is the title page. constellation and its main stars. Also with poems (modified by me).
I recognize the URSA MAJOR by the BUCKET! Seven stars sparkle here, And here’s their name:
DUBKHE illuminates the darkness, Next to him the MERAK burns, FECDA and MEGRETS are on the side, This is how the creator placed them.
Further to the “handle” there is a turn - Here is ALIOT. And behind him is MITZAR with ALCOR (These two shine in unison). Our bucket is closed by the Star with the name BENETNASH. Below is an explanation: The constellation Ursa Major (Latin name Ursa Major) is known even to a first-grader. Finding a large bucket of seven stars in a clear sky will not be difficult. However, the ladle is not the entire constellation, but only the tail and part of the body of an imaginary celestial bear. To the right and below the bucket you can find several more stars that make up the paws and head.
This is a closer fragment.
The craft (or rather an abstract on the topic) is made of black watercolor paper. I drew on it with a silver gel pen - it produces a very beautiful effect, the lines and letters shine silver. “Stars” - cut off from the Christmas tree decoration (the uncut one was left after the Snow Maiden https://stranamasterov.ru/node/115169). Of course, it didn’t work out very neatly, because the idea came unexpectedly, it was done in one evening and half the night, and in general, this is just visual material for a lesson, and not a craft as a gift or for a competition.
In general, my son likes to do something extra about the “world around him.”
We went through computers and made a computer desk https://stranamasterov.ru/node/115578.
It was snowing - he made a quilling snowflake himself (the teacher even hung it on the Christmas tree in the classroom).
Dinosaurs - I made a family of triceratops from plasticine, put it in a box, decorated it like grass, put a toy bush, got an 5+.
Well, stars and space are generally a favorite topic, so it was very interesting for him to study it using my layout. He copied, put the constellation in different positions, quickly learned a poem about the stars on his own, read myths with pleasure, discussed them (like: Mom, what do you think, when the Ursa Bears’ tails stretched, did they hurt? They probably growled?)
PS I am writing in detail not for craftswomen, of course (there is nothing so artistic here), but for mothers of first-graders (and others like them). In our class, many parents (not to mention the children) were unable to cope with the task and the topic, but Max and I had such an interesting time.
DIY rocket
A rocket made from a plastic bottle is more complicated than the one we offered for kindergarten crafts, and is more suitable for younger schoolchildren.
You will need:
- plastic bottle;
- cardboard;
- glue;
- scissors;
- foil;
- double sided tape;
- 2 toilet paper rolls/yogurt jars or something similar in shape.
To decorate the rocket: electrical tape in three colors: white, blue and red.
Progress:
- Cut off the bottom of the bottle.
- Cut a circle out of cardboard and build a “nose” for the rocket: cut a triangle out of the circle, fold it into a cone and secure it with glue.
- Wrap the body of the bottle, the cone and the bushings (or jars) with foil - the future jet engines of the rocket (see the master class at the link below).
- Attach the cone to the neck of the bottle.
- Use double-sided tape to secure the rocket parts together.
- Stick 3 strips of electrical tape of different colors on the rocket body in the form of a Russian flag.
- Cut out circles from cardboard - portholes. If you wish, you can paste on them pre-printed images of the first cosmonaut dogs Belka and Strelka.
- Attach the windows to the rocket using double-sided tape.
Space helmet
The theme of space is relevant for children of any age, not only on the eve of Cosmonautics Day. UFOs, aliens, travel to distant galaxies are one of the main topics for games for both preschoolers and older children. A helmet, like that of an astronaut, can become a favorite accessory in the “space adventures” of young explorers.
You will need:
- balloon;
- paper, newspapers or napkins;
- bowl of water;
- PVA glue;
- foil;
- wide brush;
- scissors and a stationery knife.
Progress:
- Inflate the balloon.
- Cover it with several layers of paper over the entire surface.
- Allow to dry thoroughly (about 24 hours).
- Cut a hole for the head, cut a window for the eyes using a utility knife and scissors. Pull out the ball.
- Cover the inside with foil.
- Decorate if desired: with drawings, stickers.
Studying the constellations....Homemade telescope and constellation cards
HELLO everyone! My daughter’s birthday is coming up, which I want to spend as a SPACE TRAVEL... on this trip we’ll pay attention to the constellations... but how to look at the constellations without a telescope, in the daytime and in the room? My husband and I found a way out, made this funny one telescope and cards for it with the necessary constellations... I want to tell you how we did it all... We did everything in secret from the children at night, so that it would be unexpected and interesting... For cards with constellations: - I printed out the necessary constellations from here https://www.clipartpal.com/clipart_pd/space/constellations1.html, - prepared: foil, tape, cardboard, scissors, an awl and a push pin...
For cards with constellations: - I printed out the necessary constellations from here https://www.clipartpal.com/clipart_pd/space/constellations1.html, - prepared: foil, tape, cardboard, scissors, an awl and a pushpin...
and for the “telescope” we used empty tin cans of corn and beans, my husband cut out the bottoms, inserted one can into the other... then we wrapped it with tape, the joints, then we wrapped everything with foil, and on top with tape...
I cut the cardboard, wrapped it in foil, wrapped it with tape for strength, and glued the names of the constellations in the corner...
... I attached a printed picture (attached it so that it wouldn’t “travel” with tape) and pierced the large stars with an awl, and the small ones with a button...
but my husband is checking how our “telescope” works...
and our “telescope” works SUPERBLY!!!!!!here we are looking at the constellation Ursa Minor….
...and here is the constellation Taurus...if you move the “telescope” a little, the “stars” seem to twinkle!!! I urge you to make such a device and study the constellations with your children!!!! (and for the “telescope” itself it is not necessary to use tin cans, you can use paper towel rolls, any cardboard tubes (with foil, cling film, etc.
d.) Thank you for your attention!
Spaceship
If your young astronaut already has a helmet, it is quite expected that he will start dreaming of a real spaceship. Well, everything is doable. Such a large-scale craft will have to be done by all family members: adults assemble and connect parts of the ship, children take part in developing the layout and decor. What's not a reason to spend the evening together, without gadgets? In addition, a rocket or spaceship will be an excellent playground for children to play.
You will need:
- various large boxes;
- scissors and cutter;
- large size cardboard, for example A2;
- paints or colored paper;
- foil;
- hot glue, tape.
Progress:
- Assemble the future shuttle, secure the boxes together with glue.
- Cut through portholes, make an entrance.
- Cut out supports from cardboard and secure them into the slots on the sides of the spacecraft.
- Glue the top together from cardboard or a box.
- Paint the parts or cover them with wallpaper/paper.
- Decorate with decor: stick on stars, sparkles. You can add a battery-powered garland, securing it with tape.
Tip: Use foil to imitate a metallic sheen.
Send well-prepared young researchers into space: provide children with juice in boxes and purees in soft patches, like real astronauts.
Crafts based on one of children’s favorite themes for games can be made not only for Cosmonautics Day, but throughout the year. This is a great way to spend time with the whole family in the evening or on a weekend. Space crafts can spark a lot of interest in the topic among your children. And who knows, maybe a real future cosmonaut is growing up here!
Applications
Many ideas for crafts from disposable plates are shown here.
Application “Moon” from a disposable plate and colored paper.
For space applications it is better to use a black or dark blue background.