- November 16, 2018
- Crafts
- Polianna Napara
In the mythology of many countries, the fox is rightfully considered a symbol of cunning and deceit. The cunning fox is a character that appears in most Russian folk tales. However, now that fewer and fewer people are engaged in agriculture, red cheaters no longer cause so many problems, and therefore many have fallen in love with these furry animals, some even keep them as pets.
In this article we will tell you how to make a chanterelle with your own hands in a variety of ways.
How to make a bookmark fox
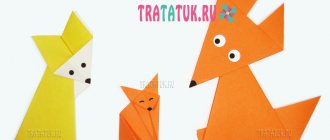
A step-by-step diagram for folding a fox bookmark looks like this:
- Fold a square sheet of single-sided orange colored paper diagonally.
- Place the resulting triangle with the fold down, and bend it in half again horizontally.
- The result was a strip of three triangles. The side triangles need to be folded up.
- Turn the fox over and draw its nose and eyes with a black felt-tip pen. The craft is ready.
Now you can use the fox trick to attract your child to read books that have a cute face in them.
Origami fox head
Let's make a very simple origami fox that even kids can do. It is important to follow the steps step by step, and then everything will work out. Fold the prepared sheet diagonally. Bend the top corner to the bottom edge. We bend the resulting triangles on the left and right sides of the center towards the middle so that the corners look up. We turn our heads over. All that remains is to depict two eyes in the form of arcs and a round nose. A simple and unusual fox is ready.
A simple scheme for making chanterelles
Another option is to make a fox face in a couple of minutes. Again you will need an orange square leaf.
You need to fold it diagonally, unfold it and fold it again along another diagonal. Bend both corners of the workpiece towards the middle, but leave a small distance between them. These will be fox ears.
Now all that remains is to turn the product over and paint the narrow fox face. You can draw slyly narrowed eyes, a nose, a mouth and even a short mustache.
Plasticine fox: video tutorial
This video shows how to make a cute little fox from plasticine - a cartoon character about the Little Prince. This is not very difficult to do, and a school-age child can handle it quite well. Well, if an adult gets down to business, it will turn out to be an excellent and stylish figurine.
However, do not forget that plasticine is a material of unlimited possibilities and imagination. We hope that the video tutorials will not suppress your originality, but will only serve as inspiration and teach you some techniques.
Tip: if your child wants to play with the resulting figurine right away, hold it under running cold water for a couple of minutes - it will harden and become less fragile and pliable.
Origami diagram of a sitting fox
The authorship of this elegant figurine is attributed to the famous popularizer of origami Fumiaki Shingu.
A sitting fox is easy to make. And from several figures it is quite possible to form a club of red-haired sages.
Instructions on how to make an origami fox look like this:
- bend a square sheet of paper along one diagonal, straighten it and bend it along the second;
- the result was a triangular blank with a fold in the middle;
- fold the side corners to the fold line to form a rhombus;
- roll the diamond in the middle “hill”, that is, away from you;
- fold the side of the resulting triangle with a triple edge by one quarter, as shown in the photo;
- open the folded corners in the center; the middle corner will lower and turn into a muzzle, and the top two will become ears;
- bend the tail on the opposite side, giving stability to the entire structure;
- draw a fox's face.
Felt fox
Another great way to make a fox craft is to glue it from felt. The result will be a flat, bulky craft, but at the same time beautiful and stylish. You can hang it on the Christmas tree, decorate the wall, or simply give it to someone.
We recommend reading:
Craft bullfinch: detailed description of how to make a bird with your own hands (115 photos)Crafts from vegetables: 100 photos of the best crafts for children and a review of recipes for adults
- Craft ship: 120 photos, templates, drawings and step-by-step instructions on how to make a boat
Prepare bright felt of the desired color. Print or draw a fox craft template and transfer it to felt. Draw all the details on it: body, legs, ears, muzzle and tail.
Cut out all the pieces separately. Glue them together and decorate the face with eye beads. And make all the white parts from white faux fur - it will be very beautiful and unusual!
Origami fox with bushy tail
A large fluffy tail is the calling card of a fox. Therefore, it plays an important role in the manufacturing scheme of the next model.
The instructions are:
- Fold a square sheet of orange paper in half and unfold it.
- Fold both halves of the workpiece to the fold in the middle.
- Fold the workpiece in half crosswise and unfold.
- Fold one side to the intended fold and bend it back.
- Convert the folded corners into triangles-pockets.
- Bend the workpiece lengthwise in the middle, with the “pockets” facing out.
- Bend over the triangles.
- Fold the triangular edge of the workpiece to the middle.
- Open the three-layer part of the workpiece in the center. This will make a muzzle and ears.
- Open the central triangle and press along the fold lines. The finished muzzle will be in the shape of a diamond.
- Make a tail on the other side of the craft. To do this, roll it twice. Once - diagonally to the upper corner, the second time - close to the fox's chest.
- Unfold both folds. Turn the middle folds in the opposite direction.
- Fold the bottom corners of the tail a few millimeters inward to give a natural shape and stability to the tail.
"Talking" fox head
The fox is a traditional fairy tale character. Since children really love home dramatizations of fairy tales, a fox head that you can put on your hand and “speak” with it will be a useful craft.
Below is a simple paper fox for beginning storytellers. You can create other “talking” characters to accompany her using the same model.
Scheme for creating a fox toy for your hand
You will need a square sheet of orange paper. The steps to create a fox are:
- fold the sheet in half;
- fold a double layer of paper crosswise so that the opposite edges meet in the middle;
- Open the side pockets so that triangles appear on top;
- turn the product over;
- bend the right and left edges of the workpiece towards the middle;
- fold the lower right corner diagonally towards the middle;
- form a fox ear; bend the top layer of the workpiece twice as shown in the photo of the origami fox;
- do the same with the second ear;
- carefully push the sides apart, adding volume to the middle part;
- press the product inside from the outside, forming the mouth of a fox;
- align all the folds and decorate the face with eyes.
For the little ones
Children 4 years old will be happy to make a fox face, which can then be used to decorate a picture or postcard. It’s hard to think of a simpler and faster way.
Description:
- Fold a one-sided square sheet of paper diagonally into a valley.
- Place the resulting triangle with its apex facing up. And once again we bend it in half towards ourselves.
- A strip of three triangles is formed. The side ones are located with the top up, and the central one - down. The figures have two common sides. We bend the side triangles along them.
- Turn the workpiece over.
- Using a black marker, draw the animal's eyes and nose.
A figurine made in this way can be used as a bookmark for a children's book. The child will be pleased to “meet” the creation of his own hands every time, which will serve as additional motivation for reading.
There is another way to form the face of a forest beauty. Let's look at how to make a similar origami fox in stages. The beginning is identical: bend the paper square diagonally. But then we fold it in half not longitudinally, but transversely. We open the workpiece.
All that remains is to make a fold, known as a “kite”: both sides of the triangle are folded obliquely so that their sides meet on the central axis. But in this case you need to step back a little, otherwise you won’t get protruding fox ears. Turn the figure over. And we finish drawing as we wish.
Realistic fox using origami technique
Having passed the initial level of simple assemblies, you can proceed to labor-intensive schemes. If you are going to create a real masterpiece in the world of origami, you definitely need to take care of high-quality material.
Only good paper can withstand complex patterns with many kinks.
How to choose origami paper
The most common and affordable option is regular office paper for printers and copiers. It comes in white and colored. This paper withstands all manipulations well, does not tear and does not lose color when folded.
There is also special paper for origami. It is already sold in square sheets, because most blanks must have equal side lengths. It can be plain or with ornaments.
Step-by-step instructions for assembling a fox
- Work on the fox begins with assembling the “door” blank.
- Then, on one side of the workpiece, triangles are made from the corners, the future legs.
- A zigzag fold separates the area of the head and front paws.
- The muzzle and front paws are being formed.
You can clearly see all the stages of assembly in the diagram, there is a folding guide and in video format.
What technique should you use to make a craft?
Don’t rush to run out and buy colored paper or reach into old chests for scraps of fabric and thread. First, look at various photos of fox crafts on the Internet, you will be very inspired, and you will certainly have a desire to urgently make something.
The craft can be made from cardboard, improvised or natural materials, fabric, felt, plasticine and more. Read and become familiar with all the existing methods and techniques, and then choose yours.3
Decide whether you will make a fox from what you have at home, or will you have to go get materials? Experiment and create boldly. It's simple!
