Brief description of the technique
Each sculpture consists of dozens of triangular shapes, but when completed, the model will appear as one wavy structure.
The duration of the manufacturing process will depend on the size and number of parts being introduced. There are several ways to fasten the structure:
- Use regular transparent glue, such as a pencil. You should not fasten the parts with PVA; over time, yellow spots will appear, which will affect the aesthetics.
- Use thick and matte paper. Cardboard and glossy sheets are not suitable. The design will hold up perfectly if all the parts are made from simple album canvas or whatman paper.
Paper that is too thin, such as that used for printing, will cause the shape to change. A few days after assembly, the structure will begin to fall apart, since the thin ribs of the parts will not be able to cope with the load.
Even though this art form dates back to around 1734 (as mentioned in the book Ranma Zushiki by Hayato Ohoko), it still generates interest today.
The principle of creation has not changed over several centuries; the classic structure consists of a large number of triangles. Photos of modular origami can surprise even an adult.
What other origami triangles are there?
Triangular modules are the first thing that comes to mind when it comes to origami techniques. But there are other elements with the same name, which it is advisable to get acquainted with so as not to get confused in concepts.
"Double Triangle"
Chinese origami modules are sometimes confused with the popular basic figure, which has nothing to do with them. The “Double Triangle” or “Water Bomb” is used in classic Japanese papermaking as the basis for many famous models. Among them are “Fish”, “Frog”, “Rabbit” and so on.
The basic origami triangle is folded according to the following scheme:
Soldier's letter
The famous “front triangles” that soldiers sent from the front lines during the Great Patriotic War, surprisingly, are also folded using the origami technique. This method made it possible to do without an envelope - the address was written on the outside of the sheet, and the message on the inside. At the same time, the letter did not wrinkle or tear; every line of it was saved for loved ones who were eagerly awaiting news.
Soldiers' triangles gave joy and served as the best evidence that their author was alive. But letters in real envelopes were sent only by official authorities, notifying about death or missing persons. In order to feel the atmosphere of those years and preserve the memory of the people’s feat in the fight against German Nazism, “Soldiers’ Origami Triangles” are often made for Victory Day.
How to make a triangular module
As mentioned earlier, for production you need medium-weight paper. A4 landscape sheets are suitable. Each will be divided into 16 or 32 equal parts in the form of rectangles.
It is worth remembering that each module must be dense and even; stiffening ribs are of great importance, due to which the structure will be more stable. Modular origami assembly diagram:
- The rectangular part is first folded horizontally. Next, an even bend appears in the middle.
- The sheet is straightened and folded into two identical squares.
- Next, the sheet is straightened again, two triangles are assembled along the resulting lines, their ends should be proportional to each other.
- Smaller triangles are made from the remaining part, after which the structure is connected by placing the corners in the formed pockets.
The number of elements will depend on the figure that the master plans to make. Beginners are recommended to use ready-made diagrams, where the number of elements is indicated in detail. Everything is quite simple, first the modules are created, after which they are simply connected into a figure.
Manufacturing of modules
The first stage is the most important and painstaking task. You need to be patient and fold the triangles themselves. Their number depends on the idea that needs to be brought to life.
- Triangular-shaped elements are folded from an A4 sheet.
- The rectangular sheet must be folded in half, and then 3 more times, without changing the position of the sheet. You will get 32 rectangles. In this way, triangular parts are made, the size of which is 1/32.
- Cut rectangular pieces from the resulting workpiece with scissors.
- Fold the rectangle lengthwise, then widthwise. A line will appear in the center.
- Press the edges towards the middle, similar to folding an airplane.
- Turn over.
- Bend the lower protruding corners upward towards the base of the triangle.
- Raise the bottom edge and bend the resulting workpiece in the middle.
The result is a triangular-shaped block. Aspect ratio 2:3. The figurines are collected from them.
How to make fish
This option is suitable for novice craftsmen; it will help hone their skills in assembling modules. You will need:
- 17 pink elements.
- 23 pieces blue.
- 1 piece black.
Once the modules have been assembled, you can begin assembly. Step-by-step diagram of modular origami for beginners:
- first, two blue and one pink modules are connected;
- third row - one blue, black and pink;
- Next comes 4 pieces of blue;
- after that again 5 pieces of pink;
- then 6 pink ones;
- 5 blue, fins added;
- penultimate row - 2 pieces blue;
- last 1 pink.
After this, you can add 3 more pink modules to make the design look more realistic.
Mounting methods
The module has 2 corners at the edges and 2 pockets on the fold line. These parts of the triangle are involved in attaching the modules to each other. Triangles are placed in two ways - on long or short sides . Bonding options:
- Take three elements. Two elements are placed next to each other with their long sides and 2 corners are inserted into the pockets of the third element standing on the short sides.
- Two elements stand on the long sides, insert 2 corners of one triangle into the pockets of the second.
- Two triangles stand on the short sides, one triangle is inserted with its corners into the pockets of the other triangle.
How to make an origami swan
Making a modular origami swan is quite simple. The only difficulty lies in the large number of elements.
To make this figure you will need 215 triangles. Therefore, it is worth preparing 7 sheets of plain paper in advance, first dividing each sheet into 32 rectangles.
Step 1
Before starting work, be sure to study the detailed diagram. The figure should be voluminous and even. How to build a good module:
- First you need to take one of the rectangles.
- Next, fold it in half lengthwise.
- After this, fold in half widthwise.
- Expand the fold widthwise.
- You should now have a rectangle folded in half with a fold in the middle.
- At this stage, the top of the rectangle (the folded side) is aligned with the central fold.
- The same thing is repeated with the other side.
You should end up with a piece of paper in the shape of a pentagon, the two sides of which meet in the center.
Step 2
The triangle has two pockets and corners. Each fits in a pocket, which creates a fastening. As parts are made, they can be stacked. This will help you quickly open the pockets to make the structure more durable, as well as calculate the parts.
If the design does not work out and you need to rearrange the parts, you need to remove the triangles from the stack. To do this, simply place your thumb directly under the first triangle and push upward.
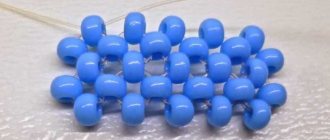
The first two layers of the swan are the most difficult. This is because there is no structure yet. First you need to make twenty pairs of parts. Since this is the first layer, you need to create a “stand”. If this is not done, the modular paper origami will be unstable on the table. Next you need to connect twenty pairs together to make a ring.
Step 3
Once the master makes the third and fourth layers, everything will become much easier. With the addition of a third, the structure can be lifted, thrown, etc. It will retain its shape during any manipulation. The fourth is done to secure the base, using the same technique. Next come 5 and 6 - this is the base of the body. To do this you will need 40 envelopes.
After this, you need to pay special attention to the wings. They are made using 36 parts. You can start from any two points of the sixth layer. Add eight modules to form the beginning of the wing. These eight parts form the seventh layer of the body. Next comes the eighth row, to do this you need to skip the first point of the 6th layer and add another module. After this, the remaining rows are made according to the same decreasing principle.
The neck and tail are the final details of the design. After the wings are formed, a small gap remains at the back; it is filled with the remaining modules. The neck is formed on the basis of the added modules in the 7th row; the triangles are assembled upward along the chain.
If some parts turn out to be unstable, they can be glued. When creating the first row, tail, wing tips and head, you can use colored modules.
Origami: history of art
There are many different versions as to how exactly this art originated. But all researchers agree that its homeland is ancient China. As you know, it was the Chinese who were the first to learn how to produce paper using wood. And they were the first to master this complex technology of paper folding.
But at first, these figurines were not just a way to decorate the interior in some unusual way or simply kill time. The Chinese used paper figures as amulets. In the temples, the halls were decorated with such elements, and previously only representatives of noble families had access to such figurines.
It was believed that a person who comes from an influential and wealthy family must master not only simple origami patterns for beginners, but also more complex technologies. Commoners then could not even dream of being trained and also mastering these technologies. And only in the 6th century a decree was adopted that allowed people who did not have a noble origin to practice origami.
In Japan, paper figurines were used to perform a ritual called Shinto, since paper was believed to be a symbol of purity. Previously, there was a tradition in the country according to which mothers passed fancy paper figures to their daughters.
And only in 1797 the first general diagrams, which were drawn up by the eminent master, were published. It was after this that different directions began to appear in this art. Origami models were developed by real masters who have reached a high level in mastering the technology.After the end of World War II, art expanded far beyond Asia. Many needlewomen from Europe began to show interest in this business. Gradually, origami became such a popular art that people all over the world began to practice it.
Modular origami is one of the main areas of art. There are several others. Some of them are not so popular. For example, wet origami. It is believed that only a few craftsmen are able to master this complex technology. Aerogami, kirigami and simple origami are the main directions that have become more widespread.
Please note that the simplest is considered to be modular do-it-yourself origami step by step, which was brought to European countries by immigrants from China. People who decided to cross the border without the appropriate permission were detained by American soldiers and placed in prison.
Their cellmates were Americans and representatives of other countries who, due to having a lot of free time, decided to master the technology of modular folding of paper figures. This absurd incident became the reason that art became widespread outside Asian countries.
Photos of modular crafts using origami technique
Penguin
Even a small child can work on a figurine of a cute resident of Antarctica. Before starting work, you need to prepare the modules:
- 129 black;
- one bright orange;
- 76 light blanks.
Let's look at the step-by-step instructions for assembling a craft from modules of a non-flying bird.
Step-by-step production
Stage No. 1. A dozen black and 6 white modules are placed with the short side up.
Stage No. 2. The entire next row requires seven white and ten black triangles. The parts are placed with the long side up.
Stage No. 3. Having made the third line of six light and ten dark blanks (long bases up), we roll all the strips into a ring.
Stage No. 4. The next chain is made up of 9 black and seven white modules.
Stage No. 5. The fifth row exactly repeats the third line.
Stage No. 6. The next row is made of seven white and nine black triangles.
Stage No. 7. The seventh row consists of ten dark and 6 light parts.
Stage No. 8. The head begins from the eighth row - it is shaped similarly to the fourth.
Stage No. 9. In the 9th row, 10 black and six white parts are placed.
Stage No. 10. In the 10th row - 9 black and 7 white blanks.
Stage No. 11. Row 11 – 10 black and 6 white modules.
Stage No. 12. The 12th ridge is similar to the tenth row.
Stage No. 13. In the 13th formation there will be only dark modules (11 pieces).
Stage No. 14. Now you need to slightly compress the upper part of the figure and attach the nose - an orange module - to the center of the penguin's head.
It remains to perform two actions - place black triangles on the sides. They will act as wings. And the last thing: cut out and then glue the eyes of the penguin.
Application and plastic
It’s easy to combine making crafts with the development of fine motor skills! To do this, roll up balls of colored paper, napkins, toilet paper, colored printer paper and glue them to the painted base.
Bulk vegetables and fruits
With one movement of the hand we turn strips of colored paper into three-dimensional fruits and vegetables: apples, carrots, cucumbers, pears, bunches of grapes.
It's easy to create a three-dimensional feel by layering multiple layers of paper on top of each other or folding them in half.
From identical silhouettes of fruits, by gluing them together, we create lantern crafts. Due to the multi-layering, we get almost real fruits and vegetables. Such crafts can be hung on a thread, placed in a basket, or glued to a base.
From many strips collected along the edge we make pumpkins, tomatoes, berries and apples. All round and ellipse-shaped fruits and vegetables are suitable here.
The strips, wound along the axis, can be turned into conical-shaped fruits and vegetables.
Vegetables and fruits can be made using special patterns. We cut them out, assemble them according to the pattern, and glue them along the edges.
Owl
In approximately the same way, a craft is made from modules of the bird of wisdom.
To make it, you need to prepare blanks of four colors - white, blue, orange and black (62, 157, 7 and two pieces, respectively).
Sequence of work
Step No. 1. Initial row - includes a damn dozen blue and five white modules.
Important! White ones are located in the center, and on the sides are sky-colored triangles.
Step No. 2. The next row consists of six white and a dozen blue modules.
Step No. 3. In the third phalanx, 5 white and 13 blue modules are placed with the short base forward.
Step No. 4. The parts in the subsequent stripes (from the fourth to the sixth) are located with the long bases upward. The fourth and sixth rows consist of white and blue triangles (six and 12 pieces, respectively). In the fifth phalanx, five white geometric figures are added to the 13 blue blanks.
Step No. 5. The seventh row completely corresponds to the fifth, but the short bases of the elements are directed forward.
Step No. 6. In the eighth ridge, the modules are placed in different directions - white - with the short side forward (two pieces), and the remaining four light ones and a dozen blue ones - with the long base forward.
Step No. 7. In the center of the ninth row (on the white area) there is an orange triangle (owl’s beak), and on its sides there are a pair of white and 13 blue parts.
Attention! In the next chains (10th and 11th) the modules are placed with the long side forward.
Step No. 8. In the center of the tenth row there are two light modules, and on their sides there is one white and one black triangle, as well as a dozen blue elements.
Step No. 9. One blue module is placed above the bird’s beak, and on both sides of it there are a pair of white blanks.
Step No. 10. The finishing row consists of 8 blue elements. Three blue triangles will serve as ears.
Step No. 11. The legs of a wise bird are made from six orange blanks.
Step No. 12. The back part (tail) is decorated with two blue modules.
All that remains is to assemble the owl’s wings from three modules and attach them to the body.