Materials and tools
If the technical training of an employee comes first when carrying out aluminum welding work, then the technological equipment for conducting the work takes second place. Regardless of the welding method, to obtain the best results, you must prepare the following:
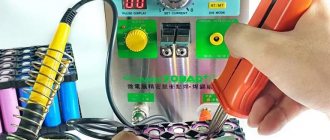
- power source - a welding machine that allows you to supply direct and alternating current, as well as currents reaching 300 A;
- electrodes of the OZANA and UANA brands, intended for all types of aluminum alloys;
- filler wire or rods;
- gas equipment - cylinders, burner, hoses;
- reliable grounding;
- work clothes made of non-flammable material;
- welding mask or goggles.
Safety precautions
The technology of the welding process involves intense spattering, which makes us, first of all, concerned about the safety of the welder.
- He must wear a suit made of non-flammable or fire-resistant fabric, as well as mittens and leggings made of similar material.
- Personal protective equipment is used to protect the respiratory system.
- The eyesight is protected by a welding mask.
- Having a reliable grounding will prevent electric shock.
Working with gas equipment is associated with increased danger. Complying with all industrial safety requirements at home is problematic, but it is necessary to follow them.
Preparing the surfaces of metal parts for welding
The parts to be welded require careful preparation. The edges of the parts are subjected to the following processing:
- Remains of fats, oils and other contaminants are removed from the surface of the workpiece using aviation gasoline, white spirit or acetone, or a solvent, that is, they are degreased.
- Cutting edges. When welding sheet material with a thickness of not more than one and a half millimeters, their edges are flanged. The chamfer is removed on parts with a thickness of more than 4 mm when welding with coated electrodes. If the thickness of the products is 20 mm or more, then cutting is necessary in any case.
- Removal of oxides from the surface is carried out with a file or a metal brush. The cleaning width on each side should be up to 15 mm. In some cases, the oxides are dissolved with a caustic soda solution.
But after such a procedure, rinsing with running water is required.
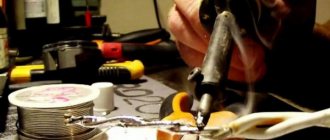
Process description
After the preparatory activities, the docking process is carried out. Welding aluminum at home using the electric arc welding method in a neutral gas environment is carried out in compliance with the following recommendations:
- the angle of inclination of the tungsten electrode to the surface to be welded must be at least 70°, but not more than 80°;
- the filler metal rod is fed into the zone perpendicular to the tungsten electrode;
- the arc size should not exceed 2 1/2 mm;
- to provide protection from oxygen, the molten metal begins to move first, the rod, followed by the electrode with the burner;
- the filler rod is periodically introduced into the weld pool;
- transverse movements are not recommended, only longitudinal ones;
- to remove excess heat, welding is performed on copper plates or a steel workbench;
- inert gas is supplied 3 seconds before the arc forms and for 5 seconds after the end of the voltage supply.
Do-it-yourself welding process Aluminum welding
Recently, semi-automatic machines, especially pulsed ones, have been gaining popularity in home workshops. The problem with the oxide film is solved by using a high voltage pulse. He literally breaks it, and due to the reverse action, presses drops of molten aluminum into the molten bath.
The process of welding aluminum with pulsed semi-automatic machines is carried out with direct current, but with reverse polarity. Uniform feeding of aluminum wire is carried out by a roller mechanism. Due to the high coefficient of thermal expansion, the wire may get stuck in the ferrule. In this regard, tips for welding aluminum and marked “AL” are used.
How to Weld Aluminum Using an Arc Welder
Arc welding has been historically important to construction since its widespread use in the 19th century.
Today it is a critical component of both buildings and vehicles. Steel is most often used for welding, but certain situations call for aluminum, which is significantly more difficult to work with than steel. However, with the right approach and planning, you can easily perform aluminum arc welding, whether it's a job on the job or in a hobbyist's workshop.
TL; DR (too long; didn't read)
Aluminum's properties make it more difficult to weld than steel: it expands more when exposed to heat, and its lower melting point makes it much easier to melt an entire piece of metal during the welding process. However, if you weld with care and at the correct speed and temperature, aluminum can be welded using either heliar or stick arc welding. Be incredibly careful when arc welding, and never look into the arc without eye protection.
Arc Welding Basics
Although advances in technology over the past century have allowed for automatic welding machines and more efficient welding machines, the basic arc welding process has remained the same.
Arc welding is the process of fusing two metal parts together using an electric arc, which creates intense heat that can melt the metal parts. When melted with a specially coated electrode, the molten metal is mixed with a filler that binds the two parts into a single whole. There are different arc welding methods based on the technology and materials used in the process.
Problems with aluminum
Steel is often considered the "default" metal used in welding, and by comparison, aluminum is a notoriously difficult metal to bond with arc welding. Because it is a reactive metal with a tendency to form oxides, it is more difficult to create a binder filler suitable for aluminum welding. Combined with the metal's high thermal conductivity and low melting point, it is very easy for a novice welder to completely melt the aluminum parts involved in the process. As a result, the first step in aluminum arc welding is to clean the base metal of any oxides or solvents.
The second step is to be mindful of your approach.
Manual welding
Shielded metal arc welding (SMAW), informally known as stick welding, is one of the older forms of arc welding. Inexpensive and easy to use in a wide range of applications, this welding method is often used by small fabrication shops and hobby welders, but can be used to weld aluminum smoothly. The key is to use a more powerful DC welder and an aluminum coated electrode. Fast welding without too much metal-to-arc contact allows you to quickly bond aluminum.
Heliarc Welding
Gas metal arc welding (GMAW), informally called Heliarc welding, is a welding process that adds an inert gas such as argon or helium to prevent oxidation during the melting process. To weld aluminum with this method, it is best to preheat the metal to no more than 230 degrees Fahrenheit before starting welding.
By using argon gas and pushing the welding gun away from the weld pool rather than away from the weld pool, aluminum can be bonded without too much trouble.
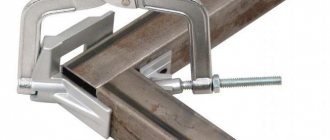
Design and functionality
The case for calcining electrodes has a rectangular shape. The dimensions depend on the volume of the electrodes to be accommodated; for household devices it is approximately 150x170x600 mm. The pencil case consists of:
- frame;
- camera;
- a heating element;
- electrical insulation;
- thermal insulation;
- front cover for loading the camera;
- back cover and heating control unit;
- wires.
Before drying the calcined electrodes, they are placed in the chamber and tightly closed with a lid. Then, on the reverse side, the wires are connected to the power source. The heating element is turned on - a spiral wrapping around the outside of the chamber.
The chamber is first covered with insulation, only then the spiral is laid so that the current does not flow when touching the electrodes and the inner surface of the thermal canister.
The heating element raises the temperature inside the device to 110⁰C. This is enough for the moisture to evaporate. After 2 hours you can start working.
In a home workshop, with a small amount of welding work, they use covers for electrodes that have a plastic sealed housing . They retain the heat of hot objects placed inside and do not let air through. The coated rods cool for several hours, remaining hermetically sealed.
How to Successfully MIG Weld Aluminum [Guide]
MIG welding aluminum can be difficult as it is very different from MIG welding mild steel. Follow this guide to learn about the key factors to consider.
Key to welding aluminum
Aluminum in its pure form is a relatively soft metal that has many uses, but requires the addition of alloy(s) to increase its strength. Because the properties of aluminum are very different from those of steel, working with this material can present some unique challenges, such as distortion and sensitivity to heat input. Despite these challenges, MIG welding aluminum is not that difficult if you use the right equipment and follow the proper procedures.
Keep these important factors in mind when MIG welding aluminum.
Tips for getting started
- Consider the thickness of the material. : The thickness of aluminum material that can be MIG welded is 14 gauge or more; The power output of your welder determines the thickness you can weld. MIG welding aluminum less than 14 (0.074 in) thick may require special pulsed MIG or AC TIG equipment.
- Keep it clean. : Aluminum must be thoroughly cleaned before welding, including removing any lubricants from the material. Removal of oxides should be done after degreasing using a stainless steel wire brush - a hand or flat wire brush will do. If using an electric wire brush, keep the speed and pressure low to reduce lubrication on the surface of the material, which can trap oxides and contaminants below the surface.
To avoid contaminating the base material, always clean with a wire brush that is only used on aluminum. - Select the appropriate gas : Since aluminum is a non-ferrous metal, it requires 100% argon shielding gas. A flow rate of 20 to 30 cubic feet per hour is recommended.
- What process should I use? When welding aluminum using the MIG method, atomization is desirable. This process involves a very smooth transfer of droplets of molten metal from the end of the electrode to the molten pool. The diameter of the droplets crossing the arc is smaller than the diameter of the electrode. In spray transfer, there is no short circuit, and the deposition rate and efficiency are relatively high. However, keep in mind that spray transfer requires a lot of heat, creating a large weld pool with good penetration, which can be difficult to control. It should not be used on materials less than 14 gauge thick.
- Gun and Wire Feed Options: Selecting a gun and wire feed system is an important step before MIG welding aluminum. Aluminum wire is typically fed using a spool gun or push-pull system. Spool guns improve soft wire feeding by placing a small amount of wire on a pistol-grip gun. Using a spool gun eliminates the possibility of bird nesting because the wire only feeds a few inches. In a push-pull system, the gun motor pulls the wire through the liner and the motor on the feeder acts as an auxiliary motor. This option is ideal for welding away from a power source and can be more ergonomic and user-friendly.
- Correct filler metal: Know the base aluminum alloy and the conditions to which the finished part will be exposed. The two most commonly available aluminum filler wires are ER4043 and ER5356.
For recommendations on wire alloys suitable for your application, contact your local welding equipment distributor or filler metal representative.
Welding technique
The operator's skill level, joint types, setup and position, and welding power source will all have a big impact on the weldability of aluminum. Consider these welding techniques to improve your skills.
- Use a stroke angle of 10 to 15 degrees—the tip and nozzle pointing in the direction of travel (see Figure 1). Pulling or using a drag angle will result in porous, dirty welds due to the lack of gas coating.
Figure 1: Firearms Techniques
- Maintain the proper distance from the tip to the work surface and, if possible, recess the contact tip approximately 1/8 inch inside the nozzle.
(See Figure 2)
Figure 2: Gun and welding area
- The heat reflector and weld puddle are very hot when MIG welding aluminum. Holding the tip closer than recommended may result in wire burning back to the contact tip and other feeding problems.
- Avoid large weaves on aluminum. When larger fillet welds are required, multi-pass straight beads will provide better appearance and reduce the likelihood of lap-in, burn-through and other weld defects.
- It is necessary to increase the torch speed because the base material heats up during welding.
Troubleshooting common problems
If you encounter these common problems when MIG welding aluminum, consider the following steps to resolve the problem.
Burn-through (melting) due to overheating of the base material
- Increase the speed of movement and make the seams shorter.
- Move around the part, distributing the heat.
- Use thicker material, change the joint design, or switch the welding process to AC TIG.
- Elimination/reduction of gaps.
Dirty welds
- Use a pushing angle instead of a dragging technique.
- Increase voltage to switch to spray mode.
- Use appropriate methods to clean the base metal, such as a stainless steel brush.
- Check the presence of shielding gas and wire alloy.
Incorrect machine settings
Wire burns back to the contact tip during or at the end of the weld
- Maintain the required distance from the tip to the work surface.
- Make sure the contact tip size, drive rollers and torch guide match the diameter of the wire being used.
Wire birdhouses (piles) in front of the entry guide on the gun
- Check and adjust the tension of the drive rollers.
- Make sure the drive rollers match the wire diameter.
- Replace the contact tip if necessary.
- Check the pressure adjustment on the aluminum hub of the spool gun.
Electrode selection
When choosing conductive rods for welding aluminum, you need to pay attention to the following aspects:
- The composition of the electrode must correspond to the alloy of the elements being connected. Information about the first is indicated by the manufacturer on the packaging and certificate.
- The thickness of the consumable material should not exceed the thickness of the workpiece by more than 1 mm. Violating the rule will result in burning through the element.
- Welding rods dried more than once reduce the strength of the resulting bead. Welding is performed with carbon, graphite or tungsten electrodes, which is determined by the method of operation.
Several types of rods are used for welding operations with aluminum. The main ones are the following groups:
- alkaline-salt - OK 96.10, 20, 50, intended for aluminum and its technical category, due to increased hygroscopicity they need protection from humidity;
- OZAHA - provide a good indicator of weldability and the resulting bead on different metal alloys, you can weld not only horizontal, but also vertical seams;
- OZA - SvA1, 3, 5, 10, for pure aluminum and alloy with silicon;
- UAHA - aluminum alloys;
- tungsten - using a controlled protective atmosphere.
The main disadvantage of the latter is considered to be difficult arc ignition.
For simple welding operations, aluminum electrodes can be made in-house.
This will require the following supplies:
- Aluminum wire ± 30 cm long, 3-4 mm in diameter;
- A coating made from crushed chalk and liquid glass.
Apply the paste mixture evenly onto the wire in a layer of 1-2 mm. After drying, the electrode is ready for use.
Review of homemade batteries
Readers unfamiliar with the principles of battery operation may wish to review our short lesson on battery basics before starting this lesson.
Battery operation
A simple battery requires three parts to operate: two electrodes made of different materials (usually metals), and an electrolyte (usually a liquid with ions in solution) that reacts with the electrodes.
The battery works when one of the electrodes (anode) dissolves positively charged ions in the electrolyte, leaving behind excess electrons.
As a result, a negative charge remains on the anode. If you then connect a wire from the anode to another electrode (cathode), the excess electrons will flow through the wire until they are evenly distributed on the two electrodes. This flow of electrons through the wire produces an electrical current. On the cathode side, the incoming electrons are stripped from the cathode and react with the electrolyte ions, clearing the way for more anode to dissolve and more electrons to flow to the cathode.
This process continues as long as the anode continues to dissolve and as long as the electrolyte continues to react with and neutralize the byproducts. Eventually, either the anode or electrolyte runs out (or the electrodes become covered in debris from secondary reactions) and the battery stops working.
Battery materials and characteristics
The voltage of the battery depends solely on the chemical reactions taking place and therefore on the choice of materials. For high voltage, the anode must be highly reactive with the electrolyte, while the cathode must be as inert as possible.
Common materials for making homemade electrodes are zinc, aluminum, copper and steel. The electrolyte is often a weak acid (such as citric, acetic or phosphoric) or an aqueous salt solution. Zinc usually dissolves most easily in these electrolytes and is the best anode material, although aluminum also operates at a slightly lower voltage. Copper and stainless steel are good cathodes and are generally similar in behavior, while stainless steel is only slightly less reactive to some acids. Among these materials, the highest voltages are achieved with zinc, stainless steel and phosphoric acid, which can produce voltages around 1. 2 volts.
The maximum available battery current is more difficult to predict. This depends not only on the chemical composition, but also on the size and proximity of the electrodes, as well as the concentration of the electrolyte. Larger and closer electrodes with more concentrated electrolyte produce higher currents.
Battery capacity is determined by size.
Larger electrodes with higher electrolyte volume and concentration last longer, provided the electrodes do not become dirty before the essential chemicals run out.
Tables 1 and 2 list common sources of electrode metals and electrolytes.
, roofing nails
Table 1: Some sources for common electrodes.
| Electrode | source | |
| zinc | galvanized or galvanized bolts or washers | |
| aluminum | beverage cans, foil | wire |
| stainless steel | mounting bolts or washers, |
98 3 COOH) Table 2: Some sources of common electrolytes.
| electrolyte | source |
| citric acid (C 6 H 8 O 7 ) | lemon, lime, orange, grapefruit, tomato juice |
| vinegar (4% to 8% acetic acid), pickles | |
| phosphoric acid (H 3 PO 4 ) | some soft drinks (eg Coca-Cola), potatoes |
| salty water | tap water and table salt (NaCl) |
Rice.
1: The battery is made from an aluminum strip from a soft drink can, a piece of copper ground wire and a Coke glass. Produces 0.75 volts and a maximum of about 3 mA. Rice. 2: Three lemon batteries connected in series with an LED. Each battery uses a zinc washer for the anode and a penny for the cathode. Together the three batteries produce just over 2.5 volts and a maximum of about 0.1 mA. Rice. 3: Electroplating pile made from a stack of pennies, zinc washers and paper stickers soaked in vinegar. The stack is housed in a plastic coin tube, which is used in coin collectors. Twenty cells are stacked on top of each other to produce 15 volts and a maximum current of about 0.2 mA.
Rice. 4: Holes are drilled in the ends of the tube to access the ends of the battery. Staples are inserted as shown to make the connection.
examples of homemade batteries
coke oven battery
Figure 1 shows a battery consisting of a piece of thick copper ground wire, a strip of aluminum from a soda can, and a Coca-Cola glass.
+ ⇒ H_2 (gas)} $$
After the battery has been running for a while, hydrogen bubbles may appear on the copper cathode.
lemon battery (and other products)
The electrolyte does not have to be in the glass. The juice inside a lemon contains citric acid, which itself provides a good electrolyte. Cut two parallel lemon slices, insert a penny into one cut and a zinc washer into the other, and you have a lemon-powered battery that provides about 1.0 volts. Figure 2 shows three such batteries connected in series to power an LED.
Other citrus fruits (limes, oranges, grapefruits, tangerines, tomatoes) are also suitable. Potatoes (containing phosphoric acid) and pickles (containing acetic acid in vinegar) can be substituted.
simple galvanic heap
A piece of paper or cardboard soaked in vinegar and sandwiched between a penny and a zinc washer forms a battery that can provide a voltage of about 0.5 volts.
When many of these battery cells are arranged in series on top of each other, a “galvanic pile” is formed. In Fig. Figure 3 shows 20 of these battery cells stacked inside a plastic tube of the type used by coin collectors. Small holes are drilled into the ends of the case to provide access to the ends of the battery. As the voltmeter shows, the pile produces about 15 volts.
An even more compact battery can be made from just pennies, without zinc washers. In 1982, the composition of the US penny changed from 95% copper with 5% zinc to 97.5% zinc with 2.5% copper plating. By taking a penny minted after 1982 and sanding down the copper on one side (you may need a grinder for this operation), you can create a sandwich of copper and zinc that is ideal for galvanizing the pilings that have been removed at the anode. thereby maintaining charge balance in that area. With the addition of salt, a water battery can perform the same as the acid batteries mentioned above.
additional resources
Concerned about Uncle Sam's views on using US currency for scientific experiments? Read the official announcement on this issue at https://www.federalregister.gov/articles/2007/04/16/E7-7088/prohibited -… which states:
“The regulation includes an exception for treatment. 5 and 1 cent coins for educational, entertainment, novelty, jewelry and similar purposes, provided that the volumes handled and the nature of the processing clearly demonstrate that such circulation is not intended as a means solely to profit from the value of the metallic content of the coins."
Calcination and drying at home
Hobbyists are interested in how to dry electrodes at home if there are no special ovens. To do this, use conventional ovens in which pies are baked.
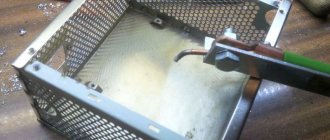
- Unpack the electrodes and take the amount needed for work.
- Place in the oven. It is advisable to use a lattice rather than a sheet.
- Turn on intense all-round heating.
- Set the temperature to more than 200⁰, which can be obtained in this oven model.
- Leave for 2 hours.
- Transfer to a thermal case.
The oven used is electric. When burning, a gas wick releases soot, moisture and other substances that settle on the coating and worsen its properties.
Drying electrodes at home can be done using a thermal pencil case. You need to take your passport and look at the maximum heating temperature. Then check the table on the electrode packaging. It depends on the material of the rod. Heat the chamber to maximum, after 2 hours switch to 110⁰. This temperature is enough to dry the electrodes.
A wire rated at 2 kW usually comes into the house from a pole. It may not withstand the load from the thermal pencil case.
Some craftsmen who do a lot of welding recommend simply placing the electrodes in a pack on a heating radiator. They claim that the coating completely dries within a few days. For simple structures that do not require particularly strong seams, this method may be suitable.
Proper heating is carried out at temperatures above 100⁰ so that the water evaporates . The amount of air should be small with a minimum moisture content.
Making a pencil case for electrodes with your own hands does not seem difficult. It looks like a small muffle furnace. Mineral wool or asbestos pipe is used as a heat insulator.
The chamber is made of a stainless steel sheet 2 mm thick. The top is covered with insulating fabric. Then the spiral is wound. A fire hose can be used as a material for the camera. It can withstand temperatures up to 200⁰C, is impervious to moisture and is made of electrically insulating fabric. The ends of the spiral are brought back and everything is covered with mineral wool.
The body can be made from a metal sheet, using the remains of a laminated roof and metal profiles. It is divided into 2 parts. The front one is large and accommodates a thermal chamber. There is a small space at the back for installing the switch and wiring. A handle is attached to the top for moving. A bracket is mounted in front - a stop.
The camera wrapped in mineral wool is placed in the housing and secured. The lid is double, inside there is a layer of heat insulation.
It is difficult to heat electrodes in a homemade chamber. It is used more like a dryer .
Graphite Aluminum Battery - DIY - Indigo Instruments
Graphite Aluminum Batteries
The progress we've been waiting for?
Fast-charging, long-lasting batteries for cell phones, laptops, electric vehicles, and even solar panels have long been desired. Consumer products have become so complex that even lithium batteries are now too limited and their safety and environmental friendliness for disposal are a concern.
An aluminum graphite battery can fix all that.
A recent announcement by researchers at Stanford University shows the promise of a revolutionary leap forward with cheap and accessible materials. See Nature for the full article (full access requires user rights).
The Stanford report says the graphite-aluminum battery can provide ultra-fast charging, a huge number of recharge cycles, and can be disposed of relatively safely. There is still much work to be done to commercialize this work, but there are some simple materials that will allow the curious to do some basic research on their own.
Basic copper-zinc battery
Most chemistry and physics teachers are familiar with lemon or potato batteries, such as the strips of copper and zinc electrodes with alligator clips shown below. This combination produces enough current and voltage to operate small lights and electric motors.
Copper-zinc electrodes for assembling a simple fruit or potato battery. Get a 10-wire electrode combo kit to make variations of this.
Aluminum graphite battery
A very simple replication of the Stanford experiments can be done using our carbon (graphite) and aluminum electrodes, as shown below.
Aluminum graphite battery simple; use large test tubes with a solution of salt or citric acid.
We tried to conduct a side-by-side comparison of a copper-zinc electrode battery with a graphite-aluminum one. Instead of lemons, we used test tubes filled with water and citric acid.
The copper-zinc combination produced about 900 mV, while the carbon-aluminum produced about 600 mV. You can also use vinegar instead of citric acid in this test tube. The difference in the Stanford work is that a saline solution was used as the electrolyte.
Our test tube can do this too, although we haven't tried it yet.
Two groups of test tubes with a rack, as shown below, were connected in such a way that 2 “cells” were in series and the other two were in parallel. This setting gives different voltage and current values. You can connect many of these cells to generate even higher voltages and currents.
Multi-cell chemical batteries for test tubes. Note: This version above is no longer available.
We'll be testing variations of this simple design ourselves further down the line, but for now there are plenty of potential experiments for home or high school, study and science fair. Let us know your thoughts.
- Electrodes
- Test tubes (use 25 mm or larger)
- Test tube rack
Error page
Error Page "," tooltipToggleOffText ":" Toggle the toggle to
FREE Next Day Delivery!
"," tooltipDuration ":" 5 "," tempUnavailableMessage ":" Be back soon! "," TempUnavailableTooltipText ":"
We are working hard to get things up and running again.
- Temporarily suspended due to high demand.
- Keep checking availability.
"," hightlightTwoDayDelivery ":" false ", " locationAlwaysElposed ":" false ", " implicitOptin ":" false ", " highlightTwoDayDelivery ":" false ", " isTwoDayDeliveryTextEnabled ":" true ", " useTestingApi " ", " ndCookieExpirationTime " :" 30 "}," typeahead ": {" debounceTime ":" 100 "," isHighlightTypeahead ":" true ", " shouldApplyBiggerFontSizeAndCursorWithPadding ":" true "," isBackgroundGreyoutEnabled} ":" false " locationApi ": {" locationUrl " :" https://www.walmart.com/account/api/location","hubStorePages":"home,search,browse","enableHubStore":"false"},"perimeterX":{"isEnabled":" true"},"oneApp": {"drop2": "true", "hfdrop2": "true", "heartingCacheDuration": "60000", "hearting": "true"}, "feedback": {"showFeedbackSuccessSnackbar" : "true", "feedbackSnackbarDuration" : "3000"}, "webWorker": {"enableGetAll": "false", "getAllTtl": "
0″}, "search": {"searchUrl": "/search/", "enabled": "false", "tooltipText": "
Tell us what you need
", "tooltipDuration": 5000, "nudgeTimePeriod": 10000}}}, "uiConfig": {"webappPrefix": "", "artifactId": "header-app", "applicationVersion":" 20.
0.42 ","applicationSha":"b0b214d15367c6464bb2ff184c24c271bef207a1","applicationName":"header","node":"d815415c-e9c9-4199-8103-0ab3abdbf85b","cloud"-a13d:"scus- a13 » oneOpsEnv ":" prod-a "," profile ":" PROD "," basePath ":" / globalnav ", " origin ":" https://www.walmart.com "," apiPath ":" / header- lower header/electrode/api","loggerUrl":"/header-footer/electrode/api/logger","storeFinderApi":{"storeFinderUrl":"/store/ajax/primary-flyout"},"searchTypeAheadApi": { "searchTypeAheadUrl": "/search/autocomplete/v1/", "enableUpdate": false, "typeaheadApiUrl": "/typeahead/v2/complete", "taSkipProxy": false}, "emailSignupApi": { "emailSignupUrl": "/account/electro/account/api/subscribe"},"feedbackApi":{"fixedFeedbackSubmitUrl":"/customer-survey/submit"},"logging":{"logInterval": 1000,"isLoggingAPIEnabled": true, " isQuimbyLoggingFetchEnabled ": true," isLoggingFetchEnabled ": true," isLoggingCacheStatsEnabled ": true}, " env ":" production "}," envInfo ": {" APP_SHA ":" b0b214d15367c6464c2ff18Beon ":" APP "," APP0.
42-b0b214 "}," "expoCookies": {}}
Please enter a location
Enter zip code or city, state. Error: Please enter a valid zip code or city and state.
Update location
Good news - you can still get free two-day shipping, free pickup and more.
Continue shoppingTry another zip code New! Free delivery without order min. Restrictions apply.
Oh! This item is unavailable or pre-ordered.
Search similar results in these categories:
.
Electrode