Areas of use
Why is this origami needed at all? Basically, as mentioned above, they resort to this in order to add comfort to their home and do something original that can surprise guests.
It will also be an excellent gift for family and friends. This gift is very original. You can make an origami vase with your own hands just for your own pleasure, to keep yourself busy with something.
God is in the details
Don't forget about the little things. The decoration will already change the overall perception of the craft. If the vase itself is light and elegant, you can place equally beautiful paper flowers in it. The main thing is to follow the style, thereby maintaining the overall idea.
Using paper of different colors, the composition acquires “juiciness”. Thus, with the help of such a gift, you can influence your friend’s mood. Don't underestimate human psychology.
Variety of origami
Origami is a very broad type of needlework and has a large number of different types. From making entire huge crafts using a large number of tools, to banal crafts that even a child can handle without any problems.
Of all the types, the modular assembly of an origami vase stands out.
Simple
This style was invented by the noble British. Its basis is the ability to fold figures using one sheet of paper.
This method is believed to simplify the creation of works. Using this type of technique, you can learn how to make unusual greeting cards, cake boxes, and snowflakes.
Required tools:
- The list of necessary things is very short. Typically, all its components are available in any home:
- Scissors (curly or regular);
- A4 paper;
- PVA glue/pencil (in case of modular origami).
Advantages of the modular type of origami
The modular assembly of a vase has a number of significant advantages:
Ease of manufacture. Yes, this is not an elementary school-level craft, but there is nothing complicated in making it.
Beauty. Due to the fact that this type of origami is made from a number of small parts, the result is a very beautiful figure.
There is a rule at work here that makes designer crafts beautiful. It is better for a person to look at a large part made from several small parts than to look at something large presented as one component.
We recommend reading:
Origami fish: step-by-step instructions for creating a fish using the origami technique. Many photos of finished works, diagrams, master class, video- Origami rose - instructions on how to make a beautiful rose with your own hands. The best schemes for beginners to create and assemble (photo + video)
- Origami bird - 100 photos of the best patterns for creating a bird with your own hands using the origami technique. Step-by-step master class with description
If you have children, you can team up with them and work on your craft together. Children really like to assemble something large and voluminous from small parts, so the child will clearly not remain indifferent.
Creating Modules
Before you start assembling the vase, you need to prepare multi-colored modules. They are most often made from standard size rectangles. To avoid drawing, fold the A4 sheet in half four times, you will get 32 identical rectangles. Then do the following:
- The rectangle is folded in half lengthwise and crosswise, marking the center;
- A rectangle folded in half along its length is folded with its short sides towards the center line, as in a paper airplane;
- Turn the workpiece over;
- The edges of the sheet that protrude above the triangle are folded upward;
- The triangle is folded in half.
Origami is made from these modules. They are connected by inserting the corner of one part into the pocket of another.
Manufacturing technique
If you look at photographs of origami vases, you can find dozens of different and unique crafts. There is an example of making a standard origami vase. To do this, you will need paper of four colors: dark blue, yellow, light blue, white.
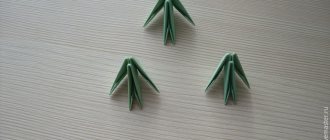
First, let's create the module itself. We take a rectangular piece of paper of any size, make two bends so that we get a kind of house, after that we turn in the remaining corners from the bottom and by slightly bending the lower ends, we give our module volume.
You can make any number of such modules, depending on the desired size of the vase. We must not forget that there are as many white modules as dark blue ones, and as many yellow modules as light blue ones.
After all the modules are ready, it’s time to form the foundation. The first layer is made from dark blue modules, and the second from light blue ones. The third row is yellow, the fourth row is white. After this, we repeat this procedure as many times as necessary.
We recommend reading:
- Origami envelope - the best schemes for assembling an envelope from paper without glue. Simple instructions with step-by-step guidance + 120 photos
- Origami paper swan - simple instructions with step-by-step guidance. Photo, video, master class, secrets of craftswomen
- Origami butterfly: step-by-step master class with real examples in the photo. Subtleties and secrets from craftswomen + instructions and video lesson for children
The last layer should be made a little smaller than the rest, as this will be the completion of the vase.
If you want to make a vase with a non-standard shape, then you need to make each layer with a different number of modules. The main thing is to maintain the right proportions.
If you do everything correctly, then this step-by-step instruction for beginners will help you make a very high-quality craft.
Original decoration
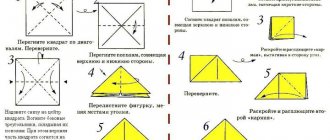
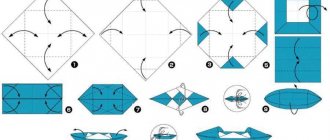
This craft is very easy to do and will only take a few minutes of your time. Let's move on to the diagram of an origami paper vase:
1) Take a square sheet of paper of a beautiful bright color.
2) Bend it diagonally and straighten it back.
3) We do the same with the other diagonal, bend it, and then unbend it back. Thus, we marked the central lines of the sheet.
4) Now you need to bend the sheet horizontally and bend it back.
5) After we have done everything described above, we must bend our workpiece into a rhombus, as shown in photos 6 and 7.
6) Iron our resulting diamond well.
7) Then we bend the right corner to the center line and do the same with the left one, this is shown in photos 9 and 10.
 We turn our future vase over to the other side and do the same with the other two corners.
Related article: Do you need a turbo brush for a vacuum cleaner?
9) Bend the upper left corner to the center and bend it back.
10) Next, fold the central upper corner, and fold the upper left corner onto it again.
11) And we continue to do the same with the remaining corners. And with the last right corner you need to do it a little differently. It needs to be set inward along the marked lines, as in photos 17 and 18.
12) In photo 19 you can see what should happen in the end.
13) Bend and then unbend the lower corner so that the vase has a stable bottom.
14) The most important thing left is to carefully straighten our craft, align all its sides well and carefully iron it with your fingers.
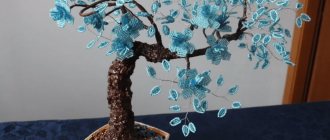
The photo shows what the final appearance of the vase should be. If you take a small sheet of paper, then naturally the vase will turn out to be small, into which the flowers will probably not fit. This craft can serve as a vase for sweets or a stand for pens and pencils.
It’s better to take a larger sheet of paper so that it ends up being a normal size and will please your eyes.
You can also use this technique to make a bouquet of flowers and put it in a vase.
If some points in the work were unclear to you, or you got confused in the diagram, then below you can watch the video on how to make this vase. In it you will find all the answers to the questions that concern you
Opportunities for imagination
If a standard vase does not suit you, then you can use your imagination and come up with something that you personally like. Among all of them, there are several good ideas:
- Floor vase
- Vase with Flowers
- Three-dimensional vase
- Vase with a pattern
Choose how you want to make a modular origami vase.
We recommend reading:
- Origami paper flower, made by yourself. 140 photos of original ideas + step-by-step instructions
Origami dog - step-by-step instructions for children. 123 photos of original ideas for creating a dog out of paper using the origami technique (master class + video)
- Origami owl: a review of the easiest ways to make an owl out of paper using the origami technique. 124 photos of original ideas + instructions with video tutorial
How to care for the product
Despite the fact that paper is a fairly light material, with proper care, a modular vase will serve you for a long time and will not lose its original appearance. It is important to remember a few rules:
The finished vase needs to be varnished. If you have nothing else at hand, you can even protect the paper from moisture with hairspray. Ideally, buy clear acrylic varnish at an art store. It must be applied from a distance of 30 cm or more so that the paper does not become soggy.
Multiple folds in paper collect dust. You can remove it with a dust broom, but it is better to blow off the dust with a hair dryer without heating the air.
When exposed to sunlight, paper turns yellow and becomes more brittle. To avoid this, choose a varnish with a UV protector or simply place the vase away from sunlight.
Vases made from modules can be used both to store artificial flowers and independently. Using this technique you can make fruit bowls, bread bins, jewelry boxes and many other beautiful and functional things for your home. Having mastered the basic techniques, you can easily create unique and original paper products.
Three-dimensional vase
The most difficult method of all of the above, since ordinary modules are not suitable for its implementation. Here you will need three-dimensional modules, the production of which is much more difficult.
This method is not suitable for beginners, so you should only try it if you have experience in this matter.
The history of the art of origami
The roots of the art of origami go back to Ancient China. The meaning of the concept is literally translated as “folded paper” (Japanese). The first paper production machine was invented in the Middle Kingdom.
But even taking this fact into account, Japan became the second homeland of origami (VIII century AD). In those days, the price of paper was so high that not many could afford it. Among the lucky ones were most of the monks.
They collected small “sanbo” boxes (Figure 1), which later served as containers for offerings to the gods. A little later, every second aristocrat could independently assemble, from paper, an original box for gifts to his loved ones.
After six hundred years, paper has lost its stamp of value. Since then, art began to develop much faster.
Vase with a pattern
Perhaps the most beautiful way to improve a vase.
To do this, you need to prepare a separate number of modules that will form a single pattern in your future vase. It is important to calculate the correct number of modules needed.
If you do not take this parameter into account, the drawing may turn out blurry and it will ruin the overall appearance of your vase. It is important to maintain proportions so that there are the same number of layers under your drawing as there are above it.
Algorithm for assembling a vase from modules
- We begin to make the bottom of the future product. Rows 1 and 2 of 24 pieces of white and pink colors need to be closed into a circle and turned out. You will get a cylinder. The third row is expanded with pink modules.
- The next one is diluted every 3 modules with white.
- In 5, you need to alternately equip it with modules of white and pink colors to form a pattern.
- In the 6th row, purple ones are added and the next couple of rows are completed as well.
- Set of 9 pink parts.
- Rows 10 to 14 are assembled in the same way, and rows 15 and 16 are made with pointed-type protrusions, where each peak is duplicated by a purple module.
- Let's move on to the skill of the neck. Here a series of 13 modules are assembled and interlocked “with hangers” through holes.
- The top of the elongated neck is shaped - put on 2 white 1/32 fragments and connect them with pink, then build a white “ladder”, which is secured with pink modules. This will create each of the 6 petals.
- In each row of petals, 4 modules are removed so that the top of the vase is harmonious. The vase is ready.
Subsequent uses of origami
Origami is not limited to this vase, it is a limitless art. You can make other household items from origami.
Lamps, jugs, figurines in the form of various birds and animals. Whatever the human soul desires. The main thing in this matter is not to limit your imagination and do everything wisely.
Varieties of modular flower vessels
It is preferable to make origami vessels in a classical style. Modern design is not suitable here.
The most popular are pear-shaped containers - you can come up with a lot of interesting variations based on them. Amphoras are also quite popular. Moreover, they can be collected both with and without handles.
Figured vessels in the form of animals or plants look impressive. Of interest are fruit bowls - vases with a flat, wide top on a long stem. Their purpose is to store trinkets and jewelry.
Decorative items may vary in size. To make floor models you need 1/16 parts.
Photo of a vase using origami technique
Did you like the article?
1+
What can be done?
An unusual vase made of colored paper will be a great decoration in the living room, bedroom, or kitchen. Photos of origami vases confirm this.
You can put candy in them, put beautiful flowers (which you can also make yourself) or simply make them the central figure.
What you need to know before getting started
Since the modules are small, the paper for them should not be too thick. Otherwise, the folds will turn out to be inaccurate, and the product as a whole will take on a sloppy appearance. It is better not to use children's art kits, especially inexpensive ones. The paper in them quickly breaks and tears, which reduces the lifespan of hand-made origami masterpieces.
The optimal sheet density is 80g/m². It is characteristic of both office and classic origami paper - kami. It is necessary that the sheets be painted on both sides to maintain the integrity of the vase design. It is also important that the surface of the material is slightly rough, which will improve the adhesion of the typesetting elements to each other.
Typically, origamists use triangular modules. They are assembled according to the following scheme:
In bundles, the triangles are attached either at a right angle upward (“look” at the sky) or downward. There are also combined compounds. In addition, there are two types of relative arrangement of modules when docking:
- Two on the long sides, one on the short side.
Fruit bowl
Fruit vases are especially loved by origamists. You can store both decorative and quite practical items in them - balls of yarn, handicrafts, small soft toys, jewelry. To increase the strength of products, they are glued during the assembly process.
This is what a classic fruit bowl looks like using the modular origami technique:
To make it you will need 1717 1/16 modules. Of them: