We sew soft toys
Interior soft toys are distinguished by their originality and character. They perfectly convey the mood and characteristics of their owners. Such a toy can be sewn as a gift, reflecting the individuality of the recipient. And you can do it for yourself - for a good mood every day.
Sewing soft toys is a great activity for children of any age. It has been noticed that children produce especially bright and interesting characters, created by a mind not befuddled by adult concerns.
Sew a soft toy KNOW-ALL BUNNY
You can use an ordinary glove. Step-by-step master class and patterns at the end of the article.
Chanterelle
To make a fox, you need to choose a bright glove - red or orange. In extreme cases, yellow and red will do. The body is made according to the cat principle.
The cuff of the glove is cut off for the head. The upper part is sewn up according to the cat stitch principle. After this, the head is stuffed halfway, and the remaining hole is gathered with a thread to create a sharp nose. The head is sewn to the body. The red glove toy is ready! By the way, such toys can also be used for home puppet theater.
obuvdk.ru
Hello, regular blog readers!
I hasten to tell you about what a wonderful lesson my student Anya Atryakhina
for your classmates. Anya is a passionate and creative person. And how many interesting things her hands can do, how many excellent creative ideas her head contains! And how wonderfully she draws!
Yesterday Anyuta gave a real step-by-step master class, where she showed how you can make a cute bunny out of an ordinary old children's glove.
Handmade glove toys are a new type of handicraft. The beauty of them is that now you don’t need to throw away your old favorite thing. You can make something useful out of it.
Anya showed the guys a way in which they don’t need to cut anything off the glove. She patiently explained and showed her classmates each step. For the guys who asked for help, Anna helped, suggested, or explained again.
At the very beginning, the second graders “hid” their thumb. Then the two fingers that are in the middle must be filled with cotton wool. These are the future bunny ears, they should stand up.
Then cotton wool is added to the glove (this is the head and body of the bunny). Two fingers - future paws are pulled back and tied with a ribbon. This is how the hare develops a head and body. The edge of the glove is sewn up.
I was glad that I only helped most of the second graders tie a knot on a thread. Some guys held a needle for the first time in their lives, but they tried very hard! Well done! And there were those who masterfully sewed up the hem, and even helped their comrades!
At the end of the work, the children only had to attach the eyes. Some guys sewed button eyes, and some glued on “live eyes”.
Once upon a time there were gloves, knitted, gray with stripes. They lived for a long time, and for more than a year they were bored in a box with nothing to do. And they had a friend - a pink glove. Her sister got lost while out for a walk and since then the glove has been left without work.
And then Inspiration came and the old gloves got a new life - they turned into toy bunnies!
And here are the instructions for homemade glove toys:
1. We prepare the gloves as in the photo - already at this stage you can see how two bunnies are made from one glove, and the paws for them from the other.
2. Here is our “sketch” of the future bunny.
3. We sew up the sides and make the “filling”. You can fill the bunnies with padding polyester, or with dry aromatic herbs, but I made mine from finely chopped shreds left over from previous handicrafts.
4. The nose and eyes can be made from beads or buttons; in my hares they are simply embroidered with regular threads. The pink bunny has an embroidered flower - this is a native decoration of the glove.
5. If you sew the bottom above the cuff and add volume to the bunny’s butt, he will sit. If the cuff is rolled up, the bunny will be standing up - then the bottom should be carefully hemmed with a round patchwork or twisted into a tight roll from the leftovers and simply tucked in.
Handmade toys have a special warmth. And homemade toys from gloves, socks or other household items give them a second life, and for a child it looks like a real miracle when one thing turns into another!
If you create such hares in the spring, when the family accumulates a dozen worn or unpaired gloves, you can stage a real performance or game of Grandfather Mazai and the hares!
How to make a dog out of gloves
1. We will need a pair of gloves
2. Take one glove. Cut the tail and 2 front legs along the lines shown below.
3. Stuff the resulting parts with padding polyester.
4. Sew on the front legs.
5. Sew on the tail.
6. Take the second glove. Cut as shown in the photo below: two fingers in the middle and a thumb.
7. Fold the glove so that the hole from the cut off thumb is in the middle. Sew along the dotted line.
8. Cut just below the seam.
9. Stuff the future head through the hole that used to be the two middle fingers.
10. Sew the hole. Bend the ears down and sew them to the head with a couple of stitches or glue them.
11. Sew the head to the body.
12. Make eyes and nose from buttons. Sew in a circle around one of the eyes to create a spot. The navel can also be stitched with thread.
How to make a hare from gloves.
The hare is made in the same way. Follow the instructions in the photo.
Other Master classes from the section
We invite you to sew such a cute angel for your children's room. Let it guard your baby's sleep.
This glove bunny is a fun DIY craft for kids ages 7-8. If you make such a toy yourself, your three or four year old child will enjoy playing with it. For him, such a game will be a fun and interesting finger workout. After all, in order for the bunny from the glove to “come to life”, the baby will have to form a rather complex figure from his fingers, and then move them independently, controlling the doll. It’s best to make the craft from your child’s old glove; the hare should fit fairly tightly on your hand. The glove hare will help you learn poems about bunnies with your child by acting them out with this glove doll.
You can take a glove for a hare in any color, not just white, like ours.
Turn the glove inside out and cut off the thumb, middle and ring fingers. Sew up the slits in the glove: sew up the cut between the bunny's ears (where the middle and ring fingers were) so that the distance is smaller. We have them sewn perpendicular to the original location. We sew up the cut at the thumb. Turn the glove right side out.
Cut out the nose and eyes from felt. When gluing the bunny's eyes and nose, put a glove on your hand and mark the gluing areas. Felt can be replaced with cardboard, buttons or beads.
From the cut off finger of the glove, make a tail for the hare and sew it to the back of the craft.
Our glove hare craft is ready, you can put it on your hand. The hare's ears are the little finger and the index finger, bend the remaining fingers as shown in the figure.
Similar articles
What does branching on the marriage line mean?
Fortune telling by hand: How many times will you get married?
Scenario “New Year with the Nutcracker” In the preparatory group The lights go out, the “Waltz of the Snowflakes” from the ballet “The Nutcracker” sounds
Pensions will be abolished for working pensioners in Russia
Cat
Since mittens are most often made gray or striped, it would be a shame not to use them to make a toy cat! To do this, cut off the middle finger and little finger of the glove at the base. The hole from the middle finger is sewn up, and the finger itself needs to be sewn to the place of the little finger.
Now, where the tail joins on the cat’s back, you need to make a vertical cut and sew the little finger there.
The body of the future cat is tightly stuffed with filler and pulled tightly together in the neck area.
The cat's head needs to be stuffed only to the middle, after which the glove sleeve is sewn up from the edges - this is how the ears are formed.
The finished Murzik can also be decorated with buttons, beads and ribbons.
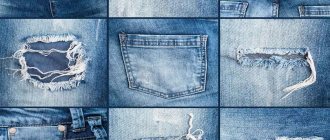
What gloves and mittens are used to make crafts?
Crafts from gloves (you can make a design of any size and complexity with your own hands) are most conveniently made from:
- knitted products;
- leather or suede;
- rubber;
- knitted
Knitted gloves
Knitted gloves are ideal for creating soft animal toys, as well as dolls and Christmas tree decorations. The color of the source material must be selected depending on what object should appear as a result of the work (for example, if you need to make a bear from mittens, it is advisable to give preference to mittens in brown or black shades).
The key points in choosing material for crafts in this case are:
- the quality of the mittens (they should not have holes or abrasions, since such defects will negatively affect the process of creating the craft, as well as the final result of the creative process);
- lack of design and secondary decorations (patterns or decorations on the original material can interfere with joining the parts of the craft, and in some cases look out of place. Before starting the work process, you must remove all decorations, regardless of the method of their attachment).
Leather, suede
It is most convenient to use leather and suede gloves to make jewelry intended for attaching them to the head or clothing. When choosing a material of the type under consideration, it is important to pay attention to the uniformity of the color of the outer surface of the mittens, as well as its integrity.
Otherwise, the craft may turn out to be shapeless or deformed during further use after 2-3 weeks of regular wear.
Rubber
Any rubber gloves are suitable for crafts, regardless of their density and original purpose.
Using medical or household mittens, you can make both unusual Christmas tree decorations and animals, birds, as well as characters from famous anime and cartoons.
Workers
If you have work gloves at home, which in the vast majority of cases are a knitted product with several rows of rubber dots on the inner surface (to minimize slipping when using the mittens for their intended purpose), you can make a cat, a dog, or New Year’s decorations.
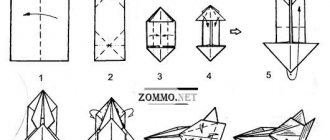
Instructions: How to make a bunny from a glove
We prepare the necessary materials to make a bunny from a glove
To work you will need:
- Glove
- Scissors
- Filler (sintepon, tinsel, cereals, etc.)
- Threads
- Beads
- Markers
DIY bunny
Making a bunny for a puppet theater
We cut off two fingers from the glove - the little finger and the ring finger. Later we will make one piece with a bunny’s paw, the second with a tail.
How to make a bunny
Sew one finger to the glove at the level of the thumb of the glove.
We tie the two middle fingers with a thread.
We have a blank for a finger bunny.
How to make a bunny
Making a head for a bunny with your own hands
The easiest way to make a head is to draw eyes, a nose and a mouth with a felt-tip pen.
Did you draw it? You've got a cute little bunny for finger play.
You can make beady eyes for the bunny, a beady nose, and stitch the mouth with red thread.
Filler for a bunny from a glove
The intended purpose of the toy depends on what you fill the bunny with.
To make a soft bunny, fill it with padding polyester.
If you want a fun, rustling toy, fill the bunny with rain, tinsel, and cellophane.
To train children's fine motor skills, fill the bunny with beads, peas or beans.
Hares made from construction gloves
Unusual bunnies made from construction gloves are a great idea for creativity with children. Shall we try?
My daughter and I love making soft toys with our own hands. Since we don’t have any special skills in this matter, but we really wanted to sew, we chose the simplest option - we sewed bunnies from ordinary work gloves.
These gloves can be found in every home. Yes, and they cost pennies.
This construction glove will become a hare
What you need for gloved hares: two gloves (for one hare), filler (sintepon, cotton wool, scraps of rags, dry grass), buttons for the eyes and nose, black and white threads (white for sewing the bunny, black for embroidering the face), a piece of fabric for clothes (you don’t have to make an outfit, but it’s more beautiful with it).
Sewing a hare is very easy and simple. Cut off the thumb, middle and ring fingers from a construction glove. Carefully sew up the cut areas with white thread. Don’t throw away the cut off fingers yourself – these will be the bunny’s paws!
Cut off all fingers except the index and little fingers
Then turn the gloves inside out. We fill it with filler and tie it at the bottom with a strong thread.
Stuff the glove with filler and sew at the bottom
We do the same with the second glove.
Sew the gloves together. So that your fingers point in different directions.
Sew two gloves
One glove will become the bunny's head. We sew buttons instead of eyes, and embroider the muzzle (mouth and eyebrows) with black threads.
Embroider the face of a hare
Then we fill the cut fingers with filler and sew them up along the edge. These will be the front legs (handles).
Making paws out of toes
We sew them to the body.
Then all that remains is to sew clothes for the bunny. So that he becomes completely handsome. I made a shirt with a collar and buttons. It can be removed. The role of the collar is played by the ribbon.
Bunny boy
To keep the bunny from getting bored, the youngest daughter made a second hare - a girl. They sewed an elegant dress for her with a bow at the neck.
Bunny girl
We got a couple of bunnies.
A pair of friendly bunnies
Even if you have never tried sewing toys, try it! Sewing such soft toys with your own hands is not at all difficult for beginners. By the way, you can also sew bunnies from ordinary gloves, slightly tattered or from which a child has outgrown. If the glove is torn, it’s not a problem. You can sew on a decorative patch to make the toy more original.
Our glove bunnies
Our hares will go to live in St. Petersburg, to live with our eldest daughter. She is just visiting us, and she really liked our bunnies.
Did you like the bunnies made from construction gloves?
Did you sew these?
Related posts:
Steffi doll - the German equivalent of Barbie
Interview with Olga Mayorova, clothing designer for Barbie
Children's tent city at home
What to give a 6 year old boy? Binoculars for hunting!
Children's construction set Salt electric robot
Paper napkin dolls
© Galina Shefer, website Grafomanim for two, 2015. Copying text and photos is possible only with the written permission of the author. All rights reserved.
The best way to say “thank you” to the author is to share a link to this post on social networks and/or write a comment!
Post Views: 2,662
It's in your hands
Do-it-yourself toys made from gloves is a completely new type of needlework, which stands alongside crafts made from socks, nylon tights and other things. Their beauty is that now you don’t need to throw away your old favorite thing - you can turn it into something useful for you and your child.
To make, for example, a funny little hare from a glove, you will need the following materials:
- A pair of bright children's gloves;
- Threads;
- Filler;
- Comfortable needle;
- Scissors;
- Doll eyes and other toy decoration items.
- Place the gloves in front of you, fingers down, pinkies facing out.
- Cut out the middle and ring fingers on both gloves, along with a piece of adjacent fabric to form a protruding wedge - you won't need these parts.
- Cut the remaining parts of the glove in half so that you are left with one piece with the thumb, index finger and part of the fabric up to the wrist, and the other with the little finger and part of the fabric up to the wrist.
- Cut off the excess fabric and sew the bases of the little fingers to each other - this is the head with the ears.
- Now sew together the parts with the thumb and forefinger - these are parts of the hare’s body with the neck, arms and legs.
- Stuff the body tightly with filler, also stuff the ears and sew the parts to each other.
For the product, it is better to choose fluffy gloves made of mohair or other fleecy material. Then the toy will be soft, and uneven seams will be hidden by pile.
Now your bunny is ready! Add doll eyes or button eyes to it, decorate its ears or neck with an elegant bow made of ribbon, attach antennae made of wire - give free rein to your imagination to make your glove toy look better than any store-bought one!
How to make a toy from a glove
For work you will need: thread with a needle, scissors, stuffing for toys (holofiber is ideal), buttons.
Carefully, as in the picture, cut off parts of the gloves and sew them in place. Sew the finger part as a paw as shown below:
Don't forget to sew on the tail! In the place where the glove meets the wrist elastic, sew and tighten the thread, highlighting the head in this way. Fill the toy with holofiber. Why them? Because this kind of toy filler is hypoallergenic and will perfectly fill the cavity of the toy, because that’s what it’s designed for. After you stuff the cat with holofiber, sew up the glove.
Sew the corners of the elastic to highlight the ears.
And if you have another single glove, you can make a sleeveless vest for the cat. To do this, simply cut off all the fingers and make slits on the sides of the glove.
Despite the diversity of companies producing children's products, the doll industry has recently become noticeably impoverished - for some reason the toys in all stores are the same. Their quality also leaves much to be desired.
Here the thought involuntarily appears that the best toy for a child will be the one that you make for him yourself from scrap materials. For example, old gloves.
Kitty
A glove toy made according to these recommendations will be an excellent gift for family and friends for the New Year holidays. The kitten turns out to be very warm, soft and affectionate, so it will certainly cheer up the lucky person who will become the owner of such a unique creation. It is interesting and useful to make such toys together with children - they will be happy to participate in the process of creating such an affectionate and kind gift.
Tools and materials
- knitted glove with a pattern - 1 pc.
- stationery eraser - 1 pc.
- eye blank - 2 pcs.
- antennae preparation - 1 pc.
- double-sided tape - 1 pc.
Step-by-step making of a kitten from a glove
- We turn the glove inside out, while straightening the middle and index fingers of the knitted item. For ease of operation, it is better not to turn out the remaining fingers, but to leave them inside the gloves.
- Now we wrap the knitted elastic band of the product up. We make one bend, then a second and a third. The result will be a blank for a kitten with a future tail, ears and paws.
- We straighten and distribute the fingers remaining inside the glove, forming a tail and paws from them so that the cat turns out smooth and neat.
- Using a rubber band we secure the body and cat's paws.
- We attach the blank antennae and eyes to the right place using double-sided tape.
Video instruction
This video covers in detail how to make a handmade glove craft in the form of a small, affectionate kitten.
Hare from a glove. Hares made from construction gloves. Instructions: How to make a bunny from a glove
How to make a dog out of gloves
1. We will need a pair of gloves
2. Take one glove. Cut the tail and 2 front legs along the lines shown below.
3. Stuff the resulting parts with padding polyester.
4. Sew on the front legs.
5. Sew on the tail.
6. Take the second glove. Cut as shown in the photo below: two fingers in the middle and a thumb.
7. Fold the glove so that the hole from the cut off thumb is in the middle. Sew along the dotted line.
8. Cut just below the seam.
9. Stuff the future head through the hole that used to be the two middle fingers.
10. Sew the hole. Bend the ears down and sew them to the head with a couple of stitches or glue them.
11. Sew the head to the body.
12. Make eyes and nose from buttons. Sew in a circle around one of the eyes to create a spot. The navel can also be stitched with thread.
How to make a hare from gloves.
The hare is made in the same way. Follow the instructions in the photo.
Other Master classes from the section
We invite you to sew such a cute angel for your children's room. Let it guard your baby's sleep.
1. HOW TO MAKE AN ORIGINAL TOY FROM AN OLD GLOVE. BASIC PRINCIPLES
According to child psychologists, children's games with bright soft toys perfectly develop fine motor skills of the fingers, tactile sensations and imagination of a small child. It is known that many children from 1 to 3 years old, with whom their parents often played various finger role-playing games using knitted or sewn soft toys, began to speak and read earlier than their peers.
Such educational games simulate interesting situations in which the toy characters of the scenes find themselves and force the child to fantasize. Be sure to communicate with your child while playing, imitate communication on behalf of the toy participants in the scenes, try to change intonation, speak in different voices, and give each character a character.
You don't have to buy all these heroes at the toy store. If you know how to knit, you can knit soft toys with your own hands using a hook or knitting needles. If you don’t know how to knit, it doesn’t matter! You can make wonderful toys from old socks or sew them from unwanted gloves. It is enough to know how to use a needle and thread to sew together the parts of the product and sew up the holes through which the glove or sock is stuffed with padding polyester (padding polyester).
In this material we will tell you how to easily and quickly make an original soft toy out of any unnecessary glove. If your child is already 5-6 years old, be sure to involve him in creative work - the baby will help you fill the glove with filler.
So, after a good rummage in the linen closet, we find old knitted or sewn gloves. They will serve as a shell for our future teddy bear. You can sew individual parts from cut gloves in different ways. The photo shows different options for joining parts of a soft toy using a needle and thread: What tools and materials will we need for the work:
√
2 soft gloves,
√
holofiber as a filler,
√
decorative elements for decoration and detailing - ribbons, lace,
√
threads to match the gloves and multi-colored ones to decorate the bear’s face,
√
scissors,
√
wire and beads (or pebbles).
Stages of work:
We cut the gloves so that the index and thumb make the arms and legs of the teddy bear, and the little fingers make the upper area of the head and ears. The rest of the head, neck and body of the stuffed toy will be made from the middle part of the glove;
Sewing the cut gloves to form the body so that the pattern matches. We make the head and ears of the toy by sewing the little fingers of the gloves;
We evenly fill the shell with holofiber, add beads (you can use a Kinder Surprise in the shell, then you get a rattle. We install wire in the area of the paws so that the bear can change poses and the position of its limbs;
We sew the parts together and lightly tighten them with thread along the neck line;
All that remains is to design the face. Sew on the hairs (you can fluff brown yarn). We make a collar from lace and sew on a ribbon. We embroider eyes and mouth. Sew all the details for decoration very tightly if the toy is intended for a small child!
2. HOW TO MAKE A CUTE FOX OUT OF A GLOVE WITH YOUR OWN HANDS
With this master class you will learn how to correctly cut out parts, stuff them with padding polyester and sew individual parts of the glove to form a solid soft toy for a child:
3. HOW TO MAKE CUTE DOGS OR BUNNY OUT OF GLOVES
This master class will help even a novice needlewoman sew an original toy with her own hands. Everything is very simple - cut off the thumb, middle and ring fingers from the glove, and then stuff the future toy with filler and sew everything together according to the instructions, which you will find at the link:
4. VIDEO LESSONS ON MAKING SOFT TOYS FROM OLD GLOVES
If you have a couple of unnecessary gloves lying around, then you can make two wonderful squirrels out of them with your own hands. This video master class describes in detail how to make markings for cutting on gloves, how to turn them inside out, how to sew individual cut parts and stuff the workpiece with padding polyester. Finally, we decorate the soft toys with homemade decorations.
If your house is full of old things: scarves, gloves, mittens, children's terry socks, then it's time to clean up the mess and throw away everything unnecessary, or... do some handicrafts and turn unnecessary trash into interesting exclusive toys and decorations. Did you smile? And even with a shadow of skepticism? But in vain. From old things you can make not just a beautiful, but also a living toy that will breathe, give warmth, and fill the house with a special, cozy aura. A house filled with such things will truly be yours.
Two different gloves, with the help of a few beads, a needle, thread and centipon, can turn into a cheerful family of hares in an hour. The child will spend hours building a house for them, planting a plasticine garden, cabbage and carrots, because these are his hares.
Do you want the same beauties? Then call the baby, look for two unnecessary mittens and let's get to work.
The main thing is that these are five-finger gloves.
We cut one glove so that there are two fingers left on one side (No. 1), and three on the other (No. 2). But from the second glove we carefully cut off all the fingers.
The first glove is the ears and body of the future bunny, and the fingers from the second will act as paws.
We take the first glove, part No. 1, and use beads to sew on the eyes and nose below the ears. Beads should be selected so that they create a clear contrast between the coloring of the glove and their own color, and do not merge. You also cannot make a dark red bunny with black or gray eyes or sew light blue beads onto pink fabric. In the first case, the picture will merge, and in the second it will be very vulgar. Try embroidering a red color with yellow eyes and a brown nose, and a pink color with orange beads. But the blue color of the beads goes well with the gray body of the bunny.
We do the same with part No. 2. Only here you should remember that the third finger is a ready-made paw.
To part No. 1 we sew two finger paws on the side, filling them with cotton wool or centipon first. You can combine business with pleasure and fill the bunny’s body with flavored and medicinal herbs. In this case, your toy will always smell like summer and forest.
Shredded shreds are also a good filler. If you sprinkle them with essential oils, they will not only act as toys, but will also serve as excellent air fresheners for the room, since the fabric retains the aromas for a long time.
Have you decided on the filler and the role that the homemade products will play?
Then go ahead: fill the body.
The ears can be modeled so that one is tightly filled and the other hangs down a little. We stuff the body tightly so that the animal will then retain its balance well and not fall.
And now the main thing: you need to finish the product and carefully decorate the bottom of the work. To do this, we hem the bottom above the cuff with a piece of fabric or simply make a tight roll from the remainder of the glove and cover the filler with it. The roller then also needs to be secured with thread.
Well, what about without a tail? It can be made from beads or a piece of centipon or fur.
The basis of the work is ready. Then it’s up to the master’s imagination. A ribbon on the ear will help determine where the girl is and where the boy is. Using threads and beads you can decorate your new friends. It depends on what you want your pets to be like.
My bunnies were lucky because the gloves already had decorations and flowers on them. Thanks to this, the hare turned out to be a fashionista and a beauty. But my dad hare will be a thrifty and caring provider.
Once upon a time there were gloves, knitted, gray with stripes. They lived for a long time, and for more than a year they were bored in a box with nothing to do. And they had a friend - a pink glove. Her sister got lost on a walk and since then the glove has been left without work. And then Inspiration came and the old gloves got a new life - they turned into toy bunnies!
And here are the instructions for homemade toys from gloves 1. We prepare the gloves as in the photo - already at this stage you can see how two bunnies are made from one glove, and paws for them from the other.
2. Here is our “sketch” of the future bunny.
3. We sew up the sides and make the “filling”. You can fill the bunnies with padding polyester, or with dry aromatic herbs, but I made my own insides from finely chopped shreds left over from past crafts.
4. The nose and eyes can be made from beads or buttons; in my hares they are simply embroidered with regular threads. The pink bunny has an embroidered flower - this is a native decoration of the glove.
5. If you sew the bottom above the cuff and add volume to the bunny’s butt, he will sit. If the cuff is rolled up, the bunny will be standing up - then the bottom should be carefully hemmed with a round patchwork or twisted into a tight roll from the leftovers and simply tucked in.
Handmade toys have a special warmth. And homemade toys from gloves, socks or other household items give them a second life, and for a child it looks like a real miracle when one thing turns into another!
Hello, regular blog readers!
I hasten to tell you about what a wonderful lesson my student Anya Atryakhina
for your classmates. Anya is a passionate and creative person. And how many interesting things her hands can do, how many excellent creative ideas her head contains! And how wonderfully she draws!
Yesterday Anyuta gave a real step-by-step master class, where she showed how you can make a cute bunny out of an ordinary old children's glove.
Handmade glove toys are a new type of handicraft. The beauty of them is that now you don’t need to throw away your old favorite thing. You can make something useful out of it.
Anya showed the guys a way in which they don’t need to cut anything off the glove. She patiently explained and showed her classmates each step. For the guys who asked for help, Anna helped, suggested, or explained again.
At the very beginning, the second graders “hid” their thumb. Then the two fingers that are in the middle must be filled with cotton wool. These are the future bunny ears, they should stand up.
Then cotton wool is added to the glove (this is the head and body of the bunny). Two fingers - future paws are pulled back and tied with a ribbon. This is how the hare develops a head and body. The edge of the glove is sewn up.
I was glad that I only helped most of the second graders tie a knot on a thread. Some guys held a needle for the first time in their lives, but they tried very hard! Well done! And there were those who masterfully sewed up the hem, and even helped their comrades!
At the end of the work, the children only had to attach the eyes. Some guys sewed button eyes, and some glued on “live eyes”.
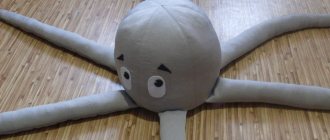
Crafts from old rubber gloves with your own hands. Master classes step by step
You can make simple crafts with your own hands from scrap materials with your child, regardless of his age. For example, with the help of knitted, rubber, leather or knitted gloves, even a novice craftsman can design not only primitive New Year's decorations, but also a doll, animals or representatives of ocean fauna (for example, octopuses).
To do this, it is enough to have a basic set of necessary tools and materials, as well as strictly follow certain instructions.
DIY glove toys
Many parents will agree that children constantly lose gloves or mittens. When my daughter lost four gloves over several seasons, from different pairs, I started thinking about what to do with the remaining gloves. And this is what I came up with: I decided to make cute soft toys from gloves with my own hands.
Materials and tools for making soft toys:
- gloves, maybe mittens
- filling: padding polyester, cotton wool or scraps of fabric.
- needles
- threads
- buttons for creating eyes
- ribbons
- pompoms
- yarn braids.
Manufacturing process:
- Take a glove, fold the thumb and two middle fingers inside, which are not needed for the ears, and sew up the resulting holes using a needle and thread.
— Fill the inside of the product with padding polyester, cotton wool or scraps of fabric. If you like, leave the “ears” empty so that they bend and hang freely.
— Sew up the main opening of the glove or mitten. The base of the toy is ready!
- Create a face for the toy. To do this, take buttons and sew them on, creating eyes. Then sew on the pompom, creating a nose. Cut a small piece of ribbon and sew it to the toy, creating a mouth.
- All! The soft toy cat is ready! Use the same principle to make other toys.
Similar:
- Next Christmas tree figures of Santa Clauses
- Previous Pictures from footprints
Finger theater - DIY glove bunnies
Useful tips
Watch the video if you are too lazy to read
Watch the video if you are too lazy to read
How to entertain a child? When was the last time your child was in a puppet theater? Let us make a small finger theater today. These will be little cheerful bunnies who will show your child and his friends a wonderful performance invented by you personally. By the way, the child himself can help you make these bunnies and, of course, take part in the performance, and maybe become its co-author.
Such joint creativity will undoubtedly improve the emotional contact between you and your child, and will also contribute to the development of such functions as attention, imagination, speech, and participation in the making of a finger theater and in the performance itself will help improve the coordination and fine motor skills of your child’s hands.
We will need:
- knitted glove;
- a piece of faux fur;
- cotton buds;
- beads;
- lace;
- ribbon;
- needle;
- thread;
- scissors;
- lighter.
Let's start with making the cheeks
1.
Take a cotton swab and carefully remove the cotton from it.
2.
Using scissors, cut off the tip of the cotton wool so that you get a small cotton swab.
You need to make two of these tampons.
3.
Let's take a knitted glove, a needle and thread, and sew both of our cheeks to the top of the index finger of our glove.
We should end up with something like this.
Now let's make the nose
1.
Take a small white bead and string it onto a thread.
2.
We sew this bead to the glove between our cheeks.
Now let's make eyes
1.
We string a black bead onto a thread. You need to prepare two such beads.
2.
Sew these beads over the bunny’s cheeks.
It's time to make the ears
1.
Take the lace and fold it into a loop.
2.
We repeat the same loop again.
3.
We cut off the rest of the lace with scissors.
4.
To prevent the edges of the lace from fraying over time, we burn them with a lighter.
5.
We sew our ears at the bottom.
We get something like this.
6.
We sew our ears to the top of the finger on our glove.
Now the hairstyle
1.
Cut out a small piece of faux fur.
2.
Sew it to the top of the glove finger right under the ears.
Making a bow
1.
Take the ribbon and fold it into a bow shape.
2.
We treat the ends of the ribbon with a lighter so that they do not fray.
3.
We sew a bow at the junction of the ears with the hairstyle of our bunny.
Here you go. Our finger puppet is almost ready.
All that's left is to make the tail
1.
From the same fur as for the hairstyle, cut out another small piece and sew it on the opposite side of the glove.
That's all! Our bunny finger is ready!
Now you can make a pair for our hero in exactly the same way, replacing, for example, the color of the bow.
See how simple the whole process of making this finger puppet looks in the video.
Now you can make yourself comfortable, invite spectators and organize a puppet show, invented and made from start to finish with your own hands and imagination.