Probably, many mothers of children have faced the need to sew some kind of educational toy for kindergarten. For older children, they are usually asked to sew educational books, blocks or rugs, and for very young children - toys that help children develop physically - orthopedic tracks, rugs, as well as all kinds of toys with which you can perform simple physical exercises.
One of these toys aimed at developing children’s coordination of movements is the “octopus”. Children happily jump over its tentacles, raise and lower them with their hands, while sitting on the floor.
Even a handicraft mother who is not very experienced in making toys can sew such an inhabitant of the seas. The materials needed for it are simple and affordable, and it is sewn quite simply and quickly.
Very simple
Even the smallest craftsman can easily make this toy. Give your baby a handkerchief or a square piece of fabric, slightly cut on the sides (as in the photo), and a small ball made of anything: fabric, foam rubber, crumpled newspaper, a ball, and so on. Let the child throw a rag over the ball and tie a ribbon around the octopus’ “neck”. Draw the eyes or glue them together.
Octopus soft toy
Even a child of five to eight years old can make this toy with his own hands, if, of course, you show him how to do it and give him the material. Moreover, a soft toy octopus is recognizable in any form, if it has a head with eyes and as many legs as desired.
Octopus
We will need:
- a square piece of plain fabric, preferably one so that its raw edges do not fray: fleece, thin felt, drape, and so on;
- a small ball, a ball, a ball of unnecessary thread or a piece of foam rubber to fill the head;
- scissors;
- beautiful thin braid;
- "eyes";
- small scarf made of colored fabric.
Sequence of work
- Determine the middle of the square flap and place a ball or a skein of waste thread in this place (the “brain” or what will become the insides of the head). Pinch the ends together with chalk or a felt-tip pen.
- Unfold the fabric, straighten it and with your own hands cut the fringe on all four sides, 6 strips on each side, without crossing the “neck” line. Try to make them the same width. You should end up with a small square with brushes.
- Put the “brains” back into the octopus and tighten the “neck” with a strong thread. You can tie a scarf or bow tie.
- Use scissors to straighten the fringe.
- Make tight braids, tying them with a bow at the end.
- Glue or sew on the “eyes”, draw a smile with a felt-tip pen and tie a scarf.
From threads
You can make the same charming octopus with pigtails with your own hands from thick threads. It is better to use synthetic yarn or cotton with synthetics. It holds its shape and volume perfectly. The technique for making the toy is shown in the video.
A few additional tips
- Instead of a lump of newspaper, you can use a plasticine ball or Kinder Surprise packaging.
- To prevent the threads from coming apart on the octopus’s head, you can lightly grease the filler with PVA glue.
- To accurately calculate the number of legs, you can do a simple multiplication of 15 cm (length of the octopus) x 3 (number of threads in a strand) x 3 (number of strands in a braid) x 8 (number of braids) = 1080 cm. This means we take a bundle of 9 threads 120 cm and fold it in half THREE times.
Very simple
Even the smallest craftsman can easily make this toy with his own hands. Give your baby a handkerchief or a square piece of fabric, slightly cut on the sides (as in the photo), and a small ball made of anything: fabric, foam rubber, crumpled newspaper, ball, etc. Let the child throw a rag over the ball and tie a ribbon around the octopus’ “neck”. Draw the eyes with your own hands or glue them together.
Sock octopus
Required:
- two old socks, maybe different ones;
- any filler;
- wooden knitting needle;
- scissors;
- threads, needle;
- felt-tip pen.
Master class on making an octopus from socks
- Take two socks and draw lines for future cuts on them. From the toe to the middle of the foot, one of the socks will represent the head of the toy. From the heel to the elastic, we divide each sock into 4 parts lengthwise. These will be the tentacles.
- We cut out the details of the toy.
- We sew the legs, leaving them unstitched on one side, and turn them inside out.
- Using a wooden knitting needle, fill all the parts with padding polyester. Carefully sew up all the holes with your own hands.
- We sew the tentacles to the head and tighten the “neck”. Let's draw a face. The toy is ready.
From a glove
This version of the sea mollusk involves both 4 legs and 8. It all depends on how many gloves you don’t mind using in your work. Moreover, the gloves do not have to be the same.
- Hide one thumb inside and carefully sew up the mark from it. Wrap the elastic band inside. Fill the remaining 4 fingers and the glove with filler and sew the top closed. To be more convincing, you can pull the glove a little at the base of the fingers. Sew button eyes and mark a mouth. The four-legged octopus is ready.
- A toy made from two gloves is a little more complicated to make with your own hands. We also remove one thumb inside and disguise its presence. We make an incision at the base of the fingers in a fingerless glove and insert another one inside it, leaving 4 fingers “outside”. We fill all 8 fingers with padding polyester, stitch them at the base, while simultaneously closing the slot. We fill the double glove with filler, first tucking the elastic. We sew up and shape the face.
Doctor Octopus
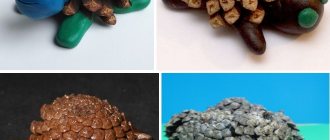
Doctor Otto Gunther Octavius, a super-villain, star of comics, cartoons and television series, has recently become our children's favorite toy. The doctor has his own biography, his personal and public life. Making it yourself is difficult, but possible. We offer several options.
- A Lego villain doctor, like the one in the photo.
- Doctor Octopus from an ordinary doll with four tentacles glued to the back from scrap materials: polymer clay, boiler tubes, wire wrapped in threads, etc.
Source: toysew.ru
tehnologi.su
Sock octopus
Required:
- two old socks, maybe different ones;
- any filler;
- wooden knitting needle;
- scissors;
- threads, needle;
- felt-tip pen.
Master class on making an octopus from socks
- Take two socks and draw lines for future cuts on them. From the toe to the middle of the foot, one of the socks will represent the head of the toy. From the heel to the elastic, we divide each sock into 4 parts lengthwise. These will be the tentacles.
- We cut out the details of the toy.
- We sew the legs, leaving them unstitched on one side, and turn them inside out.
- Using a wooden knitting needle, fill all the parts with padding polyester. Carefully sew up all the holes with your own hands.
- We sew the tentacles to the head and tighten the “neck”. Let's draw a face. The toy is ready.
Source
Doctor Octopus
Doctor Otto Gunther Octavius, a supervillain, star of comics, cartoons and television series, has recently become our children's favorite toy. The doctor has his own biography, his personal and public life. It's difficult to do, but possible. We offer several options.
- A Lego villain doctor, like the one in the photo.
- Doctor Octopus from an ordinary doll with four tentacles glued to the back from scrap materials: polymer clay, boiler tubes, wire wrapped in threads, etc.
Master class “Octopus” for children 4–5 years old
Elena Lavrentyeva
Master class “Octopus” for children 4–5 years old
,Octopus,
for children 4-5 years old and their parents.
For the sea background we will need:
Sheet A 3, two plastic plates, two plastic or paper cups.
Blue and green gouache, hand napkins.
Let's turn the drawing process into a game:
Pour blue gouache into one plate.
To another green one. We hold the glass by the bottom, dip it in a plate of paint and put prints on the sheet.
Next, randomly cut out an octopus from white paper, or take a ready-made template.
Paint the template with pink paint.
We cut out starfish at random, or take ready-made templates.
We paint one star with pink plasticine, the other with orange,
Leave small pieces of plasticine for decoration. From the remaining pieces of plasticine
Making spots on the stars.
Glue the octopus and stars onto the background.
Making octopus eyes from plasticine
And we decorate the tentacles with sequins and glue them with PVA glue.
You can add more starfish.
Children's master class using waste material “Octopus” Program tasks: Teach children to make crafts from waste material, wind a strip of paper onto a pencil to give a curl, stick it on.
Game activity for children of middle preschool age “Air Octopus” Purpose. To form the foundations of communicative competence in a situation that promotes the development of spoken language and the manifestation of cognitive skills.
Summary of a lesson on paper construction for children of senior preschool age “Octopus” Goal: Create a three-dimensional “Octopus” craft from strips of paper. Objectives: To consolidate the ability to cut a workpiece along the intended lines. Be able to. Paper construction “Octopus” Do you miss the sea or travel? While we are all in self-isolation and can only dream of a vacation, I suggest doing it with your children. Master class on designing based on the CD “Cheerful Octopus” for joint creativity of children and parents Master class: Designing non-traditional materials using the non-traditional technique “Cheerful Octopus” Author: Yulia Vladimirovna Fedoseeva. Master class “Non-traditional equipment for a sports corner - octopus” We have a wonderful neighbor in our group! A cheerful octopus has settled in our sports corner! - Who is this? - she asked me.
From a glove
This version of the sea mollusk involves both 4 legs and 8. It all depends on how many gloves you don’t mind using in your work. Moreover, the gloves do not have to be the same.
- Hide one thumb inside and carefully sew up the mark from it. Wrap the elastic band inside. Fill the remaining 4 fingers and the glove with filler and sew the top closed. To be more convincing, you can pull the glove a little at the base of the fingers. Sew button eyes and mark a mouth. The four-legged octopus is ready.
- The toy made from two gloves is a little more complicated. We also remove one thumb inside and mask its presence. We make an incision at the base of the fingers in a fingerless glove and insert another one inside it, leaving 4 fingers “outside”. We fill all 8 fingers with padding polyester, stitch them at the base, while simultaneously closing the slot. We fill the double glove with filler, first tucking the elastic. We sew up and shape the face.
INTERESTING: It’s easy to sew a brownie from burlap
Octopus
An octopus toy can be no less cute and funny, which can be sewn from a small piece of material filled with foam rubber. To make a funny octopus we will need:
- Fleece for the body, size 40x40cm;
- Bright colored tape 2m;
- Foam ball.
Lay out the fleece on a flat surface and place the ball in the center. We crimp it with a cloth, determining the future position of the head. Next, on a piece of fleece, from all corners, cut off a 10-12cm square. After this, we make 6 cuts on each side of the tenderloin, leaving 2 cm to the octopus’s head. Let's start assembling the toy. First of all, we fix the base. To do this, place the ball in its designated place in the center of the workpiece and wrap it tightly with thread. We braid the cuts and secure the edges with pieces of tape. We embroider the eyes and mouth with colored threads. If desired, you can complement the toy with a bright bondana made of fleece or any other fabric. To do this, take a piece of 20x20 cm and, wrapping the octopus’s head, fix the fabric from below. The entire process of making a toy octopus is shown step by step in the figure below:
To develop fine motor skills, you can sew small bags of pearl barley, buckwheat or rice into the tips of the toys' paws. As you can see, it turns out to be a very cute octopus! *** As you can see, making a soft toy with your own hands is not so difficult if you use a little imagination and spend a little time. Such a gentle friend, for sure. Your baby will really like it!
See also:
- Ribbon embroidery: rose, lilac and buttercup >
DIY octopus soft toy, patterns, master class
Even a child of five to eight years old can make this toy with his own hands, if, of course, you show him how to do it and give him the material. Moreover, a soft toy octopus is recognizable in any form, if it has a head with eyes and as many legs as desired.
Octopus
We will need:
- a square piece of plain fabric, preferably one so that its raw edges do not fray: fleece, thin felt, drape, and so on;
- a small ball, a ball, a ball of unnecessary thread or a piece of foam rubber to fill the head;
- scissors;
- beautiful thin braid;
- "eyes";
- small scarf made of colored fabric.
Sequence of work
- Determine the middle of the square flap and place a ball or a skein of waste thread in this place (the “brain” or what will become the insides of the head). Pinch the ends together with chalk or a felt-tip pen.
- Unfold the fabric, straighten it and cut the fringe on all four sides, 6 strips on each side, without crossing the “neck” line. Try to make them the same width. You should end up with a small square with brushes.
- Put the “brains” back into the octopus and tighten the “neck” with a strong thread. You can tie a scarf or bow tie.
- Use scissors to straighten the fringe.
- Make tight braids, tying them with a bow at the end.
- Glue or sew on the “eyes”, draw a smile with a felt-tip pen and tie a scarf.
From threads
The same charming octopus with pigtails can be made from thick threads. It is better to use synthetic yarn or cotton with synthetics. It holds its shape and volume perfectly. The technique for making the toy is shown in the video.
A few additional tips
- Instead of a lump of newspaper, you can use a plasticine ball or Kinder Surprise packaging.
- To prevent the threads from coming apart on the octopus’s head, you can lightly grease the filler with PVA glue.
- To accurately calculate the number of legs, you can do a simple multiplication of 15 cm (length of the octopus) x 3 (number of threads in a strand) x 3 (number of strands in a braid) x 8 (number of braids) = 1080 cm. This means we take a bundle of 9 threads 120 cm and fold it in half three times.
Very simple
Even the smallest craftsman can easily make this toy. Give your baby a handkerchief or a square piece of fabric, slightly cut on the sides (as in the photo), and a small ball made of anything: fabric, foam rubber, crumpled newspaper, a ball, and so on. Let the child throw a rag over the ball and tie a ribbon around the octopus’ “neck”. Draw the eyes or glue them together.
Sock octopus
Required:
- two old socks, maybe different ones;
- any filler;
- wooden knitting needle;
- scissors;
- threads, needle;
- felt-tip pen.
Master class on making an octopus from socks
- Take two socks and draw lines for future cuts on them. From the toe to the middle of the foot, one of the socks will represent the head of the toy. From the heel to the elastic, we divide each sock into 4 parts lengthwise. These will be the tentacles.
- We cut out the details of the toy.
- We sew the legs, leaving them unstitched on one side, and turn them inside out.
- Using a wooden knitting needle, fill all the parts with padding polyester. Carefully sew up all the holes.
- We sew the tentacles to the head and tighten the “neck”. Let's draw a face. The toy is ready.
From a glove
This version of the sea mollusk involves both 4 legs and 8. It all depends on how many gloves you don’t mind using in your work. Moreover, the gloves do not have to be the same.
- Hide one thumb inside and carefully sew up the mark from it. Wrap the elastic band inside. Fill the remaining 4 fingers and the glove with filler and sew the top closed. To be more convincing, you can pull the glove a little at the base of the fingers. Sew button eyes and mark a mouth. The four-legged octopus is ready.
- The toy made from two gloves is a little more complicated. We also remove one thumb inside and mask its presence. We make an incision at the base of the fingers in a fingerless glove and insert another one inside it, leaving 4 fingers “outside”. We fill all 8 fingers with padding polyester, stitch them at the base, while simultaneously closing the slot. We fill the double glove with filler, first tucking the elastic. We sew up and shape the face.
Doctor Octopus
Doctor Otto Gunther Octavius, a supervillain, star of comics, cartoons and television series, has recently become our children's favorite toy. The doctor has his own biography, his personal and public life. It's difficult to do, but possible. We offer several options.
- A Lego villain doctor, like the one in the photo.
- Doctor Octopus from an ordinary doll with four tentacles glued to the back from scrap materials: polymer clay, boiler tubes, wire wrapped in threads, etc.
www.toysew.ru