What seems natural and understandable to an adult needs to be explained to a child. A striking example of this is the seasons. The easiest way to talk about what features are characteristic of each of them, what changes are taking place in the world around us is to use the example of a handmade craft. As the work progresses, the child will not only learn a lot of new things, but will also go through each “step” from winter to autumn, and will better assimilate the information presented in a playful form.
Cardboard tree with seasons
A layout of such an unusual shape can be used not only as a theme for classes in school or kindergarten, but also as teaching material.
For this craft you will need:
- corrugated cardboard (containers for goods from the store);
- scissors, pencil, ruler;
- PVA glue and water, napkins;
- acrylic paints and brushes for them;
- felt decor.
You can make decorative elements with your own hands or buy ready-made animal figurines, flowers, and foliage at a craft store.
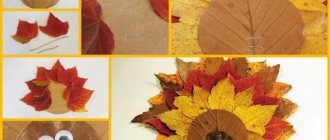
Let's start creating the base of the tree. We first cut out the template from newspaper, then transfer it to cardboard and cut it out again.
On the parts we make cuts up to the marks - on one from the bottom to the middle, on the second from the top to the middle. We “put” the elements on top of each other.
Now you need to install the tree on a round base. To do this, we bend the “legs”, remove the corrugated part of the cardboard, and glue the bent part to the round blank, the base of the “Seasons” craft.
You can start finishing the wood. To do this you will need napkins, water and PVA glue. We dilute the glue in a large container with water at the rate of 1*1, moisten napkins in the solution and use them to cover the base with your own hands on all sides, including the stand.
Using acrylic paints we paint the seasons on each side of the craft - winter, spring, summer and autumn.
The last step is decor. As we decorate, we explain to the child what changes are happening in nature, how animals behave, for example, a bear sleeps in winter, birds that have flown south return in the spring, etc.
Step-by-step video tutorial for making the “Seasons” tree:
Work progress:
Making wood .
1. Having chosen the size of the tree, draw the outline of the tree with a pencil .
2. Cut the tree .
Glue the wood to the wall using Titan
according to the instructions. We glue pieces of Velcro to the branches with the “sticky” side.
3. Cut out leaves from felt according to the template and glue small pieces of Velcro to the leaves with the “fluffy” side.
4. We begin the most exciting process - gluing the leaves to the tree .
5. The tree is ready , and in accordance with seasonal changes in nature, we decorate the wall, adding the necessary elements (raindrops, flying birds, etc.)
I wish you creative success!
A miracle tree made of cardboard “Seasons” for developing preschoolers’ knowledge about the seasons. Purpose: to form preschool children’s understanding of knowledge about the changing seasons. Objectives: – To form ideas about the features. Tree “Seasons” I present to your attention the tree “Seasons. To create the tree, I used available materials: a cardboard box, a kinder. Didactic manual for kindergarten “Tree “Seasons” Didactic manual for kindergarten. Tree “Seasons” Author: Svetlana Anatolyevna Lysenko, teacher, Zamishevsky Children’s Preschool Educational Institution. Master class “Tree “Seasons”” Genze Tatyana Konstantinovna Master class “Tree “Seasons” I bring to your attention the model “Seasons” that I made for. Master class “Wall tree “Seasons” using papier-mâché technique” Our group was renovated and had to be decorated again. I, like other teachers, want the group to be beautiful and cozy. Very. Master class on making the model “Seasons” Tatyana Romanova Master class on making the model “Seasons” To study and consolidate children’s orientation in the seasons, I suggest. Master class on making a wall teaching aid “Tree: Seasons” I bring to your attention a master class on making a teaching aid “Tree: Seasons”. Age: from 2 years. Goal: formation of ideas. Children's creative project in the middle group of the kindergarten “Seasons - Autumn” Appendix to the presentation “Seasons - Autumn” Purpose: to clarify and consolidate children’s knowledge about seasonal changes in nature and people’s work, to clarify.
Cylinder with seasons
Such a figurine, hollow inside, with openwork walls, can be used both as visual material in the classroom, for activities in kindergarten, and as a lampshade for a low-power lamp in a child’s room.
The craft is made from thick white cardboard. First you need to prepare the base. We cut out the workpiece - an oblong rectangle and divide it into 4 equal parts, drawing their boundaries with a pencil. In addition to the base, you need to prepare your own apple, birch, rowan and oak trees.
In each of the 4 parts we cut out “windows” - into them we will paste trees with signs of spring, summer, autumn and winter. We paint the “windows” in a color characteristic of each period.
Then we carefully assemble the cylinder - just glue it together.
Cube
To make an educational cube with the seasons, you need to prepare four applications with thematic pictures and the base - a cube template.
It is better to make applications together with the children, so that as you work, you can talk about each season in detail. We also draw and cut out the details of the appliqués together with the kids.
The base of the cube must be made strong. The best option is a corrugated cardboard box from a store. The size of the appliqués must correspond to the dimensions of one side of the geometric figure.
We paste the finished pictures onto the cube template, assemble it and fix it with glue.
Didactic material from the template
For group developmental activities, you can use a ready-made color template. All you have to do is enlarge and print the proposed version, then glue the blank onto cardboard and cut out the parts along the contour. The assembled layout can be used for classes with preschoolers on speech development and increasing knowledge about the environment.
Remember that the knowledge acquired during the game is absorbed better and can be easily applied in various life situations in the future. Make playing with your child not only interesting, but also useful!
Source
All seasons on one application
Older children can themselves, without the help of adults, but under their guidance, make one voluminous applique, which will reflect all the seasons at once.
Before starting work you need to prepare:
- colored cardboard and paper;
- ruler, pencil;
- eraser and scissors;
- glue for paper.
The base will be a leaf of blue color, symbolizing the sky. The first thing we will stick on it is a trunk with branches cut out of brown paper.
We will start decorating in the fall. In autumn, yellow leaves fall from the trees. We cut them from paper of the appropriate color and paste them in the lower right part of the applique.
Summer means bright green foliage, ripe apples and bright sunshine. We place them above the autumn, also on the right side.
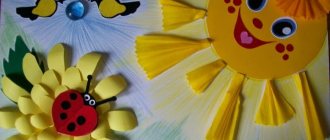
Spring is next. This season will require flowers. We will make them from red paper - we will cut the squares and bend them twice diagonally, straighten them a little and glue the voluminous buds to the tree in its upper left part. Let's add yellow bees with brown stripes on their bodies.
The last stage is winter. We cut out snowdrifts from white paper, “lay” them on the branches and the ground, and white round snowflakes will fill the space between them.
This master class can be used both at home and in a lesson in the lower grades or in classes in a kindergarten group.
Do-it-yourself teaching aid “Tree - Seasons”
Angela Sorokina
Do-it-yourself teaching aid “Tree - Seasons”
“Like ours at the gate
Wonderful!” (K. Chukovsky)
Today is Tree Day at MAAM.
This manual is intended for children of primary and secondary preschool age.
Material used for making the manual:
Goal: developing ideas about the seasons and their signs.
Tasks:
- teach children to determine the seasons by a combination of signs and signs;
- systematize children’s ideas about the seasons;
-develop logical and figurative thinking, memory and visual perception, speech skills;
-foster a positive attitude towards nature.
Usage:
The manual can be used to record the results of observations of changes occurring in trees in different seasons of the year in junior kindergarten groups. This manual is located in a corner of nature. This miracle tree promotes the effective formation of ideas about the seasons in children:
- in winter the tree is blue, there are snowflakes and bullfinches on it, a bird feeder; under the tree there is a hare in the snow, a green spruce.
— in spring it is pink, which symbolizes the time of flowering, it has leaves and flowers, a birdhouse and birds; Dandelions under the tree.
- in summer the tree is covered with green foliage, there are cherry berries, butterflies, birds on it; flowers and strawberries under the tree.
- in autumn the tree is yellow-orange, it has leaves symbolizing leaf fall; under the autumn tree there are fruits that are associated with harvest time.
This manual is used in various areas of child development and the organization of educational games, for example:
— review and discussion of the changes that have occurred;
- writing descriptive stories;
— familiarization with seasonal changes in nature;
- orientation in space: above - below, right - left;
- familiarizing children with color, shape, size; tangible properties of objects (hard, soft, fluffy); materials; development of the ability to highlight the properties of objects, group homogeneous objects according to several characteristics;
— formation of elementary mathematical concepts: distinguishing between the concepts many, one, none; comparison of objects; etc.
-attracting children's attention to the design of the room, the attractiveness of things, the development of an aesthetic attitude towards objects of their everyday environment, the development of imagination and the formation of positive emotions.
Thank you for your attention!
Didactic “Tree “Seasons” Hello, dear colleagues and friends! I bring to your attention the teaching tree “Seasons”. I saw such a benefit on my loved one. Didactic tree “Seasons” for working with preschoolers [Dear colleagues! I bring to your attention the didactic manual “Seasons”, which I prepared and dedicated to the declared year of ecology. Didactic manual "Tree "Seasons" I made a didactic manual - Tree "Seasons". “Like at our gate, a Miracle tree grows. Miracle-miracle-miracle-miracle Wonderful!” “Tree “Seasons”. Didactic manual Didactic manual “Tree “Seasons” Purpose: to form children’s understanding of the seasons. Objectives: Cognitive development. Didactic manual “Tree “Seasons” for preschool children Didactic manual Tree “Seasons” Prepared by: teacher of the highest qualification category Afanasyeva Elena Petrovna Purpose:. Didactic manual “Seasons” Getting to know the seasons causes certain difficulties for students. The main thing is what a 2-3 year old child relies on when meeting him. Didactic manual “Seasons” Hello dear colleagues, friends and guests of my blog! The purpose of this didactic manual: to consolidate children's knowledge about tenses.
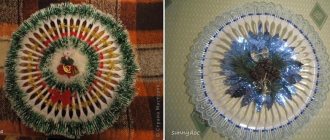
Tactile and didactic panel for kindergarten “Seasons”
Children acquire most skills after the words “I myself.” A panel with pockets, each of which contains hidden signs of a particular season, will help them study and remember the seasons. And you can make it from felt.
The panel will consist of two main parts - a felt tree sewn onto the canvas and 4 pockets at the bottom with images of the seasons. Winter will be symbolized by a snowflake, autumn by a yellow leaf, spring by a flower, summer by a red apple.
We cut out the tree from brown felt and sew it on a machine (it is better to use a zigzag stitch) onto a thick fabric that retains its shape well. As a basis for the panel, you can use several layers of dense fabric, quilted with each other.
Then we prepare the pockets and sew them to the bottom of the panel. It is recommended to treat the edges of the felt pockets with a satin ribbon - if actively used without such “protection” they will stretch very quickly and become ugly. We sew Velcro and small buttons onto the branches - we will attach decor corresponding to the chosen season to them.
We put yellow and burgundy felt leaves in the “autumn” pocket. Winter will be symbolized by snowflakes made from cotton pads and bullfinches made by hand. Summer means lush green foliage and ripe red apples, and spring means flowers.
All decorative elements must have a part with which they can be attached to the panel - Velcro or a loop to put on a button.
To make the parts voluminous, we make them from two layers of felt, laying between them a thin layer of filler - padding polyester, cotton wool or holofiber.
All that remains is to place the figures in the appropriate pockets and invite the children to play an exciting game - “Seasons”.