And build. It is advisable to have nails and a hammer.
If there is “gold”, then you can kick it – build it with bricks. It's not difficult either. Just draw a “headquarters” on paper based on the size of the brick + 1 cm on each side for the mortar. Will be cool.
You can make everything more interesting if you invite friends.
Like we need to find building materials that will be used in the construction of headquarters.
There is probably not a single child in the world who would not want to have their own house located on the branches of trees. This is not just a place for games - it is a small world with its own laws, rules, traditions. If there are several tall, strong trees on your summer cottage, you can come up with a simple project and bring it to life, to the delight of children and adults too. All that remains is to figure out how to build a treehouse with your own hands.
Options for tree structures
There are a lot of options for building tree houses. They are built both for exciting children's games and for solitude with a book under the spreading crown in the summer heat.
There are absolutely no restrictions in style and purpose. This could be a beauty's inaccessible tower, a disguised outpost, an ogre's castle, or a spaceship.
Architecturally, everything is much more modest. There are three popular, practice-tested types of structures:
- Platform design. Powerful branches or the trunk itself act as a load-bearing element, on which the parts of the lower ceiling are fixed with self-tapping anchors. If necessary, the platform is reinforced with oblique beams resting against the tree.
- Frame house on stilts. In fact, this is an independent building, the floor and roof of which are only intersected by one or more trunks. The structure itself does not rest on a tree, therefore, it does not interfere with living and growing. Such a house is installed on piles, the size of which is determined depending on the upcoming load.
- Suspended platform. Suspended from capable branches using ropes, cables or chains. The simplest, but not very reliable and safe method of organization, especially when it comes to a play area for children.
The first and third architectural types directly depend on the load-bearing capacity of the trunk, the size of its branches and the root system. After all, the tree has to perform the function of a foundation: to firmly hold the load not only of the structure itself, but also of visitors. It is believed that a trunk with a thickness of at least 30 cm in diameter, preferably more, can cope with this difficult work.
Oak is rightfully recognized as the optimal species for building a house. Next in the ranking of suitable trees are beech, maple and large spruce. Before designing a structure and planning actions, you need to carefully inspect the object to be used for the presence of parasites and diseases. If negative signs are identified, the idea will have to be abandoned.
Three main design options for tree houses are used as the basis for developing your own construction project
For the construction of the second structural type, which uses only the crown for camouflage or decoration, the load-bearing capacity of the tree is absolutely unimportant. A completely young representative of the fauna world will do, which will eventually hide the intelligence headquarters or alien ship in its lush greenery. Almost all deciduous, coniferous and even garden species are suitable.
Interior arrangement
It is worth noting that any hut should not only hold up well under the influence of weather conditions, but also be very comfortable inside. This requires certain improvements:
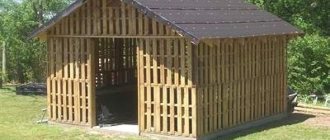
Huts are quite interesting structures in which you can relax on a hike or simply use them to amuse your children. A little practice, and all questions about how to make a hut at home should disappear, and after a few attempts you will definitely get the perfect design.
In this article we will talk about how to build a hut from boards yourself, relatively quickly and efficiently. But first, let’s figure out who might need such a design and why.
The need to build a hut is relevant in relation to summer cottages and garden plots. That is, we are talking about those situations when there is a need for temporary housing, which, after a certain period of time, can be dismantled until the next time or not dismantled at all.
Children's hut made of seven planks
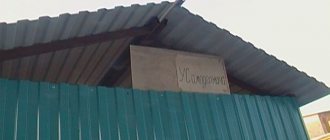
In the photo there is an outdoor toilet made in the shape of a hut
Again, you need to understand that a hut made of boards is not a dilapidated structure made of straw and branches, but a durable structure, not inferior in reliability to a light barn. So, what designs of board huts can you build with your own hands?
Preparing for upcoming work
We admit that not all domestic estates have wood suitable for building a house. However, let’s assume that it was your parents who were spared the love of gardening. That the selfless and unrequited passion in our latitudes for cultivating every centimeter did not force them to uproot such an incomparable object.
Before you start designing and choosing the best way to make a house on a tree growing within the site, you should evaluate the real situation. You need to find out if there are any local regulations prohibiting the construction of such structures. In a number of situations, permits have to be obtained for such buildings.
If the tree is located next to a neighbor’s property, you should definitely talk to its owners. It is possible that the structure will obscure their favorite flower garden, spoil the view from the window, or frolicking children will cause unnecessary disturbance to the elderly. In any case, you should discuss the upcoming construction project with your neighbors in order to preserve friendly relations.
When designing a treehouse, you should take into account that it is unsafe to place it at a height of more than 2.5 m (1). If the trunk or branches are capable of becoming a reliable support (2), they can be used as a base for building a house of the first type. The tree must have a sufficiently powerful root system (3)
Let's assume that we have no obstacles to constructing a tree house. This means we can safely engage in independent design, for which we need:
- Select the safest height for the lower floor. It is believed that for children’s games, a tree house should not be placed higher than 1.5 m. If you plan to build a gazebo, then the height limit can be moved by 2 - 2.5 m. If the structure is to be based on a branched area of the trunk, then the height of the position is determined by her.
- Calculate the optimal area of the lower floor or platform, taking into account that the projection from the building located on the tree should be entirely on your site.
- Decide on the design of the house. Decide whether it will be a site with perimeter fences and a canopy, a hut-type structure or a small frame house.
- Consider the possibility of an accidental fall. It is advisable that the ground around the structure is not compacted. Concreted areas are completely excluded, and close proximity to paved paths is not recommended.
- Consider the most convenient and safe type of staircase for moving visitors of the house up/down.
If desired, and if there are structural prerequisites, it would be good to think through options for operating the area under the structure. It wouldn’t hurt to build a shed there to store utensils and items that need to be removed from the rain.
When designing a structure, it is necessary to consider safety criteria, provide for the optimal method of movement and the possibility of using the space under the house
Gable hut
In this case there is also nothing complicated. You can use any available means in the form of spruce branches, reeds, hay, grass or straw. You need to start by preparing thin rods, a support pole and two strong flyers for the base of this structure. In this case, you need to have some skills. Install the flyers by vertically driving them firmly into the ground a third of the length so that they do not wobble. A strong horizontal pole is installed on top of them, on which thin rods are laid at an angle in the form of rafters. Then the material is laid on them from bottom to top. This must be done so that the top row overlaps the bottom. The back and side walls of the hut are covered in the same way. A fire with a heat shield is lit at the entrance to this building. In this case, it should be taken into account that the specified heat shield must be tilted towards the entrance.
Ways to build a tree house
As a hint for home craftsmen, we will analyze the two most popular methods of constructing a treehouse. They can be completely or partially copied, or based on the examples given, you can develop your own method of construction.
Frame structure on supports
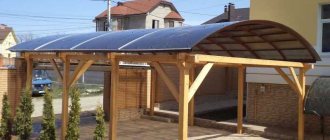
This is the most humane type of structure, which in principle can be built simply next to a tree or without it at all. It is a small frame structure mounted on piles. The roof is formed by hanging trusses, fastened at the top with metal plates. Movement is ensured by a fixed ladder installed at an angle of 45º.
The presented version of the house does not rest on the trunk and branches. In order for them to cross the floor and roof, you just need to make holes in the ceilings (+)
Read also: How to graft a grape vine
To make the frame, 105×105 mm timber was used. For the installation of a pile foundation, it would not be a bad idea to slightly increase the size of the material; for wall racks it is permissible to slightly reduce it. For wall cladding, it is better to purchase clapboard, but plywood is also suitable; it is recommended to buy a 150×50 mm tongue-and-groove board for the floor, and a 100×25 mm edged board for the rafters.
If you do not have carpentry skills, then it is better to buy metal corners and plates to connect the frame parts. Do the same with the boxes in the door and window openings, although you can make them yourself if you wish.
When building a house, it is easier to use a proven option and calculated dimensions. You can develop your own project based on the example (+)
The roof in the example is made of flexible tiles, under which a continuous sheathing of plywood or boards laid with a gap of 3 mm is installed. You will also need cement or ready-made cement mortar from a plant specializing in its production, anchors and bearings for fastening the piles.
It is easier to connect frame parts with metal corners. As an alternative, half-tree cutting is used. When choosing the second option, it should be taken into account when calculating the length of the elements (+)
The example shows an asymmetrical hanging type rafter system. The rafter legs rest against each other at the top and are connected using a toothed metal plate. The lower connection node with the frame trim is formed by a notch and additionally fixed with nails (+)
Stages of constructing a base for a house:
- We mark the site according to the size of the house. We mark the corners of the building with pegs and connect them with twine. We measure the diagonals of the marked outline, they should be equal.
- In the places where the piles are installed, we form pits with a depth of approximately 50 - 60 cm. The length of the sides of the pits is 30 - 40 cm. The smaller its area, the less mortar will be used, but the more, the more reliable the base for the pile will be. Recesses for pouring mortar can be made using a garden auger.
- We compact the bottom of the pits, after moistening the low-moisture sand to increase density. If the bottom is composed of loam or wet sand, there is no need to moisten it.
- We create a cushion for the pile foundation. At the bottom of each pit we pour 10 cm of crushed stone and 10 cm of sand. Let's tamp again.
- Pour cement mortar into one of the pits to approximately half the space remaining after filling the cushion.
- We install pieces of metal masonry mesh with a cell size of up to 25 × 25 × 2 mm on top of the filling. We fasten it with pins or wire directly into the ground wall of the pit. The main thing is that the mesh does not move to the bottom, but remains approximately in the middle of the support being installed.
- We fill the remaining space in the pit with the solution.
- Similarly, we arrange concrete foundations for all piles.
While pouring the second part of the solution, install a dowel for the thrust bearing under the pile. If you don’t install it right away, you will have to drill a hole in the concrete stone later. Let us take into account that no more than 45 minutes should pass between filling the first and second half of the pit, otherwise the support will not be monolithic.
Immediately after pouring with a building level, we check that the surface of the poured supports is at the same height. Otherwise, it will be necessary to level the thrust bearings and place wood chips or cuttings of boards under them.
It takes time for the supports to harden. According to the rules for pouring foundations for residential buildings, the next work should begin after 28 days. During this period, they should be covered with polyethylene, which must be removed periodically to ventilate the supports.
Next is the construction of the frame:
- Using thrust bearings we install piles, the upper part of which plays the role of load-bearing posts of the frame.
- We construct the lower and upper frame of the house. We connect the strapping parts to the posts using metal corners.
- We install window and door frames, if they are included in the project.
- We mark the middle of the end of the house in order to try on the roof rafters. We nail the rail strictly vertically in this place.
- We apply one board each to the left and right sides of the end of the conditional roof, mark on them the line of the upper cut and the outline of the lower notch used for installation on the trim.
- Using these templates, we prepare the required number of long and short rafter legs.
- We connect the rafters with a metal plate on the ground and transport them upstairs when finished. We reinforce the lower node in the area of the notch with nails or corners.
Now the finished frame must be sheathed as planned: lay the floor, sheathe the walls, lay the sheathing and roofing. During sheathing, we select holes for the tree trunk where it passes through the floor and roof. We form a hole with a gap around the perimeter of the trunk of 7–10 cm for free movement during growth and in case of swaying by strong winds.
The principle of construction of fences, window frames and shutters is shown in diagrams with dimensions (+)
A ladder fixed at 4 points for a children's playhouse is the safest option. However, to construct such a structure, it is necessary to pour concrete supports to support the lower points (+)
We nail scraps of board around the hole below to reinforce the floor and prevent the material from tearing off. Finally, we install the appropriate panels in the window and door frames, construct and fix the staircase.
Holes are formed in the lower floor of the house and the roof for the tree trunk so that there is a gap between the tree and the structure (+)
Construction of a platform on branches
If the trunk has a V-shaped branch, it may well become a supporting base for the lower floor of the house. True, the tree will have to be drilled, which is not very pleasant for him. In addition, the fastening points must be made in such a way that when the size of the tree changes and when it sways from the wind, it cannot damage the structure.
Before you start building such a treehouse structure, you need to do a fitting. It is needed to select the optimal position of the floor beams. It is better to do this with a piece of board, the length of which will be approximately 50 cm greater than the distance between the branches. To perform fitting and marking for the described option, you will need a reliable ladder and a similar assistant.
Having positioned the board strictly horizontally, you need to mark the attachment points on the branches and on the board. To find them, the board must be hingedly attached with a nail to one of the branches. By turning the board, slightly moving its second edge up/down, you should find a horizontal position. Horizontal control should be carried out using a building level, placing it on the edge of the board being tried on.
The fitting stage is extremely important, because... in the future, to correct the distortions, it will be necessary to drill a new hole in the wood, which will weaken both the trunk and the attachment point.
As in the previous case, it is necessary to think through safety aspects in advance and choose the optimal type of stairs for movement
The cutting of the board will become a template for applying the distance between the branches on a 100x150 mm beam, which will be attached to the tree. The holes are naturally marked in the center of the workpiece on the wide side. This is how the floor guide beam is formed. The distance on the opposite side should be determined using the same method and the second beam will need to be made in exactly the same way.
The holes for attaching the beams to the tree must be longitudinal and clearly aligned with the horizon. To do this, 5 cm are laid off from the point marked on the material to the right and left sides. Then, using a 12 mm drill, the initial holes are selected along the edges, and the excess between them is removed with a jigsaw. A longitudinal hole will allow the branches to move without destroying the structure installed on them.
Read also: The largest mushroom in the world - Wikipedia
The holes for attaching the beams to the trunk should be made in the form of an elongated slot so that when the tree sways from the wind, it does not damage the structure
Next, we begin building the house according to the following algorithm:
- We fasten the guide beams to the branches through the formed holes, installing Ø 12 mm wood screws approximately in their middle. Fastening length 200 mm. A washer must be installed between the beam and the screw.
- We check the horizontality of the fixed beams.
- We mount the lower floor beams from 50×100 mm timber on top of them in the transverse direction. We install the two outer ones first, then the intermediate ones. The distance between the intermediate beams should be equal. We fix it to the guides with 80 mm screws.
- At the end of the installed transverse beams we attach a beam of the same size.
- We reinforce the nodal connections with metal corners and plates.
- We strengthen the position of the platform with two oblique beams 50×100 mm, the upper edge of which rests on the formed platform, the lower edge is nailed to the tree. Fastening to the platform is carried out with angles, to wood with 100 mm screws.
- We lay the floor with a 50×150 mm board. We pull together the tongue and groove board and nail it in 4 - 5 pieces to the floor beams. It is permissible to lay a non-grooved board with gaps of 2 - 3 mm; each element must be secured with two screws or nails.
- Along the perimeter of the platform we construct a fence from a board or block installed vertically with a distance between elements of approximately 10 cm. In the corners of the platform, bars of adjacent sides are installed close to each other. The length of the fencing elements is at least 90 cm, so that the total height with railings is about 80 cm.
- We lay a block on top of the fence, which will form a railing. The block is attached with corners to these unique balusters.
The site is ready. In order to climb there you will need a ladder, the type of which is selected based on safety considerations. If children will be in charge of the house, it is better to build a durable option on stringers or bowstrings with at least one-sided railings. If an extension ladder is to be used, the beams at the bottom should be sharpened and buried in the ground to secure the position.
The design of the top of the platform can be varied. A folding or stationary structure in the form of a hut or gable roof is suitable. The construction of the treehouse can be continued using frame technology or an awning can be placed there, stretched over posts located in the corners.
Video instructions for DIY builders
Budget method for building a summer base on a tree:
Experience of American builders in the construction of tree houses:
The options we offer for building a tree house are most often used by independent craftsmen. There will not be the slightest problem with the construction according to the described schemes. But the result will be appreciated by the adults in the household and the younger generation.
If there is a child in the family, there should be a separate place for children's games. It is very easy to set up a safe and comfortable children's playground in a dacha or suburban area. An interesting and very welcome addition to the site could be a small house or hut located right on a tree. Making a treehouse with your own hands is not that difficult if you choose a simple project and easy-to-use materials.
DIY tree house
DIY tree house
How to build a tree house
How to make a hut for children from different materials
You can dig 4 wooden beams into the ground or use nearby trees. A strong rope is pulled around the trunks. This creates a rectangular base onto which you can stretch the fabric on top and sides.
You can make a hut for a child with your own hands at the dacha from a variety of materials and plants.
From living leaves
Living gazebos are created from garden plants. You can connect willow branches to each other. They take root well in the ground and grow quickly.
A green halabuda can be made from a wooden frame and climbing plants. During the flowering period, children can have fun in a beautiful shelter made from natural materials.
Drawing up a drawing and choosing a tree
First you need to think through all the details and draw up a drawing. The main parameters are the height and area of the house, as well as methods of its fastening. Typically, the base of the house is a rectangular shield with holes for branches, supported at the corners by strong pillars. The walls and roof of the structure can be of any shape and made from any available materials.
To get into the house you need a staircase
To get to the house you need a staircase. It should be as reliable as possible, have a strong fastening and at the same time not spoil the appearance of the structure. It is impossible to nail a ladder to a trunk - this is detrimental to the tree, and due to its growth, the structure will become increasingly deformed. A rope ladder is the cheapest option, but it can be used at low heights and only if the child knows how to handle it. All this must be taken into account when drawing up the project and calculating the material.
Tree house
It is very important to choose the right tree, because the strength and reliability of the house, as well as the safety of the child, depend on it. You should not choose old trees with large hollows and voids inside, with a lot of dry branches, or with exposed roots. Trees that are too young and immature are also not suitable for such purposes.
Tree house
It is not recommended to build a house on the branches of willow, poplar or birch. The best option is an apple, maple or ash tree with a trunk diameter of at least 30 cm, with a strong root system, healthy bark and the absence of parasites. It is advisable to choose a tree with a straight trunk, this will make it easier to mount and secure the base.
Tree for a house
Where to place
Before you make a compost pit at your dacha on your own, you need to find a suitable place for it. This is a rather important point, since if the location is inconvenient, it will be difficult to move the filled composter without dismantling it.
When choosing a location, certain requirements and recommendations should be taken into account.
This is due not only to the unpleasant appearance of the pit with decomposing waste, but also to the odors emanating from it, insects swarming nearby, which can penetrate into the house.
The distance to it should be 25 meters or more. On a site with a slope, they try to place the composting pit at the lowest point, but at the same time maintain the specified distance to the neighboring water source.
Preparatory work
Having chosen a tree, you need to prepare it correctly. Small, dense growth on the lower branches and trunk can be safely removed with pruning shears, but medium-sized branches should be pruned wisely. Ill-proper pruning can have a detrimental effect on the tree and it will dry out. To prevent this from happening, you can leave all the large branches and mount the base for the house around them.
For construction you will need tools:
- hacksaw or circular saw;
- hammer;
- plane;
- drill;
- screwdriver;
- roulette;
- building level;
- sandpaper.
Materials you will also need:
- edged board with a section of 5x25 and 2.5x15 cm;
- timber 150x150 cm;
- support beams with a diameter of 20 cm;
- galvanized screws;
- nails;
- metal mounting plates;
- antiseptic impregnation for wood;
- solid oil or oil waste.
Before starting work, boards and timber must be treated with impregnation and dried in the sun. This will prolong the operation of the house and protect wooden surfaces from dampness and rotting. The length of the support beams should be 1-1.5 m greater than the distance from the ground to the base of the house. Beams must be dug into the ground, so after treating with an antiseptic, the lower part of each beam is covered with a dense layer of grease, bitumen mastic, or impregnated with oil waste.
Prices for various types of construction boards
Checklist “Useful books on creating and managing a team”
1. Daniel Pink “Drive: What Really Motivates Us”
The motivation system, which is based on financial rewards for results, is outdated. In the book, the author explains what non-material methods of motivation stimulate people even more than a quarterly bonus.
2. David Sherwin, Mary Sherwin “How to Create a Real Team”
The book reveals in detail the principles of team building. Try them to increase alignment, create a smooth work environment, and streamline your business processes.
3. Zuzana Shokhova “The Way of the Scrum Master”
The author provides interesting, effective tools and tips that will help you become a real Scrum Master. You will be able to build self-organizing teams, simplify business processes, better understand your employees and achieve results faster.
4. Jeff Sutherland “Scrum. A revolutionary method of project management"
The author shares his unique project management method. Thanks to Scrum principles, teams begin to work efficiently, harmoniously and flexibly. Learn from Jeff Sutherland and you'll be able to complete tasks faster.
This training may be right for you:
- Best Agile Training Courses
- 10 Best Online Courses on Business and Teamwork
- 10 Best Online Personal Growth Trainings from 1,500 Rubles
- Best Corporate Training and Personnel Development Courses
- 10 Best Business Courses in St. Petersburg from 1,900 Rubles
Tell us in the comments what was your worst interview? Repost so as not to lose tips and create a team competently!
House construction technology
How to build a tree house
How to build a tree house
House construction plan (top view)
House construction plan (side view)
Stage one - installation of supports
Carefully measure the distance between the main branches and determine the location of the platform for the house. Project the corners of the base down and mark these points with beacons. Using a drill, holes are prepared for the supporting beams; The depth of the holes is at least 1.2 m, the diameter is 25-30 cm. Sand is poured into the bottom in a layer of 10 cm, then the same layer of crushed stone. The beams are lowered into the pits, leveled and temporarily reinforced with cinder blocks or timber spacers.
Construction of supports (level check required)
The racks are located in the pits
And the pits themselves are cemented
All beams must be the same height and stand strictly vertical. In this case, the tree trunk can be located between the support pillars or act as one of the load-bearing supports. Mix the cement mortar, pour it between the walls of the pit and the pillar, and leave to dry. When the base is sufficiently hardened, the spacers are removed.
Stage two - platform installation
Once the cement has hardened, you can make a platform
Read also: How to make an outdoor toilet with your own hands photo
For the platform frame, take a timber and cut it to the required length. If the platform rests on pillars at all corners, surrounding the tree trunk, the supporting beams of the frame are fastened along the perimeter of the base. To do this, each beam is raised to floor level, leveled horizontally and both ends are screwed to the inner surface of the pillars. The resulting harness is reinforced at the corners with metal plates.
Next, additional beams are stuffed inside the frame, placing them parallel to each other at a distance of 20-30 cm. Where the tree trunk passes, a hole of the appropriate size is left. From below, the frame is lined with two transverse boards, placing them on both sides of the trunk. All connections inside the frame are reinforced with metal plates and bolts.
Fastening the frame of the house
Fastening the frame of the house
If one of the supports is a tree, the platform is mounted differently. The beam is raised to the level of the base of the house and screwed at both ends to the pillars, and in the middle it is nailed to the tree trunk. Then the timber is fastened in the same way on the other side. Both beams must be positioned strictly horizontally. After this, other beams are placed on top, perpendicular to the bottom ones, in increments of 0.5 m. Of course, all elements of the platform are bolted together using steel plates.
The third installation option is mounting without load-bearing supports. If the platform is attached exclusively to a tree, 2 beams are nailed to the trunk 30 cm below floor level on both sides. Then the remaining beams are laid perpendicularly on top in increments of 50-70 cm and connected at the ends with thick boards. The result should be a rectangular structure lying in a horizontal plane. Now additional spacers are installed: they take beams of the same section and fasten them at an angle to the platform, resting one end against the outer beams of the frame, and connecting the lower ends to the tree trunk.
Stage three - laying the floor
For the floor, use high quality edged polished boards. The wood is carefully checked for the absence of roughness and knots, and additional sanding is carried out if necessary. The boards are cut to the size of the floor and laid out on the ground for marking. This is necessary in order to accurately cut holes for the branches and trunk of the tree, because it will not be possible to make neat cuts at the top.
So, the boards are laid out in a rectangle, leaving gaps of 1-2 cm, the circumference of the trunk is measured and the boundaries of the cutout are marked on the future floor of the house. Using a jigsaw, cut holes of the required diameter and fit them onto the wood. The floor should not be closely adjacent to the bark, otherwise as the tree grows, the structure of the house will be deformed. If the blanks correspond to the drawing, you can attach the floor to the platform.
Attaching the house to the branches
The boards are laid on the frame in the same way as on the ground, at intervals of a couple of centimeters. These gaps are designed to drain rainwater. Secure the floor using self-tapping screws or nails. The finished flooring must lie strictly in a horizontal plane, not creak or wobble under loads.
Stage four - installation of the walls of the house
Installation of house walls
Installation of house walls
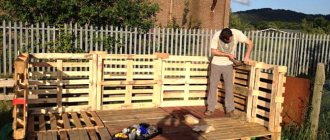
First, you need to install a strong timber frame around the perimeter of the platform. Here you can take lumber of a smaller section, for example, 50x50 mm. The timber is cut to the height of the walls and installed at each corner of the base, screwed to the protruding support beams with anchor bolts. Intermediate posts are mounted at a distance of 40-50 cm from the corner posts and fixed to the outside of the frame base. You cannot attach the racks directly to the floor; such a connection will not be reliable.
Installation of house walls
Installation of house walls
Installation of house walls
Corner and intermediate posts are reinforced with spacers and then sheathed with boards. The walls can be solid or lattice, it all depends on the preferences of the master. The number and shape of windows, as well as their location, can also be selected at will. The main thing is that the openings are reliably protected and the child cannot fall out of the house.
House frame. Window
House wall cladding
House wall cladding
Stage five - roof installation
The roof is best done in the form of a canopy. At a height of 1.5-2 m above the walls you need to find two strong branches located on both sides of the house. Metal hooks are screwed to the branches and a thick cord or reliable rope is pulled between them. A piece of tarpaulin is thrown over the rope and its ends are secured at the corners of the house.
If branches interfere with making a canopy, you can mount the roof differently. A timber frame is attached along the upper edge of the corner posts. Next, 2 trusses are assembled and installed above the opposite walls. The trusses are connected to each other by two wide boards, which are stuffed along the upper edge of the rafters. Additional fastenings are not required for such a small roof, and the structure needs to be covered with some lightweight material - polycarbonate sheets, corrugated sheets or ondulin.
Holes are cut in the roof, as well as in the floor, for large branches, if the structure cannot be installed otherwise. Again, you cannot attach the roofing close to the tree; you should definitely leave a small space around the cutout.
Stage six - installation of the stairs
The staircase to the house can be rope, straight wooden, light lattice, long or short, flat or steep. There are a lot of options, and choosing the right one is not at all difficult. One of these options is a ladder in the form of a shield with slots. To begin with, take a 50x50 mm beam with a length of 2.5 m and place it against the base of the house at an angle of 75-80 degrees, that is, almost vertically. Mark the cutting lines with a pencil and saw off the excess. The second beam is cut in the same way.
Having laid the beams on a flat surface, boards with a thickness of 2 cm or more are stuffed on top. The width of the boards is 15 cm, length 50-70 cm. An oval hole is cut into each piece the width of the foot and the cuts are processed with sandpaper. The cutout should be located on one side, at a distance of 5 cm from the end of the board. When sheathing the board, the blanks are nailed so that the cutouts alternate: the first board with a cutout on the right, the second with a cutout on the left, and so on until the end.
The boards are attached to the beams as a continuous sheet, without gaps. The finished ladder is placed against the house and secured on the outside of the platform using plates and bolts. Be sure to check the reliability of the fastening, because falling from the stairs can result in serious injury. The firmly fixed structure is treated with a primer with antiseptic properties, and then painted or coated with wood varnish.
Staircase option for a house
The final stage is finishing
The house is ready, now all that remains is to decorate it and make it cozy. To protect the wood from weathering, it is recommended to paint all external surfaces. It is advisable to choose the same colors for the walls and stairs, so the house will look more harmonious. There is no need to paint the inside of the boards, the main thing is that they are as smooth as possible. For convenience, you can attach light shelves inside, put a basket for toys or a children's table. The floor is covered with a soft rug and comfortable children's pillows are laid. Everything else depends only on the little owners of the house, so further arrangement should be entrusted to them.
Tree house
Tree house
Video - DIY tree house
Making buildings
While hiking, the question may arise about how to build a hut in the forest. Therefore, it is better to understand this matter as early as possible.
Each type of hut has certain assembly stages that should not be disturbed so that it does not fall apart too quickly. To begin with, you can try to assemble a lean-to structure, since this is the simplest structure that can be erected within a few hours.
Read also: Installation of an electric meter connection diagram
Lean hut
For assembly, use various branches that can be found nearby. Usually such huts are built in the forest. What the assembly looks like:
To prevent it from being cold inside the canopy, it is necessary to light a fire near the entrance, behind which a reflector is installed - a fence made of stakes driven into the ground, as well as branches intertwined with each other. Thanks to this structure, heat will pass inside the structure.
Gable structure
This option can also be made during a forest hike. But it will require collecting a significant amount of available materials. First you need to select a suitable site and clear it of debris and stones. It is worth noting that you should never install a hut near anthills or animal burrows.
A long pole is installed on the resulting base, which can be tied using tape or threads that you have with you. You can also use tree bark or weave a rope from roots or grass. Poles made of thick branches are tied on both sides of the structure. They need to be fixed at the base with driven pegs. At the top, fixation is made using tape or tree bark.
The design will resemble the gable roof of an ordinary private house. This entire building needs to be very well covered with branches on all sides except for the entrance. At the final stage, it is necessary to cover the hut with straw. If the laying is dense enough, then even snow and rain will not get inside the structure, and therefore it will always be comfortable and dry there.
If there is such a possibility, then it is advisable to stretch a film or any tarpaulin over the structure. But it is worth noting that with this method you need to make fires very carefully, since any spark can lead to a fire. To prevent the hut from flooding during rain, it is necessary to make small ditches around the perimeter that will drain water to the side.
Winter hut in the ground
There are not only ground-based ones, but also types of huts that are located below ground level. Such a house will be warm not only in summer, but also in winter.
The entrance must be closed with a wooden shield. To prevent the structure from rotting due to weather conditions, it must be treated with a special solution.
Indian wigwam
A wigwam is a circular hut. It can be built outdoors or inside your own yard to delight children. It is always fun for kids to play in such a children's hut.
If the hut is made of fabric, then first you need to make a cover that has ties with which everything will be attached to the base. It is worth noting that the cover should cover most of the structure.
There is no need to cover only the entrance to the structure. The “door” can be made from two curtains that cover the hut. A good, thick blanket should be placed on the floor to prevent the children from getting cold.
Source