Cantilever canopy
The first way is to build a canopy from consoles. Before you figure out how to attach a canopy to your house or on the property, you should create a project for it. In this case, it is necessary to take into account during calculations:
- dimensions of the new building;
- the force of the load on it from wind and precipitation;
- snow load;
- the place where the canopy will be erected.
Different types of awnings are made from different materials. If you have a project, you will be able to choose the ideal amount of building materials.
If a cantilever carport is being built for a car, then it is necessary to take into account the passage of a loaded car under it.
If the canopy is associated with any building, then its height will be limited by the roof of the building. In this case, it will not be possible to create a full-fledged arch. Due to the lack of free space near the house, small sheds are often erected.
Generator house design
Uninterrupted operation of the generator room will be possible only when you can constantly maintain the temperature inside not lower than +5°C. It is considered optimal for high-quality and uninterrupted operation of the unit. That’s why it’s so important to insulate the building.
For the frame of the generator room, we recommend that you use a steel angle. It can be attached to the anchors that we mentioned earlier and which you should have secured while laying the foundation.
A profiled metal sheet is welded to the internal and external posts with a distance of 10 cm between each. Afterwards, fill the resulting free space with high-quality heat-insulating material. Mineral wool, which is comparable in thermal characteristics to brickwork, is a good choice.
You will also need angle steel for the roof frame. It is necessary to lay metal sheets on its shelves, and put insulation on top of them. The roof itself should be made of metal tiles.
Door and platform to the generator
The width of the door to the generator room should be between 60 and 70 cm wide. Make the area between the doors and the generator itself 1x2 m in size. Between its other sides the distance can be smaller - from 50 to 60 cm.
Inside, be sure to finish the walls with special paint that will prevent the metal sheets from rusting. This way you will not only achieve a pleasant interior design, but will significantly extend the life of the house itself.
Any generator room must have a good ventilation system. The easiest way to do this is to take a pipe out of the house (we recommend a 10 cm galvanized iron pipe). If your power plant is air-cooled, you will need a forced ventilation system. Such a fan will need to be mounted either into the wall or directly into the air duct. In this case, the fan can perform quite different functions:
blow on the engine of the unit;
remove excess hot air.
If the power of your installation is below 6 kW, you will need to install at least 2 fans (each with a capacity of 1000 m3/h). They should turn on and off automatically during the start and end of operation of the generator engine.
Don’t forget about “bottom” ventilation, which is formed due to the leaky connection of the wall to the floor. This way, the exhaust gas, which will contain an excessive amount of carbon dioxide, can easily “leak” out of the generator room. The same applies to gasoline vapors, the accumulation of which can cause a fire or even an explosion. As you may have guessed, this is precisely the main reason why you should not “immerse” the generator house too much in the ground.
Additionally, you can hang shelves in your building where you will store your tools or containers with additional fuel. The brackets for them can be safely mounted on the wall of the structure.
Note! In addition to the process of building a generator house itself, it is very important to provide you and the specialists with the opportunity to comfortably service the generator. Therefore, here are a couple more points that should not be forgotten.
Before turning on the generator, the switch must disconnect the house from the main network. Therefore, it should be in a convenient place and preferably in your sight. Do not forget also about its careful isolation from metal surfaces and other objects.
Almost any generator can be equipped with automation (if it is not provided for during production, of course). Such an automatic reserve input device will independently respond to power surges in the network. This will prevent your generator from running idle.
Please note that when you switch the generator, the voltage in the network will most likely drop briefly. During this period, it is advisable to provide particularly sensitive devices with an additional power stabilizer (computer, telephone, etc.). It will just allow you to maintain the correct voltage level required for the operation of electrical appliances for several minutes.
You can use a classic UPS as a stabilizer. In addition, any uninterruptible power supply, in principle, will become a good protector during voltage surges in the network in your country house.
Key points
There are many options for building a canopy in the yard with your own hands. To get the best result, it is worth considering several basic parameters during the construction of a canopy.
Canopy shape
Canopies over the porch of a country house can have different shapes:
- Arched. Such a canopy usually has very good parameters;
- Gable. A canopy of this shape has identical characteristics to the roof of a private house;
- Single-pitch. This option is the simplest and is very reliable.
How to build a canopy over a terrace
A reliable and beautiful canopy over the terrace is an indispensable component of interior design in any suburban area, and can become a real calling card of the house. Despite the apparent simplicity of the structure, in practice its installation raises many questions. First you need to decide on the shape of the visor, select materials and carry out the necessary calculations. If you doubt your knowledge, the recommendations below will help you get the missing information.
Types of canopies by shape and type of construction
The shape of the roof over the terrace can be:
- One-, two-, three-slope. A single-pitch canopy is the simplest model. It is ideal for wide support roofs made of profiled sheets. Gable and tri-slope options will add an architectural “zest” to both a classical-style porch and a country house. They are made with support pillars, allowing the structure to withstand the heavy weight of the roof.
- Semicircular. They are usually made from cellular polycarbonate sheets. This form can be a small canopy over the steps or a full-fledged canopy covering the entire facade.
- Curly. These canopies are the most difficult models to install, requiring certain construction skills. But they are the ones that attract the most attention. This group of canopies is made from tiles, cellular or monolithic polycarbonate.
The type of structure can be modular or monolithic. The first option is simple and easy to manufacture. Other advantages include the ability to quickly replace individual parts, an abundance of shapes and colors, and a relatively affordable price. Such visors are usually covered with glass or plastic. Monolithic models always act as an indivisible canopy structure. This is, of course, an undeniable advantage of the structure, but the process of construction and repair becomes noticeably more complicated.
Choosing material for building a canopy
To build a canopy over the entrance, you can use a variety of materials. But most often builders use polycarbonate, tarpaulin, awnings, fabric, and wood. When choosing, consider the concept of a personal plot. It is important that the extension fits harmoniously into the overall picture of the landscape.
Polycarbonate
In recent years, polycarbonate visors have become very popular. Their frame is often metal, but can also be made of brick or concrete. Modern material has a high degree of elasticity, which makes it possible to easily attach it using screws with a thermal washer. In addition to ease of use, the advantage of this building material is also environmental friendliness, safety and affordability.
The disadvantage is poor abrasive resistance and susceptibility to ultraviolet rays (this disadvantage has now been practically eliminated by applying a special protective film to the surface of the sheets).
Metal canopies
Metal is also widely used in the construction of visors. Steel structures require a minimum of construction skills, they are durable and do not allow moisture to pass through. In addition, even beginners can build them. In this case, metal pipes are used. Fastening is done by welding or rivets. For supports, choose a pipe diameter of 10 cm, the wall thickness should be at least 2 mm. The disadvantages of using this material are susceptibility to rust and expensive welding services.
The main types of such structures
The design can be:
- Closed type. Such canopies usually have closed openings and have windows;
- Semi-closed type;
- Open when making a light roof on several supports.
Racks
Typically, when creating canopies, wooden or metal posts are used. But the structure will be much more stable if you use concrete supports. The holes for the supports must be dug below the freezing level of the ground, somewhere around one meter.
However, if the shed is being built in the northern region, you will have to dig a much larger hole. Sand is poured and compacted at the very bottom, then concrete is poured and a support is placed. First it needs to be leveled, and only then should the hole be filled to the end.
Beautiful examples
When choosing a lean-to carport, many people want not only practicality, but also originality. You can get ideas from the Internet or specialized literature, or you can bring your ideas to life.
You can illuminate the canopy with additional lanterns, or hang bright flowerpots with flowers.
If it is a wooden canopy, then the racks or individual elements can be decorated with carvings. This style will be especially relevant at the dacha; it will create the look of a cute country house.
Canopies with a completely transparent roof also look impressive. For this, transparent polycarbonate is used.
And metal frames look good with additional forging.
Whatever the canopy, everyone notes its practicality. This is an inexpensive and high-quality alternative to a garage.
How to make a lean-to carport with your own hands, see the following video.
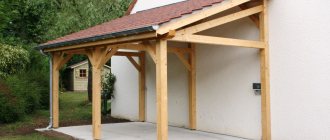
Canopy made of wood and metal
It is not advisable to dig wooden posts into the ground, even if they have been treated with moisture-proofing compounds.
It is recommended to pour concrete supports, the minimum depth of which is 0.5 m. Reinforcement is placed in the concrete racks and a wooden block is secured. In this case, wooden rafters are used. It takes a lot of time to build such a canopy.
Canopy frame
The frame for the canopy can be wooden or metal. Assembled using self-tapping screws or bolts. If you use laminated timber or dry boards during construction, then such a canopy will serve for many years.
The metal parts of the frame are usually welded. For a large canopy, it is better to choose a semi-arched shape.
Supports should be placed no more often than every 120 cm, and two posts are enough to the attached wall. For a tile roof it is better to lay timber often, but for polycarbonate it is pointless.
Very often, supports and rafters made from profiles have different thicknesses. This depends on the location of application of a particular canopy element. The pillars must be positioned strictly vertically.
Project preparation and selection of materials
First of all, you need to decide where the canopy will be located and what function it will perform. For example, a canopy in front of the entrance to a private house, depending on the size and configuration, can
:
- protect the porch from precipitation;
- play the role of a terrace located along the wall of the house;
- protect the path from the gate from precipitation.
A canopy-terrace attached to a house does not have to be located along the same wall as the main entrance to the house. Typically, such structures are built on the south side so that you can spend more time in comfortable conditions.
Extension in the form of a terrace on supports made of metal profiles
Vertical supports
. For their manufacture, timber or logs, metal and forged racks can be used. This depends on the chosen design of the structure, its size and planned loads. Supports on the ground can also be pillars made of brick or stone, or concrete columns lined with any suitable material.
Supports on the wall
. The principle of attaching the edge of the roof to the wall depends on the design and characteristics of the attached canopy. Horizontal supports are used (a beam or a piece of metal profile is attached to the wall) and brackets.
Rafter system
. The material of manufacture may not be the same as that from which the supports are made. Wood or metal profile pipes are predominantly used, which make it possible to construct roofs with curved surfaces.
Roofing material
. The same one can be used as on the roof of the house. For a canopy over the entrance to a house or a roof protecting the path leading to it, transparent polycarbonate is suitable - such a design will not clutter up the space. It is better to equip a canopy-terrace with an opaque roof or a matte polycarbonate roof, so that the place to relax is comfortable in the heat.
One of the points that you should pay attention to at the design stage is the angle of the roof. An extension with a flat roof, capable of withstanding increased loads, can be used as a two-level terrace - a convenient ladder is installed to climb to its roof
Two-level usable terrace
A flat roof should be sloped away from the house to prevent moisture from accumulating at the junction of the wall and the attached structure. If you plan to make a usable roof, the slope of the slope should be 3-5°. For a regular pitched roof the figure is 10-15°.
Arched structures and roofs of complex shapes are calculated individually, and the preparation of the project should be entrusted to professionals. Errors in calculations can lead to the fact that the canopy cannot withstand the loads and collapses.
Initial work
The very first thing you should do is clear the area where the canopy is located of any debris. After this, it is leveled with sand and gravel. A complex and large canopy requires a foundation.
Make recesses for the racks and lay the electrical cable. Determine the spacing of the racks. If there is a body of water nearby, then the supports should be primed and waterproofed.
Roof
Slate can be of several types:
- Fiber cement is very reliable and durable. Can withstand heavy loads, but is rarely used during construction;
- Asbestos-cement is a very popular type. Sheets of such slate can be flat or wavy.
- Corrugated sheeting is a very strong and durable material with good ultraviolet resistance.
- The metal profile can be hollow, with a cross-section of different shapes. Used for rafters and posts.
Lumber:
- board;
- beam;
- plywood.
Plywood is used for lining under the roof.
Roofing felt is rarely used, usually for waterproofing.
The awning is also rarely used. It is a seasonal roof option.
Metal profile canopy
For roofing a canopy made from a profile, it is recommended to use grade “N” corrugated sheeting.
Making a canopy from a metal profile
It is necessary to calculate the weight of the structure. Based on the data obtained, the material for the frame is selected.
It is not recommended to install corrugated sheets in windy weather. Sheets of the required size are cut using metal scissors. If the walls are not insulated, there is no need to waterproof the roof.
The profile is attached starting from the bottom of the roof. The new sheet is laid with a slight overlap. To make the joints airtight, you can use mastic. The sheets are attached to the sheathing using self-tapping screws.
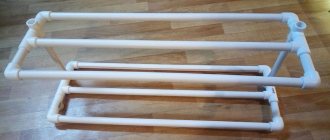
Preparatory work for installing a lean-to metal canopy
We could also consider gable structures, but the purpose of this particular article is to make an extremely practical, simple and cheap canopy with a metal frame, so we chose a lean-to structure. Make it 2 times faster, since there is no need for bent trusses, joining the roofing material in the center and 30% less materials will be needed. Let's look at all the instructions step by step and start with the preparatory work.
STEP 1: choose a place for a lean-to canopy. You can build wherever there is space, but it is better to choose a small hill in the yard and a place with shallow clay so that water after rain does not accumulate under the canopy, and you can spend a minimum of money on installing concrete under the supports. Feng Shui lovers are not welcome here, since practicality is the main thing here.
STEP 2: selection of materials. We have already chosen it. Our supports will be made of a metal square 40x40 mm, we selected it taking into account the load of the structure and the possible wind load of 4%, and we also did not forget about precipitation for the harsh climate zone. The supports are designed for a metal canopy with a slope of 15-20% and dimensions of 4x4 meters. The roof can be made of polycarbonate, but we still preferred metal sheeting because it is inexpensive and easy to work with.
STEP 3: clearing the area. We will use a concrete floor for the car, so the area needs to be planned and about 10 cm of earth removed to be filled with slag and a screed of at least 5 cm thick to be installed. This is a lot, quite enough for a heavy SUV (within reason, up to 2500 kg). If you want to buy a hummer or tractor in the future, then your screed depth will be at least 12 centimeters.
STEP 4: calculate communications. Yes, you heard it right, there will be more communications around the canopy. For what? It's simple. Firstly, water will not wash it away and will not flow under the canopy, and secondly, it just looks cool and is inexpensive. These will be low tides in the ground and drainage systems. In addition, it is necessary to supply electricity to the canopy just in case of a fire (suddenly there is no place to barbecue or you need to warm up the car) and make future wire leads from under the screed or along the supports.
Polycarbonate canopy
This option is the most popular. This material is quite light and durable. It can withstand quite heavy loads. It is very easy to cut and drill.
The factor that makes polycarbonate canopies popular is the availability of a wide range of colors for this material.
Why tree
Wood is an environmentally friendly, affordable material, reliable and safe for humans, which is the main factor why this material has been in demand for many years; it is distinguished by its warmth, naturalness, and color. These factors allow this material to add uniqueness and beauty to landscape design.
Of course, wood does not have high strength coefficients, unlike stone and iron structures. Wooden structures are subject to rot and attacks from insects and mice. But this can be avoided if you properly treat the wood with stain and fixing solutions. The varnish also has its own profound effect, and the varnished wood itself looks gorgeous.
Wooden canopy design option
When it comes to wooden sheds, some people think that they are simple, nondescript structures. But everything will depend on the imagination, the desire of the average person to correctly draw up a project. You can decorate the designs with filigree carvings, balusters and beautiful carved elements. At the same time, take into account the image of the garden where the canopy will be located, next to the house or separately.
Important! The entire structure should look proportional and interesting. This is the only way a canopy attached to a wooden house will please you
Making a polycarbonate canopy
Polycarbonate sheets are cut, and then the edges are covered with punched tape. It is recommended to use a lightweight frame. The thicker the sheet, the wider the sheathing should be. The lower protective film is removed at the beginning of installation, and the upper one at the end.
Having completed the arrangement of the canopy, drain gutters should be installed and the area under the canopy should be arranged. A large number of photos of DIY canopies can serve as an example and source of inspiration for creating your ideal canopy.
Preparing materials and tools
Let's look at the stages of building a metal canopy with our own hands using the example of a gable structure with a polycarbonate roof, measuring 6x3m. Its device is one of the simplest.
To make such a canopy, you will need the following materials and parts:
- professional pipe measuring 80x80 mm with a section thickness of 3 mm and a length of 3.5 m - 6 pieces;
- corrugated pipes for a purlin measuring 50x25 mm with a section thickness of 2 mm and a length of 6 m - 7 pieces and 2 pieces measuring 50x40 mm and a length of 6 m;
- ready-made gable trusses with an angle of inclination of 20 and a length of 3.5 m - 5 pieces;
- sheets of cellular polycarbonate measuring 2.1x6 m - 4 pieces.
- hardware for fastening polycarbonate;
- straight joint profile - 10 pieces of 2 m each and 3 corner pieces of 2 m each;
- end polycarbonate profile – 21 m;
- crushed stone and concrete mixture.
You can’t do without a tool, such as a hole drill, a screwdriver, a welding machine, a drill, a measuring tool, a construction level, a marker, an angle grinder with a special attachment for cutting polycarbonate sheets.
DIY canopy photo
Total
Category: Instructions