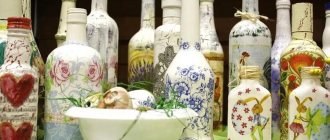
Store-bought toys do not have the same charm and do not have the same fabulousness as those made by hand. They are unique, original and not similar to each other. They not only look great, but also bring a festive atmosphere.
There are many ways to create balls, but today we will look at my favorite and quickest technique. To decorate the room, I also recommend making a three-dimensional Christmas tree, paper snowflakes, a Rat toy, and then, for sure, the holiday spirit will reign in your home.
The idea itself is very simple and accessible, a few years ago, my children and I attended master classes on creating products in the decoupage style, we made a lot of everything, some were left, some were donated. Today, I offer interesting and most beautiful ideas, so let’s get started.
How to prepare blanks
You can work with three types of balls:
- wooden;
- glass;
- plastic.
It is difficult to paste a design onto glass ones, and you will need special paints - stained glass. Plastic ones can be rough, so they need careful sanding. But a ball made from a board absorbs paint and varnish perfectly, so it’s much easier to work with.
Craft stores sell ready-made pictures for decoupage. But you can take any image you like from multi-layer napkins. They will also make good crafts.
Before you start gluing the pattern, the workpiece should be prepared:
- sand;
- paint;
- polish.
After this, glue the drawing, and then apply varnish, glitter, patterns - there can be many ideas for decoration.
It is better to tear off the selected design from the napkin rather than cut it out - this way it will stick to the ball more easily.
Creating compositions
Decoupage becomes especially popular during the New Year. New Year's style is especially favorite among both ordinary people and creative people. Before you start decoupage, you need to create a composition so that the implementation is harmonious, without chaos.
We offer you basic options for New Year's compositions that can be used to decorate both balls and other items.
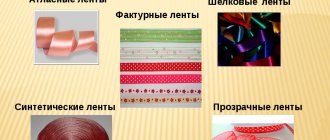
- Encircling lines. The strips can be made of fabric, paper, serpentine, they are glued around the main product. They can be placed parallel, obliquely, at different angles, or perpendicular to each other. Keep in mind that the width of the strip affects the ease of smoothing it out.
- Capes or hats. This method is that the composition is located only on top of the background, for example, a ball.
- Placer. On the toy to be decorated, elements of a homogeneous type are arranged randomly or in a certain order: circles, triangles, stars, hearts. You can use regular confetti.
- A combination of elements of different sizes. The combination of large and small decorative materials looks very impressive. For example, one large one and a scattering of small ones around it.
- Dividing the original basis into shares. This is done using a wide-sized tape, which is cut into narrow strips. They, in turn, when glued, form different zones for decoration.
- Big drawing. This composition is created in this way: one or several images with a single plot are taken and placed on different sides of the subject. Or a drawing is taken and a supporting composition is formed using painting and patterns.
These compositional options allow you to decorate part of the surface of an object. You can decorate the surface completely.
- Patchwork method. A large image is taken, capable of covering the entire surface of the base, and divided into fragments. Then they are applied, overlapping, to the surface of a Christmas tree decoration or tableware.
- Globe method. Suitable for decorating balls and round objects. An image is prepared that is equal in length to the circumference of the base and no more than half in height. The strip is divided into equal parts, then they must be glued, carefully joining.
In addition to the basic compositional solutions, consider additional decor. It is this that allows you to add the finishing touches to the ensemble, giving the decoupage item chic, expressiveness and originality. Experts highlight the following additional decoration techniques:
- volumetric type ornament, made using relief gels, contour and structural pastes;
- dot painting, contour patterns;
- vintage and surface aging;
- gilding;
- stylistic thematic painting;
- imitation of different materials: stone, wood, snow and ice.
Popular articles Congratulations on the first of April
Master class on making decoupage
Having prepared a wooden ball and selected an image on a napkin, you can get to work:
- Paint the blank ball in the desired color and let it dry so that the paint does not take off.
- Carefully tear the edges of the napkin from the design and tear off the excess layers, leaving only the one with the design.
- Attach the drawing to the ball in the right place, glue the entire picture with a brush, dipping it in glue, and let it dry.
- Cover the entire ball along with the design with clear varnish.
- Decorate the ball with a ribbon or bow.
If you use PVA, dilute it with water in a 1:1 ratio before starting work. For work next time, make a fresh batch of wiring.
Decorating the ball
For additional decoration of New Year's balls, semolina is often used. This grain gives the New Year's ball the effect of snow grain. The semolina is fixed on the ball as easily as a napkin.
(Step 4)
To apply semolina, you need to draw a certain pattern on the ball with glue, often these are ordinary snowflakes. We pour semolina onto the area; it will stick to the base. And we send it out to dry again.
When the glue has dried, we begin to paint the semolina. During this, it is advisable not to touch the background of the base. Coloring should be done as carefully as possible so that the grain does not fall off.
It is also recommended to carry out this process with liquid paint; it will penetrate to the base. After finishing coloring the semolina, we send the toy to dry.
Using a stained glass outline
To make the lines on the ball voluminous or in the case of decorating the painted base with patterns, use a stained glass contour. This is a thick paint of different colors in tubes, which is convenient for applying thin lines, moving along the drawing and lightly pressing the tube.
A stained glass outline can be used to highlight leaves, berries or other elements of the picture. It is applied to an already glued and dried image. The paint is quite thick and does not spread, so it will not damage the drawing.
If you want to create a general background using a stained glass outline or make a thick frame, then use a brush.
With gold stained glass you can apply curls to the base of the ball or draw snowflakes, because we have a New Year's theme.
DIY New Year's toys: how to make for the New Year
Since the Christmas tree is considered the main attribute of the holiday, its decorations play an important role in creating the mood and New Year's atmosphere. Making your own Christmas tree decoration is quite simple. To do this, you can use any available materials that you can find in the house - paper, cardboard, fabric, newspapers, threads, etc. You can also use decoupage technique for this process. Don’t even rush to throw old light bulbs in the trash, they make fun decorations for your Christmas tree.
Christmas ball made of threads
Using this technique you can make balls of different sizes and colors. Create a whole collection of these Christmas tree decorations.
Materials:
- Air balloons
- Threads (cotton)
- PVA glue
- Water
- Sugar
- Scissors
- Polymer glue
- Aerosol paint
- Decor
The balloon must be inflated to the size you want to eventually get the ball for the Christmas tree.
Next, you need to mix 50 ml of PVA glue with two tablespoons of water and two teaspoons of sugar.
Soak the threads in this mixture and wrap them around the balloon in a chaotic manner. Leave the ball to dry for several hours. Once it dries, pierce the ball and carefully pull it out through the holes between the threads. Finally, you can decorate the finished ball with sparkles, sequins and other decor.
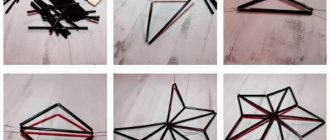
Fairy ball
Based on the previous master class, you can make a more original decoration - a fairy ball, in which you can create a real composition.
Materials:
- Twine or thick thread
- PVA glue
- Balloon
- Decor: figures, cotton wool, cones, stars, etc.
Dilute PVA glue with water (2 to 1). Soak the threads in this mixture until they are well saturated.
Inflate the balloon. We randomly wind the thread around the ball and leave it for several hours until it dries completely. When the rope has become hard and dry, you can pierce the ball and pull it out.
We cut a hole with scissors and make a stand for the ball from threads. It can be made from thick cardboard or board.
Attach the ball to the stand with glue.
We put cotton wool in the hole of the ball, and you can put figures on it.
Light bulb toys
Even a burnt out light bulb can become a New Year's toy. It will be an ideal material for creativity, since, first of all, you don’t mind it and you can experiment.
Materials:
- Broken light bulb
- Acrylic paints
- Brushes
- Decor – ribbons, cords
- Hot melt adhesive
First you need to clean the surface of the light bulb from dirt. This can be done with a cotton pad soaked in alcohol. We paint the lamp – black the back, white the belly of the penguin. Draw the penguin's face.
You can dress up the penguin - knit hats for it, you can tie a scarf around its neck. Don’t forget to make a loop so you can hang the toy on the tree.
Painted light bulbs look beautiful and original.
Ball of sequins
By making such a beautiful shiny decoration for your Christmas tree, you can pleasantly surprise your guests. And if you are going to visit, then such a souvenir can be a wonderful gift.
Materials:
- Styrofoam ball
- Sequins
- Pins
Creating such a colorful ball is quite simple, but the process can be lengthy.
Use pins to attach the sequins to the foam ball without creating gaps.
At the top of the ball, place an element for attaching a lace.
Salt dough toys
Crafts from salt dough are easy to make, can be stored for a long time and come in different shapes.
To make dough for toys, we need:
- 2 cups of flour
- 1 cup salt
- 250 g water
Mix all ingredients and roll out the dough. You can use printed stencils or cookie cutters. You can add dyes to the dough. Finished figures must be dried in the open air or in the oven. As a result, you can cover it with paint.
At the last stage, you can decorate the figures with beads, rhinestones, shells and other elements.
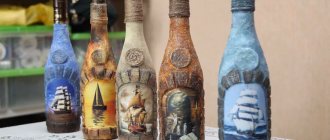
Decoupage in papier-mâché style
If you've ever made papier-mâché, you'll notice some similarities to decoupage. True, in our case we glue one layer, but several layers are used there. If desired, the Christmas ball can be decorated like papier-mâché. You just have to seal the entire workpiece.
Soak paper from a magazine or newspaper in glue until it becomes soft and pliable, and cover the ball with pieces. The musical score will look beautiful.
Final stage
In principle, the ball using the decoupage technique is ready, but many will be puzzled here, since the place near the handle of the toy looks ugly. Sometimes this transition is poorly painted over or the part itself remains dirty. Therefore, let's complete the product.
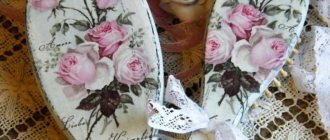
Finished balls after decoupage
In order to give the product a finished look, we will use tinsel. We will tie it around the stalk and make a bow. You can simply decorate the product with festive rain and secure it with wire. To make the part better fixed on the handle, it is advisable to drip a little super glue or varnish.
Now our Christmas tree toy has a completed look and can go to the Christmas tree. By decoupaging your Christmas tree balls, you can be sure that the toys will have a beautiful appearance and will be presented in a single original copy on your Christmas tree!
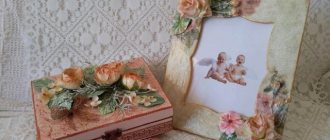
Decoupage in vintage style
You are unlikely to find ancient images on a napkin. Therefore, you will have to look for photographs or postcards with photographs from a hundred years ago. After applying a photo of the angel to the toy using the technology described above, decorate the ball in retro style with an applique of beads or beads, apply stained glass patterns or curls. Just choose the color to match the main one. Bright and contrasting colors will not convey the era of antiquity.
If you want to create the effect of a cracked surface, use craquelure varnish. When you apply it, everything will be even and smooth, but as it dries, the varnish will crack, forming picturesque traces of antiquity.
New Year films"
We all know that on New Year's Day, every year, films with the same New Year's theme are shown on the TV screen. Why not immortalize this on New Year's toys?
Just imagine the originality of this movie idea for New Year's balls.
Balls in the design of a specific film by cutting the most popular frames or simply assembling a variety of recognizable fragments. Home Alone, The Irony of Fate or Enjoy Your Bath and other films can be just some of the examples with a diverse direction in this topic. Thus, you can make a New Year's selection with your favorite cartoon or movie characters. The balls will be different, but among themselves they support the same theme, which overall creates an unforgettable visual picture of perception.
You can make DIY decoupage Christmas balls with your children. This will allow children to show their imagination, have an interesting time and get vivid memories for life.
So, many families begin to develop a “tradition” when every New Year a child makes one memorable ball, which over time can not only be passed down through generations, but also preserve memorable memories within the family circle.
Features of working with plastic balls
To make decoupage on a plastic ball, you should take into account some features of the material:
- First of all, wipe the workpiece with alcohol, prime it, and after 2 hours apply white acrylic paint and let it dry. Then sand with fine-grained sandpaper.
- Tear out the image of Santa Claus from the napkin, separate the top layer and make darts so that the design fits tightly to the ball. Glue it by thoroughly coating it with glue with a synthetic brush and smoothing out the folds.
- Choose a color for the background that matches the picture. If necessary, dilute the two paints. Sketch the background with a sponge, carefully working around the drawing. Apply snowdrifts and snowflakes with white paint.
- Cover with two layers of acrylic varnish.
Balloon decoration
If desired, the ball can be decorated with icicles. You need to apply thick glue in layers from bottom to top so that it resembles the outline of an icicle. After the glue has dried, paint the icicles blue.
Walk over the icicles with a semi-dry sponge dipped in white paint to imitate snow. When everything is dry, coat with 5 layers of varnish. Don’t forget to take such a beautiful photo to show off your talents to your friends and relatives.
Volumetric patterns
To get a three-dimensional design, you can cut out flowers and leaves from lace and stick them on a ball painted white. After the glue has dried, use a brush with contrasting paint to follow the drawings. Then remove the residue with a wet washcloth. The paint will remain only between the patterns and will look like a beautiful shadow.
Working in the decoupage style does not require any special skills, and the results are exquisite and unsurpassed.