Any work that is done with your hands has a positive effect on the development of creative abilities and motor skills. Therefore, adults and children are encouraged to spend time together doing crafts. Now we have to figure out how to make a bird with our own hands from scrap materials for a competition or just for interior decoration.
Making a bird out of paper
These are the materials you will need to create a simple paper bird craft:
- Cardboard paper.
- Scissors.
- Quilling paper or strips of colored paper.
- Paper glue.
- Markers and pencils.
- Sample.
Brief instructions on how to make a paper bird with your own hands:
- Using a pre-printed template, you can make several versions of birds at once. To do this, the drawing is transferred to cardboard and then cut out along the contour with ordinary scissors.
- Next, take quilling paper, but you can use any colored strips of 0.5 cm.
- Next, you need to glue the bird’s body itself from cardboard, as well as strips, to the base. This is done using a regular glue stick.
To make the craft look interesting, you can glue the strips (which act as wings) not completely. Then, in any draft or wind, they will move. Using a marker, details are drawn - eyes, lines for the ears, etc.
Application
This type of creativity is suitable for adult beginner craftswomen, and for children, and for spending time together. Applications can be given as gifts or made for exhibitions in kindergarten or school. There are many variations of crafts.
Option 1
For kids, the ideal option would be to create a do-it-yourself applique in the shape of a bird from cotton pads. For work you will need
- base – a sheet of white or colored paper, cardboard;
- cotton pads and paper glue;
- brushes and watercolors;
- scissors and a simple pencil.
As decoration you can use small cereals, sunflower seeds, grains made from plasticine.
The bird can be made from round cotton pads or cut in half - it depends on the imagination of the authors. It is better to stick the discs onto the base first, and only then paint them.
It is important not to wet the cotton figurine, but only to paint its surface. Wet cotton wool may become deformed.
Option 2
This method is simplified. It will also require a base, which adults must prepare with their own hands - a sheet of paper with a figurine of a chicken or sparrow drawn on it.
First, draw the beak, eyes, and legs of the figure. Then the places where the plumage should be are sealed with tufts of cotton wool.
The next step is decorating the base. Paints, pencils, cereals are used.
Option 3
For older children, you can complicate the task - create an applique from small elements. We prepare not only the base sheet, but also the elements of the bird - the body, plumage, decor.
The first step is to prepare the base of the application. On a basic sheet of paper you can draw grass, food, or stick on a house of individual elements.
The next stage is the creation of the bird itself. First, the base is glued, then the small details - plumage, beak, eyes.
How to make a double-sided bird
This work option is suitable for the smallest craftsmen, since there is virtually nothing to cut out. The creative process must take place under the supervision of parents. Brief instructions:
- To begin with, the blanks are printed. To do this you need a color printer.
- One bird consists of 3 main circles, which will decrease in diameter from the larger one.
- Next, each part is glued to each other, after which it is folded in half using a ruler.
- You can glue wings made of felt or even fabric to the base of the bird.
Next, draw the eyes; you can glue the yellow beak separately. This craft takes no more than 10 minutes. You can make a whole garland from a number of such birds.
How to make a paper bird with your own hands, step-by-step instructions
There are a large number of hobby options, and everyone is sure to find something of their own. Paper crafts today are of interest to quite a lot of people of all ages: from adults to the smallest child who will benefit from this activity. Having free time and a suitable scheme, you can engage in this simple and at the same time aesthetic activity. Paper design has an attractive power that draws all family members into the process.
Contents of the material
Origami bird "Pomeranian pigeon" made of paper
The product was originally created as a symbol of the religious beliefs of the Pomeranian people. In those days, the toy was made of wood and hung from the ceiling in the front corner of the house, where there was usually a table and benches. Another name for this bird is “bird of happiness .
The manufacturing scheme is not particularly complicated. Even a small child, with diligence, can successfully make this dove. A special motivation for constructing such origami is the belief that creating thousands of such crafts will bring a purposeful person the fulfillment of his cherished desire. For easier understanding, an exact diagram or video is needed:
- To get started, you will need a square sheet of paper, which should be folded strictly diagonally twice. The resulting lines intersect in the center of the square;
- you need to turn the paper over and start creating the following auxiliary lines. The corners of the square need to be attached to the center, forming a small triangle. This must be done with other angles as well. The resulting small square is made up of small triangles;
- you need to bend the corners of the inner side so that a rhombus is formed;
- you need to hold the figure in such a way that its upper fragments, which will ultimately be the wings, are directed upward. Next, you need to fold the paper sheet and create a vertical line running from the bottom of the future wings to the base of the diamond-shaped figure;
- Now you should carefully, but not completely, bend the corners of the paper structure to the middle of the body. The resulting fragments will create the image of a tail and head. All that remains is to make the paws for the Pomeranian pigeon out of paper.
Gallery: paper bird (25 photos)
How to make a crane (origami) with wings with your own hands
This work is not easy and will take a little more time for beginners, but it will amaze those around you with its grace and originality. Using just one simple piece of paper , you can create a work of art. Any color will work: a flapping bird will create a rainbow iridescence when using many shades. A master class on creating a crane will give you and your child unforgettable moments of joy.
Important!
It should be remembered that for better performance it is necessary to approach the joining of corners with great care and repeatedly smooth out the folds with your fingers .
- To create this bird you will need real origami paper, square-shaped and some shade.
- Pull the upper corner away from you towards the lower one to form a triangle. The same must be done with the other two corners. The folds cross at the center.
- Now you should place the sheet so that the side of the square is parallel to the chest and fold it horizontally. You should get four such folds.
- The next step is to create a small square. Pull the lower edge of the future bird towards you. The sides of the figure must be folded along the horizontal lines that were at the previous stage. Next we pull the corners down. The opposite faces meet in the middle, and the top layer covers them and forms a square shape.
- The bottom corner is facing you. Here you need the edge to lie clearly along the central fold strip. On the other hand, a similar procedure. At this intermediate stage of the master class, a figurine resembling a kite is obtained. The same should be done on the other side. The upper areas of both kites need to be bent and unbent.
- We reveal the “snake” elements of the future bird. The paper should be positioned with the bottom edge towards the person making the figure. By lifting the top layer by the bottom and straightening it, we get a “diamond” that will be on the snake. This must be repeated on the reverse edge.
- The opposite edges are folded onto the same side: left to left, right to right. Now there are three peaks looking down at you.
- It is necessary to straighten the potential birdie so that the “diamonds” appear again. You must open the corners of the structure after turning it on its side. The bottom of the paper needs to be folded and the corners closed. Taking the bird by the middle, pull it forward so that nothing turns around. We repeat the work with the other edge. Now the bird has a tail.
- Bend one diagonal edge of the origami to the bottom to create a head. The open figure forms two acute angles. Having bent the tip, make sure that it is in the middle. These origami edges need to be connected.
- The wing is obtained after the top layer of the triangle in the middle part of the bird is bent. The same goes for the second one.
- The bird will play and manipulate its graceful wings when pulled by its voluminous tail.
How to make an origami sparrow bird
The master class for creating this specimen is not at all difficult; an adult or child requires strict adherence to step-by-step instructions and thorough patience - especially if you want to do this for the first time.
- As in previous versions, you need a square piece of paper to create. You should bend it diagonally.
- We lower the upper corner of the triangle to the center line so that an isosceles triangle is formed here. We do the same in reverse order.
- We bend the main corners towards the middle. You should have an oblong diamond in your hands.
- We unfold its corners, and bring out those edges that were hidden, pressing them to the center line. The parts that extend beyond the plane of the sparrow figurine are its wings, which should be bent by one third.
- We pull the bottom of the oblong diamond up and wrap it, pull it back and create a small bend. The bird's tail is ready. The origami should be folded in half, and the edge should be folded in the area of the head.
A sparrow, made with your own hands from paper, will blend harmoniously with your home environment and delight a small child.
Paper birds
Other types of needlework
1igolka.com
Bird - Christmas tree toy
Some parents may still remember how many years ago there was a huge shortage. On the Christmas trees they hung sweets, fruits and products that they could make with their own hands. Today you can buy anything in a store, but toys lack that interest and sincerity.
To immerse yourself in childhood, it is recommended to make Christmas tree decorations in the form of felt birds or pine cones with the children.
What do you need:
- Several pieces of felt of different shades and colors. You can collect the bird from leftovers, as it should be small in size.
- Next, find red woolen threads.
- After this, you need to print the pattern templates using a printer.
- The details are cut out and transferred to the fabric with soap.
- After this, pruning is done.
- The parts are carefully sewn together with threads.
Such a toy can last for many years; to make it look voluminous, it is filled with padding polyester or cotton wool. Using the same technology, you can make birds from foamiran with your own hands. This foam material will withstand any load, even if it is sewn together with threads. It feels like felt itself.
Origami crane
In Japan, there is a tradition of making flying cranes out of paper to make your most desired wish come true. The greater the number of such birds a person collects, the greater the amount of happiness that will follow him.
But Russian fanciers slightly modified these cranes to suit their folk traditions. They are made similarly to wooden amulets from the Arkhangelsk region. It was believed that they protected the house from evil spirits, troubles and diseases.
In fact, Russian firebirds and Japanese cranes have a lot in common. Both of them were made without the use of glue. For example, Russian amulets were carved from a single piece of wood, and Japanese cranes were made from a sheet of paper.
Making a porcelain bird
If you are tired of using ordinary polymer clay, you can also plunge back into childhood and teach your descendants how to make crafts from cold porcelain. This activity is suitable for schoolchildren who are interested in creating something unusual. The recipe for porcelain at home is very simple:
- First you need to find any frying pan with a non-stick coating. It will not deteriorate during operation and can be easily washed.
- Next, you need to find 1 cup of starch, add a tablespoon of cream to the mixture, then fill everything with PVA glue (1 cup) and 1 tbsp of glycerin (available at any pharmacy).
- Place everything on low heat and stir until smooth.
Next, the mass is pulled out, you need to let it cool a little. After this, it is completely ready for modeling. It is better to work with gloves. The bird is molded as if from ordinary clay, first the body is formed, then the head and beak. After drying, you can carefully cut out the wings with a knife. This toy will look very expensive in any interior.
Alternative recipe
In many cases, craftsmen end up with a mass that quickly becomes covered with cracks. This often depends on the quality of the starch and PVA glue. There is another option that will help if the solution begins to crumble in your hands:
- You need to add another spoonful of glycerin.
- Next, add a few tablespoons of dissolved citric acid (not juice) to the total mass.
Painting porcelain afterwards is very difficult, as a special glaze is needed. However, adding a little dissolved food coloring can create some truly beautiful items.
DIY birds made from salt dough
This type of handicraft is called bioceramics.
For simple figures, the dough recipe includes:
- 1 cup flour;
- half a glass of finely ground salt;
- 125 ml water.
We begin preparing the material for modeling by combining flour and salt. Gradually add water to the mixture in small portions until you get a tight dough that does not stick to your hands, but does not crumble.
Step-by-step instructions:
- Draw a bird template on paper and cut it out.
- Roll out the dough into a layer about 1 cm thick.
- We cut out a figure and decorative details from the dough according to the template - balls for decoration, a wing.
- We glue the decor to the main part using a brush dipped in water.
- We make indentations along the contour of the figure and decorative elements using a felt-tip pen cap and a toothpick.
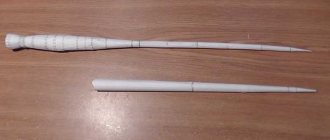
- Carefully insert a long wooden skewer into the base of the craft.
- Dry the product thoroughly. This can be done on a radiator or in the oven at low temperature.
- We paint the figurine and coat it with varnish on both sides.
You can use this craft in any way you like - insert it into a bouquet, decorate an indoor flower with it, put it in a gift box along with other souvenirs.
The figurine can be either flat or voluminous. The choice of option depends on the purpose of the souvenir, the imagination and experience of the craftswoman.
Making a bird from threads
This option is suitable for little ones, but it must be done under adult supervision. DIY thread bird step by step:
- It is best to use regular wool threads, they look more voluminous.
- You will also need a small amount of cotton wool or foam rubber.
- To work you need 3 small skeins of different colors. For example, if it is a bullfinch, then you need white, black and red.
- Next, each color is wound on a piece of cardboard. Then it is cut so that the same threads are obtained.
- They are put into a bundle and pulled together using knots.
- Foam rubber is placed in the center for volume.
This bird can even be worn as a keychain.
Finally - a little decor
And the final touch is to write a congratulation or message, which was normal among the aristocrats of Japan, or use it as a pendant. If you don't have enough inspiration, look at photos of origami birds with congratulations written on them, etc.
We recommend reading:
- Modular origami vases - a simple DIY assembly diagram. Step-by-step instructions for beginners + 125 photos of the best ideas
- Origami fish: step-by-step instructions for creating a fish using the origami technique. Many photos of finished works, diagrams, master class, video
Origami rose - instructions on how to make a beautiful rose with your own hands. The best schemes for beginners to create and assemble (photo + video)
Making an origami bird
This is another option on how to make a paper bird with your own hands for children. The instructions are very simple:
- To create a beautiful dove, you only need a square sheet of paper and a black marker.
- First, the sheet is folded diagonally.
- Next, the resulting triangle is folded in half.
- Next, the upper corners are bent upward.
- Having turned everything over, the folds are repeated on the other side.
- Next, the structure unfolds as in the boat technique.
- An internal fold is formed.
- The corner bends upward again.
After this, the structure unfolds from the side, and the dove gets a wing. The head in this scheme does not look very similar to itself, however, using a marker you can fill in the eyes and make the beak more pronounced.
Let's fly...
If adults want to fold something beautiful and functional out of paper, it is much more important for children to get an exciting toy. The next model is addressed to young masters, which, unlike other types of origami birds, actually flies, and does not sit on a support or float in a suspended state.
How does she do it? The principle of movement is the same as that of the well-known paper airplanes. The aerodynamic qualities of origami allow you to cover quite large distances, and by making it out of thick paper, you can get not a disposable, but a fairly durable toy.
In appearance, the “flyer” most closely resembles a swallow or swift.
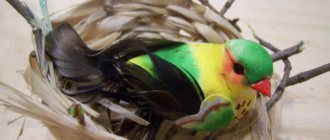
Birds made from cotton pads
This is one of the simplest options that is suitable for little ones. There is no need to print anything out; all the necessary materials are at hand. Here are simple instructions:
- To begin, draw the background in watercolor on a thick sheet of paper. The sky and a branch from the tree are added.
- After this, take two cotton pads and connect them together on a sheet with glue. Next, another disk is taken and cut into two parts - these are the wings.
- After this, you can add eyes and beak, which are also made from scrap materials.
Even a child as young as 2 years old can do this cute work. It is advisable to use a glue stick to glue the parts together.
Step-by-step instruction
Mark a diagonal fold on the sheet. Place what you got with the middle line facing you. Fold the sides towards the center. A basic “kite” figurine will be released. According to the picture, bend the triangle located at the top back.
We recommend reading:
- Origami envelope - the best schemes for assembling an envelope from paper without glue. Simple instructions with step-by-step guidance + 120 photos
- Origami paper swan - simple instructions with step-by-step guidance. Photo, video, master class, secrets of craftswomen
- Origami butterfly: step-by-step master class with real examples in the photo. Subtleties and secrets from craftswomen + instructions and video lesson for children
Bend the sides towards the axis in the middle. The top layer of the future figure should be raised.
Now fold the previously marked folds in the other direction to get the basic “Fish” shape. Lower the triangles located at the top down.
Next, return it back, but fold it in half. The result will be something resembling a crown. Bend the lower part of the top 2 times. Then tuck all the folds inside, closing both halves.
Turn the resulting model 180 degrees over. In the area where the head is supposed to be located, create a reverse inner fold.
The final touch is to draw the bird's eyes with a pencil, pen or felt-tip pen.
We recommend reading:
- Origami paper flower, made by yourself. 140 photos of original ideas + step-by-step instructions
Origami dog - step-by-step instructions for children. 123 photos of original ideas for creating a dog out of paper using the origami technique (master class + video)
- Origami owl: a review of the easiest ways to make an owl out of paper using the origami technique. 124 photos of original ideas + instructions with video tutorial
Of course, it won’t fly, but it will perfectly decorate any room. Whether it's the kitchen or the desk. So we assembled a bird for children using the origami technique.
And the option for more experienced people is best to simply watch on video, because... It will be much more difficult to explain than to simply show.
Egg shell craft
The question: “Which came first: the chicken or the egg” is not worthwhile in this type of creativity. Definitely, to make a souvenir you need to take an egg and only then it will turn into a chicken. Below are several master classes on how to create them.
What is necessary:
- Eggshell (whole),
- paints or corrugated yellow colored paper or thin rope,
- perhaps knitting threads,
- eyes for toys,
- red thick paper or thin colored cardboard for the beak and scallop,
- yellow colored paper for wings,
- scissors,
- PVA glue,
- plasticine,
- stick or stand,
- needle,
- plate.
Work algorithm:
- Get a raw egg.
- Carefully make holes with a needle or nail from the bottom and top.
- Blow the white and yolk through the holes onto a plate; they can be used for cooking.
- Rinse the shell well under water.
- Dry.
The next step depends on what material you have prepared for making the chicken.
Chicken painted
If you choose the simplest method, then you need to take egg-colored gouache and paint the shell.
Instead of gouache, you can use Easter sets.
Chicken wrapped
The shell can be wrapped in yellow corrugated paper, glued with PVA glue or yellow soft craft foil.
Chicken thread
The next idea is also with shells. Take thin twine or knitting threads. The shell is coated with glue. The rope is secured over the top hole with the same glue or a small piece of plasticine. Then it is wound around the shell in a spiral. Each layer is under the other, close to it.
Having reached the end, the rope is cut and the lower end is secured in the same way as the upper.
While the chicken is drying, other preparatory work needs to be done to create it.
Wings, a beak and a small scallop are cut out of thick colored paper or thin cardboard. If you have feathers, wings and a crest can be made with them.
All parts are glued to the shell, and the eyes are also glued there. If you don’t have purchased eyes for toys, you can draw dots or circles with a black marker, or make them out of paper.
If the chicken needs to be hung, make a loop of thread, attaching it to the comb. And, if you carry it with you, it’s easier to attach a stick to the bottom of the plasticine, for example, a cocktail tube or a sushi stick.
How to make a peacock from plastic bottles
The problem with plastic processing has long become a global catastrophe. Every day, people throw away tons of material that does not reach recycling centers.
To rid the planet of garbage, you can find plastic bottles in your yard or house and make a beautiful peacock out of them that will decorate your dacha or home area. Detailed instructions:
- The number of plastic bottles affects the size of the bird. Therefore, the more of them there are, the more massive the craft will be.
- The best place to start is with the head; it is usually made of dark and green plastic. In order for the material to undergo deformation, you need to use fire (a simple lighter). Next, you can cut off part of the neck of the dark bottle and twist it, forming part of the beak and head.
- After this, you need to take 10 bottles of 0.5 liters each, cut off the neck part so that smooth lines are obtained. Thus, when assembled, you should get small feather scales.
Next you need to make the body. To do this, you can use bottles of different sizes and colors. Usually large 2 liter bottles are cut into strips, forming a long tail.
At the end of the work it is necessary to add the characteristic features of the peacock.
Small “eyes” can be made from leftover plastic and placed on the tail using the same lighter, which will melt the plastic a little.
Making a bird using the quilling technique
Quilling is an ancient and very interesting art that is accessible to everyone. It is not at all necessary to purchase a professional tool; it is enough to use colored paper and plastic scissors. Master class on how to make a bird out of paper:
- First you need to cut a sheet of colored paper into small strips of 1 cm.
- Next, use the sharp part of the scissors to carefully pull the strip through. It should curl up into a spiral.
- From these parts you can assemble any animal, insect and bird.
Next, you can take a regular photo frame, remove the base from it and assemble the prepared parts into a composition. Spirals are easily deformed, so you can even create unusually shaped wings from them. All that is required from the master is boundless imagination.
Who is the Bird of Happiness amulet suitable for?
The amulet is very popular among people. It can be used by anyone who wants to protect their home from evil. A wooden bird can be bought in any souvenir shop, and in order for it to acquire a magical meaning, it is activated in a certain way. She protects children, helps to maintain comfort, and with her there will be no sadness or sorrow in the house.
The Bird of Happiness amulet protects the house from evil
Slavic beliefs say that the Bird of Happiness is needed by pregnant women. It is hung over the expectant mother's bed. Thus, she protects her and the unborn baby, and subsequently will help the birth pass without complications.