How to make a medal out of paper
Quite often, medals are required for some festive event involving children.
For example, they are awarded to the winners of various gaming competitions. It is quite possible to purchase such attributes nearby, in a store, but it also happens that it is very difficult to find them. Although, if you try a little, it is quite possible to make them, even with your own hands. And you will spend very little of your free time. How to make a medal out of paper
What do you need to create your own paper medal?
You will need regular or shiny cardboard, thick cardboard to match the shiny one, as well as glue and tape 1-1.5 centimeters wide. You will need scissors, a pencil and a ruler.
If you have not done this before, it is advisable to study the step-by-step instructions. It will be more convenient if you worry about everything you need for creativity in advance.
Dad gift ideas for babies
Dad, in the eyes of little children, is always a hero and superman - he is the strongest, the biggest, the most dexterous and the most skillful, he can handle everything, he knows everything and he does everything better than anyone. Therefore, when children in kindergarten are preparing for the Defender of the Fatherland holiday, they often make crafts not only on military themes. This version of the “toolbox” postcard will be an original gift against the backdrop of various tanks and airplanes, which are usually given to dads on this day.
The card is easy to make, and this type of craft is suitable for both boys and girls. And to make it even easier for kids, below is a template that adults will use to help them make such a card.
In kindergarten, it is not customary to divide crafts for February 23 into those that are more suitable for boys and gifts for dad, which are better made for girls. Everyone makes either airplanes, or tanks, or military-themed postcards. But at home with a child there is always the opportunity to do something original and unusual. Not all girls like to make military equipment; they will be closer to the kind of DIY postcards that are shown in these videos.
But even if mom and daughter decide to give dad something from the military arsenal, a great idea would be to make an airplane like this with a congratulatory message from a template.
For such a craft, in addition to the template, you will also need:
- thick cardboard;
- colored paper;
- hole puncher;
- glue, scissors and a beautiful ribbon.
Airplanes are perhaps the most neutral crafts - both girls and boys can make them. A wonderful option for such a gift for dad is a passenger airliner made from a plastic bottle.
Even if dad is not a pilot, he will be pleased to receive such a gift from his child, because as a child he probably dreamed of airplanes or rockets, and childhood dreams are not forgotten. To make such a craft, you need...
- Make something like this from a small water bottle (0.5 l). To do this, cut off the neck with a knife and cut the bottle itself into two unequal parts. Make cuts on the sides and top for the wings and tail and glue the two halves of the bottle back into one.
- Make blanks from cardboard - a tail and wings.
- Insert the wings and tail into the slits made with a knife and secure them with tape and glue.
- Use 6 plastic bottle caps to make airplane wheels by connecting them with tape, as shown in the photo below.
- Cover the airplane with old newspapers and white paper on top. Paint it with blue or blue gouache, leaving only the “glass” on the cockpit untouched.
- Glue the wheels after painting them with black and blue gouache.
- All that remains is to glue a few photographs of family members onto the body of the airliner, cutting them out in the shape of a window, and the plane is ready to fly.
If we talk about a gift for dad, which will suit him as a congratulation from both his son and daughter, then it will be a bookmark in the form of an epaulette. Best of all, the general one, as a hint that dad is always the most important one in the house. But this option will also work.
To make such a bookmark, you will need:
- felt in two colors (olive and yellow) for the base and stars;
- red thread and needle;
- cardboard, scissors and ribbon in green or any other color.
Using the template, cut out one epaulette from cardboard and two from felt. The cardboard one should be slightly smaller so that it fits easily between two fabric parts. Sew or glue stars cut out of yellow felt onto the felt blank and sew stripes with red thread.
Then place a cardboard piece between the two parts of the fabric shoulder strap and stitch all the parts with red thread using an overcast stitch. Leave a hole in the wide part of the shoulder strap in the center and insert a ribbon into it. Then sew this place too, attaching the braid to the shoulder strap.
Even a boy will be happy to make such a gift for his dad, especially if his mom tells him that all soldiers must know how to sew in order to sew on their own buttons and shoulder straps while serving in the army. This craft is more suitable not for kindergarteners, but for elementary school students, because it requires the ability to hold a needle in your hands and handle it.
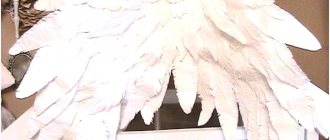
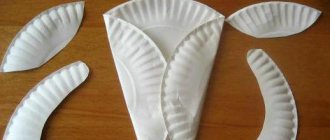
Medal shape
Now you need to glue the sides of the resulting fans together so that they create a single figure that looks like a circle. After this, a small circle is cut out of thick cardboard; its diameter should be about 2 centimeters or a little more. Carefully fold a circle of “fans” so that it resembles the sun, after which you need to glue a small cardboard circle to its middle.
Medal shape
On a piece of shiny cardboard you need to draw an even circle, the diameter of which will be 3 centimeters. To do this, it is best to use a compass, or take a special round template. The figure is cut out, after which a pre-prepared tape with a length of approximately 35-40 centimeters is glued to its wrong side. Next, a shiny circle of cardboard is glued to the middle of the previously made “fan circle”. And you definitely need to make sure that everything is glued together neatly and evenly.
Disc medal
To work, you will need 3 unnecessary CDs and a wide braid, preferably with golden decor, as well as a satin ribbon and a cord with a badge holder. You will need a glue gun and hot glue sticks, as well as a glue stick. You need to print or draw a congratulation on thick paper, then stick it on one disk, after which a ribbon folded in a loop is glued to it on the back side. Next you need to glue the second disk on the same side.
Disc medal
Making a medal out of paper is not that difficult. Unlike one bought in a store, such a medal will please and be a reason for tenderness to anyone who receives it: a relative, friend or colleague. This is an excellent holiday attribute and a way to creatively congratulate a person.
How to make a medal from paper How to make a medal with your own hands Making a medal yourself
Wooden badges are the hit of the season!
Stylish, elegant, and most importantly - environmentally friendly! That's why wooden badges have won the love of young people. Would you like an exclusive mini-brooch for yourself? We'll have to work!
To make a wooden badge for clothes, prepare:
Making wooden badges should start with a sketch on paper. You can draw whatever your imagination dictates - ice cream, an elephant, a bunny or a cactus.
Now, using a simple pencil, transfer the image onto a wooden piece about 5-8 mm thick. These are sold in craft stores.
It’s cool if you know how to work with a chisel, or burn patterns on wood (this is often taught in labor training classes). Then the surface of the icon will become textured, and the contours of the image will become clearer.
Paint over the intended image with acrylic paints. When the paint is completely dry, use a glue gun to attach the English dowel. Cover the badge with wood varnish.
The stylish decoration is ready.
When making wooden badges, additional materials are often used - threads, beads, pieces of fabric.
Master class “Medal” with your own hands in 5 minutes
Marina Afanasyeva
Master class “Medal” with your own hands in 5 minutes
Master class “Medal” with your own hands in 5 minutes
I thought for a long time about how to thank the employees in an original way and say thank you to them. I looked in the store and on the Internet for unusual forms of gratitude. I settled on medals, but they are all very ordinary and hackneyed. So I decided to do it myself.
We will need:
- blanks, openwork napkin (small);
- satin ribbons (you can use ribbon);
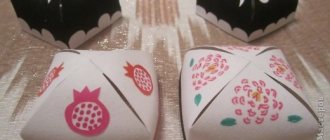
1 step. I found and selected a floral template in the form of a circle on the Internet (it’s different for everyone). Every medal has two sides.