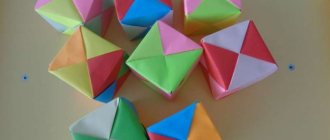
origami paper hare
Little bunnies with their long ears, big teeth and innocent eyes are loved by everyone. To learn how to make a paper hare with your own hands , you won’t need a lot of time and effort. But most importantly, children simply adore these little fluffy animals, so paper hares are a favorite craft for all children.
There are many examples with step-by-step photos, instructions, diagrams and much other useful information.
In the article you will find how to do:
- Origami paper hare
- Origami jumping bunny
- Origami rabbit diagram
- Easter bunny made of paper
- Inflatable origami bunny
- Simple origami rabbit
- Paper hare craft
- DIY cardboard rabbit
Origami hare for children
Using this diagram you can make a paper hare for children with your own hands. The model will surely appeal to children, because these playful origami hares , if controlled correctly, can move: they can curtsy, straighten their backs, tilt their heads and much more.
To make such a cute little animal, you only need a square sheet of paper. How to make an origami hare is shown in the diagram.
If this scheme is too complicated for you, detailed step-by-step instructions can be found on the website, the link is below.
Photo source: luntiks.com/kids-origami/how-to-make-origami-for-kids-step-by-step-paper-moving-hare-1772.html
How to sew on eyes
Many people wonder: how to sew eyes on a knitted hare. Regardless of the type of material, the eyes are sewn on in the usual way. Hare eyes can be made from a variety of materials. If these are buttons, then you can simply sew them on using the appropriate function on a sewing machine or with your own hands. Another method involves ready-made eyes, which can simply be glued to the fabric in the right places. Most of them already have an adhesive backing. If it is not there, then you will have to buy special glue.
Model with very beautiful eyes
If a toy is made for a child, then it is important that there are no loose elements or buttons on it, because a tomboy or a baby can tear them off and swallow them. Here it is recommended to sew on the eyes with regular threads or appliqués.
Bunny Tilda
Primitive dolls
This type of toy got its name because of its ease of implementation. This is a feasible job even for a child (under the supervision of an adult, of course). There are many options for simple dolls, and all of them are distinguished by the simple shape of the toys and the absence of complex elements both in work and in the pattern.
Easter bunny
In the culture of some countries of Western Europe, Canada and the USA, a rabbit hiding and laying out colored eggs is an integral symbol of Easter. Children look forward to this character no less than they look forward to Santa at Christmas; they enjoy looking for hidden eggs (not so much chicken eggs, but chocolate ones, really).
A handmade Easter bunny can be a wonderful addition to traditional decor this holiday. To work you will need :
Material (a piece of 30 by 30 cm is enough).- Hollow fiber or other filler.
- Non-woven fabric.
- Sewing machine and accessories.
- Pencil, paper and scissors.
- Two buttons for the eyes.
- Cosmetic blush.
A plump oval body and two ears - that’s the whole Easter Bunny. You can draw the pattern yourself, or you can use a ready-made template. The pattern for the bunny's body looks like an oval, in the upper part of which a triangle is cut out. This is necessary for a more regular and rounded shape of the toy. The hare's ears are elongated, rounded triangles, and the tail is made from a small circle of fabric.
Fold the fabric in half face to face and secure with pins. Cut the pattern out of paper and transfer it to the wrong side of the material. Trim off excess material, departing from the contours by 1-1.5 cm. Sew the main part of the body along the drawn line, 2 cm short of the sharp edges. Turn it inside out and stuff it with holofiber. Sew the opening with a blind stitch.
Cut out two ear pieces from non-woven fabric and place them on the corresponding pieces of fabric on the wrong side, adhesive side down. Iron with a hot iron through a thin damp cloth. Sew the pieces along the lines and turn them inside out. There is no need to stuff your ears with filler. To give the ears a more interesting shape, you need to fold the lower part, through which the ear was turned inside out, in half and secure it with hand stitches.
Sew the finished parts to the top of the hare's head using neat stitches. The tail for a rabbit is quite simple to make - you need to sew a prepared circle of fabric around the circumference with stitches, departing 1 cm from the edge. Pull the thread and pull the fabric together. Fill the resulting part with holofiber and finally tighten the thread, fixing it to a knot. Sew the finished tail to the hare's butt.
Sew on button eyes and brown the cheeks. You can embroider a small triangle of the nose with pink thread and lay a small vertical line down from it. Such a face will look cute and funny. The rabbit is ready!
Paper crafts
When asked what a bunny craft can be made from, most people will answer – paper. Let's consider a quick and simple craft that even a small child can handle. The basis for such a bunny will be a roll of cardboard, which is used for cling film, foil or toilet paper.
For work, you also need to prepare the following materials:
- scissors;
- pencils;
- paints;
- tassels;
- colored paper;
- glue gun
To decorate the finished product, you should purchase paper flowers or bows, bunny eyes, and multi-colored pom-poms that will serve as tails from a specialized craft store. To get ideas, you can look at photos of bunny-themed crafts on the Internet.
Three-dimensional figurine
At the very beginning, you need to carefully cut out the scans from the paper. After that, fold them sequentially, glue them with glue, and leave to dry.
While the main part of the figure is drying, you can proceed to the remaining parts. Next, the bunny’s paws and ears are cut out and glued together. By that time, the main part of the figure will already be dry, and the remaining parts can be glued onto it.
Once the entire figure is assembled, you can begin detailing. You need to carefully paint the craft. It is best to do this using watercolor or gouache, as this is the easiest way and also has less risk of damaging the figure.
It is very important that the child does most of the overall work. This will allow him to gain a huge number of skills that have a beneficial effect on his motor skills.
It is necessary not to forget what the goal was set initially. If this is a common task in kindergarten or school, you need to insist that the child do it himself. But showing him how to do it right. This will instill in him independence and determination, which will be very useful to him in life in the future.
If this is a competition, especially one that involves the help of parents, then there is no need to limit yourself. You can use all your skills and not just glue a bunny, but embroider it. This is a rather complicated method, but it will definitely be highly appreciated by the child’s teacher.
A simple model of a small hare
To make a small origami hare, you will need a sheet of paper measuring 15 by 15 cm. If you don’t have a sheet of this size, you can take a sheet of a different size. If the leaf is smaller, you will get a small hare, and if it is larger, then the hare will turn out to be large.
Place it diagonally with one corner facing you. In this position, the sheet represents the geometric shape of a rhombus. Then follow these steps:
- Fold the rhombus in half with two opposite corners, one of which is opposite you. You will get a triangle. Run your palm over the fold to secure it. Expand the triangle and return the sheet to its original position. Now bend the sheet so that the two sides to your right lie on the fold line of the triangle. The result will be a quadrilateral.
- Make a three-centimeter cut from the corner to the right along the fold line of the quadrangle. Now fold the figure along the fold line to form a triangle.
- The trimmed top pieces are the parts of the bunny ears, fold them up.
- Unfold the figure and fold the back of the triangle inward.
- Draw the bunny's eyes, muzzle, antennae, and straighten his ears. The craft is ready.
Manufacturing algorithm
Let's look at the detailed instructions for making a bunny from a cardboard sleeve. Initially, you need to apply the outline of the ears and cut lines to the roll.
If you use a roll of foil, you can use it to make two animals at once. Cut the workpiece with scissors or a stationery knife. The resulting figurine must be painted white or gray.
From a sheet of pink paper you need to cut out the inside of the ears, as well as small hearts that will serve as noses. You also need to cut black paper into thin strips to make the mustache. One hare will need three stripes. All elements must be properly glued to the workpiece.
The resulting bunny can be decorated at your discretion. This craft option can serve as a holder for pencils and pens, or as a stand for Easter eggs.
Photos of bunny crafts
Note!
Parents often wonder how to make a bunny with their own hands, because when there are children in the house, you want to decorate every room and even the garden as much as possible. Skilled needlewomen go to great lengths to create home comfort. Today we will look at several options for making bunnies from various materials.
Zayka Mi as the Russian answer to the Barbie doll)
Bunny Mi was invented by a Russian designer.
This is a very cute toy, it’s hard to find these now - everything is too “Disney” and “commercial”. I personally DO NOT like soft toys, and neither does my daughter. But we love these. A very cute and stylish toy, we finally came up with something unusual. Unlike fashionable tildes, which are most often purely decorative, interior dolls, Bunny is not only a beautiful piece of furniture - you can really play with it and dress it up - like a Barbie and Ken doll. There are clothes for both boys and girls, for example Prince and Princess. You can tie them to the wedding car instead of dolls, all the variety)). We also now consider them an ideal gift that everyone likes). At the same time, Bunnies can be given to both adult girls and children. There are approximately 100 varieties in total; a new collection is released for each season.
And the main thing that won me over is that you can buy clothes (!) from this collection to dress up your bunny.
Bunnies come in four different sizes and two shapes: standing (they stand confidently on a shelf) or sitting (their legs dangle funny from this shelf).
We have five of them in different sizes at home. The toy is very pleasant to the touch, and beautiful, and these clothes are funny - even adults can’t resist - as a result, I see, recently there has been an office with them, and bed linen.
We also have linen, and notebooks with it, and even a puzzle where Bunny sews on a retro sewing machine)):
Here are the options for sizes and shapes:
This is what the packaging looks like:
Each outfit comes with accessories for the ear, paws or handbag. Small bunnies are great for wiping the glass of a smartphone, by the way).
The quality of tailoring is excellent).
Clothes can be changed not only between Bunnies - Lala dresses up other bunnies from her collection, dolls, and even our kitten in them. The latter is especially “comfortable” because the clothes have anatomical “bunny” holes for the tail))):
A little about those Bunnies that I really like:
I gave the guy in the orange velvet jacket to Lyala for last New Year. He also has pants with suspenders and a silk bow tie. Then I didn’t know that there were a whole horde of them).
We saved the rest here for gifts. For example, on Saturday we will deliver this big princess to a little girl:
In general, there are a lot of cute models there. I especially like everything in the Marine style and those with bouquets. And, of course, the biggest bunny is the one with the heart. It is no longer on sale :-(.
And they are also very funny in stores:
A sort of brave Tailor).
The remaining several dozen models (!) can be seen and purchased in their official online store at the Zaika Mi representative office.
Hoop sheathing
How to make bunny ears with your own hands? This question arises before parents of children during the preparation for holiday matinees. The craft on a hoop, additionally trimmed with satin or plush fabric, looks impressive. The ears are brighter and shinier. To sew bunny ears from fabric you need to make a pattern.
To do this, also use the prepared hare ears template, but leave 1 cm on the fabric around the perimeter of the workpiece for sewing the parts together. Pink fabric is sewn onto the front of each ear, and then the pattern pieces are sewn together with stitches along the back side. All that remains is the inlet hole for the wire rod. To keep the ears in the correct shape, the wire is raised to the height of the ears and bent in half at the end with a loop.
To cover the hoop itself with fabric, you will need a strip of fabric, the length of which is a couple of centimeters longer than it. Then, along the front side of the fabric, the two edges are sewn together in the shape of the letter “P”, leaving only an opening for pulling the hoop and ears. Make hidden stitches so that they are not visible from the outside. At the end of the work, all that remains is to sew the parts of the ears and headband together.
Yarn paintings
If you don’t know how to use many small pieces of thread that are no longer enough for pompoms and kititsa, then make a picture from them. You don't need a large amount of materials for this. All you need is scissors, cardboard and glue, and don’t forget about the threads themselves.
Follow the algorithm of our lesson, and you are guaranteed an excellent result:
- On the cardboard, trace the contours of the pattern that will be created with threads. If you have printed the finished picture, then stick it on top of the cardboard.
- Now you have a long job ahead of you. It is necessary to cut all the threads into small, small pieces. Entrust this task to your child or do it with him. This will amuse him and at the same time force him to work a little. All pieces need to be sorted by color.
- Now start creating the painting. To do this, step by step, lay out threads of the same color on a heavily glued area of the design.
- This must be continued until there is not a single empty space left in the picture.
- Let the masterpiece dry and you can safely hang it on the wall!
Materials
To create a pompom bunny you will need the following materials:
- A skein of gray or white yarn. It will be good if it is soft, but not too thin yarn from the children's series. Such threads will not prick. It is also not entirely practical to use lurex yarn or grass. We remember the main thing: we are creating a toy for the baby, and he should be pleased to pick it up.
- Scissors.
- A needle for yarn with a wide eye.
- PVA glue.
- Cardboard for creating round stencils.
- Felt for ears (you can buy 2 colors - gray and pink). Instead of felt, you can use regular cardboard or colored paper.
- Mustache line.
- Buttons or beads for eyes and nose.
Craft on a plastic hoop
A ready-made hoop can be purchased at any department store. However, rods will be needed to attach separately made ears. They are easiest to make from thin wire. The part that will stay on the plastic is bent into a “T” shape or a loop. You can attach it securely with any superglue, for example transparent “Crystal”.
For this craft, the ears are assembled from two parts. In the photo above you can see that the outer white long parts are cut out of thick cardboard, and the inner pink inserts are cut out from sheets of felt. However, the parts are not completely glued together, but along the contours. Leave a small pocket at the bottom for putting on the wire rod. To prevent the ears from slipping, apply a couple of drops of hot glue. They will not leave stains on the craft, and the ears will look neat.