DIY paper man
This article is for those who love origami and paper crafts. Here you will learn how to make a paper man with your own hands . This is a fun craft for any age, but of course most of all for children who love to create their favorite characters, for example, Spider-Man from paper and other scrap materials.
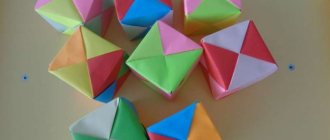
Basically, all the presented figures are made using the origami technique. In the article, only simple models are selected; anyone can make such an origami person out of paper . Step-by-step photos, diagrams and master classes will help you, and for each example there is a link to the original source. Happy creativity!
Paper men (garland)
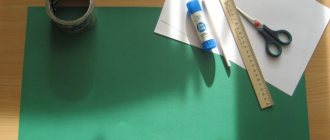
A garland of paper people is a great option for decorating your home for a party or birthday. Making it is not difficult. You only need a few sheets of colored double-sided paper, a pencil, scissors, and glue.
Fold like an accordion
Cut a rectangular sheet of paper lengthwise into two equal parts. You can also take colored paper in the form of a strip, but such options are rarely found on sale, so we’ll take plain paper. We fold the paper strip like an accordion, carefully ironing the fold lines.
Draw a man
On a sheet of paper folded into an accordion, draw half of the man’s figurine so that the figurine’s arms fall on the fold line.
Do-it-yourself tutorial “Human Figure”. Master class with photos
Making a teaching aid “Human Figure” with your own hands step by step with photos.
Master class for additional education teacher.
Making a teaching aid “Human Figure” with your own hands. Author: Garbuzenko Marina Nikolaevna, art teacher, MBU DO AR "Children's Art School of Aksay" Description: the master class is designed for art teachers, also for children 8-12 years old - provided that they are helped by a teacher! Purpose: Textbook. Purpose: production of a methodological teaching aid (template) for studying the proportions, movement, and poses of the human figure. Objectives: - help students study the proportions, movement, poses of the human figure. - with the help of a cardboard man, understand the plasticity and mobility of the human figure, consolidate the concepts of the proportional features of the figure of an adult, and use it for plot compositions; — develop fine motor skills of students’ hands; — activate students’ creative skills; — to cultivate accuracy and hard work in students; - develop students’ imagination and creativity. Working with children of primary school age, I came across their problems in depicting a person. Many eight- and nine-year-old schoolchildren portray an adult incorrectly and disproportionately. Sometimes such problems arise in children and older people. This may be due to many factors. But it happens that for a given topic it is necessary to draw a proportional figure of an adult. In addition, awareness and consolidation of the concepts of proportionality of the human figure will be important in the child’s further visual activity and contribute to a harmonious worldview. To depict a person with the correct proportions, we use a template. In my class, all the children made themselves such cardboard men, of course with my help. Whenever you can’t draw a person, or you’ve forgotten the proportions, this manual is a great help! Moreover, playing dancing people is very fun and interesting - you can come up with a million expressive poses. True, you can’t do a profile picture or a three-quarter turn, but there are a large number of beautiful full-face poses - please!
For this work we need: - a printed stencil on a sheet of A4 office paper; - a blank sheet of A4 cardboard; - pencil; - scissors; - awl; - 15 pieces of copper wire with a diameter of 1 mm, approximately 7 cm long.
So, first I suggest downloading my template drawing and printing it on regular A4 office paper
Transfer the drawing onto cardboard. If you can, print it directly onto cardstock, although this is unlikely to work. Then carefully cut out the parts from it. Poke holes with an awl according to the marks. Don't let children do this! THIS PART OF THE WORK IS PERFORMED BY AN ADULT!!!
We connect the parts using flexible copper wire. The wire should not be too thick - you won’t be able to roll it into a spiral, and the cardboard will tear. We pass it through two holes and roll the wire in a circle on one wrong side and the other. At first the revolutions are small, then large. It looks like tiny spiral roses. First we fasten the head, neck, chest and pelvis. The neck and pelvis remain below (in the background).
The second we connect the arms and torso. Please note - the shoulders are attached on top of the torso, the forearms on top of the shoulders, the hands on top of the forearms. In the diagram, the hands are numbered, so it is difficult to confuse the right with the left. Although if you mix them up, it will still work out well.
The third is to fasten the legs. We attach the thighs on top of the shins, and the shins on top of the feet.
We connect the legs with the body.
That's it - the cardboard man is ready!
I hope that the little man will help someone in his activities, as he helped me! Well, an example of its use when drawing a person is given below and can only be limited by a flight of fancy.
We recommend watching:
Tournament "Funny Colors" for children in grades 5-7. Scenario
Summary of an integrated lesson in fine arts and music for students in grades 5-6
Drawing lesson for primary schoolchildren on the topic: Winter in the forest
Scenario of extracurricular activities on MHC in 5th grade
Similar articles:
Lesson notes on fine arts, 8th grade. Design and architecture in human life
Lesson summary on fine arts in grades 5 - 6
Development of an integrated lesson on fine arts and artistic work
Japanese painting technique sumi-yo
Club lesson summary. Wood painting
What is a height figure?
Large, human-sized figures cut out of thick cardboard were the first to be used in their work by advertisers. They called their creation a hardposter, which literally translates as “hard poster.” In fact, figures made of cardboard are original posters, but not in the form of ordinary posters that are attached to a wall or stand, but silhouettes of anything. The main “hero” of a hard poster can be an actor, a cartoon or comic book character, a product or service being promoted on the market, or a representative of a certain profession.
The main task of tall figures is to attract the attention of passers-by. And indeed, no matter where the hard poster stands, it always catches the eye. Mainly due to the fact that on it a person sees something bright and interesting, and even presented in an unusual, three-dimensional way.
Paper doll with clothes to cut out
A paper doll, as a variant of a toy, continues to delight more than one generation of little girls. Of course, she is very fragile, and so are her outfits. But only with this doll you can quickly change them, and they will fit in a small folder without taking up much space. The old Soviet times, when such a doll could only be bought at a kiosk or store, have sunk into oblivion. With the development of Internet technologies in our time, any paper beauty, from a baby doll to a fairy, can be downloaded from the Internet, printed, if necessary, subsequently pasted on hard cardboard, and cut out. In our opinion, even the process of cutting out a doll and her outfits is pleasant in itself. Well, trying on clothes with a freshly printed fashionista is generally a pleasure. There are versions of paper dolls of this type in a coloring version. That is, you yourself, or your child, can color the toy as you like.
How to order cardboard figures?
It is enough to simply buy ready-made products by contacting the seller of such products. But if you need to order a hard poster based on an individual sketch, you should do this in advance. To make a life-size figure, you need to create a model. It is made using a special computer program, then a template is made from it, according to which the stand is cut out. This procedure is labor-intensive and requires a significant investment of time and money. Before the client confirms his order, the manufacturer must discuss with him the smallest details regarding the size of the hardposter, its shape and the printed image.
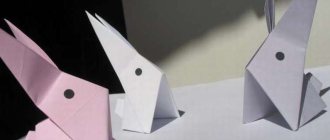
Origami paper man
This kind of macho can be made from an ordinary sheet of thick colored paper. For this we need a square sheet of paper measuring 20x20.
Bend
Bend a sheet of paper diagonally in two directions. We smooth the fold lines with our fingers until stable boundaries are formed. After folding, our sheet looks like a square with diagonal folds intersecting in the center.
Bend it in half
Next, fold the sheet in half and iron the border of the fold.
Bend it a second time
Unfold the sheet of paper and fold it in half a second time, perpendicular to the previous fold line. However (special attention should be paid to this), we bend the sheet of paper not in the same direction, but turn it over to the other side.
Triangle
Then fold the sheet of paper in half again and tuck the sides inward along the fold lines. We get this triangle.
Bend down
Bend the top of the triangle down so that it touches the base. Iron the fold line.
Second time
We bend the top a second time, this time towards the fold line.
Bend
Then fold the end of the top in an identical way, and accordion fold all the fold lines.
It should look like this.
Harmonic
We bend the entire fabric of the triangle with an accordion.
Expanding
Unfold a sheet of paper.
We fold
Then we fold along the fold lines on all sides towards the center, as shown in the photo above.
Additional fold lines
We form two additional fold lines at a short distance from the main one. This is the future face of our little man. And again we fold the canvas accordion-style towards the center, like last time.
Forming a little man
Next, we proceed directly to the formation of the face and arms of the man. Unfortunately, in photo format it is not very convenient to highlight all the small nuances of production. You can study this method in more detail in the video for our article (see “Origami Man”).
Assembly procedure and reamer cutting
Before you start collecting papercraft animal diagrams, you need to clear your workspace of unnecessary items. After this, you can proceed to printing blanks. Here you will need to pay attention to whether the parts are numbered. If not, do it yourself with a pencil on the gluing margins. This will help save time when gluing large crafts.
- Cutting out parts. There are three types of lines according to which the blanks are cut. Solid line - cut off a piece of paper using scissors. The dotted line bends inward on models without textures, and bends outward on models with textures. Dotted - no textures outwards, with textures inwards.
- Preparing folds. In order for the part to bend in the correct position, you must first go through all the lines. Fold the workpiece along the dotted lines, then press them further with a ruler. Don’t be afraid to bend it too much; when gluing, everything will “fall” into place.
- Gluing papercraft diagrams of animals. The folded edge of the paper on the outside is generously coated with glue. The numbers on the “ears” of the parts are a place for gluing; look for the same pair for each number and connect them. The gluing is hidden inside the craft so as not to expose the technical parts.
Don’t rush to connect all the parts of the craft together, wait until the previous gluing has completely dried, and only then continue working. The finished model must dry completely (from 1 to 3 hours), after which it can be transported.
Papercraft can be challenging for beginners, so the pieces need to be glued together carefully. Even small errors of 1-2 millimeters can result in large mismatches. When the figurine is ready, it can be painted. Sometimes crafts are decorated with garlands or light bulbs, turning them into a night light.
Cardboard figures: tips for making. Growth figures
Cardboard figures are one of the subtypes of decorations. In business they are used to attract the attention of partners and clients, in entertainment - to create the necessary ambience, in everyday life - to decorate space. Such installations are often found, but not everyone knows how and where they are made. The article will tell you what cardboard figures are, what they are like, how they differ, and where they are obtained. The publication also presents useful picture templates with which you can make large cardboard decorations for a party or presentation yourself.