I welcome everyone to the pages of the site. Today's theme will be especially beautiful and fabulous. We will learn how to make crowns from different materials for our princes and princesses.
Although we do not live in the tsarist era, sometimes we want to plunge into this historical atmosphere. And the appropriate outfits and attributes will help us with this. And of course a suitable event. For example, it could be just a game or a children's party. You can also arrange a themed photo shoot or party. In general, I think you will find a purpose. Therefore, choose the master class with the crown you like below and proceed to the most interesting thing - the creative process!
Craft template
The finished crown can be of absolutely any shape, size and made from any suitable material. Before printing and using the template, you need to adjust it to the desired size.
How to find out the size of the finished crown? Measure the circumference of the child's head - this will be the size of the product. When preparing the template, leave 1-1.5 cm for gluing the crown. You can edit the template to size in any photo editor.
Accessory made of wire and beads
You should take care of the frame. To do this, you will need a wire from which to form a circle according to the size of the child’s head. 5 elements no larger than 12 cm in size are prepared from the same material. Each piece must be folded in half and then secured to a hoop made of wire. Coat all elements with a glue gun.
The beads will be attached to this base. They are selected so that the tones match. A bead or stone is threaded onto the wire and then carefully twisted. The luxurious decoration is completed with beads through which a wire is threaded. Then the resulting elements are wrapped around the workpiece.
A crown made of soft wire can be complemented with various elements:
- pom-poms;
- snowflakes;
- asterisks;
- beads;
- other decor.
It all depends on what event and what dress it is created for. Products are decorated with flowers and other plant elements. There are no limits to the imagination of masters.
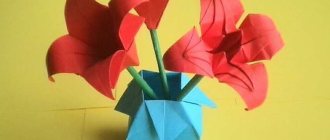
Paper crown for princess
A paper crown decorated with sequins looks very interesting. To bring your idea to life, you will need yellow or gold paper, scissors, glue and large sequins. This is the simplest version of the crown and is quite easy to make:
The first step is to prepare a template. You can either find the blank on the Internet or draw it yourself.
The resulting template must be attached to a sheet of colored paper, circled and cut out. Having adjusted it to the circumference of the child’s head, the product must be glued and wait for the glue to dry completely.
We recommend reading:
- DIY polymer clay jewelry: review of the best master class with step-by-step instructions for beginners (150 photos of original ideas)
- DIY polymer clay flowers (120 photos of the best ideas) - simple instructions with full description + master class and video tutorials
- Quilling for beginners (200 photos) - step-by-step instructions with description. The best master class on creating quilling crafts with your own hands
The last step is to decorate the craft: take large sequins and cover the product in random order or laying out a specific composition.
Why use a crown template?
Even the most primitive option, which does not involve additional decoration, will be an excellent way to spend leisure time. To adults, homemade decoration seems ridiculous, but in the eyes of a child, everything looks different. Crowns made of foamiran or any other paper material are used during games and holidays. Sometimes such decorations are made in order to highlight a particular child (for example, a birthday boy) or, conversely, to emphasize the uniqueness of each member of the group.
Children are taught to work with special scissors (not sharp) from the age of 3; older children already know how to follow a contour, wrap paper, use a pencil and ruler. Even when using a crown stencil, this activity has a positive effect on the child's development:
- If a sketch is created in advance, fine motor skills, speech (when discussed with a parent), accuracy, and coordination improve.
- During such a lesson, they simultaneously study geometric shapes and primary colors, reciting these points.
- Imagination and imaginative thinking develop as the child creates a unique craft.
- Experience with glue, scissors, paper and brushes has a positive effect on the further development of these skills; they will definitely be needed at school.
- Children always enjoy the opportunity to create something with their own hands, so their mood improves.
Typically, for such crafts, not only a crown template is used, but also felt-tip pens, pencils, scissors, glue, elements for decoration, as well as paper or cardboard as the main material.
"Fur" crown
A real royal crown with fur trim can be made from cardboard and cotton wool.
Prepare for work: thick cardboard, cotton wool, paint, glue, scissors, decorative elements. So, first, let's cut out a template from plain paper and transfer it to cardboard.
Next, you need to cut out the blank and glue it. We will make a fur trim along the bottom of the product. To do this, draw a straight line around the circumference, spread with glue and cover with cotton wool.
Cotton wool can be painted with any color. Instead of cotton wool, you can use a strip of faux fur. To decorate the product, you can use any material - beads, colored rhinestones, sequins, cotton balls, and so on.
Antique model
A crown of vertical sharp triangles on a common hoop first appeared in Ancient Rome and was called radiant. The emperors who wore it identified themselves with the sun god Helios, being considered his direct heirs on earth. The radiant crowns seemed to confirm these claims. During the era of the late Roman Empire, in 274, the ruler Aurelian introduced the cult of a new, more militant deity Sol Invictus - the Invincible Sun. In honor of him, he wore a crown with long teeth that diverged to the sides, even more reminiscent of the rays of the daylight.
Much later, already in the 19th century in France, a similar dress became a symbol of the Goddess of Liberty, copied from the Roman Juno. She was depicted in particular on the Great State Seal and represented a young woman in a Greek chiton with a radiant crown on her head. The image inspired the sculptor Frederic Auguste Bartholdi to create a giant statue of “Liberty Enlightening the World,” which was installed in New York Harbor and became the “hallmark” and the most recognizable landmark of the United States.
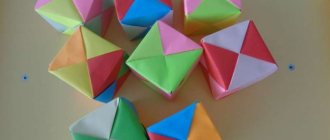
Even in the early Middle Ages, when heraldic shields began to be used, the radiant crown was called antique, indicating that its owner belonged to the Roman family. Knowing the glorious history of royal jewelry, making it will be even more interesting. The crown consists of triangular modules, which are made up of squares 30x30 (or 21x21) cm. Their number depends on the size of the child’s head and usually varies from 6 to 8.
It is better to take paper with a print; there are two types. An origami crown made from it will look more impressive than from simple metallized sheets.
You will also need:
- rhinestones of different shapes, colors and sizes;
- ruler;
- scissors, heat gun.
Step-by-step instruction:
- Place the first square face down on the table. We bend it in half widthwise and then open it.
- Fold in the same way in the other direction, making a notch.
- We bring the upper corners to the center line.
- Add the remaining squares in the same way.
- We bend the lower part of each module to the horizontal axis.
- Let's make a second turn.
- We bend each module so that the right and left parts are at right angles.
- You can make 2 parts with different patterns.
- We take 2 modules.
- We place it with the front side facing us.
- We open one down, wind the second to the middle and close it back.
- Gluing the modules together.
- We continue until we get the required amount and close the circle.
All that remains is to decorate the origami paper crown with rhinestones, sequins, cord or other decorative elements. Children will be happy to assemble it with their own hands, the main thing is to help them work with hot glue.
Elsa's Crown
Many girls are fans of the cartoon “Frozen” and each would like to be like one of the heroines. Please your daughter and make an Elsa crown with her, especially since it is not at all difficult to make.
What can a crown be made from? Prepare silver cardboard, glass beads of a similar shade, thin gray satin ribbon, scissors, glue, and blue pebbles for decoration.
Prepare a strip of cardboard 3-4 centimeters wide and a length equal to the circumference of your head. Tie pieces of satin ribbon to the ends of the strip.
Using the template, cut out the front of the product and glue it to the strip. Next you need to decorate the product. Use glass beads and blue stones or rhinestones for this. This is the simplest option for making a crown for the heroine of an animated film.
Using a figured stencil and decorative elements, you can make a more original product.
Winter crown using quilling technique
The next crown is worthy of real queens. To make it you will need:
- white paper;
- thin paper of different colors;
- wooden stick;
- plastic ruler with circles;
- scissors;
- glue.
The product is made using the quilling technique:
Winter Crown (Step 1)
- On a sheet of paper, draw a template for the future crown. Cut multi-colored paper into strips of different widths. We recommend using a length of 25 centimeters and a width of seven centimeters.
- Start from the base. It will require twenty circles and two diamonds. We connect the resulting circles using PVA and get the first row.
- Fill the gaps that were created when gluing the circles together with diamonds. This is the second row of the crown. Repeat alternating until you achieve the required height and width of the product. (Step 2)
- A snowflake completes the look of the crown. To do this, we glue together multi-colored circles and diamonds. We fix the snowflake in the center of the product.
As you can see, the crown using the quilling technique looks magnificent and flawless. This manufacturing method can be used for other crowns.
Miniature crown
A neat little crown can be made from a toilet paper roll.
Shape one edge of the sleeve and thread a thin elastic band through it to hold the crown on your head. The sleeve crown can also be glued to the rim.
You can decorate the products to suit every taste: cover them with colored paper, sequins, paint them, add feathers, flowers, and so on.
Crown "Miss Golden Autumn"
To realize an original idea for making an autumn crown, you will need:
- headband;
- leaves (real or made from colored paper);
- thin wire;
- scissors.
Attach the leaves to the rim using thin wire. To prevent the leaves from falling off during the event, they can be pre-sprayed with varnish.
Paper leaves are secured with a glue gun. The bright, fluffy headdress is ready.
Homemade crown decoration
Currently, on the shelves of specialized craft stores you can find many decorative elements for crafts, which can also be used to decorate a homemade crown: rhinestones, beads, sequins, colored and packaging crowns, satin ribbons, lace, plastic flowers and much more.
In addition, you can decorate the product with improvised materials - pebbles, pasta, shells, cotton wool, and so on.
A DIY crown is a fun, original accessory for a carnival, party or children's entertainment. By using your imagination and imagination, you will end up with a product of incredible beauty.
Cardboard decoration
Girls love to dress up to look like princesses. A boy may also need an attribute of power if he is a royal person at a party in a kindergarten or school. Parents can make their child's dream come true by making their own crown. An item created with your own hands will perfectly harmonize with your outfit.
A simple accessory is cut out of cardboard. You just need to draw the shape of the product; it is selected in advance. You can find a suitable pattern. Using a ready-made template, it’s easy to create a beautiful accessory. A crown made of paper with your own hands will look original, you just need to find a material of a suitable color. An elastic band is attached to the finished product on both sides.
Photo of a paper crown
Did you like the article?
1+
Monarch headdress for boy
Any boy will be happy with the chic crown of a real king.
You will need:
- a sheet of high density paper;
- scissors;
- glue;
- rhinestones and beads for decoration.
How to do?
- Make a strip for the base of the crown and glue its ends together.
- Take paper of a different color and cut out 2 more strips, which should be wider than the previous one. Glue them to the base with the letter X. Measure it on your head and see if anything is in the way.
- Cut out 6 stripes to decorate the crown. Trim one end of the strips to create a semi-circular oblong border line. Glue the opposite side of the strip to the base of the craft from the inside. It turned out something like the sun with rays.
- Study the photo of the crown and give the stripes the appropriate shape. Attach the decoration to the top. Decorate the craft with the prepared decorative elements.
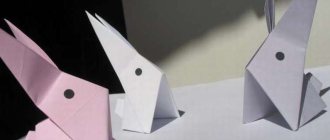
Modular 3D origami made of white paper - swan
Modular origami allows you to create very beautiful, voluminous crafts. This master class shows you step by step how to assemble a beautiful swan. This product can become a decoration for your home. Step by step instructions:
- According to the scheme, we make 458 white triangular modules. One orange or red for the beak.
- We take three modules, insert the corners of two into the pockets of the third.
- Let's add two more.
- Using the same scheme, we add two modules.
- We position the structure as shown in the photo.
- We insert the corners into the pockets.
- We assemble three rows in this way, each of which consists of 30 modules. We close in a circle.
- We put on the fourth and fifth row modules in the same way.
We take the workpiece, gently press the center with our thumbs, turning the product inside out.
We bend the edges up.
- We put on the sixth row, arranging the modules in a checkerboard pattern.
- In the seventh layer we make wings: put on 12 modules, skip two corners, attach 12 more. On the missing narrow section there will be a neck, and on the remaining wide section there will be a tail.
- In the next row we reduce the wing by one module.
- Similarly, reduce each row until one triangle remains.
- We make the tail according to the principle of decreasing by one module in each new layer.
- We make the neck and head 10 white and 1 red module, on which you need to glue the corners so that the beak is not forked. The neck is assembled like this: we insert the corners of one into the pockets of the other module.
- So we collect the rest, arching our necks.
- We place the neck in the right place.
How to make a crown - in modular origami:
In total you need to collect 760 yellow, 84 red, 30 white modules. Each module is assembled from 1/16 sheet (A4 format). The crown is assembled from the bottom up. The first and second rows - 60 yellow modules each.
The corners located at the top (of the first row) should be lowered down. The corners located at the bottom (second row) should be raised up.
Third row – 60 yellow modules.
Fourth row. After 4 yellow modules, one red and one white module alternate. There are 6 red and 6 white modules in total, 48 yellow ones.
Fifth row. Red modules are rubies, white modules are diamonds. A total of 12 white, 12 red, 36 yellow modules.
Sixth row. 6 red, 6 white, 48 yellow modules.
Seventh row. 60 yellow modules.
Eighth row. 60 yellow modules. 2 modules are usually put on, 8 - backwards, etc. to the end of the row.
There will be a total of 6 such parts (see photo). They are assembled from modules located in the usual position in the eighth row. There are 31 modules per part.
The parts are arranged in pairs opposite each other.
The teeth of the crown are laid out between the parts. First row: 3 yellow, 1 red, 3 yellow modules.
Second row: 2 yellow, 2 red, 2 yellow.
Third row: 1 yellow, 2 red, 1 white, 2 red, 1 yellow modules.
Fourth row: 1 yellow, 2 red, 1 yellow module.
Fifth row: 1 yellow, 1 red, 1 yellow module. Sixth row: 2 yellow modules. Seventh row: 1 yellow module.
The top of the crown is decorated with either a gold or silver “ball”. The first and second rows – 8 modules each.
The first two rows are turned inside out.
The ball is placed on top of the crown. For strength, you can glue it with glue.
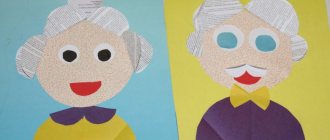
"Chamomile Flower"
Every child loves this plant with a bright yellow center and delicate white petals around the edges. Make it your own great pleasure. To create your own daisy, you should stock up on cardboard, PVA, scissors and multi-colored sheets of paper.
Sequencing:
- White paper is drawn using a ruler with a simple pencil. It is cut into strips of equal length;
- small circles are drawn on a yellow background and carefully cut out;
- on green paper, draw lines along a ruler and cut out three stripes;
- you will need to cut out a few green leaves;
- white strips for the petals are glued together with loops;
- All the details are glued onto the cardboard in the places outlined in pencil.
Paper selection criteria
Not every sheet of paper is suitable for assembly
You need to pay attention to strength and density so as not to tear the figure with a careless movement. You should also not use thick paper - it is not so convenient to fold, this can be a problem for beginners
The selected sheet should hold the folds made and remember them. Therefore, beginners are not recommended to work with napkins - they do not hold their shape well, crumble, and lines are hard to see.
What you can use:
- white office;
- color office;
- sticky notes;
- special sheets for origami;
- wrapping paper for gifts.
Professionals use special paper - kami. It can be found in the creativity departments.
During training, if you feel sorry for wasting good sheets, you can arm yourself with newspapers, pages from magazines or pages from old books.