how to make a paper tree
You don't need seeds or soil to grow paper trees for kids. Read this article to learn how your own paper tree Most of the crafts presented are so easy to make that you will soon have a whole forest full of fantastic paper trees.
Here are more than twenty examples with step-by-step photos, diagrams and collages. These are different options for three-dimensional and two-dimensional crafts, origami trees and models made using the quilling technique. And of course, the children’s favorite craft, a paper Christmas tree . You can make them tall or tiny, fun and modern, or elegant and traditional... or somewhere in between... the possibilities are endless.
DIY model for kindergarten “Africa”. Master class with photos
Master class with step-by-step photos on making the “Africa” model.
Author: Elena Vladimirovna Ivanova, teacher at MBDOU “Kindergarten No. 34”, Ivanovo Description: this master class is intended for educators, additional education teachers, and caring parents. The layout is a box with materials (plants and animals). All components of the layout are mobile. Children fill it with content as they wish. Playing with it promotes the development of creative thinking and the development of the makings of a landscape designer. Purpose: design of a nature center (educational area - cognitive development), use as a visual and didactic aid, for independent games. Goal: Making the “Africa” model. Objectives: - expand children's understanding of different continents; — to develop an interest in the animal world and the peculiarities of the climatic conditions of Africa; — create conditions for the development of cognitive and research activities of children.
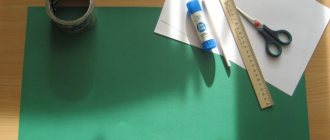
Africa is the second largest continent after Eurasia, washed by the Mediterranean Sea from the north, the Red Sea from the northeast, the Atlantic Ocean from the west and the Indian Ocean from the east and south. Africa is also the name given to the part of the world consisting of the continent of Africa and adjacent islands. There are 55 states in Africa. The African continent crosses the equator and several climate zones. Due to the lack of constant precipitation and irrigation, there is practically no natural climate regulation anywhere except the coasts. There are different versions of the origin of the toponym. Initially, the inhabitants of ancient Carthage used the word “Afri” to refer to people who lived near the city. This name is usually attributed to the Phoenician afar, meaning "dust". After the conquest of Carthage, the Romans named the province Africa. Later, all known regions of this continent, and then the continent itself, began to be called Africa. Another theory is that the name "Afri" comes from the Berber ifri, "cave", referring to cave dwellers. (From the Internet) Materials for work: A lid from a box of copier paper, colored paper, colored cardboard, 2 pictures of African nature, 2 files, scissors, glue, a simple pencil, ruler, double-sided tape, sand, animal figurines .
Safety precautions when working with scissors: 1) Work with well-adjusted and sharpened scissors. 2) Place the scissors with the rings facing you and the closed blades away from you. 3) Do not leave cutting tools open. 4) Don't leave tools on the edge of the table. 5) Watch the movements of the blades while cutting, take care of the fingers of your left hand. 6) Pass the scissors only closed, rings first; 7) Do not play with cutting instruments, do not bring them to your face. Use scissors only at the table.
Work process:
1. Measure a strip of colored paper equal to the sides of the lid in width, length, height. You can choose any color, I liked purple.
2. Cover the sides of the box.
3. Glue yellow cardboard to the bottom of the box.
4. Cut out the letters A, F, R, I, K using a stencil. (The stencil is larger than A4 format, I had to scan it 2 times, otherwise the edges would not fit).
5. Trace the letters on colored paper and cut them out.
6. Glue the letters onto the box where the front will be. You can decorate with a picture or sticker based on the theme.
7. Print pictures or photographs of African landscapes. I suggest these:
8. Seal them with cardboard and put them in a file to preserve their appearance. If possible, you can laminate it.
9. Stick pieces of double-sided tape on both sides along the length and width.
10. Glue the pictures on these sides.
11. Cut out an “oasis” from blue paper.
12. Glue it to the corner of the box.
13. Pour sand on the opposite side. I recommend pouring boiling water over it first and calcining it in the oven.
14. Install a palm tree in the oasis (I took plants from the designer set).
15. Add low-growing shrubs to the “desert” area.
16. Place animals.
In independent play activities, the children themselves drew and sculpted animals and plants that could be useful to them in the plot.
Thank you for your attention!
We recommend watching:
Do-it-yourself cut-out pictures for preschoolers Fire safety layout in kindergarten Do-it-yourself layouts for kindergarten Do-it-yourself farm layout for kindergarten
Similar articles:
DIY layout for kindergarten on the theme Autumn
DIY educational panel for kindergarten
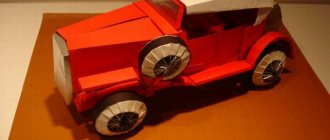
Making trees for a gaming table or diorama
To make a tree crown we will need the following:
The trunk frame itself.
Kitchen sponge.
Paints in the right shades. I had X-28 (Park green), XF-5 (Flat green), X-15 (Light green), XF-58 (Olive green) and XF-3 (Flat yellow) and X-20A solvent for these paints
Old electric coffee grinder
The technology itself is simple. We tear off the hard layer from kitchen sponges and throw it away or keep it for our own needs. Cut the sponge in half. We put one half aside; it will go on foliage of a different shade. We cut the remaining half into pieces with a side of about 2 cm. Pour two milliliters of paint into a coffee grinder and add the same amount of solvent. Load the cut half of the sponge. Grind to the desired consistency. I crushed it into lumps, as in the photo below.
Lay out to dry. We repeat the entire procedure for the remaining shades. I made four shades of green.
After drying, some of the powder particles stuck together and turned into flakes. Not scary. We put it in the coffee grinder again and literally fluff it up a little. Don't overdo it, there will be dust. I scattered the prepared powder into the jars.
PS: there is a pharmacy near the house, I ran there and bought a dozen 100 ml. jars for analysis. By the way, I recommend these for all kinds of solutions, bulk materials and small things. They close tightly and look neat. There are also small ones, 50 ml. They also work well. Here they are:
PPS: The sponges in the sets come in interesting and matching colors. Red and yellow ones don’t need to be painted, there will be autumn foliage, if you tint green or yellow, the result will look more interesting than tinting a white sponge.
PPPS: Do not forget that the coffee grinder cannot be used for its intended purpose in the future, unless, of course, you like the invigorating aroma of acrylic paint in your morning coffee.
So, we are ready to create trees. In a suitable bath we make a mix of our greens. For deciduous trees, I took three types: the bulk was from X-28, and I added a little XF-5 and X-15.
You shouldn’t make a one-color crown; it will look flat and monotonous. Apply PVA glue to the knots on the tree frame...
and carefully roll the crown in powder. If there are bald spots left, then coat them with glue and sprinkle with herbs.
Let it dry for several hours, then carefully shake off the excess and admire the result. It wouldn’t hurt to consolidate our result by spraying the wood with hairspray.
Instead of PVA, you can use Moment-Crystal contact glue. If the crown seems “watery”, then after spraying with hairspray, the tree can be rolled in powder again (or several times). I made the Christmas tree a little differently: I trimmed the frame with wire cutters to a characteristic cone shape, used only the darkest powder, and after fixing it with hairspray, lightly “salted” it with light X-15. But this could have been done with X-28, then there would have been less color contrast.