For many people, a tie is an indispensable part of their wardrobe. Some people buy them in brand stores, others look for cheaper options. But few people think that you can make a tie yourself. Moreover, you can sew a real one and make a variety of crafts for different purposes.
You can also do the opposite - make crafts from old ties, but this is the most obvious, because many in childhood sewed outfits for dolls from unnecessary ordinary clothes.
It is much more interesting to make the tie itself, and this is possible from different materials and with different levels of complexity.
Materials for making a tie
There are quite a lot of material options for crafts in the shape of a tie; these can be paper and cardboard, fabric and buttons. The paper origami technique will help inexperienced or limited people to quickly and easily create crafts. The same applies to children; origami is the most suitable way for them to create a tie. The main features of the form of the created object are reflected in the minimum folds of the paper work.
In order to give your work a decorative look, you can use ready-made ideas from the Internet.
Paper clip bookmark
A small and simple bookmark made from a paper clip will help hold pages in place.
- From the fabric you need to cut small strips 1.5 cm wide; for convenience, leave the length to the maximum.
- Iron the strip and fold it into a bow, tie the middle with thread.
- Attach the bow to the paperclip with wire and fill it with glue.
- Cut another strip of fabric 0.5 cm wide, use it to cover the glue.
Shorten the ends of the bow.
Example of a paper tie idea
There is a ready-made template, using it we cut out two pieces of absolutely identical ties from cardboard. Now we need to make decorations, for this we can use figures cut out of paper. We glue the two parts of the tie together and apply them to the front part for decoration. Using a hole punch, we will make holes and thread a beautiful ribbon through them.
Butterfly
This tie model looks very elegant. It gives any composition an elegant and festive look. A paper “butterfly” can also be used for a New Year’s costume, especially for children, since it is quite durable and will not tear at the slightest movement.
To make the origami craft more durable, you can coat it with nail polish.
Paper is not the only material suitable in this case. You can make an origami bow tie from banknotes. The gift turns out to be very impressive, and the banknotes, if carefully folded, will not be damaged.
A paper bow tie is made in the same way as a “money” bow tie. From a standard A4 sheet, first make a square, then fold it in half lengthwise and cut it into two rectangles. Each of them is ready to turn into an aristocratic bow tie.
Fold the rectangle in half along the long side. We put the corners inside. We bend the long sides so that they meet on the central axis of the workpiece.
Bend the right side diagonally, perpendicular to the left. Straighten and repeat the action in the other direction. We fold the resulting triangles inward inward and, as it were, “close” the workpiece.
We bend both parts of the “bow” from the place where the “middle” folded from triangles ends. We lower the free ends down, and bend the upper corners of each half.
Turn the workpiece over. Very carefully straighten the middle, stretching the “bow” to the sides. It turns out to be a tie “knot”. Let's crush it slightly for plausibility.
If desired, the free ends of the origami can be bent back. We get two options, assembled according to the same scheme.
Tie as a gift
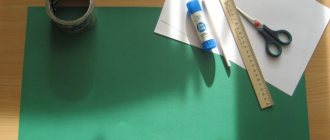
In order to make a gift tie, you need to prepare cardboard, multi-colored napkins, a pencil, scissors, gel glue, regular glue and a hole punch.
Gift creation process
We draw a tie and several stars separately on cardboard, and then cut them out with scissors. We place all the stars on the tie in a chaotic order. This is necessary in order to outline them with a pencil. It is necessary to immediately make holes for threading the tape. For decoration we will need napkin balls. They can be done in two ways:
- cut into small squares and roll into balls;
- tear the napkin into pieces and form into balls.
Apply glue to the drawn stars and place balls on them. It is worth paying attention to the fact that the same-color balls are pressed tightly against each other and that the entire space of stars is filled. We glue the edges of the tie with a different color of napkin balls. We fill the remaining space with other balls of different colors.
After everything is dry, apply glitter gel glue. The last step is a ribbon that can be glued with tape on the back side.
Lasse-origami
Extremely elegant and beautiful bookmarks are obtained when working using Japanese technology.
Let's look at how to make a hedgehog and a Christmas tree. Both the animal and the tree will need:
- sheets of white and brown paper;
- black felt-tip pen;
- glue and scissors.
The difference will be that for the New Year's beauty you will need sparkles (tinsel) and another sheet of paper - green.
Unique tie
The following materials will be used to create an original and unique tie:
- colored cardboard with an unlimited number of colors;
- various pictures of cars, planes, ships, etc.;
- corrugated multi-colored paper;
- scissors, napkin, glue and oilcloth.
Making a Tie
To make the base of the tie, we use a ready-made template. Using a template, cut out a tie from cardboard. To create the braid, we will use crepe paper. To do this, use scissors to cut out a rectangle measuring 5x20 centimeters from it and roll it into a tube.
We connect the resulting paper tube with a tie using glue. On the front side, we lay out the prepared cut-out pictures in a different order and glue them.
It turns out to be a very beautiful tie that is not available anywhere else.
Shape selection
How to sew a tie yourself? First you need to decide on the shape of the future product. For the office dress code, the Windsor or Regatta accessory uniform is suitable for men. The classic shape of a men's tie is the herring, but today stylists are suggesting moving away from the standard pattern. To make the image unique, use neckerchiefs and plastrons.
- Ascots are recommended for grooms and participants in luxurious festive events.
- A plastron decorated with a pin looks great with a casual-style vest.
- Shar Pei is a knotted tie that has many folds.
For large, corpulent men, wide-shaped ties from 7 to 10 cm are suitable. Young people choose models with a smaller knot and ribbon width. The tie should reach exactly to the place of the belt buckle - no higher, no lower.
To choose the shape of the accessory, you need to decide where and with what you will wear it.
Ready-made templates and patterns of ties
Such templates are available ready-made on the Internet; they can be a good preparation for future crafts. Save them for yourself or print them out right away, this will be your lifesaver. On some templates there is a place for ribbon decoration; in the upper part there is a fold line for this, we fasten them with glue and thread the ribbon.
Drawing
Another simple and easy way to make a bookmark with your own hands. This work can also be entrusted to the smallest member of the family. Let the child draw an object, flower or animal.
Then you should circle the drawing and carefully cut it out. You need to make a hole in the top of the round blank and pass a beautiful lace or ribbon through it. The bookmark is ready.
Another option for making a round bookmark is also possible. A beautiful image, say roses, is found on the Internet and printed. Then the child paints the flower, cuts it out and sticks it on cardboard. The remaining actions correspond to the first type of work.
Making a shirt and tie
To make the base of the postcard, take a sheet of colored cardboard and fold it evenly in half. We draw the shape of the shirt on cardboard of a completely different color, the next step is to cut out the shape. We apply the shirt to the base of the card using glue. Well, as for the tie itself, we also depict it on cardboard and carefully cut it along the contour with scissors.
The next step is to apply the tie to the shirt. Inside the craft, write your most sincere and positive wishes to the person for whom this wonderful and original card is intended.
You can decorate your shirt and tie at your discretion; there are many options. So, the work is ready.
The best gift is a gift made with your own hands, and if this gift is also made with soul, then it is a clear leader. Creating original and unique crafts with your own hands becomes a very entertaining and interesting process. This activity can become a hobby for both adults and children.
With the help of such simple activities for making a gift with your own hands, thinking, imagination, fantasy and creativity develop.
Decent couple
The origami tie is original, but not very practical. It's another matter if it is added to a shirt using the same technique. This wonderful tandem can be used as a postcard or an envelope for money. It is advisable to make an origami shirt and tie in contrasting colors so that both decorative elements are clearly visible.
It is not necessary to take the classic combination of white and black or their monochrome variations. A tie of a bright shade looks very interesting against the background of a “Hawaiian pattern” or a checkered pattern.
For an origami shirt, we do not use a square, as usual, but a whole sheet of A4 or A5 format. We outline the main fold lines - there are four of them. Fold the sheet in half along the long side and open it. Then we bend each half in the middle again.
Now that the rectangle is marked, open it completely and carefully smooth it out. We fold the corners of the short side so that they are on the central axis of the workpiece. The result is two diagonal lines.
We lay two corners to the intended diagonal. Then we fold the top part of the rectangle along with them. Straighten the bent part. We “close” the sides of the future shirt and bend the “sides” with our fingers, starting to form “pockets”.
We continue to process the upper part of the “shirt”. Our task is to fold an envelope from it so that the side parts (“pockets”) formed by the previous folds stick out. When we press them to the main workpiece and turn it over, the silhouette of a shirt with sleeves will be clearly visible.
We bend the lower part of the product by 2 cm, from the wrong side to the front side. This is the future collar. Turn the workpiece over.
We mark 2 cm from the bottom upward. We bend both sides so that we get a shirt collar. Fold the blank in the middle and carefully place the shirt under the collar.
At this point, you can finish making the shirt. If desired, make a flat stand at the bottom. Then the origami turns into a table card. You can put money or a small note with your wishes on the side.
All that remains is to add a tie to make a cute and impressive souvenir.
If some aspects of the assembly remain unclear, a training video will help clarify them:
Without words about love
Girls give the object of their sympathy postcards in the form of a shirt and tie, but young people can also make an equally creative souvenir in return. This is a good surprise for Valentine's Day or celebrating an important date for two. Although no one forbids presenting it without any reason.
A heart with a tie looks very unusual. And you can do it in a few minutes.
You will need: single-sided decorative paper - colored or packaging.
The sheet should have a square shape. Draw a diagonal fold line. To do this, fold and straighten the workpiece again. We place it on the table with one of the vertices facing us. We bend the upper corner to the previously outlined diagonal. Then we fold it again.
Let's turn the workpiece 90º so that the double-folded side is at the top. Let's straighten the square and fold it into an envelope. We turn the sheet 90º again, the side with the three marked fold lines is on the right. Laying the corner. It should reach the second line. On the other side, we bend the same corner towards the first, forming a “pocket”.
We straighten the fold and, smoothing the side edges, turn it into a tie. We fold the bottom part of the paper pattern to the wrong side. Then we fold the resulting figure along the central diagonal.
We bend the right side of the workpiece and place it under the tie. We do the same with the left side.
Turn it over. We bend the upper corners.
And we tuck it inside our figure. The next task is to round the corners of the workpiece so that it resembles a symbolic heart as much as possible. Sequentially bend the vertices of all triangles, as shown in the figure below.
Turn the “heart” over to the front side.
How to make a bookmark from toys for a book
An equally interesting bookmark can be made from small children's toys.
- Cutting off part of the toy
- We take a simple paper clip with pliers and heat it.
- We insert a hot paper clip into one of the parts of the toy.
- You need to wait a little for the paper clip to harden, and the bookmark will be ready.