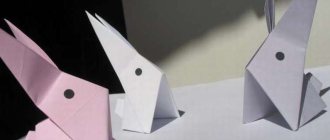
If it is not possible to have live fish, there is always an alternative. Check out 45 great examples, how to make paper fish with your own hands, this is a great activity for children and a good opportunity for parents to exercise with their kids. There are many options on how to do it paper fish for children.
From this selection you can choose a paper fish that is most suitable in terms of complexity or attractiveness, of course, depending on the age of your child. Movable fish and accordion fish, flying and voluminous, made from toilet paper rolls and woven from paper strips, and even a small aquarium with paper fish - nothing is impossible for little lovers of paper crafts.
How to make a decorative autumn wreath
You can weave a beautiful wreath from bright autumn leaves to decorate windows, doors, walls, etc. A wreath attached to the front door will delight not only you, but also your guests.
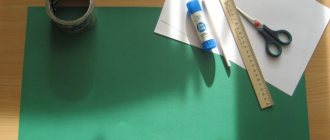
What you will need for the craft:
- flexible branches of any tree;
- dried leaves of different colors (contrasting combinations, for example, yellow and red, look best);
- bunches of red berries (rowan, viburnum, etc.);
- physalis;
- glue;
- spool of strong threads;
- decorative metallized threads;
- small bird figurines for bouquets.
How to weave a wreath:
- The branches will serve as a frame - make a round or oval wreath out of them.
- For strength, secure the structure with thread in several places.
- Wrap the frame tightly with gold thread, leaving small branches free.
- Glue the leaves to the branches.
- Attach the berry clusters using thread.
- Glue or wrap physalis with threads.
- Finally, attach the birds to the wreath.
A finished craft made from leaves in the form of a wreath can be hung anywhere in the house; it will delight you with its beauty for a long time and remind you of the most colorful time of the year.
Beautiful autumn leaves can be used not only for simple children’s crafts, but also for complete interior decoration. One such product is a fruit bowl.
To make such a vase you need:
- glue and brush;
- inflatable ball;
- petrolatum;
- scissors;
- maple leaves.
Step-by-step instructions:
- Inflate the balloon to the size you need.
- Lubricate the surface of the ball with Vaseline, this is necessary so that the leaves do not stick to it during the process and are easily separated from it.
- Fix the ball in a stationary state, this will make it more convenient for you to make your vase.
- Glue maple leaves to the ball, having first generously coated them with glue.
- To make the vase strong enough, you will need several layers of maple leaves.
- As soon as the last layer is completed, carefully coat the product with glue again and leave for 3 days.
- Burst or deflate the balloon and remove any remaining residue from the product.
The original interior decoration is ready.
Craft for children “Lemon miracle”
This is a very simple lemon craft. But it will make the kids very happy, because they are very quick to make, which means there are a lot of them. You can create a whole army of these “lemons”. You can play with them or serve the table, and then add them to tea or eat them like this. How to do?
- 1. To make this craft, we only need lemons, a knife and a marker.
- 2. Using a knife, carefully cut out a mouth on the lemon, and use a marker to make eyes for it. The bulge of a lemon is its nose. That's it, that's all science.
By making more of these, you will decorate the table in an original way, and you will delight the kids with indescribable delight !
Textile
Can be used partially, especially as large elements for the main product. For example, it could be water. Of course, children will not be able to cut out the material themselves. It is difficult to cut straight, the material crumbles.
Requires some dexterity. Parents or a teacher can help with this by making large blanks and templates in advance for the whole group.
The child can be assigned homework - cutting something out of fabric under the supervision of the parents.
Individual approach to each child
During preschool preparation, the educational process requires an individual approach. If one child is diligent, you should entrust him with cutting out elements from cardboard paper.
But entrust a real fidget with gluing the details of the composition. This way, the noisy child is involved in a group activity and will not get bored while cutting out appliqués for a long time.
The formation of work fronts depends on several aspects:
- Temperament. Don’t push a slow baby by motivating him with the words “Everything has already been done!”
- Preparation. Not every child and their parents practice appliqué or other exciting activities at home. Therefore, not every child in the group will master certain tasks.
- Initiative. Don’t contradict your child if he wants to draw fish instead of the sea.
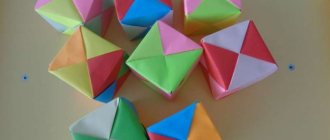
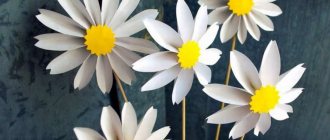
Panel Underwater world
Now we want to offer you an amazing craft that can become a real art object in your baby’s nursery, or perhaps an unusual gift for friends, a teacher, or a kindergarten.
For this craft, you will need a large sheet of blue or light blue colored cardboard. This will be the base of the panel.
Using ready-made templates, make inhabitants of the underwater world.
Print the templates onto colored paper, then cut out and fold along the dotted lines. You should succeed: fish, crab, starfish. Glue the finished paper characters to a sheet of blue cardboard.
You can cut out algae from green paper, and air bubbles from white paper.
Video master class:
Fruit craft “Heavy tangerine”
This unusual craft will surely delight your kids, because these tangerine people look fun and original. They are very easy to make, and then they can be displayed on the table, which will undoubtedly decorate . Let the children try to take the tangerine from the funny guard! How to do it?
- 1. For the Mandarin Man craft, we will need the mandarin itself, a cutting board and a knife.
- 2. Using a knife, cut out the figure of a man on the fruit - head, body, arms, legs and carefully remove the excess skin.
- 3. The resulting silhouette is now separated from the fruit, straightened and made to look like a person. That's basically it.
The “heavy tangerine” craft is ready! [icon_text box_type='icon_in_a_box" box_border='yes' box_border_color='#e6d1d1′ box_background_color='#f2dcdc' icon='icon-link' icon_type='circle' icon_size='icon-2x' custom_icon_size=" image=" icon_position ='top' icon_border='yes' icon_border_color=" icon_color=" icon_background_color='#c7bbbb' title=" text='
Simple tori recipes for children.
Useful, beautiful and interesting. Diet for a nursing mother with colic: Here. How to choose a crib for a newborn: https://tinymini.ru/poleznie-statii/detskaya-komnata/krovat-dlya-novorozhdennogo.html' title_color='#000000′ text_color='#000000'] Place it on the table, surprise guests and delight the children who with great pleasure !
Peculiarities
A foam fish or foam rubber is a bait most often used for fishing for predators. Resembles the shape of a small fish
It is made of foam rubber, thanks to its porous structure, the fish does not sink and retains its buoyancy in the water, which distinguishes it from other baits and attracts the attention of toothy predators
Most often pike perch bite, but of course pike and perch. The foam rubber is easily saturated with water, so it must be wrung out periodically.
Foam rubber is a fairly inexpensive material and can be easily processed, so making a foam rubber fish with your own hands is not difficult.
Plasticine fish
Many children enjoy the cutting process. You can encourage them to shape the fish.
For the craft we prepare:
- colorless manicure varnish;
- modeling board;
- plastic knife;
- round vase.
- beads, plastic aquarium plants;
- plasticine;
Step-by-step recommendations:
- You need to remove the sausage from the plasticine and cut off the third part with a knife.
- Divide the cut piece of plasticine in half. We make a ponytail on one side. To do this, roll the ball and flatten it. Now use a plastic knife to cut out the desired shape of the tail and draw grooves along it. From the second half we similarly make one large fin and two smaller ones.
- We take a large piece of plasticine aside and make the body of a fish out of it. To do this, roll the ball and use a knife to form the scales in the form of semicircles.
- We collect fish. To do this, attach the tail, the upper large fin and the lower small one.
- We sculpt voluminous eyes. First, we attach two flattened white balls to the fish’s head, then smaller green ones on top of them. Small black circles complement the eyes. To make your eyes shine, you need to paint them.
- Cut out a mouth at the bottom of the fish's head.
- To decorate the composition, take a small spherical vase or a small round aquarium. Place beads at the bottom of the container. Place the finished fish in the center and distribute the seaweed around it.
Craft “Hedgehog made from fruits”
There is a lot of fruit in the house, but the child does not eat. I want to feed my child vitamins, but it doesn’t do any good. There is a way out - offer him a fruit hedgehog. [icon_text box_type='icon_in_a_box" box_border='yes' box_border_color='#e6d1d1′ box_background_color='#f2dcdc' icon='icon-comment' icon_type='circle' icon_size='icon-2x' custom_icon_size=" image=" icon_position ='left' icon_border='yes' icon_border_color=" icon_color=" icon_background_color='#c7bbbb' title=" text='You can and should invite him to help make it, and then the baby will definitely eat it later and ask for more ' title_color=" text_color=”] And such a beautiful hedgehog will always be an amazing decoration for children’s and holiday tables. How to do?
- 1. We need a large pear, a bunch of grapes, toothpicks, a knife, a plate and three clove buds.
- 2. Take a pear (make sure it’s not soft, otherwise it won’t hold its shape) and very carefully remove the skin with a knife.
- 3. Then we take a bunch of grapes and place large grapes on a toothpick so that the fruit is in the very center of the stick.
- 4. Place the pear in a plate so that the place where the stalk was (now this is the face of our hedgehog) is on the side. We begin to insert toothpicks into the back.
- 5. Make a semicircular row, then a second one (should fit tightly), then fill the back to the end, without any empty spaces.
- 6. Select three small carnation buds, use a toothpick to make holes for the eyes and nose in the muzzle and insert them there.
The fruit hedgehog is ready! All to the table!
Equipment
The size of the fish is also important, it depends on the size of the hook on which it is planned to be mounted.
Foam rubber fish can be equipped with: a regular single hook, offset, double or triple. For easier rigging, it is better to cut the fish on the back.
Invariably, the best sinker was and will be the Cheburashka, although modern collapsible weights can be very convenient if you need to quickly change the bait. The shape is not particularly important, however, it is better to use a streamlined one.
To get better acquainted with this Russian fishing invention, look at the photographs of foam fish.
Note!
- A nod for do-it-yourself winter fishing - how and what to make good gear from. 115 photos and video tips from the pros!
- Do-it-yourself spinners - types, features of homemade spinners and their assembly (100 photos and videos)
- How to minimize fishing costs? Useful tips from experienced fishermen and an overview of current solutions (65 photos)
Craft for children “Banana Dachshund”.
Kids love all kinds of kind and cute animals, so they will be happy to help you make a beautiful and simple dachshund from a banana and carrots that will decorate any holiday children's table. How to do it?
- 1. Take two bananas, peppercorns for the eyes, a small carrot for the dachshund’s mouth and several toothpicks to hold the structure together.
- 2. Then take a banana, cut out the legs from its peel and secure everything with toothpicks. The body of our dachshund is ready.
- 3. Take the second banana, cut it and make ears from the peel; We make eyes with pepper, and from a carrot we get a smiling mouth, which should be secured with a toothpick. The dachshund's face is ready.
- 4. And finally, we carefully attach the head to the body with toothpicks, and the “Banana Dachshund” begins to delight the kids!
[icon_text box_type='icon_in_a_box" box_border='yes' box_border_color='#e6d1d1′ box_background_color='#f2dcdc' icon='icon-link' icon_type='circle' icon_size='icon-2x' custom_icon_size=" image=" icon_position ='top' icon_border='yes' icon_border_color=» icon_color=» icon_background_color='#c7bbbb' title=» text=' A useful and interesting leisure activity is modeling from salt dough. Dough recipes and craft options. How to teach a child to draw - read here! ' title_color='#000000′ text_color='#000000']
DIY spring vegetable and fruit crafts for school
Although no time of year compares to autumn in terms of the abundance of vegetables and fruits, you can create original toys and decorations for your home long before the harvest season. For example, zucchini appears in some regions already at the end of May. You can create various animals from them. The photo presented in the article shows crafts in the form of penguins, to create which, in addition to the zucchini themselves, you only need a sharp knife, a carrot and black peppercorns (for the eyes).
Operating procedure:
- one end of the zucchini is cut off so that it can stand straight;
- cut out the skin on the resulting head and body (see photo);
- insert black peppercorns into the right places;
- a decoration and a beak for a penguin are cut out of carrots;
- secure all the parts to the zucchini, either by inserting them into the slots or using toothpicks;
- They make legs from pieces of carrots and place them on a flat plate;
- install the body of a penguin on them.
A piece of the sea in a cardboard box
There are so many photos of aquarium crafts on the Internet. Try making a product from an ordinary shoe box, and if you find a base with a transparent lid, then nothing will fall out of it, and the aquarium will turn out like a real one.
Necessary materials for the craft:
- shoe box;
- fishing line;
- buttons;
- paints;
- colored cardboard;
- pebbles, shells for decoration.
Preparation method:
- Prepare the base for the aquarium: paint three sides with blue paint and the bottom of the box with brown.
- From colored cardboard we cut out figures of sea animals: fish, octopus, starfish, etc.
- Glue shells, starfish and pebbles to the bottom of the aquarium.
- You need to make a small hole in the fish, thread and tie a fishing line.
- Make cuts on the roof of our aquarium - this way the fish will move inside their house.
- We pass the other end of the fishing line through the hole and tie the buttons.
- Glue the octopus and algae to the sides of the box.
You can add new fish to this toy craft every time.