You don't need seeds or soil to grow paper trees for kids. Read this article to learn make a paper tree DIY is a fun and interesting activity for the whole family. Most of the crafts presented are so easy to make that you will soon have a whole forest full of fantastic paper trees.
Here are more than twenty examples with step-by-step photos, diagrams and collages. These are different options for three-dimensional and two-dimensional crafts, origami trees and models made using the quilling technique. And of course, the children’s favorite craft, a paper Christmas tree . You can make them tall or tiny, fun and modern, or elegant and traditional... or somewhere in between... the possibilities are endless.
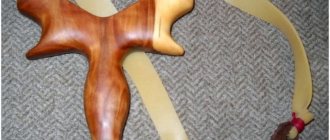
Master class on making wood
Let's make a tree in bonsai style. To do this, you need to follow a certain method, prepare wire, beads, and glue.
Master Class:
- You need a thin wire 45 cm long.
- Beads are strung on it and twisted into a loop. 8 beads are enough for one loop.
- Prepare a bud from 10 loops, leave 10 cm of wire, cut the rest.
- You need to make 150 blanks.
- We begin to form a branch, for which we take three branches and twist them together with a thread.
- After making a few turns, add two more simple branches. All blanks must be applied.
- This way you get a DIY wire bonsai , top and branches.
- During winding, a thick wire is inserted into the barrel, which will stabilize the entire structure.
- The base is prepared, the trunk is inserted into it and secured.
- The entire surface of the branch is covered with a layer of glue and alabaster.
- After drying, the base will need to be painted brown with a special durable paint. You can add another, light shade on top for decoration and decoration.
- Cover the base with pebbles, gluing them to this surface.
New Year's applications for children
Christmas tree applications
The winter beauty of the Christmas tree can come in a variety of designs. In addition to crafts, children will also love the “Paper Christmas Tree” applique, especially since you can choose any desired option from the ten presented below. This is some kind of collection of all the works together, with links to detailed reviews with photos and instructions.
More details: paper Christmas tree applique
Funny deer
The New Year's applique "Deer" is suitable for children of all ages. It is very easy to make, and then show your creative talents and decorate it festively and brightly.
Read more: New Year applique with deer
Volumetric snowman
A postcard with a snowman is a wonderful three-dimensional applique that a child can make for his loved ones on the eve of the New Year holidays.
More details: applique with a snowman
Toy on a branch
A New Year's card with a three-dimensional branch and a toy is an excellent holiday applique, a gift to loved ones that a child can make with his own hands.
More details: applique with a toy on a branch
This is not all applications for children; the selection will be supplemented with new and interesting ideas, voluminous, using different materials and techniques.
To be continued…
Pumpkin
You will need: rolls of toilet paper or paper towels, scissors, twine or rope, stick, pva glue, for decoration - glitter or book pages.
Master Class
- Cut the sleeve into circles.
- Apply glue to one piece, sprinkle with glitter or glue a piece of page and leave to dry.
- Decorate with glitter or book pages with every detail.
- Gather the circles onto twine to form a pumpkin.
- Glue the stick into the middle of the pumpkin.
The pumpkin made from bushings is ready! You can find even more crafts made from bushings HERE.
"Children's" option
For young and beginning origamists, very simple diagrams of paper trees have been developed. Models will be used for cards, garlands or as tags for gifts. You can make deciduous trees:
Step-by-step instruction:
- We use a 15x15 cm square. We start from the front side. Draw a diagonal fold.
- We bend the right and left sides towards it.
- We bend the inner points along the dotted line.
- Turn the workpiece over.
- We raise the sharp lower corner until it intersects with the vertex.
- And, stepping back about 1 cm, bend it back.
- Fold the corners as shown in the picture.
- Open the “pockets” from the inside and flatten them.
- Raise the bottom point to the nearest fold line.
- We lower the top.
- Turn the figure over to the front side.
- Fold the product in half and open it. This will give it a little volume.
Coniferous wood is no less quickly and easily made, which will be appropriate all year round, and not just during the winter holidays.
Step-by-step instruction:
- This time we start from the inside out. Otherwise, the first three steps repeat the previous algorithm. We outline the diagonal.
- Fold the side corners towards the center.
- Turn the figure over to the reverse side.
- Fold the sides again towards the middle line.
- We also turn the figure over to the reverse side.
- Fold in half.
- We bend the top layer down with an offset.
- Combine the red dots.
- Turn the tree over to the front side.
Fish made from colored paper
You will need: colored paper, scissors, glue, markers.
Master Class
- Take a square of paper and fold it in half.
- Cut corners.
- Cut the fishtail into 6 strips.
- Throw each strip to the other side according to the principle of braiding, secure with glue.
- Draw eyes with a felt-tip pen.
- Make the required number of fish of different colors.
Paper fish are ready!