Necessary tools and materials for work
To make a basket from newspaper tubes with your own hands, you will need the following materials:
- old newspapers, magazines or advertising leaflets;
- scissors;
- universal glue or glue stick;
- stationery knife;
- water-based brush and stain;
- cardboard or thick paper for making the bottom;
- scotch;
- an oblong knitting needle with a diameter of 2.5 mm or a thin kebab skewer;
- clamps for strong fixation;
- container for diluting paint;
- ruler;
- pencil;
- varnish;
- heaviness for oppression.
How to make newspaper tubes
Paper vine can be made as follows:
- cut strips of 7-10 by 30 cm from the starting material with a stationery knife;
- lay the strip vertically and begin to twist it diagonally using a knitting needle located at the bottom left at an angle of 30 degrees. Having reached the end, you need to glue the corner to the base of the workpiece;
- pull out the knitting needle and leave the tubes to dry for 15-25 minutes;
- When folding strands, it is advisable to make one end slightly wider than the other to lengthen them during the working process.
There is an even simpler option for making newspaper vines without twisting. It is necessary to cut strips, as for forming tubes. And fold them several times lengthwise to form edges of equal width. They can become material for ordinary wicker, which will serve as the bottom of the basket.
Oval bottom
If you decide to make a product with an oval bottom, in this case everything is even simpler.
First of all, lay out the required number of racks parallel to each other at a distance of about 2 cm. Take 2 working tubes and braid the racks with a rope.
Now you will need another working tube. Fold it in half and braid it around the first row of braid. In this case, the first two working tubes (or rather their ends) play the role of side posts.
Next, follow the step-by-step photo diagram of weaving an oval bottom.
Want more visual examples? A detailed video is at your service.
Staining the tubes
You can easily paint a basket made from newspaper tubes with your own hands. You can paint both the finished product and paper blanks.
For strength, the created craft must be thoroughly soaked in PVA glue and allowed to dry.
It is better to dilute it with a small amount of water and apply with a brush. Then they paint with acrylic paint or stain in several layers for an even shade. If desired, you can add different dyes or colors - paste. To get an even tone, you must first coat it with any product that has a coloring pigment: brilliant green, iodine, food coloring, gouache, tonic.
It is better to paint newspaper blanks before starting work, since unpainted gaps will not be visible. A special fabric dye, water-based acrylic polymers, stain and food coloring agents are used. The stain is suitable for painting white tubes; they look like natural vines. The main shades are oak, coffee, mahogany and walnut.
To paint long workpieces, you need to make a device from a piece of large-diameter polypropylene pipe.
Both ends must be cut off and a plug (plastic jar) glued to one of them with PVA glue, which will prevent liquid from leaking out.
Then you need to pour the coloring agent into the pipe, not reaching the top a little, and place it on a special stand.
Next, you need to take several tubes and lower them into the solution. After impregnation, they should be pulled out and immersed in the coloring liquid with the other side. During the dyeing process, it is advisable to add emulsion to the container for good dyeing of the source material. At the end, all the workpieces are laid out on a level place and dried in the shade in the air.
Short strands are painted in a bottle with a spacious neck. It is necessary not to completely fill the container with dye. Then lower several tubes there and shake them for uniform painting, then turn them over and repeat the maneuver. Place on a smooth surface, dry and paint a second time to achieve a rich color.
To prevent the workpieces from becoming wrinkled, you should lay a piece of thick paper around the circumference of the bottle or pipe.
We paint the blanks
In principle, it is not so important whether you paint each tube individually or a ready-made basket. It is, of course, easier to decorate the finished product, but in this case there will be white gaps. Here the choice is yours.
Before painting, it is better to protect all surrounding surfaces - lay newspaper or unnecessary cloth on the floor or table, depending on where you are working, to avoid long and labor-intensive cleaning.
We recommend reading:
DIY paper orchid - a review of the best ideas and tips from craftswomen. Step-by-step instructions + master class (photo + video lessons)- DIY paper hyacinth: the best master class for beginners with step-by-step instructions and diagrams from A to Z (130 photos)
- Paper stars - instructions on how to quickly and easily learn how to make beautiful stars with your own hands (100 photos of finished works)
In the list above, stain is listed as a paint. It is well suited for white tubes - the color will be as natural as possible, close to the color of real wood, from oak to walnut. You can also use any other coloring material - batik, acrylic or even food coloring.
Since our tubes are long, you can use any non-metallic tall vessel, preferably with a large diameter, as a container for painting.
If you don’t have something like this lying around the house, you can make it yourself: take a polypropylene pipe, cut it off at both ends and glue a plastic cap on one end - a jar lid or something similar. Ready. You can start painting.
Pour dye into the container. Make sure that the liquid level is below the height of the tubes so that they don't sink headlong, and you don't have to fumble around in the paint looking for those unfortunate tubes.
Dip several blanks into the paint, wait a little, then pull them out by the unpainted edge, turn them over and lower them the other way. Wait again, then remove and lay out to dry on a flat surface.
We recommend reading:
A paper crown is a simple instruction for creating original jewelry with your own hands. Templates, diagrams, master class, exclusive design (110 photos)Weaving from newspaper tubes for beginners: the best free master class, with step-by-step instructions. Photos, diagrams, unusual ideas, videos
Paper rose - how to make it yourself? Step-by-step instructions, original ideas, photos, videos, master class
Keep them away from sunlight. If the color seems insufficiently saturated to you, do not be lazy and repeat the procedure again.
Ready! You can move on to the next step.
Methods of weaving from newspaper tubes
A do-it-yourself basket from newspaper tubes can be woven in two ways: solid and openwork.
In addition, there are different types of weaving, the main ones of which are:
- Simple weaving . Consists of making a frame of rigid paper tubes. First, the narrow tip of the workpiece is fixed to one of the twigs of the frame and braided with a newspaper vine through one around the remaining parts of the frame at the back and front. You can use several lines and alternate twisting through 1-3 warp rods.
- Layer weaving . Allows you to create a dense and reliable craft. It is necessary to wrap the cord around the first four supports and leave it sticking out to the side. Place another rope near the last braided post and braid the next 4 parts of the frame with it. It is necessary to add new tubes until the place where the wrapping began is reached.
- Openwork weaving . The technique is selected based on the intended pattern: columns, diamonds, stars. Most often, this type of twisting serves as a decoration for other types of work, forming carved holes.
- Rope weaving (spiral) . The principle is to wrap the vines not only around the supports, but also to intertwine them with each other. For a simple design, you need to take two tubes and braid the first post at the back, and the second at the front. The next support should be done in reverse, and the third one the same as the first. Then alternate in the same sequence.
Types of weaving
The most suitable option for beginners would be simple weaving. The basket will turn out to be minimalistic, without patterns or delicacy, but more durable and reliable.
The point is to draw the tube in turn from the front side, then from the back side.
The interval can be different - braid every second post, every two second ones, or, for example, skip 2 and braid the third.
You can even alternate intervals in one basket, but it’s better to start simple. You can weave obliquely, that is, place the tubes at an angle to the frame.
A slightly more complicated version of the simple one is layer weaving. When weaving layer by layer, the tubes should be as uniform in size as possible so that the product comes out neat.
The cord wraps around the first 4 posts and remains sticking out. The last braided post becomes the first for a new cord, which braids the next 4 posts. And so on, weaving from left to right until we return to the place where weaving began.
The openwork type of weaving suggests that different patterns will be obtained on the basket. The pattern depends on the weaving technique. Such baskets turn out to be more decorative, since they are less strong due to large gaps in the woven figures.
Rope is a simple and at the same time beautiful type of weaving. The principle is to braid both the racks and the cords themselves together.
For example, take two tubes. One weaves the stand from the face, the other from the inside, the next one - on the contrary, the next one - like the first one. In the spaces between the posts, the tubes cross each other.
Weaving baskets of different shapes
Baskets made from newspaper tubes have different shapes. Even beginners can weave various configurations with their own hands.
Square basket
Sequence of making a square basket:
- You should start by forming the bottom. To do this, take a cardboard strip and bend it in half. Punch holes in the cardboard at a distance of no more than 2 cm. Insert an extended “work cord” into the resulting holes.
- A long vine should be woven near the cardboard. Having reached the edge, turn and weave in the opposite direction. To extend the “working cord” it is necessary to re-glue the paper blanks. The bottom width may become narrower and should be adjusted to the desired size.
- Then the side walls of the braid are formed. An oblong newspaper rope is required, which is bent in half and both ends are threaded into the bottom. The tails that appear from the bottom of the bottom must be bent upward and secured. The “working cord” must be made to the desired size depending on the required height.
- To fix the sides, you need to place a heavy thing in the center , similar to the shape of the future basket. Then attach the frame tubes to it using an elastic band.
- Start weaving from the bottom of the craft. Using a long piece, weave it into one side, alternating the placement of vertical strands, placing them at the back and in front.
- At the beginning of work, the tip of the “working cord” remains, which can later be used as one of the components of the frame . It allows you to form an odd number of vertical blanks. After the next row, the unoccupied edge should be braided. The procedure of weaving the sides is carried out in a circle until a basket of the required size is obtained.
Rectangular basket
To form the bottom of a rectangular basket, you need to cut out a template of the intended size from cardboard, place it along the edge of a twisted tube, and secure the structure with clothespins. Then lay newspaper blanks across the base so that each bundle in turn goes from below or above the base, and adheres to the desired grouping of weaving.
For some period, the craft should be covered with another paper cord and secured with clips. The bottom will become like a comb, and then you need to weave in new pieces, observing a checkerboard pattern and forming the desired density. If the bottom becomes strong enough, you can remove the clothespins because it can hold its shape on its own.
When the base is woven, ray-like strips remain, which in the future will be used as the basis of the frame, and with their help you can form frame walls. If the tube runs out, you need to add a new one. When decorating the edges, unnecessary ends are cut off and glued inside.
Punnet
To create a round-shaped product using the rope method, you need to follow the following steps:
- Take six strips of newspaper and use clothespins to make a solid surface.
- Repeat this manipulation again and fold both parts crosswise.
- Then put the paper vine into the work. Bend the workpiece in half and place its tip in the place where the cross is formed.
- Next, a circular bottom is woven. The work cord must be bent with each turn, which is made at an angle of 90 degrees. This maneuver, which forms a ring, should be repeated 4 times, and then fixed with clamps.
- The sides are woven in pairs. Place an oblong double paper vine exactly under the created bottom. The ends of the paired strands should be secured to the basket.
Oval basket
An easy way to create a basket:
- to create the bottom you need to take several newspaper blanks and weave them together in the form of an oval.
- fasten them by tying them together
- Having formed the base, you need to weave it according to the usual method.
- Having made the desired diameter of the bottom, wrap it and lift the tubes up.
- Secure the strands with clamps and continue weaving.
- After finishing the work, secure the edges in the usual way.
Corner basket
When weaving corner crafts from newspaper bundles, it is advisable to follow these rules:
- To make stands, it is advisable to use a vine from a whole sheet of paper for printing or use magazine source material. Soft blanks will not be able to withstand the braid.
- When designing a basket, to form a uniform bottom, you should place a weight on it, paying special attention to the corners of the product.
- For painting, it is necessary to accurately calculate the required amount of acrylic coating, because if you add another shade, the color will be far from ideal.
Transition from the bottom to the walls. Raising the racks
Once the bottom is done, sound logic dictates that somehow you need to move from it to the walls to continue working. We'll look at several ways to raise racks to create beautiful pieces.
Smooth or imperceptible rise
The easiest way for a beginner is to simply lift the posts up about 30 degrees with your hands and continue to braid them with rope. After the first circle, the racks need to be raised another 30 degrees and continue to weave with a rope.
By the third, or maximum fourth, row you need to completely align them and continue braiding. This will create a smooth rise.
This method is used when it is necessary to achieve a smooth transition of the bottom into the walls of the product.
In the finished product, such a smooth rise of the racks will look like this: the transition is not sharp, the bottom gradually turns into walls:
Simple vertical lifting. Establishing a stand for the next
To master this technology, take an additional tube, preferably in a contrasting color, so as not to confuse it further, and place it on any rack; we will henceforth call it the first one. This manipulation will allow you to “reserve” a place for the last raised rack.
So, bend the first post, bend it through the additional tube and bring it up through the next one.
Bring the second rack up through the third in the same way.
Repeat these steps around the entire perimeter of the bottom. When you reach the extra tube, take it out and insert the last post in that place.
All the racks are already up. Before weaving the walls, pull each of them up a little.
A clear and sharp transition from the bottom to the walls will be visible in the finished product:
Using a string of three tubes
If you are new to newspaper crafting, this method may seem overwhelming to you. Therefore, we suggest you start your training by watching a clear video master class from Lada Ligai.
The transition made using this technique (a rope with three tubes) will be neat and smooth:
Master class: a simple basket made from newspaper tubes
A simple model of a basket made from newspaper tubes is created with your own hands in this way:
- Use a knitting needle to twist 30 strands of newspaper strips, 10 cm wide.
- Using a jar, cut out 2 circles from cardboard. Flatten the tubes for the frame on one edge by 3 cm and glue them to one of the circles with the flattened side.
- Glue the second circle on top of the first so that the ends of the paper cords are between them. Raise the blanks up and secure with an elastic band.
- Next, you should take the newspaper edge flattened on one side and pass it behind the tube located next to the right, pulling the edge further and bringing it in front of the next paper strip. To form the bottom row, you need to alternate the workpieces in this way, putting others into the hole when they are finished.
- Weave to the desired level, then trim off the excess ends and treat the basket with glue.
Instructions
Step 1. Making tubes
To do this, you first need to cut the paper into equal sizes, for example, A4 or A5. Suppose you chose old newspapers to make a basket, which already have the size we need. Next we need to cut the newspaper pages into strips - future tubes. Here's how to do it quickly:
- Open the newspaper completely, then fold it in half lengthwise and press the fold.
- Now take a kitchen or utility knife and cut the newspaper at the fold. It is advisable that the cut areas be smooth and not frayed.
- Separate half of the resulting stack of paper, bend it lengthwise and cut it again. You will get strips about 10 cm wide. Now carry out the same procedure with the remaining stack of paper.
- Next, sort out those strips that have light edges without text or pictures - it is from these strips that you will get white tubes. They are more convenient for work, because they are easier to paint to resemble rattan or wicker. But this does not mean that you cannot use colored strips; it is simply advisable to first coat the tubes twisted from them with light paint, or paint them more densely (we’ll talk about the nuances of painting below).
- So, let's start twisting the tubes. Place a wooden skewer on the very edge of the strip (but not on the white one!) at a minimal (!) angle and try to tightly screw the paper onto it (photos 1 and 2). At first, this can be done on the table, twisting the skewer and holding the paper, and when you reach the middle of the tube, you can lift it up and continue twisting.
When you only have the tip left, you need to lightly grease it with glue and only then screw it to the end (photo 3). Woo-ala, the first tube is ready! All that remains is... to wind another 100-500 of these tubes (the exact number depends on the size of the basket). Don't be afraid, it's not that difficult or time-consuming, but patience will help here.
For those who want to learn all the intricacies of the art of making straws, we suggest watching a video tutorial from Elena Tishchenko.
So, we have learned the basic way to make tubes from newspapers. However, let's get back to the instructions.
- In this master class, the decorator first wound only 24 tubes from strips of kraft paper (7x45 cm in size), and then about 120 larger tubes (from strips 7x90 cm in size). Why did he do this? Read on.
Step 2. Making the frame
Next we need to make the frame of the basket. To do this, take a base made of cardboard or hardboard and, using double-sided tape or glue, attach the tubes to it, maintaining the same interval between them (2-5 cm). You should end up with approximately the same design as in the photo below, but the exact number of tubes depends on the size of your base and the chosen spacing.
- These tubes are called vertical posts, since later they will “stand” and serve as the frame of the future basket.
- According to the decorator's idea, the main weaving of the basket should be deliberately rough, so thicker tubes were used for the walls. However, these 24 stand tubes are made thin to make them easier to braid later. You can repeat the designer’s technique, or you can weave a basket from identical tubes.
- If desired, the cardboard or fiberboard base can be pre-upholstered with fabric, such as linen.
Next, simply glue a second piece of cardboard or fiberboard onto the resulting structure and press it. It is best to leave our workpiece to dry for 1 day.
Step 3. Start weaving
The base is ready, which means it’s time to start weaving! There are many ways of weaving, we suggest mastering the most basic one – “rope”.
- Bend the tube in half and wrap it around any vertical tube stand (you can start from anywhere);
- Then cross the ends of the tube as shown in the photo below. You will have your first loop.
- Then wrap the second post and cross the ends again. You will get the first eight.
- Continue weaving until the horizontal tubes run out. As soon as this happens, drop a little PVA glue inside each and insert new tubes to a depth of 2-3 cm (their tips can be slightly bent).
- Thus, you need to weave 7 rows if you want to make a low basket like in our master class.
How to fix racks in a vertical position with clothespins
- If you want to weave a basket with higher walls, then after the first two or three rows you need to use a template box and weave around it. In this case, you should periodically correct the weaving - align the racks, compact the woven rows, etc. For convenience, the racks can be fixed in a vertical position using clothespins, as shown in the picture on the right. By the way, if you want to weave a round basket, then a saucepan, round box, flowerpot, etc. will work as a template.
Step 4. Finish weaving
Finally, we completed the last row, trimmed and adjusted everything, and took out the box template. Now we need to finish the job beautifully. To do this, we simply cut off the horizontal tubes with which we weaved the walls, leaving only 5-10 cm of their length, and hide the ends inside the weaving (left photo below).
Great, now let's get to the racks. You can simply cut them off, lightly smearing the edges with glue, or make a simple but beautiful edging:
- Bend the first vertical post 90 degrees and braid it behind the adjacent post on the right, then bring it along the outside of the third post. And finally hide it behind it and glue it. Repeat with the next upright and all the others.
Step 5. Apply varnish
Hooray! The basket is almost ready, all that remains is to coat it with varnish. This tutorial uses acrylic spray varnish, but you can go over your braid with a brush.
- If desired/necessary, the basket can be painted before applying varnish, but it is best to paint the tubes before weaving begins - this way the coating will be of a higher quality. Water-based acrylic paints are ideal for painting; they will give the paper density and dry quickly. For more information on coloring newspaper tubes, see the following video tutorial from Elena Tishchenko.
Step 6. Attach the handles
- Cut off the buckle and the end with the holes from the belt. Then cut the middle part of the belt into two equal parts. This is what you should get.
- On the back of the resulting strips, use a marker to mark the location of 2 screws at each end of the two strips.
- Use a power drill, awl, or just a nail to make holes in the strips at each mark (8 holes total).
- On the front side of the tape, place a washer on the hole made, screw the screws into them using a screwdriver.
- Next, attach the handles to the outside of the basket. Each fastening screw must fit between two rows of weaving as shown in the next right photo. Then, from the inside of the basket, screw the end caps onto each of the 8 screws.
Woo-ala, the paper basket is ready!
A complex basket made of newspapers. Step-by-step instruction
A low, practical basket is made as follows:
- For the bottom you will need 13 newspaper tubes. 5 of them need to be placed side by side, and the remaining 8 should be laid out crosswise on top.
- Next, we braid the top in the form of a braid with one piece of paper.
- When the paper rope runs out, it should be extended.
- Weave the bottom in this way to the required size.
- Having completed forming the base, you should bend the tubes upward and braid them again.
- Having created 4 rows of walls of the future product, fix the main strips on the sides with clothespins and then form the basket. The entire craft is braided in two pieces.
- At the end, the edge is made with a figured volumetric weave.
- Hide and glue the excess ends.
- Pull out the clothespins, paint and varnish the basket.
Newspaper processing
Before you start weaving, you need to process the newspaper strips - twist them into tubes.
This is done in a certain sequence of actions:
- You need to drop a drop of glue on the edge of the newspaper strip, then place the knitting needle on it. It should form an acute angle with the lower long edge of the sheet. The diameter of the tube depends on the size number of the knitting needle: the thinner the knitting needle, the denser the tube will be.
- Twisting should be done in a circular motion, starting to rotate the knitting needle from the corner of the strip and maintaining a certain angle of inclination of the tool. The size of this angle determines the type of tube obtained as a result.
If the angle is less than 30 degrees, the tubes will be short and very dense - they are good for forming the frame of the product. If the angle is more than 90 degrees, the tubes will come out long and fragile - it is extremely difficult to work with them. The optimal size of the knitting needle angle is 45-60 degrees: the result will be a standard length, and the density of the tube will be moderate.
- When rolling the strip into a tube , you need to hold it by the edge and after each turn around the knitting needle, carefully tighten the paper. This way it will be wound tightly, which will ensure good quality of the tube.
- Having formed the tube completely, you need to carefully pull out the knitting needle and drop a strip of glue onto the corner, then press it with your fingers. One edge of the tube (from which weaving began) should be narrow, and the opposite edge should be slightly wider.
This is important so that during work, if the need arises, you can increase the length of the tube. This is done by inserting one tube with a narrow edge into the wide edge of another tube, after dropping a drop of glue.
There are types of products such as small panels, frames, decorative rugs and others, the manufacture of which requires flat tubes, which must be prepared taking into account certain nuances:
- When securing the edge of the strip with glue before twisting, you need to make sure that it does not fit too tightly to the entire length of the strip. The opposite edges of the tube should be the same in width.
- To twist, you must use a knitting needle of the required size, not forgetting that the diameter and density of the tube depend on the thickness of the knitting needle. And the wider the initial tube, the wider the flat tube formed from it will be.
- The required number of finished tubes should be laid out in one layer on the table, after which you need to walk over them with a rolling pin.
If desired, newspaper tubes are painted in the desired color. Gouache or acrylic paint diluted with water are suitable for these purposes. You can use watercolors and wood stain - but they do not paint over the letters of printed text well.
Painting each tube separately is a rather long and labor-intensive process, so you need to find a suitable container for the job:
- long tray;
- 5-liter bottle with the top cut off for long straws;
- 2 or 1.5 liter bottle for shorter straws;
- small bucket.
Before painting, you need to prepare a solution of the required shade and saturation and pour it into a container. After this, you should place the tubes in the solution for as long as it takes for them to fully color.
If staining occurs in a 5-liter bottle or bucket, a stack of tubes is dipped into the solution with opposite ends alternately. If you are painting short tubes in a small bottle, then after placing them in the solution you need to shake the bottle, then turn the tubes over with opposite ends to the bottom and shake again.
Edge decoration
When the basket is the desired height, it is advisable to hide the ends of the tubes that form the frame, secure and hide the workpiece. To do this you will need an extended knitting needle. It should be threaded through the hole near the stand in the middle for 3 rows. Repeat the same action in the other direction, then throw the stand over it and thread it down.
This will ensure that all the posts can bend. After finishing the work, you can get the finished edge. Lubricate the places where the racks hit with glue and let dry, then cut off all the excess ends of the workpieces. Carefully hide the sections among newspaper strips.
Simple bends: how to finish weaving
Everything good, even our weaving, tends to end. We propose to analyze the main options for finishing work on the edge of the product.
After weaving is finished, unnecessary posts always remain. You can take the path of least resistance and just cut them off. But protruding stumps will make the edge sloppy and will negate the overall impression of the quality of your work.
Obviously, the remaining racks need to be laid correctly. This is what we will do.
By default, you have already figured out the working tubes yourself: you trimmed off the excess, hid the ends in braid and glued them.
The easiest way to complete weaving
For the first time, the easiest way is to bend each post into the hole from which the next one comes out.
The process of such lazy bending is clearly presented in step-by-step photos.
Simple folding
Reserve a place to finish bending with a piece of tube.
With the rack, go around the next rack and bring it out. Repeat this around the entire perimeter, bringing the ends of the posts outward.
To join the weaving, insert the last post into place of the additional segment, having first removed it.
Now the protruding ends of the racks need to be pulled through the gap into the product. This time, tuck them under the posts. Spread the weave evenly with your fingers (walk along each post and pull it out with your fingers), cut from the inside and glue the remaining ends.
Rod
This type of bending is more difficult than the previous ones. If you decide to take it on for the first time, be sure to check out the recommended video.
Isis
Isis can be considered a relative of the rod. They are performed similarly, but there are some differences. The rod is made from the racks included in the product, and for isida you will need additional tubes
.
Watch all the details of the process in a detailed video tutorial.
In our next article we talk in detail about how to weave a basket from paper wicker From and To >>
How to make a pen
The easiest way to make a handle for a basket:
- You will need 4 long flexible ropes. For elasticity, it is worth spraying them with a spray bottle.
- Use clothespins to mark the places on the basket where the handle will be attached.
- Pass the tubes through the rows already made so that they are of equal length.
- Having obtained two rows of four strands, you should cross the parts. As a result, an even braid-curl should form.
- Make spirals until you get a handle of the desired length.
- Thread the braid through the braided model.
Round bottom for large items
It will be a little easier if you cross several tubes laid one next to the other. In the photo (see below) we took five tubes and intertwined them relative to each other. To make the bottom less voluminous, it must be flattened. The easiest way to do this is with a rolling pin or a bottle - rolling it several times.
To make it easier to work further, coat the intersections with PVA glue.
Next, we take the straw and begin to tie the bottom, passing the straw through three tubes (the rope method). So - through three tubes - we make two rows. Then - several rows - after two.
A few is to ensure that the dimensions of the bottom are almost “right” - in shape.
We weave the last two or three rows through one tube. During weaving, the warp tubes must be spaced at the same distance.
This is actually how it works, you just need to make sure that the distance is the same.
When switching to weaving the walls, we cross the base tubes one with the other. This makes the product more stable and the transition more reliable.
To weave the walls, you can use the working tubes that were used to weave the bottom.
Newspaper basket lid
The lid for the craft is made similar to the bottom, and should be slightly larger than the size of the top of the original.
To make it you need:
- in the side surface of strong and even cardboard you need to make small indentations with a knife;
- thread a piece of paper through the holes on each side;
- wrap around the edges of the product, bending one element after another;
- Finally, hide the free edges under the lid;
- for handles, insert 2 pairs of tubes along the two upper edges;
- stretch them to the middle, bend them and intertwine them with each other;
- coat the edges with glue and fasten with clothespins;
- for a neat appearance, they should be lubricated with PVA again and rewound with paper.
Round box with lid
Cut out two circles from thick cardboard, coat them with glue and cover them with newspaper or any other beautiful paper. To carefully wrap the edges in a circle, make cuts along them. If you wish, you can immediately paint and dry the workpieces well.
Using double-sided tape along the entire diameter, place stand tubes, the number of which must be calculated in advance. Fill everything with glue around the perimeter, place the second bottom piece on top and dry it under pressure. To start weaving, insert a working tube next to the stand or connect two and loop it on.
Braid the entire base around the perimeter with two tubes of a spikelet, pressing tightly. Moisten it a little, bend the racks, and lift them up on the next lap. To make the box more interesting, add a second working tube of a different color.
Photo: berkem.ru
Build up all the details so that these places are hidden on the wrong side. And so that when weaving the box itself holds its shape, use a blank of a suitable size. You can braid any round box of the same diameter. Weave the last row, bending the racks inwards as much as possible parallel to the bottom.
Then carefully bend each post one after the other and cut it to the same length. Lift them back and braid them again with two long working tubes, just like the sides before. After three rows, cut all the posts as close to the edge as possible and tint the ends.
Make a beautiful decorative cover from cardboard, wrapping paper or napkins. Glue the posts into it in the same way as into the bottom, and use the same principle to weave a small lid. Calculate the number of rows during the process, based on your box.
Scrapbooking for Beginners: 8 Step-by-Step Ideas
Decorating a newspaper basket
You can beautifully decorate a basket of newspaper tubes with your own hands in the following ways::
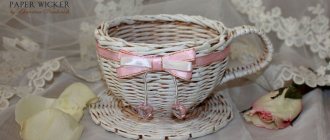
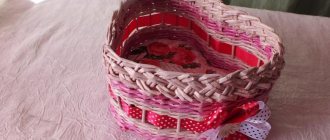
- Through repainting . It is advisable to use moisture-resistant acrylic paints. The best option is to cover it in two layers, and the color saturation can be controlled by covering the craft with additional layers. You can decorate a multi-colored basket with several shades, or apply any thematic images to the surface of the basket.
- Using multi-colored satin ribbons . To do this, you need to leave room for them during the weaving process. It is advisable not to braid the craft at a level that corresponds to the width of the decorative components. After completing the formation of the basket, you just need to lay a ribbon between the paper blanks and secure it with glue or thread. A basket made from newspaper tubes with your own hands can be made in any shape, decorated with various ribbons, flowers and other interesting details.
- Pasta in the form of various figures . Before gluing, they must be treated with an aerosol of a golden or metallic hue.
- Leather flowers . To make them, you need to take artificial material and cut out drop-shaped parts for the petals and oval, sharp-angled parts for the leaves. To bend the components of the flower, it is advisable to hold them over the fire using tweezers.
- decorated using the decoupage technique will look like a real masterpiece. To fix the image, varnish is used.
A DIY basket made from newspaper tubes will be an excellent decor for any room, be it a bathroom, living room or dining room. The main thing is to create with positive thoughts and love. The creative process of making newspaper crafts helps relieve stress after everyday life and redirect attention, and the created models will decorate any interior.
Laundry baskets
The main advantage of working with this technique is its practical side: having learned to weave baskets from scrap materials, you can easily create household items.
One of these useful devices is a laundry basket - the work is simple, the difficulties lie only in the size of the product itself. To weave a laundry basket from rolled newspapers yourself, be patient and have the necessary materials.
Option for storing laundry
Prepare the following materials and tools:
- thick cardboard, some needlewomen use corrugated cardboard;
- wallpaper or colored paper for gluing the bottom;
- paper tubes, pre-painted in the required color and covered with stain;
- clear varnish;
- PVA glue;
- fabric for the liner on the base.
You will also need clothespins to secure the bottom while it dries and heavy objects such as a weight or a stack of books. A box, the size of which the basket will be woven, will not be superfluous. It will add stability to the bottom and make the basket the correct shape.
The first thing to do is paste the wallpaper onto cardboard and wait for it to dry. After this, take the prepared tubes and distribute them along the bottom, securing them with glue. Place a second sheet of cardboard on the sticks and secure them firmly with glue and clothespins, waiting until they dry completely.
When the material has dried, you can proceed to braiding the walls. To do this, the tubes are bent with each subsequent roll and pulled up. A box of a suitable size is placed in the center of the bottom so that the weaving takes on the correct shape.
The work uses the technique of layer-by-layer weaving with several tubes at once.
You can use both single-color convolutions and two-color options. The tube is inserted behind the base of the axle, then brought out in front of the axle - thus creating a weave similar to calico fibers.
When the height is reached, you can proceed to making handles. To do this, lifting rows are made on opposite sides of the basket, simulating a handle. At the end of the work, the tubes are cut and hidden inside, fixing with glue. The decoration of the basket is made according to your wishes: often this is a single-color painting with acrylic paint.