There are many types of special garlands sold in stores, but to make this day truly unique, we suggest making the decorations yourself.
Here we have collected interesting ideas and master classes that will help you make a Happy Birthday garland from paper, fabric or felt!
As well as ready-made templates and layouts for printing!
Volumetric paper garland
The simplest option for creating a voluminous paper garland will appeal to adults and children. The process does not take much time, and the result exceeds expectations. At the same time, the production itself is exciting and delights children. At the same time, this is an excellent way for an adult to relax and take a break from everyday routine and stress, and for a child it is an opportunity to improve concentration and fine motor skills, and show imagination.
Paper balls
To make it, you will need to take a sheet of paper of the desired shade; it does not have to be the classic white color. The paper is then folded and cut as per the instructions to create a square shape folded in half. The large triangle is folded two more times. On the resulting small triangle, markings are made according to the example of the template, and the shape is cut out. The finished form is straightened and connected in the appropriate places, as in the diagram, to form three-dimensional snowflakes that remain to be put on the thread.
Flashlights
Another cool option for a paper garland. Using the template below, cut out the required number of elements from colored paper, glue and secure with a thread. Ready!
Christmas tree decorations 3D
Make a garland in the form of Christmas tree decorations. Cut out the parts according to the template, fold them in half and glue them together, as shown in the MK below.
Geometric garland
Lovers of strict forms will be delighted with this idea. Redraw the template or print it. Fold it towards you along the dotted lines and glue it together. Add glitter as desired and secure the shapes to string or string.
Garland of strips of paper
Here's a quick and original idea made from stripes. Here, by the way, you can use old magazines, for example, postcards and so on.
Or this option. You can make real winter patterns from plain paper. By the way, this is a great idea for decorating a home photo zone.
Make balls from strips of paper and secure them with string or ribbon. The original decor is ready!
Garlands of pine cones and light bulbs
Already in one of the articles, when we were making souvenirs for the New Year, I showed how you can quickly and beautifully decorate pine cones. And here, too, you can use this product. Dip a pine or fir cone into PVA glue and then let it dry. This is the first option, you can use acrylic paints.
But the second one, dip it in PVA, and then in semolina or glitter. Let the natural material dry.
Then tie a red thread to the cone, after a couple of centimeters again and so on.
Alternatively, you can sprinkle artificial snow on PVA or regular salt.
In general, use your imagination and act!
Here's another idea using wire.
You can make a garland of light bulbs, dip each one in paint and let it dry upside down. Then tie it on tinsel. And voila, the shining multi-colored composition is ready.
Accordion paper garland
Garlands in the form of an accordion have a special appearance; they attract attention and enhance the feeling of the holiday. To create them, just stock up on colored paper of various shades, cut into identical strips. The edges of the strips are attached to each other, maintaining a right angle, and are alternately wrapped, stacking on top of each other. The resulting garlands are short or medium length. Each of them must be connected at the beginning and end, using glue or a stapler, to form a circle. Finally, the circles are strung like an accordion on a thread or ribbon and placed in any suitable place in the room or on the tree.
For inspiration, more ideas for garlands made of paper fans.
Mickey Mouse garland: manufacturing secrets
The modern Mickey Mouse garland is actually a more updated variation of the traditional birthday craft with letter patterns.
For it, in addition to glue and scissors, you will need red and black bright cardboard, letter templates and, of course, a Mickey Mouse template for the garland to live up to its popular name. Also stock up on double-sided tape and satin paper.
- Start tracing the Mickey Mouse templates with a pencil and cutting out the resulting outline with scissors;
- Cut out templates with letters;
- Glue several circles with letters using double-sided tape onto the paper cut out from the template;
- Make a small cut on the resulting “ears”;
- Insert the tape into the cut, connecting the elements together.
The result is a beautiful garland made in a children's style. A child as young as one year old may like the bright colors and become a pleasant surprise for an older cartoon lover.
Garland of paper stars
Garlands of stars can be called an example of an ideal decoration for the New Year, giving a special, bright festive effect. And such a craft can be given a particularly interesting look using paper or cardboard with a “mirror” surface that imitates gold or silver.
Flat stars on a thread
Stars of different or the same sizes are cut out from suitable paper, and a hole is made in one of the “rays” of each figure using a hole punch. Threads are threaded through the hole, tied to keep the position of the star static, and the product is ready.
Stars a la origami
First, a square is formed from a sheet of paper, cutting off the excess part. The square is folded into a triangle, then several more bends are formed on it in accordance with the instructions. This way, you get the details of future stars, which need to be joined into single shapes using glue. These stars are glued to a regular garland between light bulbs or to a thread, forming a unique product.
3D stars
Halves of stars are formed from paper according to the example diagram, which will need to be connected to each other by laying garlands or thread between them for fixation.
Origami stars
And of course, the idea of a New Year's garland for fans of the origami technique. Below you will find detailed step-by-step instructions for making stars.
Star patterns
In your work, you can use any one or several templates, according to which unusual and beautiful stars can be easily cut out and assembled for future garlands.
DIY garland for the New Year
A New Year's garland can be used to decorate not only a room, but also a Christmas tree or any other irreplaceable attribute of the New Year holidays.
You can take any thing as the basis for New Year's garlands. You don't have to get hung up on traditional stars.
Take felt-tip pens, thread and a hole punch, and the necessary images for the holiday garland printed in A4 format.
- Carefully cut out the images;
- Use a hole punch to make holes in the images;
- Place the images in the order you want the garland to appear;
- All that remains is to stretch the thread into the very holes made by the hole punch.
A New Year's garland can be used to decorate not only a room, but also a Christmas tree.
Using this system, you can make absolutely any New Year's garland.
Garland of paper circles
An interesting solution would be to make garlands of circles for the New Year. They are distinguished by a unique appearance, reminiscent of the style conveyed in the well-known “The Great Gatsby”. Falling from the ceiling, flowing along the walls or curtains, they enhance the bright festive atmosphere. But in accordance with the amazing effect, this option has a rather labor-intensive implementation process.
To form the decoration, it is better to take hole punches with stencil forms for cutting out circles of various diameters, or try to draw the necessary circles yourself with a compass or by hand. You will also need colored paper, glue and thread of a suitable color and density. You can also use paints, glitter and other additional decor.
During the process, you can use one of the master classes as an example or instruction.
A simple garland of paper circles, glue and ribbon
You can also sew the circles on a machine or glue them onto tape in semicircles.
Dilute the paper circles with other elements, such as stars.
Balls 3D
Add more circles to each ball and you will get another original version.
Well, if time permits, be sure to pay attention to the honeycombs.
Beautiful large Russian letters for design: letter templates, print and cut out
- Whatever font you choose for the design of your stand or poster, the letters should remain readable. Otherwise, the beauty you create will turn the text into a puzzle. When creating an inscription, you can, of course, be guided by your taste or idea of the design of the future text, but frills will only complicate the text, and not make it more beautiful.
Letters written with fountain pens turn out beautifully
- When using a computer program or ready-made templates, you should not count on the special “beauty” of the inscription or its uniqueness. This is explained simply: the creators of such templates do not bother searching for information about a well-created font.
- For example, you can click on one of the template links and see the letters in the presented font of different widths. Letters can be created in violation of all requirements. One font may contain rounded, wide letters and elongated ones, some may have protruding ends. If you think this type of font is beautiful, then use it to design a poster. However, you should not expect that everyone will like the result.
Beautiful large Russian letters for design.
Here is an example of a readable simple font:
Beautiful large Russian letters for decoration
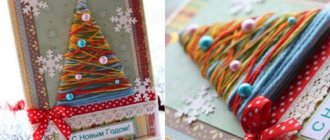
Paper Christmas tree garland
Garlands with paper Christmas trees have a stylish and modern appearance. But they require accuracy and scrupulousness in work, since the end result should be geometrically correct and symmetrical mini-trees connected into one chain. With skill, this version of the garland can be made in an hour or two. The main thing is to stock up on templates, suitable thickness, density and color paper, scissors, glue, threads or tapes. And then it’s enough to take one of the master classes as a basis and either reproduce it or use it as an example and source of inspiration.
Garland with Christmas trees 3D
Solid garland of paper Christmas trees
Christmas trees made of triangles
Christmas trees made from paper strips
Flat Christmas trees on tape
Flags in the form of a garland for decorating a room - printable templates
Now I present to your attention a long-forgotten idea in the form of flags. After all, this is the most common way to decorate a Christmas tree or rooms. You can also decorate doorways or windows with them.
You will need:
- textile
- stencils
- threads
- rope
Print the templates on a piece of paper or draw them yourself, attach them to the fabric and cut out the desired image.
Sew all the blanks onto a strip of fabric or rope. And then iron the flags.
You can also use felt, since it does not crumble and it will be easy for you to complete this craft.
Or also make a garland out of cardboard or paper.
Take the templates and print them out:
Then apply glue, place a string and glue the two halves together.
Take the next masterpiece to your collection.
I also really like this job. Bravo to the master!
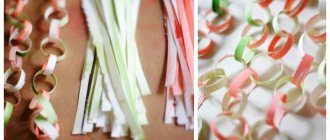
Garland chain
Make a chain of multi-colored rings, adding color to your New Year's decor.
Or dazzling white, recreating a snowy atmosphere in a warm house.
How to beautifully write letters for the design of a poster, stand, holiday: samples of letters for writing
When creating text, follow the following sequence:
What you will need to create beautiful letters on a large format poster or sheet of whatman paper: a fountain pen for ink and ink
- set of nibs for fountain pens (nibs of different thicknesses)
- wide markers (special, for glossy surfaces)
- paint for these markers (specialized stores sell paint with various tints, for example, metallic)
- If you don’t have a fountain pen, you can use felt-tip pens, colored pencils, gouache or watercolor
If you don’t have a fountain pen, you can use felt-tip pens, colored pencils, gouache or watercolor.
To write vertical dashes and lines, you can use a narrow tip; for the side parts of letters, use a wide tip. With this method of writing, letters acquire volume.
- If you decide to use markers or colored pencils, start by outlining the letters. This is done with a simple pencil. The outline is then outlined with a felt-tip pen, and only then the letter is painted over with paints or pencils.
- To prevent the inscription from looking boring, you can add shadows behind the letters. This will create the illusion of a wall behind the 3D letters, which will cast a shadow. Letters drawn in 3D also gain additional volume.
- So you've chosen a font. Today it won't be difficult. you just need to be able to correctly search the Internet.
How to beautifully write letters for the design of a poster, stand, holiday How to beautifully write letters for the design of a poster, stand, holiday
Technical part: recommendations
- we decide where the inscription will be located
- Without pressing hard on a simple pencil, we make a horizontal line on the sheet (there should be no traces left after using the eraser): we apply alternating stripes according to the height of the font and the line spacing
- if you decide to make an inclined inscription, then immediately prepare an inclined line like a school copybook, but place the lines less frequently
- after drawing the auxiliary lines, we begin to write the letters with a simple pencil, maintaining maximum accuracy in reproducing the configuration and adhering to the width of the letters of the selected font
- mistakes made when writing letters are corrected immediately with an eraser
- We outline the finished inscription with a pen, felt-tip pen or marker
- do not erase draft and auxiliary lines (they can be removed only after the main inscription has completely dried)
How to apply text using carbon paper?
- Print out your favorite template
- Place carbon paper on a sheet of Whatman paper
- Place the original text on top and trace it with a pen or pencil
- After this, remove the copy paper and template, trace the resulting contours again with a pen or felt-tip pen
Don't be afraid to draw lines with a pen and pencil. The ink will cover the contours drawn earlier in pencil and the letters will be drawn evenly and equally. But if you skip the step of drawing pencil lines, the inscription will come out sloppy.
You can choose from the letter outlines proposed in our article and use them as cheat sheets when creating your text.
Crepe paper garland
Original crafts are made from crepe paper (also corrugated). For this type of crafts, it is better to use a thin one, then the product will turn out airy.
Fluffy corrugated paper garland
Make a fluffy garland from long strips. By the way, this craft can be used as a boa to complement a festive look.
Garland with crepe paper tassels
Or this option with tassels.
Crepe paper on a string
How to decorate a window with garlands (ideas)
Finally, I want to show you a bunch of other ideas that you can also take note of. Wonder, please, it’s so great when windows and walls and even doors are decorated in a winter theme, you immediately feel the holiday, and your mood lifts.
Here they are droplets of cheerful mood from beads.
Use music CDs or regular cardboard rings wrapped in thread.
Make naughty bunnies or tops.
A product made from fir branches and twinkling lights looks very beautiful.
Here is another children's delight, a garland of pine cones in the shape of owls.
In the West you can often find shoes or mittens.
Garland of snowflakes
The most obvious option for decorating for the New Year. Of course, snowflakes can be cut out. This idea seems to lie on the surface. But you can get creative and do something more interesting.
Snowflakes from openwork napkins
If you don’t have time for decor at all, but really want to decorate your apartment, house or office, round openwork napkins will come to the rescue. This garland looks especially cool in a=vertical design!
Snowflakes made of accordion paper
Make voluminous snowflakes out of accordion paper. By the way, instead of paper you can use paper bags, then you will get a huge garland!
Strict geometric snowflakes made of paper strips
Beautiful Russian letters with monograms for decoration: letter templates, print and cut out
- Get started by creating a sketch. You will reduce the time spent on creating a poster or inscription for an event if you write the text in a small format, displaying the maximum amount of detail.
- While preparing the sketch, you should have a clear idea of what your inscription should look like in the end. Finish execution can begin only after preliminary sketches. The decision about the location of the text also needs to be made at the sketching stage.
- When starting to write text, you should adhere to a simple and simple rule: all characters must have the same width. Also, the inscription should consist of the same combination of thin and wide lines. Do not write overlapping graphic elements, or have characters of different heights, lengths, or widths. Between letters, no matter what format you create them in, the same distance should be maintained.
- If the above requirements seem too complicated for you, then write the letters without complicating them with various additional elements. Take your time, because this activity is only for the patient.
- If you are not sure that you will be able to write a beautiful inscription on a large-format canvas, then use a stencil for the work. Now there are many sites where you can find stencils for printing, made in various styles.
- But if you find it difficult to draw using a stencil, then choose a suitable font and print the letters on your computer. Next, you will need to carefully cut out the letters and place them on the poster, gluing the bottom part. such an inscription will also look good.
Beautiful Russian letters with monograms for decoration
Beautiful Russian letters with monograms
Simple flat garlands
And finally, garlands for the lazy.
New Year characters
Print the templates below, cut them out and secure them to string or string.
Flashlights
This idea captivates with its simplicity and at the same time originality. If you don't have glitter paper, regular paper will do. The highlights can be completed with a white marker, paints, or completely abandoned.
Checkboxes
Flags are another simple and festive option. Choose the appropriate flag shape or combine!
Gingerbread houses
Well, how do you like this miracle? The cutest gingerbread houses will be a great addition to your New Year's decor.
Garland mesh
Another adorable idea for lazy adults or kids! I remember such beauty from kindergarten; by the way, in kindergarten we made a garland chain with the whole group. And you?
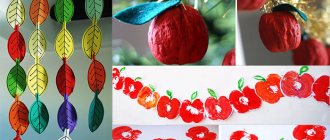
Eco garland leaves
Well, an option for lovers of eco style. Not a single tree was harmed during the making of this craft! However, in winter it is difficult to find a tree with leaves. Although …
Or the “thicker” option
By the way, you can make any shape, for example, holly. Tissue paper leaves also look really cool.
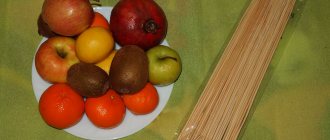
Garlands: Fabric marker
This master class will also have templates, but you no longer need to cut out the letters. Such a garland looks very neat and beautiful, and will certainly please the birthday boy.
And the most important advantage of fabric garlands is that they can be stored for a long time!
You will need:
- fabric, paint or marker,
- letter templates,
- scissors, ruler,
- thick thread, glue.
Progress:
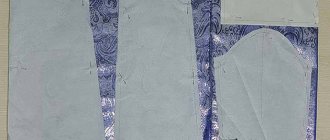
- Find or buy fabric in your home that is similar in type to the one shown in the photo. A fabric like burlap works well. It should be light in color with a discreet pattern that will complement the letters and not draw attention away from them onto itself.
- Cut the fabric into even rectangles. In this case it is 17x12 cm .
- Choose a stencil of letters in the style you like and print. Then place each letter on a separate piece of fabric and trace.
- Paint over the letter and let it dry. A marker will also work.
- The color should be contrasting and stand out well against the background of the fabric, not merge, so that the inscription can be read even from afar.
TIP: As an alternative, you can cut out templates in thin plastic or film, apply them to the fabric and immediately sketch
- Now you need to attach the letters to the thread, forming a garland. Determine at what distance from each other they should be and glue them on a thick thread. You can also attach each letter with two clothespins.
Cardboard
When using cardstock, each letter is cut out in duplicate for the front and back. Plus, the side parts are cut out to make them voluminous.
In this case, you can use either special corrugated cardboard for creativity, or just thick cardboard found in the house.
In order to make letters for a wedding photo shoot from fabric, you need at least basic sewing skills. To begin with, you should, as in other cases, make the desired letter on cardboard as a stencil.
Do not forget that it should be slightly larger than the workpiece in order to subsequently give it volume and the necessary allowances when sewing the parts together. Sew the front and back sides of the letter with the right side inward, and turning it inside out, fill it with padding polyester or other material intended for this purpose.
Do not skimp on filler, otherwise your letter will not hold its shape.
- Chest for a wedding - 87 photo ideas for a stylish and harmonious element of marriage
- Wedding inscriptions - symbolism and basic ideas for implementation + photos
- Wedding wish tree: 89 photos of great ideas and tips
Christmas garland and tree from modular origami (diagram and description for beginners)
The next garland, as you already read in the subtitle, we will make using the origami technique. Let's make these snowflakes, and then make a chain out of them. The result is a delicate and beautiful decoration for the holiday.
Necessary materials:
- White paper;
- Ruler;
- Pencil;
- Glue;
- Scissors.
Subsequence:
We draw a sheet of paper into 3x3 cm squares. To make one snowflake you will need 16 such squares and 2 paper circles with a diameter of 2.5 cm.
We assemble modules from squares according to the following scheme.
We glue the 8 resulting blanks to the circle, as shown below:
We attach another circle and 8 remaining blanks on top.
Glue the snowflakes together using the rays.
These snowflakes are also assembled from modules. And they can also be combined into a bright garland.
The result depends solely on how complex you have the patience to create modules.
Such snowflakes from modules, if connected, also form a wonderful decoration.
The only caveat is that the modules will need to not just be inserted into each other, but glued together. Otherwise, the structure will simply crumble.
In general, create for your health, there are many ideas in the origami technique: