The technique of weaving from newspaper tubes is not much different from weaving from wicker. But there is still a difference - newspaper tubes are available to everyone and special tools are not needed to make crafts from this material. Making crafts from newspaper tubes develops fine motor skills, fantasy and imagination of the child.
What you will need
DIY crafts from newspaper tubes require a competent approach to choosing the material you will be dealing with. The lighter the paper, the better, as it is easier to weave with. Give your preference to unnecessary newspapers and non-glossy magazines.
We will also need:
- A sharp stationery knife with which we will obtain strips of paper.
- Using scissors we will trim the ends of the weave.
- A knitting needle onto which strips of newspaper are wrapped; the thinner it is, the better. Wooden or metal will do, as long as it is long.
- A short wooden stick, such as a skewer, to help thread the ends of the weave through each other.
- Two types of glue: PVA for preparing the material from which we will weave and “Moment” for more complex connections in a finished structure.
- The form in which you will paint (if necessary) your tubes. There can be one or several containers.
Care of finished products
If you cover a wicker product with 2-3 layers of varnish, it will last for 5-7 years. Crafts do not require special care. It is recommended to periodically wipe them from dust with a damp cloth and not leave them in the sun to prevent the vine from drying out.
It doesn’t take much time to learn the basics of wicker weaving. Beginners need to follow step-by-step instructions and listen to the advice of experienced professionals. To begin with, it is important to master simple weaving, and when the work turns out neat and beautiful, you can move on to more complex methods.
Making straws
Next, we begin making the tubes, for which we take half a newspaper spread and, using a black marker, measure out the divisions at a distance of ten centimeters from each other. Using a knife or scissors, cut into strips and take one sheet and set the rest aside for now.
Looking at the photo of crafts made from newspaper tubes, you may not immediately notice, but a tighter twist is used for the base. To achieve this, place the knitting needle on the corner of the strip and start winding the paper at an angle of 45 degrees.
If you need a thinner tube, increase the angle to 60 degrees. When finished, coat the end of the paper with PVA glue, press and remove the knitting needle.
Making paper vine
Before starting work, you should stock up on the starting material - newspaper tubes. The beauty of future products will largely depend on the ability to twist them. To work you will need:
- scissors;
- PVA glue;
- ruler;
- a simple pencil;
- knitting needle with a diameter of 1-1.5 mm or wooden skewer;
- paper.
Before cutting the paper into strips, determine the direction of the fibers. To do this, tear off a strip along and across the sheet. In one direction the tape will come off well and evenly; in another - worse, the place of failure will be fringed, uneven. The first option suits us.
Everyone chooses the width of the paper strips used “for themselves.” Tubes made from ribbons that are too narrow will be thin, they will wrinkle and break easily. Wide strips of vine will bend poorly and will be difficult to work with. The golden mean is considered to be a strip width of 5 to 10 cm. For beginners, it is better not to cut strips longer than 42 cm.
For weaving, you can use any paper that can be easily rolled into a tube. Both blank sheets and printed ones will do. There has been no lead in printing ink for a long time, so you don’t have to worry about your health. It will be easier for novice craftsmen to work with newsprint, since office paper is a bit dense for curling.
You can twist the tubes using a knitting needle or a wooden skewer. Each master chooses the method of twisting himself: hanging or rolling it on the table. The angle between the knitting needle and the tape should be no more than 45 degrees. A corner of the paper is curled into a spiral, layer by layer rolled into a rope. When folding paper tape, you should twist the knitting needle with one hand and adjust the tension force and angle of inclination with the other. 1 cm before the fold, secure the edge with a drop of glue.
During the work, the rods will need to be extended. For convenience, the ends of the tubes should be of different diameters in order to fit one on top of the other. Add glue to the thicker section and insert the thinner edge of the next tube. Before work, the paper vine is moistened. To do this, 30-60 minutes before the start of weaving, it is sprayed with water from a spray bottle. This will give the twigs elasticity and flexibility.
Let's get started
There are a number of techniques that you need to know, since each of them allows you to achieve a unique and inimitable result for your work. Considering these techniques in isolation from practice will not give you anything. Therefore, we suggest moving from simple products to more complex ones, learning the basics of weaving.
Photos and patterns of weaving bottoms of different shapes
As you gain experience, you will want to make products of other shapes - oval, rectangular, multi-faceted.
The section contains several diagrams showing how to make forms more elegant and complex.
forest owl
For the owl, you need to prepare five dark tubes and two of any other color in advance.
- Form small spirals of a centimeter in length from two light tubes and, without cutting them, glue them to the base - the eyes are ready.
- Place the spirals next to each other so that the base of each of them is in different directions from each other.
- Bend one dark tube slightly into a semicircle and place it above your eyes, then take a second strip and glue its ends to the middle. You should get a kind of figure eight. Place it above the owl's head, next to the existing blanks.
- Slide another one under all the tubes so that its middle is located directly under the eyes and begin to wrap around each side. As a result, you should get wings, so make a couple of turns around them, do not do this anymore, concentrating only on the body.
- If desired, the owl can be decorated with a nose and slightly fluffed tassels in the head area.
DIY basket for beginners
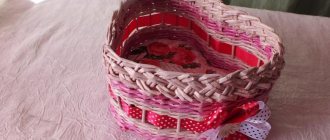
Wicker weaving for beginners always begins with making a small basket. This is the easiest craft to make using simple weaving. Step-by-step instructions will help you weave a beautiful basket quickly and easily.
Weaving the bottom
The basket model described in this master class is useful for storing fruits and vegetables, and is also suitable for carrying food on a picnic. Baskets are woven starting from the bottom.
Algorithm of actions:
- Prepare 8 rods of medium thickness. Find the middle in 4 of them.
- Use a sharp knife to cut small indentations and insert the rest of the vine into them. Arrange the rods crosswise.
- Weave the middle of the cross with thin twigs so that the branches do not fidget or pull out. After 3 turns, it is necessary to move the rods apart. The finished design now resembles a sun with 16 rays.
- Next, braid each rod with a “snake” separately. You need to be more careful and ensure that the distance between the rods remains the same.
- When the branches run out, you need to weave in others. For each new vine, sharpen the tip and carefully insert it into the previous 2 rows of braid. Cut off the protruding end of the old rod with pruning shears.
- There are 16 rays at the bottom of the basket. It is inconvenient to work with so many rods. To make the task easier, you need to weave another branch. Using an awl, an additional rod is placed between the weaving of the previous 2 rows.
Next, weaving continues according to the familiar pattern until the bottom reaches the desired parameters.
Moving to the walls
To weave the side parts of the picture you will need a thicker vine.
Algorithm of actions:
- Sharpen the ends of the new rods with a knife.
- Insert the rods into the weaving so that each spoke of the frame has a new element. Crooked branches should be placed with the defective side inward.
- Remove the old ends completely using a sector.
- The first knitting needle needs to be bent to the left and pulled under two adjacent branches, then bent upward.
- Also bend all the other spokes of the frame.
- In row 1, 3 rods should be placed along the knitting needles. Bend the left branch to the right and place it in front of the 2 nearest rods. Bend the 3rd needle and pull it forward.
- Weave 2 rows by analogy, then switch to classic weaving.
- Attach another branch to each knitting needle. Weave all the elements in turn. It is important to remember that the direction of their growth should move along the left arm.
- Place the thick end of the vine behind 1 knitting needle, stretch the second in front, and lay the third behind. Attach the new rod to the knitting needle on the right.
- Weave in new willow branches by analogy, to the end of the row.
Continue working until the walls of the basket reach the desired height.
Trimming the edges and handles
The edges of the basket can be braided as follows:
- Bend one knitting needle to the right and down. It will be located behind the next 2 rods.
- Pull the knitting needle behind the other 2 rods.
- Pass the knitting needle behind 1 vine, then back.
- Repeat these steps with the remaining parts of the frame.
- At the end of the weaving, cut off the protruding vine from the inside of the basket and tuck it between the weaving.
Now you need to make handles for the basket.
Algorithm of actions:
- Decide on the size and shape of the handles. Take a thick and flexible rod, bend it in a semicircle and cut off the excess ends.
- Sharpen the rod with a knife on each side and insert it into the wall of the basket, pushing both ends under the weaving.
- Braid the arms with thin willow twigs. It needs to be inserted into the slots located near the ends of the handle.
- Twist the thin rod around the thick one several times. Pass it under the wicker edge of the product, and then bring it out and tighten it.
- To secure this captivity, a small rod is needed. It should be inserted next to the handle and wrapped with a thin vine. Hide the end of the winding between the braided rows.
The wicker basket is ready. It can be coated with spray varnish, dried and used.
Photo frame
Crafts from newspaper tubes or a master class from them allow you to make not only various kinds of animals, but also something useful for your home, for example, a photo frame. For it you will need a dense rectangular base on which you need to glue a sheet of newsprint. When everything is dry, take the blanks and apply glue along the edge to form the sides.
Start placing newspaper tubes in each corner at a forty-five degree angle. Their number will depend on the size of the photograph or painting that you place in the frame.
When you're done with the corners, start forming the inner sides. Glue only the corners, leaving the sides free to pass through. The frame can also be decorated with various patterns to suit your taste.
Decorative star
From cocktail tubes you can make a wonderful craft for decorating a festive room or New Year tree. To do this you need:
- Prepare tubes of the same size and color.
- Fold four of these tubes into a rhombus, securing the corners with super glue or a glue gun.
- In a similar way, make a diagonal in a rhombus using the fifth tube.
- Make four more such elements, lay out the parts in the shape of a star.
- Connect the modules with glue, wire, fishing line or thread, pulling the material through the cavities of the tubes.
In order for the star to be hung on the Christmas tree, a loop is tied to one of the ends of the product.
Second bottom option
In the second case, we place an odd number of paired guides on the table and begin to braid them with two tubes, one of which is threaded from above, and the second from below.
Having reached the end, the tube is bent, and then the following guides are inserted into the edges. When inserting the guides, help yourself with scissors by cutting one of its ends.
Weaving walls
Two tubes are inserted into the base of the basket and braided around the posts - one goes in the front and the other in the back. Cut the part you will be inserting diagonally to continue weaving.
Press the inner paper vine with your fingernail to help it bend better. Continue this until the basket reaches the required height. If necessary, increase the guides by extending them with additional tubes.
Round basket with handle
Weaving from newspaper tubes, namely crafts from them, can turn out better if you use a frame. Such a frame can be a round plate on which the bottom or the entire work will be formed.
Take eight guide posts and connect them together, intertwining them with each other. They should form a square and face perpendicular directions. Next, take two tubes and insert them into the resulting base and begin to weave in a circle, forming the bottom and moving down.
The handle is made of woven paper vine, on which several tubes are wound.
Procurement of material
The varieties of willow most often harvested for weaving are willow, three-stamen and basket willow.
You can harvest vines at almost any time of the year. Branches cut in summer and early autumn do not require additional processing, but are less durable and break more often. Vine harvested in the autumn-winter period will be more durable.
The bark of this vine is thicker and more difficult to peel off. To make it easier to peel the bark from the branches, place the branches in a saucepan (if the branches are large enough, twist them in a circle), cover with water and boil for 2-3 hours. After this, rinse with cold water. Then you can easily clear the branches.
If time is tight and you consider boiling the branches a troublesome task, put them in water and leave them in a warm place for 10 days. The branches will be saturated with moisture, and the bark will be easily removed.
To harvest thin vines that will be used for delicate work, annual shoots are usually taken. To work on large products, as well as for making frames and bases, two-year-old shoots are harvested.
Branches for harvesting vines must be flexible, strong and healthy, without damage or heavy contamination. With additional cleaning, their fragility increases and elasticity is lost. To cut the rods, use a sharp pruning shears, which is used to make an oblique, even cut without splinters. If the vine is wet, it should be well dried for long-term storage, arranged according to size in a sunny place with good air ventilation. This treatment will help to naturally whiten the shoots. Insufficiently dried vines can quickly become moldy.
Before starting harvesting, cut one rod from the selected bush and carefully inspect it. Flexible and elastic branches usually have a small core. If this is the case, feel free to harvest twigs from the selected bush.
Store the vines, sorted by size, in a cool, dry room.


