How to decorate?
Today, organza is widely used in all kinds of needlework, because this fabric perfectly holds its shape and is very easy to work with. Organza is a fairly lightweight material that is perfect for stylish and sophisticated home decoration.
To decorate your home before the New Year holidays, it is best to make an organza Christmas tree.
The big advantage of this craft is that it is quite possible to determine the color and size of the finished product yourself.
A decoration made of organza is a rather interesting and unusual craft.
A do-it-yourself figure using organza can be made quite quickly; with such a craft, everyone can celebrate the holidays in an original way.
To conduct a master class, you need to prepare the following equipment:
- a piece of cardboard;
- organza;
- glue;
- mesh or tulle;
- scissors;
- all kinds of decorations.
The size of the finished product depends entirely on the size of the selected cardboard, which is why, in order to get a fairly large product, you need to secure several album sheets of cardboard.
From one prepared cardboard sheet, you need to cut out a small semicircle, then twist it in the form of a certain cone, which needs to be firmly fastened, because this will be the basis.
After this, you need to cut out medium-sized triangles from tulle and organza and make a tube out of them. Using glue, you need to glue the rolled tubes directly to the base.
For convenience, it is best to start gluing the triangles from the bottom and you should definitely try to ensure that the prepared tubes are glued evenly on absolutely all tiers.
To ensure stability of the structure, it is necessary to place the tree on a base made of felt.
Christmas tree made of organza using cutting technique. Master class with step-by-step photos
I present to your attention a New Year tree made of organza using the trimming technique .
To make a Christmas tree with your own hands we will need:
- A4 cardboard
- hot glue gun
- cotton wool
- stick
- white organza
- stapler
- gypsum
- small pot
- gold paint
- beads, ribbons and other decorations for the Christmas tree
Organza Christmas tree master class.
First, we make a cone out of cardboard, cutting off the excess paper. If it turns out a little uneven, then it’s okay, it won’t be visible later.
Next, fill the cone with cotton wool, you can also add crumpled paper. We need to make sure that the cone inside is not empty and stronger.
Immediately insert a stick into it. Try on the stick with the pot to see what height you need. My stick came out to be about 12 cm. Cut a circle out of paper and make cuts. You will need it to cover the bottom of the cone.
Now let’s “plant” our Christmas tree in a pot using plaster.
When the plaster hardens and the Christmas tree stands firmly, you need to paint the trunk and pot with gold paint. And now the most interesting and time-consuming part! Let's take organza. I had a roll of 9 m by 50 cm. It will take about 1-1.5 meters for the Christmas tree.
Cut strips 2 cm wide.
and then, folding the strips together in 3 or 4 pieces several times, we cut 2x2 squares. It’s okay if they turn out uneven. And you need a lot of such squares.
Next, we apply 2 squares diagonally and fold them together 2 times, secure with a stapler.
You should get things like this.
We also make a lot of them, 5 times more than in the photo.
We take the Christmas tree and, starting from the top, use a gun to begin gluing our little things.
Here I stopped to paint the trunk and the pot, but if you did this earlier, then you need to glue the tree to the end and the bottom too. The tree is ready, we glue cotton wool into the pot under the tree, imitating snow. Everything is ready, all that remains is to decorate! This is a complete flight of fancy! I used these different gold jewelry.
And it turned out to be a New Year tree made of organza in gold.
Source
Master class on making
There are a huge number of methods for making Christmas tree crafts. The master class on making a Christmas tree from organza is quite interesting and original. It is quite possible to use various materials for production.
In addition to a piece of cardboard, foam plastic, which must first be covered with foil, is ideal as a base. When the base is prepared, you can proceed to decorating the Christmas tree. The finishing is done using organza, which must be cut into squares of the same size.
To decorate the Christmas tree, you need to pierce several squares with toothpicks and secure the fabric beautifully with glue. Then, when all the squares are completely ready, you need to fill the entire base with them, simply inserting toothpicks into the foam.
The finished product must be placed in a flower pot and decorated beautifully with the help of original decorative ribbons, as well as a variety of beads.
This tree looks very beautiful and original, and the master class is quite simple, which is why even children can easily repeat it.
If you wish, you can make such a Christmas tree using candies, in which case the finished Christmas tree will not only be very beautiful, but also quite tasty.
The completed figure looks very attractive, because a person can easily choose the size and color of the future product.
In addition, it is quite possible to conduct a master class with your children and thereby have a fun and interesting time with them.
Options and ideas for making organza Christmas trees
Organza is used in making crafts, sewing clothes and curtains. It is popular because it holds its shape well and does not cause inconvenience in work. Doesn't crumble or wrinkle.
Organza products will organically fit into the interior of the house
You can make such crafts yourself or with children. The most common type of Christmas tree that you can find and make with your own hands is from foamiran. Their distinctive feature is most often considered to be a certain humanity: such a beauty has legs and boots, in some versions handles, and its top is usually twisted into a spiral. Organza Christmas trees on a cone base and assembled in layers are a traditional option that has been performed year after year for many years. For independent children's creativity or work under the guidance of a senior, making a Christmas tree using the trimming technique is suitable - both primary school students and preschoolers can cope with this type of work.
How to make an interesting and unusual product?
The decoration looks very beautiful and original, which is why during the holidays it can become the best product for absolutely any home. The master class on making such a Christmas tree is quite simple, but you need to prepare all the necessary equipment and be patient.
You can make a pine figure from thick wire and organza. To make such a Christmas tree, you need to take thick wire, material of any color, ribbons, glue and decorative ornaments.
The thick wire must be bent slightly near the edge and completely wrapped with decorative ribbon. It is necessary to make a large number of separate, rather large petals from the main material and fasten them to the wire in such a way as to create a lush and beautiful figure.
The finished product must be placed in a plastic cup and secured. Then you need to decorate everything to your liking. This master class will appeal to everyone, and you can do it with the whole family.
How to make a Christmas tree from candies and tinsel
The second master class will describe the process of making a Christmas tree from sweets and tinsel. To work, you will need several sheets of white or green cardboard, about a kilogram of sweets, tinsel, tape, a stapler and PVA glue.
First of all, on a sheet of green cardboard you need to draw an even circle and divide it into four parts, then you should cut out the circle itself and one part, and the remaining parts should be twisted into a cone shape, thereby creating the base of the Christmas tree. You need to make the bottom row of needles from tinsel; to do this, measure out a piece from the tinsel that is equal to the diameter of the base, and glue it to the bottom wide edge of the tree. Next, you need to make the next row of candies, which need to be glued over the tinsel with a slight overlap. The next row should again be made of tinsel, and on top again you should make a row of candies. Thus, alternating a row of tinsel and a row of candies, it is necessary to decorate the entire base of the tree.
We have to:
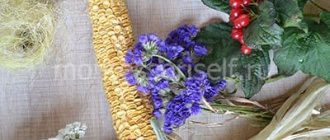
- dark green organza fabric;
- yellow yarn;
- whatman paper A3;
- newspaper;
- beads and half-beads of red, yellow and some white;
- Christmas ball;
- candies;
- pencil;
- a glass of yogurt;
- building gypsum;
- PVA glue, stapler, scissors, hot gun.
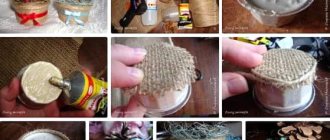
First, let's make a base - a cone. For this we take whatman paper A3 (if you want a small Christmas tree, you can also take A4).
We lay it vertically, marking the center on the top side. We take in our hands a thread a little more than 40 cm long. We tie one end to a pencil. We hold the second with the thumb of our left hand in the marked center. We stretch the thread and draw a pencil from one side of the sheet to the other. It turns out to be part of an oval. Cut along the marked line.
From the center we draw two lines - one to the beginning of the oval, the second to the end. We cut the sheet along them.
Coat with PVA glue and connect the sides. There should be a 1 cm hole at the top. Trim the bottom a little, and our cone is ready.
We strengthen it with the help of newspaper: we crumple the sheets and fill the void inside the cone with them. We cut out a circle to the size of the bottom plus 1 cm. We make cuts on this centimeter, the distance between them is 1 cm. We bend it. Coat the inside of the cone with PVA glue and insert the bottom. You can lightly paint the cone with paint or a felt-tip pen so that the white color shows through less.
We cut the organza into squares 7 cm by 7 cm. And we twist it into little balls: we add two opposite corners (we get a triangle), and to the same top a second pair of opposite corners. The sides are hidden in a little bag. We fasten with a stapler at the base.
We put the cone on the jar to make it easier to work, and take a hot gun. Drop a drop of glue onto the base of the bag and glue it to our workpiece.