Every girl has many pairs of earrings of various shapes, colors and materials in her jewelry boxes. And large collections are necessary to be able to create a great look with the help of accessories. Simply by changing your accessories, you can look different every day. Craftswomen can create earrings on their own, let's look at how to create unusual and spectacular tassel earrings with your own hands.
Methods and patterns for weaving
You can use different methods to create a product. Those who are just making their way into beadwork should work according to ready-made simple patterns. A master class for beginners will help you weave a lariat from beads. The mosaic option is ideal for beginners. It is better to carry out the first tests with only one color, and then weave multi-color works.
Using a needle
A simple way to weave a lariat is done with a needle. A detailed master class will allow even a teapot to cope.
- A thread of the required length is cut, threaded into a needle, and the end is secured with a knot.
- Begin weaving, adhering to the pattern.
- The result is a strand of seven beads. The initial option could be five.
- Weave according to the pattern to the required length. 80 cm is just right.
- put on limit switches.
- Product design – tassels at the end. A chain is made by connecting rings whose diameter is 6 mm. Beads of a similar or opposite shade to the lariat are placed on the pins. There should be a pair of beads on each of the rings. The brush looks like a bunch of grapes.
Before starting work, you should familiarize yourself with the diagram.
Using a hook
Lariat can also be created with crochet. For products with a pattern, patterns are also used. They are not needed for a single-color harness. It's better to start with this option. For strings of more than 12 beads per circle, you will need a filling tube to maintain the shape. It's called regilin.
- Beads are strung on the thread in the required quantity using a needle.
- Make one air loop without beads. The others should already be with them.
- Close the chain into a ring by connecting the first and last loops.
- Insert the tool into the first loop right in the middle, move the bead, grab the thread, and knit a half-column.
- Continue in a similar manner after reaching the required length.
- The plait is finished with two rows without beads.
The beginning of the bundle will be loose, but this is normal. When the tourniquet reaches 1-2 cm, it will become denser. It is necessary to ensure that the beads are laid horizontally.
Selecting color and image
Interesting, elegant earrings can complement any look, the main thing is to choose the right colors. Black tassels will suit girls with blond hair, and red tassels will look great on brunettes. We also remember that:
- Gold-colored tassels will match clothes of any color and add a festive touch to your look;
- White will also go well with any color of clothing and will add freshness to the image;
- Multi-colored ones will look great with summer clothes.
Related article: Crochet hexagon boots: master class with diagrams and videos
In order for the image to look great, it is necessary to take into account the combination of colors of jewelry and clothing items. There are several rules for this:
- We select jewelry in a shade close to the chosen outfit;
- Choosing a great color to accent the decoration;
- Combination with one of the shades of the outfit;
- Using complementary colors.
Since these earrings are very elegant, they are not suitable, for example, for office clothes. We choose earrings according to the situation and in accordance with the chosen clothes. What would these earrings go with? They are perfect with the following clothing options:
- Dresses with fringes, in the same tone or opposite;
- Earrings with beads and rhinestones for evening dresses;
- Tassels in blue tones go well with jeans.
Hairstyle is also of great importance. Tied hair will highlight the lightness and luxury of the earrings. And if you let your hair down, then you should use a contrasting color of the decoration to avoid merging. A good choice would be if the details of the clothing, for example, shoes, a handbag or a belt with earrings, are combined. Tassels will look great with the following clothing options:
- Lightweight tunic made of plain fabric;
- Thick fabric vest;
- Denim dress;
- Sundress with a neutral pattern;
- Trousers with fringed belt;
- Leather skirt;
- Blouse of the opposite color;
- Sophisticated floor-length dress;
- Shorts with a T-shirt.
Main characteristics of the lariat
Not every harness can be called a lariat. This must be remembered in order to create a truly classic product that will have the desired characteristics. These include:
- the weaving should be the same along the entire length of the lariat;
- decorations should be used that are similar in appearance and belong to the same style;
- the weave should not only be soft, but also flexible enough to change shape if necessary;
- the edges must be decorated with fittings.
You can use the fittings that the master directly likes. But we must not forget that it must be functional.
Making a brush
After cutting and preparing the template of the selected length, begin winding the threads around it. Make rotational movements tightly, with tension, so that the coils do not hang over the edges, but lean tightly against the edges of the template. How to make tassel earrings with your own hands from threads can be clearly seen in the photo below.
When the required thickness of the tassel is reached, the end is pushed under the bun from above and all the threads are tied into a strong knot. Leave long ends so that later it will be convenient to attach the craft to the clasp.
When the threads are securely connected, the template is removed. The tip of the scissors is inserted into the middle of the bundle, pulled down until it stops and all the threads are cut. If they are slightly different lengths, it’s not a big deal; at the end of the work you can always trim them with scissors.
The last step is to tie all the threads under the knot. Here you can already use other shades to highlight the accent point. All knots are tied tightly and the ends are cut close to them. It is advisable to hide them inside the brush so that it looks neat. You already know how to make tassels for earrings. Now let's look at how they are attached to the clasp rings and how you can diversify this type of jewelry.
How to weave a two-color lariat
Having mastered the weaving technique, you can move from monochromatic patterns to patterned ones. You can come up with them yourself or use ready-made ones. It’s good when there is a photo next to the beaded lariat diagram - you can immediately understand what kind of decoration you will get from the presented picture.
There are many options here:
- Stripes;
- Geometric designs;
- Abstract divorces;
- Folk ornaments;
- Twigs and flowers;
- Butterflies.
It is worth highlighting two large groups separately.
- Products woven from beads and glass beads.
- Two-color lariats woven from two monochromatic strands.
The technique for weaving multi-color jewelry is the same as for single-color jewelry.
Bead selection
When visiting a store selling weaving products, you should control yourself, because the wide selection of products can make your head spin.
Matte, with sparkles, long, short, small, large, like pebbles and pearls have different colors with unusual coating - the choice of material can take a long time.
To make your search easier, you should turn to professionals; with their help, you can choose beads faster. Accessories for needlework are divided into:
- bugles (elongated tubes);
- beads (standard round shape);
- Charlotte (round with a flat side);
- cutting (short faceted tubes).
Read here How to crochet beautiful napkins: tips with video lessons and patterns
After purchasing everything you need, you can begin to study patterns for making beaded earrings.
Using macrame knots
With Josephine knot. An extraordinary option is to tie a spectacular Josephine knot.
It is better to place it near the clasp. Here is a pattern for knitting a knot.
Other knots can also be made following the diagram.
Pigtail. We fold the transforming tourniquet in three and weave a braid of three “strands”. Let's focus on the diagram. We only have one end, so we must not forget to free it when weaving by removing it from the loop.
We try it on so that the braid covers about half of the product. We bend it slightly in a semicircle, and at the end we thread the free end of the tourniquet into the formed loop. If you have brushes it looks very nice.
Tue oroi riant. You can also braid the braid completely up to the clasps. It will also turn out original. The braid can be loosely tied or tightly - this way we get different versions of the necklace.
We carry out the third version of the nodes strictly according to the scheme.
Other node options.
What can you wear with tassel earrings?
Such accessories are more suitable for everyday clothes: sundresses, jeans, suede or leather jackets, shorts, etc. Jewelry looks good with retro-style suits, ethnic motifs or art deco. Clothing can be of a simple cut with complex draperies.
For the look you choose to be perfect, the shape of the jewelry must match the main lines of the clothing. For example, earrings with single tassels resemble a triangular shape, so an A-line silhouette would be more appropriate in an outfit. Chandelier earrings suggest full skirts, flared pants and peplums. The flat shape of the tassels in the decoration corresponds to the straight lines of the costume.
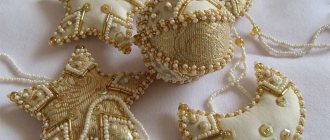
How to decorate a decoration
When the rope of the required length is ready, it is necessary to shape its ends. You can do this in the following ways:
- sew the ends of the decoration together;
- connect the ends of the product with beads;
- decorate the ends with pins, fishing line, thin wire. This type of design makes it possible to install a lock or clasp on the finished decoration.
Videos and articles from experienced craftswomen will tell you all the features and secrets of fastening pins in harnesses.
Beads, chipped stones, caps, and rings are used as decorative elements. This fitting allows you to embroider a finished lariat over the surface, as well as create unique additions to a braided rope (various pendants, tassels of unusual shapes). The result is a one-of-a-kind piece of jewelry.
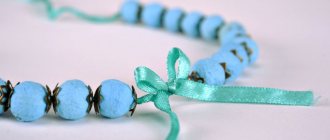
DIY bead tassels
Meet our new CATALOG! Please note that the Bead Salon catalog does not contain all available products, but only the hottest and most profitable items, as well as new items and news. In order for you to be able to think through your purchases in advance and, Of course, the save catalog is valid for 4 weeks. Enjoy browsing and happy shopping!
Posted in
We bring to your attention a master class that shows how to weave a beaded tassel using simple threading and a base strip made using the mosaic technique. A bead brush is a universal element that can act both as an independent decoration and as one of the details of a larger product.
Posted in
Make yourself a holiday bracelet in the color of the Christmas tree! It's simple but elegant!
The New Year is already waiting to be celebrated, We need to celebrate the holiday with joy! All the worries, troubles and sorrows
Definitely a thing of the past!
I wish you endless joy, so that you remain beautiful! Be serious, sometimes careless.
Good health and love!
salon-bisera.ru
Step-by-step description of the weaving pattern
This scheme is simple. And therefore it is most suitable for beginners. Since they are not recommended to begin their acquaintance with weaving techniques using complex patterns.
- Work begins with the bead, which is in the second row. But this applies only to the first two rows; then the work scheme changes.
- First, you need to string the 1st bead in the second row onto the needle.
- Now you need to string the bead that is first in the 1st row onto the needle.
- Until the end of the pattern, you should weave in this order - 2 and 2, 3 and 3.
- Now we need to close the circle.
- It is necessary to work in rows, following the pattern.
- Continuing to string beads separately from each row, you need to weave the 3rd row.
- The third row is woven through one bead of the 1st ring.
Next, you need to strictly follow the diagram. The length of the decoration depends on how many rows were woven. You shouldn't make it too short, because then it won't look like a lariat. The design of the lariat can be anything.
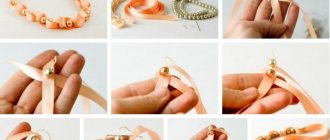
Step-by-step instruction
So, let's start creating beauty with our own hands.
Step 1: make the tassels
First we make the tassels. To do this, you need to collect 7 separate strands of red beads (each of 70 beads). In order to secure and hide the ends of the fishing line or thread, the beginning and end should be pulled twice through the last 10 beads. All rows of beads must be the same, you may have to add or remove several beads in some row. The number of threads collected can be large - it all depends on the size of the caps you choose.
Step 2: Putting the threads together
Then we collect all the threads together, fold them in half, aligning the ends, and tie them in the middle with transparent fishing line, thus creating a tassel. We tie a small round piece of felt to the place where the bead threads are tied, or with the same fishing line, we will use it to attach the tassel to the cap.
Step 3: Glue the cap
Apply a small amount of glue to the inside of the cap and on the top of the felt circle, and then insert the bead tassel into the cap. Press the felt firmly onto the cap using a toothpick to ensure a tight fit and hold for about 30 seconds. Assemble the second brush in the same way and let the glue dry thoroughly.
Step 4: attach the rhinestones
While the tassels are drying, we attach the rhinestones to the jewelry base. To do this, drop a small drop of glue onto the back side of the rhinestone and glue it onto the base, after which we tighten the clamps.
Step 5: Assembling the earrings
When the glue dries, we connect both parts of the earrings together. To do this, we use metal rings, which we thread through the holes on the cap with a tassel and on the base with rhinestones. Beaded earrings in the shape of tassels are ready.
Using master classes from our “Beaded Pendants” section, you can also make a pendant that matches your earrings.
5319 Christina January 7, 2016
0
Christina All posts by the author (1170)
How to wear a lariat
Lariat is an original thing that immediately attracts attention. This is not a thin chain that can be combined with other jewelry, so this jewelry should be the main focus of the image.
If you wear other jewelry, it should be simple. It is not recommended to wear two tourniquets at the same time, for example, on the neck and on the belt
Wearing options:
- Short necklace . This necklace looks good with clothes with a semi-circular neckline. If its length reaches the waist, then the decoration can be combined with a sweater or turtleneck jumper.
- Classic sautoir . The cord looks very beautiful in the form of a classic sautoir - an elongated necklace with a pendant. In this case, instead of a pendant there will be a beautiful knot. Another option is to tie the lariat so that the clasp acts as a pendant.
- Necklace with weaving . The easiest way is to fold the rope three times and weave a braid from it.
- Multilayer neck decoration . How to tie a lariat to wear around the neck? You can intertwine two strands. The result will be a voluminous decoration that will look very impressive in the summer with light clothing.
- Bracelet . It can be a multi-layer bracelet - the tourniquet is simply wrapped around the wrist, or it can be a braided bracelet.
- Knots . You can wear the accessory around your neck or waist by tying a simple knot. Over time, you will learn to weave more complex, intricate knots using patterns.
If you wear this accessory in different ways, be sure to untie the knots and straighten it when you take it off, otherwise it may become deformed. The Lariat is an unusual thing, because it can be worn in any way your imagination dictates. If you are into macrame, you can experiment with weaving.
You will learn how to make such a decoration with your own hands by watching the video:
Thread brush
Chains are the most trendy nowadays. That’s why the tassels made from them ended up in honorable first place. But let's be honest. What material are brushes most often made from? Right. From threads! This is what we will do now. Fortunately, science is not so complicated, even an amateur can do it.
Let's start from the end. These brushes, made from synthetic or other threads, are sold ready-made in any craft supply store. Depending on their use, they can equally well become decor for clothing, interior design, or jewelry. In the latter case, all you need to do is place the base of the brush in the cap already mentioned above. For example, like this, using glue:
There seems to be no reason for unnecessary movements when making the brush itself. But this is “sort of” only until you need a brush of a certain size, fluffiness, size, color and, what is also very important, from threads of the same texture as the main product. This is where the need arises to make a brush yourself, exactly the one you need here and now.
Tools and materials:
- A small (depending on the size of the brush you need) fragment of thick cardboard.
- Any thread will do. But keep in mind that with non-slip threads like wool, linen, cotton, etc. the work is much easier. Silk, nylon and other slippery threads are less pliable, slip out of your hands, and tend to come apart at the most inopportune moment in the most inopportune place. So, if you have to work with just such people, and you have never done this before, rehearse on a spool or ball of less capricious threads, and once you get the hang of it, the others will succumb.
- Scissors are very sharp scissors designed for cutting textile fibers. Otherwise, you won’t see a neat brush.
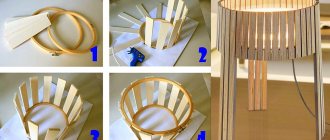
Progress:
- We prepare a cardboard rectangle: its length can be any, it is convenient for some to hold it in their hands when manipulating, but the width is the length of the finished brush, adjusted by a few millimeters for fasteners.
- We carefully wind the thread onto the cardboard base, trying to lay tight turns closely adjacent to each other. Once the brush has reached the desired splendor and density, cut the thread from the skein.
- From the same skein we cut off a short thread, approximately the same thread that is convenient for threading into a sewing needle.
- Carefully thread a piece of thread under the turns, exactly across it, so that it ends up between the cardboard and the threads wound on it.
- We tie a strong knot, firmly covering all the turns at once.
- We move the knot to the upper edge of the cardboard blank: simply scroll the turns around the cardboard.
- Along the bottom edge we carefully cut through all the turns, freeing the cardboard covered by them.
- We cut off another piece of thread for tying and tie it across the tassel, stepping back a little from the top band.
- You can step back again and tie it again, then the base of the tassel will be more voluminous, and the tassel itself will be held together more securely.
The thread tassel is ready and awaiting your further orders and uses. For example, these:
By the way! In exactly the same way, brushes are made from leather or textile cords of moderate thickness. The cord, of course, is less pliable, but it is also submissive.