how to make daisies from paper
Daisies are the embodiment of simple beauty and sincere joy. In this article you will learn how to make paper daisies with your own hands . These are very simple flowers with characteristic shapes, so their paper counterpart is also very easy to make.
A paper daisy flower with a yellow center surrounded by rays of white petals brings sunshine to any floral arrangement or bouquet. Here are 12 simple examples with step-by-step photos. These are daisies made from corrugated paper , several origami models and light versions of daisies made from colored paper using templates.
What can you make your own chamomile from?
You can create daisies yourself from any available materials; the following are suitable for this:
- paper of different densities and textures;
- cotton pads;
- plastic dishes;
- satin ribbons;
- textile.
DIY chamomile fans, step by step with photos
To create a daisy fan with your own hands, prepare 2 sheets of white cardboard, 3 sheets of white A4 paper, yellow paint, glue and scissors.
1. Cut out 2 blanks from cardboard. The first blank will be in the shape of a semicircle. You choose the size of the semicircle yourself; the larger it is, the wider the fan will be. You will also need to cut out a circle from cardboard with a diameter smaller than the previous one; it will serve as the core of the chamomile. Bend the circle in half.
2. Glue the core bent in half on both sides of the semicircle.
3. In the center of the core, cut a slot for the hand and apply yellow paint over its entire area.
4. Cut out the petals from white paper and glue first one side of the semicircle, and then the other.
The daisy fan is ready.
Daisies using modular origami technique
Using the origami technique, you can make a beautiful and durable decoration for your home. Making your own chamomile from paper is simple, but preparing the modules will require patience. To make the flower beautiful you will need 150 identical rectangles of different colors. You can cut them yourself from A4 paper available at home.
You will need:
- yellow paper - 60 squares;
- white paper - 90 squares;
- green paper - 1 sheet;
- scissors;
- glue;
- skewer for flower stem.
The number of yellow and white sheets that need to be prepared is determined by the size of the future modules. A4 can be divided into 16, 32 or 64 parts.
Step-by-step production of modules:
- We connect the long sides of the rectangle, bending it in half.
- Repeat the procedure for the short side.
- We bend the corners of the rectangle towards the middle, as if we were making an airplane.
- Turn over and bend the corners to create a schematic heart.
- We tuck the protruding parts. There is no need to hide them inside.
Having practiced, you can do modules in a few seconds, while simultaneously watching a movie.
Chamomile assembly:
- The first 20 yellow modules should be placed in a row on the short side of the triangle with the “ears” facing out. Another 20 modules are placed side by side on the long part. They are then connected as shown in the diagram.
- The 3rd row is laid out similarly to the second. All modules are connected in a wide strip.
- 60 parts are rolled into a ring and fastened together. You will get a beautiful yellow flower that can be hung separately in a frame on the wall.
- To continue making the daisy, you need to turn the yellow circle over and put on another 20 modules, making a base for the petals.
- 10 modules hold the petals together in the middle.
- According to the scheme of points 4 and 5, the following rows are formed until the white paper runs out.
- To make a flower stem, use any suitable stick, including those served with sushi and napkins. The green leaf is cut into strips 1 cm wide. The paper is smeared with glue and wrapped. The leaves are cut out separately and glued to the stem.
- The flower is placed on the stem and glued if desired.
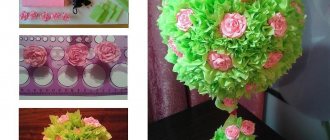
DIY daisy bouquet, master class
The most convenient way to create a bouquet of daisies is from crepe (corrugated) paper. Thanks to the structure of this paper, bouquets look like real ones.
For a bouquet of daisies with your own hands you will need:
- white and yellow crepe paper;
- green colored paper;
- scotch;
- ruler;
- toothpick;
- threads and scissors.
Divide a sheet of green paper into 4 parts in width and cut off a strip. We wrap the strip around a toothpick. This will form a stem. Glue the end of the paper with tape. After winding, remove the toothpick.
Cut a rectangle measuring 25x10 cm from white crepe paper, and 20x4 cm from yellow paper.
Take a yellow strip, cut it in half, fold it and make small cuts at the ends.
We also cut the white shelf of paper in half and fold the sheets towards each other. Apply a yellow stripe to the center of the white stripe.
We fold the strips like an accordion, find the center of it and tie it tightly with thread.
We round off the ends of the accordion using scissors.
We wrap the center of the accordion with a stem and secure the tip with tape.
We straighten the petals and the center of the chamomile according to the principle of creating pom-pom balls. If you are not familiar with this technique, check it out in our article: “Paper Balls”.
Using the same principle, create as many daisies as you want to see in the bouquet. Wrap the daisies in flower packaging or place them in a beautiful vase.
Simple application
Creating such daisies using the origami technique is very simple, and this activity will not take much time.
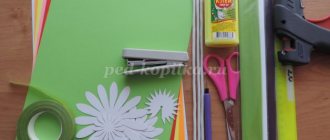
To work you will need:
- squares with sides five centimeters made of white paper;
- green paper;
- brown paper;
- colored cardboard;
- yellow paper napkin;
- scissors;
- glue.
This kind of work will be very interesting for children.
First, fold the sheet in half.
Fold the resulting triangle in half and unfold it back.
We turn the workpiece so that the corner faces down.
We fold both sides, connecting them to the fold line.
Then we turn the workpiece and bend the corners.
We turn the workpiece back, and now the first petal is finished. You will need eight such petals for one rose.
Related article: Knitted sleeveless vest for girls in raglan style with video and photos
Then we take a napkin and form a yellow core out of it.
Now all that remains is to collect the flower.
We assemble the entire composition on cardboard and glue it.
Below are diagrams for creating daisies using this technique.
DIY daisy headband, detail
We bring to your attention detailed instructions for creating a headband from foamiran. All you need is foamiran in yellow, green and white colors, a glue gun, an iron and scissors, a ruler and a headband.
To create one daisy, a circle with a diameter of 7 cm is cut out of foamiran. The circle is divided into 16 equal parts and, 1 cm short of the middle, is cut.
The edges of each part are rounded. 2 such blanks are made.
The blanks are glued together.
A strip 0.5 mm wide and 20 cm long is cut out of yellow foamiran. One edge is cut into narrow strips.
The strip is twisted and the ends are glued together.
Next, the middle is glued to the flower.
Leaves 6 cm long are cut out of green foamiran.
To give the leaves a curved shape, place each one on the surface of a hot iron for a couple of seconds.
For a headband 37 cm long and 0.8 cm wide, prepare 8 of these leaves and 4 daisies.
Next, 2 leaves are glued to the back of each chamomile.
Glue the daisies to the headband.
Decorate with a ladybug.
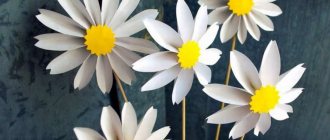
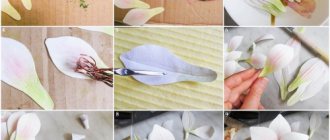
DIY origami daisies made from paper, step by step with photos
1. Cut 8 identical squares from white A4 paper.
2. Bend the square diagonally, then unfold and bend 2 opposite ends of the square to the resulting bend line.
3. Without turning the workpiece over, fold the top and bottom sides in half.
4. Turn the workpiece over to the reverse side and bend it along the longitudinal fold line.
5. Turn the piece over, bend it in half and glue the center together with a pencil.
6. Using the same technique, prepare the remaining 7 squares.
7. Glue the petals together to form a flower.
8. Glue a circle of yellow paper in the center. Ready.
Topiary of daisies, step by step with photos
To create a daisy topiary, prepare:
- artificial daisies;
- artificial leaves;
- tree branch;
- decorative pot;
- foam ball;
- stones;
- gypsum;
- glue gun
In a foam ball, we make holes for a tree branch, insert it and fill it with glue to fix it. The topiary ball is a mandatory element, but if you don’t find a foam ball in your city, you can make it yourself. How to make a ball yourself, read our article: “Do-it-yourself topiary.”
Fill the pot with plaster, place the end of the branch with the ball in it, and secure it. Wait for the plaster to harden.
To cover the plaster, place stones in the pot; you can also use any decorative elements.
Let's start decorating the ball. Glue on artificial daisies and leaves. You can also add other flowers, beads, etc. to the composition. Make sure that the ball is completely covered with decor and there are no bald spots.
Love does not love
It would seem that chamomile is the most common flower that grows in almost every meadow or field. But this is its beauty.
Chamomile is a light and fresh flower, without unnecessary luxury or pathos. Almost every girl used the petals of a daisy to guess whether her boy loved or did not love her.
The color scheme of the costume is also quite simple - the petals are white, the middle is yellow, and the stem is green.
It’s quite easy to make a carnival daisy costume with your own hands. Using fabrics and simple sewing techniques, you can create a cute, playful and flirty look. Even your little fashionista will love this outfit.
Use your imagination, be inspired by our article and make a carnival daisy costume that will be remembered by your child and all the guests present at the holiday.
Let all matters fade into the background, plunge headlong into the atmosphere of creativity.
Do-it-yourself daisies from spoons, step by step with photos
Tools materials:
- plastic spoons;
- green plastic bottles;
- wire;
- yellow plastic bottle caps;
- glue gun;
- soldering iron;
- nippers or side cutters.
Plastic spoons will serve as petals for the flower. Therefore, the larger the spoon, the larger the petals will be. Using wire cutters or side cutters, we bite off the handles of plastic spoons.
Using a soldering iron, we make holes in the lid into which we insert spoons in 2 rows in a checkerboard pattern.
To securely fix the spoons in the lid, fill the tips of the spoons with hot glue.
Cut off the top and bottom of a plastic bottle. Cut the middle of the bottle in a spiral.
From the top of the bottle we form a sepal, and from the remains of the middle of the bottle we cut out leaves, the edges of which we singe with a candle or lighter.
We wrap the wire with a plastic spiral. To keep the wire in place, heat it over a candle and add leaves at the same time.
We put the sepal on the resulting stem, and fix the end of the wire in the inside of the lid, fill it with hot glue.
A bouquet of these daisies can be used to decorate a windowsill or garden plot.
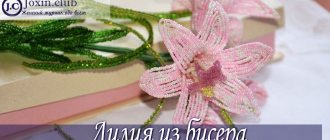
DIY beaded daisies, step-by-step instructions with photos
To create a daisy from beads you will need:
- mix of white cuttings;
- mixed green cuttings;
- yellow beads;
- wire with a diameter of 0.4 mm;
- wire with a diameter of 0.6 mm;
- wire cutters;
- tape;
- wire with a diameter of 3 mm.
We collect white beads on the wire and count 0.5 cm per axis. Make a loop at the end.
We weave 2 pairs of arcs. When the arcs are woven, we twist the working wire with a loop, and bite off the ends of the wire with wire cutters.
Twist all the wires together. For 1 chamomile you will need to make 12 such petals.
We make the leaves according to the same pattern as the petals, using wire 0.6 mm in diameter. The length should be 10 cm.
We collect beads onto a wire with a diameter of 0.4 mm, count 3 cm and twist them. We retreat a couple of millimeters and make the same loop. We make 7 such loops that will form a sepal.
Let's start with the middle of the flower. Cut a 10 cm long wire from a skein and string 3 yellow beads onto it. Next, we wind the working wire with already strung yellow beads and, according to the principle that the petals were woven, we weave 2 pairs of arcs + 1 row.
We collect a flower. Wrap tape around the top of the wire. The length of the wire is 20 cm. We wind the middle of the flower to the top using wire. We wrap the tape over the top again.
Then we wrap 6 petals using the same principle. We wrap the tape with tape and wrap the second row of the remaining petals.
We wrap the sepals and cover the wire with tape.
Winding tape over the entire length of the stem, we attach 2 leaves to it.
Having made several of these daisies, you can assemble them into a beautiful composition.
Petals
Now an origami daisy is created from blanks. You need to decide how many yellow modules you need in total. It depends on the desired number of petals in the row. For example, there will be 7 petals. Then, based on the calculation that 1 petal is equal to 2 modules, and there will be 3 rows, a total of 42 such yellow blanks need to be made. We take the number of modules we need per row based on this calculation (if there are 7 petals, that means 14 modules in a row)
Please note that the module has a long edge and a short one. So, we place the first row on the surface on the short edge
We put the next row of 14 modules on top of the first, but placing them on the long edge. We put the last, third row on the second, placing it again on the long edge. You need to be careful that everything doesn't fall apart at this stage, the modules are not yet fastened in any way. When the row is assembled, the last module tightens the row into a circle. When all three rows are assembled, you get a sun-yellow daisy base.
DIY daisy card with photo, step by step
To create a daisy card you will need:
- White paper;
- sheet of double-sided cardboard;
- a sheet of yellow paper;
- foam double-sided tape;
- glue stick;
- pen;
- ruler;
- scissors.
From double-sided cardboard, cut out a square measuring 15x15 cm for the base (ours is green) and cut off the sharp corners.
Cut strips measuring 10x2 cm from white paper, fold them in half and round the corners. In total, you need to cut and decorate 12 such strips.
Cut out 2 circles with a diameter of 4.5 cm from yellow paper.
Glue 6 petals one by one into the center of the green square and cover with a yellow circle.
Glue the remaining 6 petals in a checkerboard pattern.
Glue the remaining yellow circle to the center using double-sided foam tape.
In the middle of each petal, write a wish or compliment. The postcard is ready.
Male chamomile
The daisy carnival costume is suitable not only for girls. It will look no worse on a boy. For example, green pants and a yellow shirt would be perfect for this costume. As an additional decoration for a very small daisy (a boy under 3 years old) a hat with petals is suitable, for an older one - a stylized boutonniere.
As a basis for the chamomile headdress, you can use a hat that is currently the right size for your child. You just need to sew yellow fabric onto a ready-made hat and attach pre-prepared satin petals to the edges. It is better to use satin, as it is soft and bright. Do not use felt, as it is denser.
This is how you can easily turn your boy into a cute daisy.
DIY daisies made from sausage balls, step by step with photos
Daisies are created from 2 sausage balls ShDM 160 and ShDM 260 (ShDM is the size of the balls).
- Inflate a larger balloon, leaving the tip of the ball about 4-5 fingers uninflated.
- Conventionally divide the sausage into 6 equal parts and twist the body of the ball into sausages.
- We tie the ends of the ball together.
- Bend the first bubble in half and 2 turns, twist the first petal.
- In the same way, twist 3 more petals.
- Wrap petal No. 5 around one of the ready-made petals, and twist the last petal.
- Straighten the chamomile.
- Inflate the ball into a smaller sausage and twist a bubble at its tip several times.
- Fold the bubble in half and screw the tip to its base.
- We will thread the stem with the core into the center of the flower.
The flower is ready.
Panama "Fluffy daisies"
Good day to all!
The size of the panama hat turned out to be 49-50 cm. I drew a diagram for the same size. My OG Diana is 52 cm, so I will knit her with you and show you how to increase the size. So, those who are already ready, you can start. Up to the 13th row inclusive, we knit the same way for both sizes.
When knitting a pattern in those places where we stick the hook into the post, it is advisable to use the “deep” sticking method. The hook must be inserted not under the two upper half-loops of the column, but into the body of the column itself. This method will not allow the pattern to shift when we knit with the crown. After 13 rows, the bottom of the Panama hat should look like this:
I don’t focus much on the diameter, but if someone needs it, then I got 13 cm. On the exhaust gas 49-50 cm in the 14th row we make increases in every 6th column. Total 168 CH and 168/8 (report size) = 21 reports. On the OG 51-52 cm, in the same 14th row we make increments alternately in the 4th and 5th columns. The total should be 176 CH and 176/8 = 22 reports. The width of the report is about 2 cm. If the essence of the final increases in the 14th row is clear, then you can do the calculation yourself for the required exhaust gas. If not, ask, I’ll count it. Starting from the 15th row for all sizes we knit according to the pattern. Repeat rows 15-20 two more times. We also knit rows 33-38 according to the pattern. They differ from the 15-20th only in the last row. Instead of a dc, I knitted a sc. And also, how to understand whether you got the right size is difficult for me to answer. I often use a ball. I pump it up to the required size and if everything goes as it should, the Panama hat should fit it without tension and without tails. It’s convenient to try on and you don’t have to bother your child with fittings again. Fields
If you did everything correctly, the fields should have the shape of a flat circle on the plane.
We take regilin and tie it with RLS. I don't measure the length in advance. I just trim off the excess later.
DIY daisy made from satin ribbons, step by step with photo
The secret to creating daisies from satin ribbons is that the satin ribbons are pre-gelled.
It's easy to do:
- 100 ml of water is poured into a bowl and 1 spoon of instant gelatin is added.
- Gelatin with water is heated on the stove until the gelatin is completely dissolved. Gelatin should not boil!
- Satin ribbons are lowered one by one into cooled gelatin for 1 minute.
- The gelatinized ribbons are removed and excess moisture is removed with your fingers.
- The ribbons are hung at one end without touching each other until completely dry.
1. Cut out templates of chamomile petals and leaves from cardboard. 2. Trace the templates on the green and white tapes with a pencil. Cut it out. For one flower you will need 2 petals and 1 leaf.
3. Using a soldering iron or a hot needle, make 1 hole in the center of each flower.
4. Wrap a wire 8 cm long with tape. 5. We thread a wire through a small button, which will serve as the middle.
6. Generously apply glue to the button and place it in a jar of cornmeal or yellow glitter.
7. Alternately glue 2 blanks with petals.
8. Glue the leaf to the stem.
Chamomile is ready.
DIY wreath of daisies on your head, details with photos
This master class will use satin ribbon daisies from the previous master class. In total, you will need 21 daisies per adult head. You will also need 65 cm long floral wire, satin or organza ribbon and tape.
Wrap the floral wire with daisies. Try to place flowers on both sides of the wire.
To disguise the wire and make the wreath look natural, wrap the wire with tape.
Wrap the wreath with matching organza ribbon, leaving tails at the beginning and end for tying.
The wreath turns out beautiful and looks natural.