Balloons are used to decorate a room or serve to entertain children. Crafts made from cotton or plasticine balls are also popular, and you can also get creative with tennis balls, glassware and other materials.
How to decorate a room with helium balloons
Balloons inflated with helium create a festive mood and transform the room beyond recognition. Gather several of these balls into a bunch and tie them to the back of a chair or even to a table to create a rainbow fountain. Another original option is to buy balloons in the form of numbers or letters and put a word or significant date on the ceiling.
Surprise Ball
You need to place various colored pieces of paper, small toys and candy wrappers with wishes into the ball and inflate it. The decoration is suspended from the ceiling and bursts at the right moment, and the contents rain down from above. This kind of entertainment will be especially interesting for children.
Cotton Ball Poodle
Crafts made from balls using cotton wool can be created with small children. Soft toys or handmade panels will make an excellent gift or decorate a nursery.
For work you will need the following materials and tools:
- cotton wool packaging;
- cardboard;
- PVA glue;
- markers;
- scissors;
- paint brush.
Step-by-step work:
- On thick paper, draw a silhouette of a poodle and a separate ear.
- Small balls are formed from cotton wool.
- Glue is applied to the top of the dog's head and cotton balls are placed on it.
- The tail, boots and part of the poodle’s back are designed using the same pattern.
- Separately, the dog's ear is covered with balls and glued in the right place.
- To make a white poodle look good, it is glued onto colored cardboard and placed in a beautiful frame.
The portrait of your four-legged pet is ready, you can decorate your children's room with it.
Such crafts from small balls twisted from cotton wool can be created during labor lessons at school or kindergarten. They perfectly develop fine motor skills and improve the child's mental abilities.
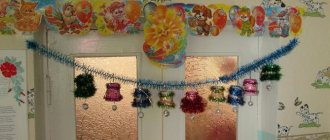
Wind chimes and decorative lanterns
To make your first craft, you will need some wire. It will have to be wound around each ball to secure it thoroughly. The work is painstaking, but the result is worth it.
The second decorative element is much simpler. You will need several jars with screw caps and sticks of any size. First of all, decorate the jar with balls and dry. Then make a hole in the lid, insert a stick into it and secure with glue. Finally, assemble the structure by screwing the can to the base.
Crafts made from ball plasticine
There is a special hypoallergenic glycerin-based plasticine on sale, which consists of small round particles connected by a plastic material that practically does not stick to your hands. The mass of plasticine balls can be fine-grained or coarse-grained.
The child can mix colors to form a multi-colored ball mass. After hardening, the modeling material becomes hard, and simple crafts hold their shape well. Such products can be safely given to small children.
DIY crafts can be made either from plasticine itself or combined with natural materials, creating entire compositions.
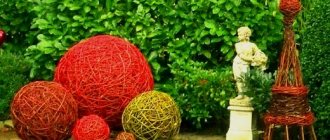
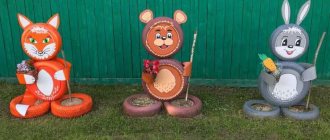
Motley ball in the garden
When creating decorations, it is important not to forget about your site. A great idea would be to make the ball shown in the photo above. A friend told me that Americans make them from bowling balls. The technology is similar to that described above: cover the base with glass balls and dry for several hours, or preferably overnight.
However, residents of Russia will have to purchase the base in advance, and it will not be cheap at all. That's why my friend uses inflatable balloons. He also glues them over, and after drying, pops them with a needle. However, such a craft must be handled carefully: one blow and the masterpiece will crumble. If there are no quiet places on your site, I recommend using any stone of a suitable size as a base. This will make it more reliable and durable!
Capcom changed team and restarted development of Resident Evil 4 remake
A step-by-step recipe for making cute cakes with an original design and taste
We make a comfortable duvet cover with our own hands: you will need two sheets
Snowman made of foam balls
To make a product made from foam plastic balls you need to prepare:
- foam balls of different sizes;
- felt;
- colored marker.
Sequence of work:
- Connect the two largest foam balls together. This will be the head and body of the snowman.
- Using a felt-tip pen or colored marker, you need to draw a face; if you wish, you can take a piece of red felt and make a nose out of it.
- Two smaller balls are glued to the body on both sides; these will be the snowman’s arms. Below are three balls of the same size - legs.
- One foam ball is cut in half, and these halves are glued to the legs of the snowman, creating feet.
- You can sew a hat, a scarf and make gloves from felt fabric. The snowman is decorated with tinsel.
Panel made of pieces of multi-colored glass
Glass bottles and jars can be given a second life. The skillful hands of a craftsman can turn fragments from green, brown and transparent glass containers into a panel or painting. To create such a masterpiece, you need to have pieces of broken glass, tile grout, silicone, and a syringe to fill it. Perform the work in the following sequence:
- make it yourself or download a drawing from the Internet
- paint it in the colors of the existing fragments
- place the drawing under transparent plastic of the required size
- Glue the glass pieces to the base in accordance with the pattern using silicone (from a syringe)
- dry
- After drying, fill the gaps between the pieces of glass with diluted grout
- remove excess grout from the painting with a wet sponge
- dry, make a mount and place it on the wall.
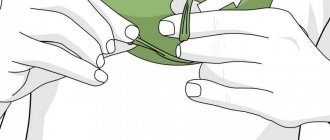
Long balloon dogs
Children often ask to buy them funny toys made from elongated balloons. You can make them yourself. In order to make a dog from long balls, perform the following steps:
- The pump inflates the ball; leave about 8 cm uninflated.
- You need to make 3 sections, each about 4 cm. The first bubble will serve as the dog's muzzle. It needs to be fixed by hand.
- One section needs to be pulled back and secured with a lock.
- Three more identical sections are twisted together - these are the dog’s legs.
- 4 more sections are twisted.
- One bubble is retreated and the lock is made again.
- The resulting dog's muzzle should be turned on its side and the tail raised up.
From tennis balls
Tennis balls can be used in completely unexpected ways. If you have a few old tennis balls lying around, you can cut them up and put them on furniture legs to protect the floor from scratches.
On a tightly screwed jar lid, just put the cut-off part of a rubber ball and twist it - the jar will quickly open.
If you need to protect yourself from loud sound or noise, you can make an ear device out of tennis balls: cut the object in half, attach the parts to the arch and use them as noise-isolating headphones.
Christmas tree toy made of plastic ball
Once upon a time, such balls were popular; they were often taken for swimming, as they floated well in the water.
Now these balls have not lost their relevance either, because you can make an original Christmas tree toy from a plastic ball.
To work you will need:
- plastic ball;
- bright fabric, if the diameter of the ball is 7 cm, then it is enough to take a piece of material measuring 25x25 cm:
- thin braid from which the loop will be made (20 cm);
- elements for decoration (braid, lace, tinsel, etc.);
- glue gun;
- large sewing needle;
- rhinestones, beads.
Sequence of work:
- The nylon braid from which the loop will be made is held over the fire, and its hard side is threaded through a needle with a large eye.
- The same needle pierces a plastic ball.
- Thread the braid and tie it into a knot so that it is closer to the ball; the knot can be hidden under the fabric.
- A square of fabric is glued to the ball, creating a kind of bag. At the base, where the loop is, the fabric is tied with thread, and excess material is cut off.
- A silk ribbon wraps around the ball, the excess is cut off and glued in a circle to the workpiece.
- A lace braid is glued over the satin ribbon.
- A bow is formed from satin ribbon and lace and glued to the base of the ball.
- Additionally, you can decorate the toy with decorative elements.
The New Year's ball for the Christmas tree is ready.
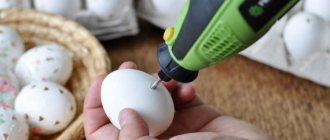
Step-by-step making of a candlestick
Step 1
At the very first stage, you need to carefully pour the decorative balls into the bottle so that they fill it 1/3.
Filling the beads into a glass bottle
Step 2
Using a watering can, pour alcohol-based burner liquid into the bottle and add as much essential oil as you see fit, but about 15 drops will be enough. You can use absolutely any essential oil, everyone chooses the aroma according to their own taste.
Fill the burner with alcohol-based fluid.
Step 3
For the wick, we place a metal holder in the neck of the bottle; for this you can use any cylinder or metal ring that will fit in size. To ensure that the holder sits tightly in the neck, you can wrap it in several layers of electrical tape.
Any metal ring will work as a wick.
Step 4
At the final stage, insert the wick of the required size (so that it reaches the decorative balls) into the holder and place it in the bottle, securing the holder well in the neck. That's all, our candle is ready!
Fix the wick on the bottle
All that remains is to place these candles in your living room, after which you can light them and enjoy the mesmerizing flame and pleasant aroma! These wine glass candles will be the perfect addition to a romantic evening.
Ready-made candlestick from a bottle
Have a nice romantic evening!
Today on the blog of the online store site we will talk about what crafts and useful things for decorating your home you can make with your own hands using decorative glass balls.
In the “Floristry” category of our online store site you will find sets of glass beads designed for creativity and home decoration. Decorating a room with multi-colored glass is not difficult - you can put them in a special flat vase for tabletop compositions, pour them into a large wide glass, or simply place them in small groups on shelves and a coffee table. We are all very familiar with their decorative properties, because glass beads are often used in the design of shop windows and interiors of modern cafes, restaurants and shops, where you can see a lot of useful ideas.
Handicrafts are another matter. Not many people know that with the help of semicircular glass pebbles you can create very interesting little things for the interior, homemade gifts and just trinkets for the soul. Working with glass is of great interest to children - a good reason to do something useful together. In this post we will show you a number of interesting crafts made from glass beads that should fill you with creative inspiration.
Transparent glass balls, cut in half, look like large drops of water - if you place them on fabric or paper with a small pattern, you can get an interesting visual effect. Take advantage of this property to create simple crafts! Carefully glue the cut out circles with images (you can draw them yourself) under the glass hemisphere and see how beautiful and three-dimensional they will look.
This simple technique is an excellent basis for creating a lot of useful things and gifts. Starting from refrigerator magnets, handles for furniture cabinets and other small things to various kinds of jewelry. Take a look at these photos.
Multi-colored glass balls open up even more space for creativity. They can be glued to various interior items: trays, flower pots, vases, photo frames and lamps, laying out patterns in one color or combining them like a mosaic.
From colored pebbles you can create interesting collages and paintings that will become an unusual and stylish decoration for your home.
Well, for activities with a child, another interesting idea is to apply children’s pictures with colored glass pebbles.
Working with glass is very interesting; this material is decorative in itself, so achieving a good result will not be difficult. Try your hand at creating unusual crafts using one of the ideas we suggested or come up with something new. .
Balloons are used to decorate a room or serve to entertain children. Crafts made from cotton or plasticine balls are also popular, and you can also get creative with tennis balls, glassware and other materials.
Glass bead jewelry
Surely everyone has these items in their home. Glass beads are used to create compositions in aquariums or used in home interiors. You can also make a diamond pendant from them. This decoration will especially interest girls.
The sequence of work is as follows:
- Place the balls on a baking sheet and place in the oven for 20 minutes.
- Prepare a bowl of water and pieces of ice in advance.
- Remove the balls from the oven and immediately place them in a bowl of ice.
- As a result, the balls become embossed from the inside, the iridescence resembles the sparkle of diamonds.
- A device for pendants is bought in a specialized store, the balls are pierced, and a pendant is formed.
- After this, put the pendant on the braid.
The decoration is ready.
Murano glass
The historical collection of the island of Murano contains elegant examples of small plastics - beads, pendants, rhinestones and glass balls, made by Venetian craftsmen since the thirteenth century. Balls made of semi-precious stones, turned and polished by hand, date back to the same time. But the real fashion for balls began in the 15th and 16th centuries. From Venice, the balls were delivered to the richest houses in Europe. However, Murano products were more expensive than gold, so the only mention of Murano glass balls refers to the story about the pomp and splendor of the court of King Louis XIV of France, who preferred to play and admire orange glass balls; apparently they reminded him of our daylight, whose name he wore it with pride.
In addition to orange balls, in the annals of Murano there are many colors and shades, balls made with the most varied and, like all products of Venetian glassblowers, unique techniques. Iron oxide colored the balls green, and an admixture of gold colored them ruby. Aventurine glass imitated the aventurine gemstone: many sparkling sparks inside the ball appear when copper is added to the yellowish-brown glass mass. Balls made of filigree glass, which brought fantastic fame to Venetian craftsmen, are transparent, decorated with milky-white spiral threads, made of agate glass; differently located and colored layers create patterns of agate, chalcedony, and jasper. Mosaic glass, decorated with small flowers and stars fused into it, made from multi-colored tubes twisted and cut across. They are interspersed into the overall mass in the form of a mosaic, and so they are called “millefiori” - “a thousand flowers”.
After establishing trade relations with Venice (at the end of the fifteenth century), Russian merchants began to bring glass beads, pendants and balls from “fryags” (as Italians were called in Rus'), which Murano craftsmen called “conterie”, which in Italian means “to count” " A game similar to marbles was also known in Russia, but it is noteworthy that balls made of Venetian glass were used in ancient Rus' as a design material. Rich fashionistas of those times decorated mirrors and icon cases with wonderful balls and rhinestones, and wove them into kokoshniks and sundresses. But, as already mentioned, Murano products were unusually expensive, and unlike Russia, Europe has always lived in an economical mode.
Paper balls
Surely many people made crafts from paper balls for the New Year. One of the options:
- Cut 12 circles of the same size in 4 different colors.
- You need to add the circles like this: first 2 of the same color, then two of the other and then 2 circles of the third color, after which everything is repeated again.
- When all the circles are folded, they need to be folded in half.
- If you plan to hang a ball, then lay a thread in the middle of the fold.
- The middle of the fold is fastened with a stapler in two places.
- One semicircle is divided into three equal parts.
- Glue is applied to one upper part diagonally and glued to the next semicircle.
- On the next part, glue is applied at the bottom, 1/3 of the half circle and glued to the next semicircle.
- These actions need to be done with all departments.
The New Year's toy will turn out to be original and colorful.
If you get creative, you can come up with different uses for balls of different shapes and sizes. They can be used in everyday life, save money on buying toys, and work with small children by creating interesting crafts.
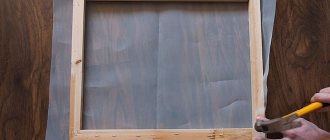
Homemade stained glass
Another idea that I really liked. True, I didn’t dare to cover the new double-glazed window with glass beads - it became a pity, but I created an imitation of a window in the child’s bedroom. To do this, I asked my husband to design a base - a frame and a small window sill. Then she nailed them directly to the wall, and then painted them white to match the real windows. When the paint was completely dry, I began to decorate. By the way, I didn’t come up with the picture myself. I just used the embroidery pattern I liked.
Another important point: if you have colored wallpaper, you will first have to cover the separated niche with white paper. I don’t recommend painting over it, as this will make the glue stick worse.
When the preparation is complete, attach the glass balls with the “Moment”, focusing on the diagram. Wait until everything is completely dry. And add a short curtain to the window. Did it turn out great?