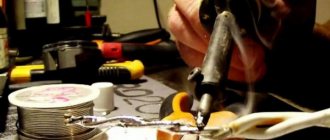
Aluminum is often used to make parts. Sometimes pieces of aluminum are melted to repair a defect and castings are made. You can melt duralumin fragments and unnecessary radio components. The review presents ways to melt aluminum at home, and what you will need for this. Experts will share their experience and tell you what properties of light metal need to be taken into account in order to melt the metal yourself.
Technology for melting aluminum at home
The essence of melting consists of several stages:
- Preparation of scrap. The raw materials used are aluminum profiles, wire (preliminarily crushed with pliers), and used parts. The pieces should be small. Paint and inclusions of other metals are not removed from them; all this will be part of the slag.
- Selecting a container in which to melt aluminum. A durable vessel made of steel (melting point 1300°C) or cast iron (1100°C) is suitable; use ready-made refractory crucibles.
- Preparing the mold for the melt. At home they are made independently. The manufacturing procedure is presented below.
- Melting scrap. The heat source is first determined.
- Slag removal, casting production. The easiest way to melt is to carefully pour liquid aluminum into a prepared container or mold; the slag remains on the walls of the melting vessel. To prevent it from sticking, you need to cool it quickly.
In principle, the technology of industrial and artisanal casting is no different. The scrap is melted until it becomes fluid. After this, the melt is separated from the slag and poured into prepared forms. After the castings have cooled, they are broken. It is important to determine what should be obtained from liquid aluminum as a result. Even if you decide to melt metal for the sake of experiment, the container or mold for casting still needs to be prepared. Then it will be possible to examine the resulting ingot, check it for porosity, cleanliness, and uniformity of structure.
Characteristic
The melting point of materials is determined by their purity. Due to its lightness and good ductility, aluminum is suitable for various technological procedures. Under the influence of high temperatures, a reaction with oxygen occurs.
An oxide film appears on the surface of the metal, protecting it from oxidation and corrosion. During melting, aluminum changes its structure, so it needs a protective coating. With sudden cooling, additional internal stress and shrinkage appear.
Equipment and methods of smelting
Before melting aluminum, choose a place and method for heating the metal. Two commonly used options:
- In garages or households, aluminum is melted, a smelter is built, it is made of bricks without the use of a binder mortar. A metal frame is convenient as a support; it should have a hole for air injection; for this, use a vacuum cleaner or hair dryer. A homemade stove is lined with coal. The melting container with the crowbar is placed inside. To better retain heat, the bricks are covered with a sheet of metal on top.
- At home, to heat up a small amount of scrap, use:
- gas burner;
— blowtorch;
- with a gas stove, you can melt a small amount of scrap, but the melt yield will be low.
The casting is melted in a steel vessel. To increase the heating rate, a design of two containers is used; they are inserted into one another with a gap of 1 cm. The bottom of the large container is perforated, it serves as a flame divider. When there is a gas burner, combine bottom heating with top heating. You can melt metal faster.
Optional equipment
For small portions of scrap, tin cans are sometimes used. But this container is unreliable, and the tin may burn through. It is safer to use a ceramic or metal refractory crucible for muffle furnaces. A good option is a cut-off fire extinguisher glass. For convenience, a gutter is made through which molten aluminum will flow. When working, use long tongs. You will need a spoon with a long handle to collect the slag.
Technical features of aluminum
Aluminum is considered one of the most popular metals. It is very convenient to work with, the melting point is 658 degrees. It has excellent heat and electrical conductivity and is resistant to corrosion.
Today we will cast a cover for the car's water pump.
Materials used:
- Sand.
- Aluminum.
- Gypsum.
- Plasticine.
- Silicone Grease.
- Steel wire.
- Lego constructor or any children's construction set.
Necessary tools for work:
- Lathe.
- Screwdriver.
- Muffle furnace.
- Drill.
- Pliers.
- Dremel engraver.
How to make a casting mold
Before melting aluminum, prepare a blank for casting. There are several ways to pour liquid melt. The open and closed methods are most often used. Each one is worth telling in more detail.
Open form
When aluminum is melted using an open method, after melting the melt is poured into a prepared container, for example, a tin can. The aluminum casting is removed from the can while hot, when the hot melt has set slightly on top. Just tap the container lightly. If an ingot of a given geometry is not needed, the molten metal is poured onto any flat refractory surface; it holds well, does not spread, and looks like mercury.
Features of the technological process
A crucible is a refractory container for heating metal. Products made from the following materials are used:
- Porcelain.
- Steel.
- Cast iron.
- Corundum.
At home, a ready-made crucible or container made from a wide iron pipe is used. To make it, you will need a grinder and welding equipment. The volume of the crucible is selected individually, the container is heated evenly, and the crushed metal melts as a result of heat transfer.
Before heat treatment, it is necessary to reduce the melting temperature so that the state of the metal changes faster. To do this, aluminum is crushed into small fragments. Ignition or oxidation occurs frequently after such grinding. The state of the resulting aluminum oxide changes at higher temperatures. This substance is removed along with other slags after remelting the base metal.
During the heat treatment process, you will have to avoid liquid getting into the crucible. The sudden evaporation of water causes an explosion. When immersing metal in a container, you must make sure that there is no moisture on it. Aluminum wire is most often melted. First, the material is divided into fragments with scissors, then compressed with pliers. This method prevents the exposure of oxygen to the metal. If there is no need to obtain high-quality parts, there is no need to grind raw materials.
You will have to model the casting technology yourself if you need to obtain molten aluminum at home. The material is pre-cleaned from dirt, impurities, and slags. Large workpieces are divided into several small fragments. The casting method requires following the instructions: the most convenient method is used to melt the metal. Slag is removed from the surface of the fluid. Liquid aluminum is poured into a mold, which breaks when it solidifies.
Useful tips
- The melt must be hot so that the mold is filled evenly. It is poured when it acquires the consistency of mercury.
- Castings with complex configurations are made quickly; they try to fill the molds right away so that the metal does not have time to set and no partitions or voids are formed.
- Metal can be poured into plaster over wax or foam; high temperatures cause the wax and foam to burn out. The surface of the casting will be smooth.
- To cool the casting, do not immerse it in water; the casting will crack.
- When melting pure aluminum, the technology of using protective fluxes is used; they protect the metal from oxidation.
Fire safety must be observed; the casting process involves the use of an open flame. It is important to use personal protective equipment: gloves, goggles.
Second phase
Firing the workpiece in a muffle furnace. We set the firing mode to 350 degrees, it takes 5 or 6 hours for firing. After six hours, remove the pan from the oven. In this case, no cooling is required. We send aluminum to the furnace to melt. Aluminum is used grade AL-9. This is the most suitable grade of aluminum, excellent for casting products. Fill the bottom of the bucket with sand and place the hot mold there. We install the sprue on the casting hole. It can be made from sand and liquid glass. Fill the bucket with sand to the border with the sprue. In this case, coarse sand is good; condensation does not form in it, unlike fine sand. You can start casting. All preparatory steps have been completed. Don't forget to remove the oxide film before starting the process. The middle part of the sprue needs to be heated with a burner. This way the metal will shrink better.
It's time to break the structure.
As we can see, the mold poured perfectly. Of course, there are marks from the joints, but this is not a problem; they can be easily removed with a Dremel. The sprue can be removed, we are preparing for turning the product.
How does the forge work?
From available materials you can make an effective system that allows you to carry out forging work. There are a large number of types of structures that you can make with your own hands. The professional forge is equipped with the following elements:
- the table is made of fire-resistant material;
- firebox with grate;
- air chamber to increase fuel combustion efficiency;
- air drainage with supply air duct;
- valve for regulating air supply;
- tent;
- window for feeding workpieces;
- umbrella;
- chimney;
- crucible;
- hardening bath;
- gas-air chamber.
The type of equipment under consideration can be called a classic forge used in blacksmithing. It is very difficult to create it yourself, but you can make a simpler design for melting aluminum.
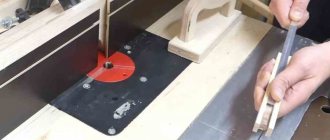
Sand casting
Sand casting (casting in sand-clay molds) is one of the most common methods for producing cast parts in many industries - machine tool industry, automotive industry and much more. This method is widely used in single, batch and mass production.
Sand casting
Sand casting technology
The technology of sand casting is not complicated. This casting method is used for the manufacture of castings and parts from gray cast iron and low-carbon steel alloys. Sometimes, sand casting is used for processing non-ferrous metals - aluminum, copper, etc.
When choosing such sand casting, a technologist must understand that the quality of the finished parts will be quite low. This is primarily due to the fact that the use of such technology cannot guarantee that foreign inclusions will not get into the liquid alloy.
When casting in sand molds, gas formation occurs very rapidly, especially this process manifests itself when casting in wet molds. It is acceptable to use this form of casting to produce parts with complex geometry.
But a number of restrictions on obtaining such blanks are imposed by the fact that the removal of the finished casting is associated with certain difficulties.
Sand casting makes it possible to produce workpieces weighing up to hundreds of tons. Thus, they produce frames for metal-cutting equipment, body parts, etc.
Meanwhile, the accuracy of the resulting blanks is below 14th grade; in addition, shells and foreign inclusions can be found on the surface of cast parts.
That is why those surfaces that will come into contact with other parts are always machined.
Foundry products
Sand or earth casting is used to produce many parts. For the convenience of consumers, they can be systematized into several groups. Group A - this group includes castings of simple shapes - rings, wheels, flywheels, etc.
Group B - this group includes reinforcement elements, bearing housings, complex surfaces with an obtuse or acute angle. Group B - it includes blanks for gears, frames, casings, etc. Group D - these are castings for the production of machine beds, complex body parts.
Group D are castings that are produced by molding according to a model.
Complex housing parts Blanks for gear wheels Fittings Castings of simple shapes
Thus, we can conclude that in sand molds it is possible to cast sewer manholes and parts with complex geometric shapes, for example, compressor stage casings, etc.
When designing a sand mold, the designer must take into account that in the direction where the finished casting will be removed there should be no obstacles in the form of protruding rods, etc.
Foundry models
Models for this form of sand casting must withstand quite a lot of pressure that occurs when filling the flask with casting soil. That is why metal and hard wood are used to make injection molds. All materials that can be used to make injection molds can be combined.
That is, they can be assembled on threaded connections, glued, etc. To eliminate pores on the wooden parts of the models, they are carefully treated with abrasive sandpaper. Then it is varnished. When making casting molds, it is necessary to take into account the fact that it is necessary to maintain the angles of inclination of the vertical planes.
The presence of these corners will subsequently make it easier to remove the finished casting from the mold.
Basic elements of casting in sand-clay molds
One of the key factors determining the quality of casting is the properties of the sand (earth) used to obtain casting equipment. Practice shows that the finer and purer the sand, the higher the quality of the resulting casting will be. We must not forget about the rods, which can be multi- or disposable.
General classification of sand molding sands
Depending on the application, the mixtures can be divided into the following subtypes:
- facing them are used to create the working surface of the mold;
- single (filler), they are used directly to create the mold.
General classification of sand molding sands
Facing materials have a thickness that is determined by the thickness of the future casting; it can be 20 – 100 mm. A filler mixture can be poured on top of the mixture used for cladding. A filler or single mixture is used to fill the entire mold and is used for the production of equipment for all types of production, from single products to mass production.
Sand casting begins with its creation. A distinctive feature of sand tooling is that they can only be used once and to obtain a new part it is necessary to make a new one.
The equipment is produced with a model of the future part in hand. It is installed in a flask (a wooden or metal box for molding sand) and covered with earth. Then it is necessary to compact the filled sand mixture.
To do this, use manual or mechanized impact tools and devices.
Once the mixture reaches the required condition, that is, the required density, the model is removed and the foundry workers will have ready-made technological equipment at their disposal.
To obtain cavities located inside the future casting, rods are used. They are usually made from the same material as the equipment itself. The process of producing a sand casting mold includes the following main steps.
- installation of the model in the flask;
- compaction of the sand mixture;
- removing the model from the flask.
The complexity and technology of production of foundry equipment largely depends on the following parameters:
- the size of the future casting;
- number of cavities;
- type of equipment.
If the mold being manufactured requires additional heating or baking, the time required for its production will increase sharply. To facilitate the removal of the finished casting, various lubricants, for example, grease, are applied to the working surfaces.
Sand casting mold assembly
After the casting tooling has been produced, it is prepared for pouring the melt. The working surfaces must be lubricated with a special compound that facilitates the free removal of the finished casting. After preparing the working surfaces, the injection molding rods are installed.
Mold making process
At the final stage, the half-forms are connected to each other and securely fastened. The reliability of the assembly will not allow the melt to flow out of the mold.
Types of sand molds
The variety of sand molds for casting has allowed them to be divided into several groups designed to produce castings with different characteristics.
Sand casting molds
In total, we can name 7 groups of foundry technological equipment or model kits.
- A model kit made of metal, which includes additional devices for machine molding.
- The set is made of metal and includes additional devices that are designed for machine and manual molding.
- Model kit used for machine and hand molding. The models themselves are made of metal, and some parts, for example, rods for forming cavities, are made of wood of different species.
- Set for the production of manual and machine molding. Models and rods subject to heavy wear are made of metal.
- Set for molding castings from hardwood.
- Set for forming castings, made of soft wood.
- Kits for performing manual molding of castings.
Raw sand mold
To produce casting equipment, mixtures consisting of sand, water, clay and some kind of binding material are used. A typical recipe looks something like this:
- 90% sand;
- 3% water;
- 7% clay.
Raw sand mold
Equipment of this type is considered to be very economical and widely used.
Dried sand mold
The production of such equipment is similar to the production of a raw form, but additional materials are introduced into the formulation to bind the components of the mixture.
Dried sand mold
The working surfaces of the equipment are dried by heating. This approach to the manufacture of molds leads to an increase in the dimensional accuracy of the workpieces and their quality. The production of such forms requires a lot of time and, as a result, their cost increases and the production of parts decreases.
Dry sand mold
This type of equipment uses organic additives. Their task is to bind the components of the mixture into a single whole. Final processing is carried out in an oven. The obvious advantages of these products include the accuracy of the casting. But we must understand that these molds have high manufacturing costs and low casting productivity.
Chemically hardening sand mold
Resins are introduced into the molding composition of chemically hardening equipment. They provide the formation of a model in the open air without the use of heat treatment.
Chemically hardening sand mold
The mixture is based on quartz sand. In addition to sand, the mixture includes liquid glass and caustic soda. The addition of this chemical affects the technological properties of the mold. In particular, its service life will be extended. After hardening, its strength will be higher than that of other types of mixtures.
Characteristics of foundry sand
When performing sand casting, you must understand that the quality of the casting directly depends on the composition and properties of the foundry sand. Foundry practice has identified five key parameters that determine the quality of foundry sand.
Physical characteristics of sand
- strength;
- gas permeability;
- stability when exposed to temperature;
- subsidence ability;
- possibility of repeated use.
Strength
Strength is the ability of the mixture to maintain specified parameters during the casting operation and transportation of the flask inside the production facility.
Gas permeability
Gas permeability is the ability of sand to pass through gases formed during the solidification of the melt. If the mixture has high permeability, the porosity of the casting will be reduced. If the permeability is low, the surface quality will be much better. Gas permeability directly depends on the composition and fraction of the sand mixture.
Thermal stability
The ability of equipment to maintain a given shape when exposed to temperature, resist cracking and the appearance of other defects that appear when exposed to high temperatures of molten metal is called thermal stability.
The ability of the molding sand to compress tightly during the solidification of the cast part. If sand did not have this property, then the cast workpiece would not have the ability to change dimensions inside the mold. And this would ultimately lead to cracking of the workpiece and the appearance of other defects that arise when molten metal spills.
Reuse
This means the possibility of using molding sand for the production of equipment intended for the formation of a new batch of castings.
, please select a piece of text and press Ctrl+Enter.
Making a furnace
The basis of the stove will be a 50-liter metal barrel, which is cut with a grinder to the required height.
The inside of the barrel is lined with heat-resistant (fireclay) bricks. Heat-resistant adhesive is used for bricklaying; it is shown in the photo.
We cut the barrel with a grinder, then lay a fireclay brick base on the bottom of the barrel and “concrete” it around with high-temperature tile adhesive.
Then we expose the side walls. In order for the bricks to stand as close to each other as possible, it is advisable to remove small chamfers.
For forced air supply, four nozzles are used at once, which are located inside the barrel itself. This interesting air supply system is made of copper tubes with a diameter of 28 mm and fittings - to install it in the four lower bricks you need to make four holes at a slight angle (from top to bottom) for the tubes.
Instead of copper tubes, you can also use ordinary steel ones, which, naturally, will reduce the cost of the entire structure. In this case, copper tubes were used only because they were available and needed to be attached somewhere.
Two hair dryers will be used to supply air - their power is quite enough for such a stove. After installing the air supply pipes, we begin to fill the first “floor” of bricks with tile adhesive.
For laying the second row, half-bricks are used, which will be positioned with a slight slope.
The tubes for forced air supply will be located inside the barrel itself. Please note that the weight of the crucible furnace is approximately 200 kg. Therefore, if you do not want to install it specifically in one place, then make a movable support from the corners and four wheels in advance.
All that remains is to make a handle and a hook for the crucible.
Using both a handle and a hook at the same time, it is very convenient to pour molten metal from the crucible into the mold. That's all, the homemade furnace for melting aluminum is ready!
Popular homemade products on our website
- Homemade log stove: 17 photos and description
- Do-it-yourself brick stove for a bathhouse
- DIY tent stove
- DIY camp stove from a freon cylinder
- Do-it-yourself rocket stove made from a pipe
- DIY barrel oven
- DIY wood-burning garage stove
- Furnace made from rims
- Universal stove for heating a garage
- Do-it-yourself walk-behind tractor trailer
- Do-it-yourself long-burning stove: diagram, photo,…
- Do-it-yourself Butakov stove
- Camping mini stove electricity generator: making...
- DIY rocket stove: drawings, dimensions, photos and description
- DIY brick oven
- Do-it-yourself turbo oven for outdoor trips
- DIY camp stove (24 photos)
- Do-it-yourself pipe bender for a profile pipe
- Do-it-yourself long-burning stove
- DIY motorcycle trailer
- Do-it-yourself furnace
Security measures
The use of personal protective equipment is required when melting aluminum. Hands, face, open areas of the body must be protected. It is recommended to use welding gloves that can withstand temperatures greater than 600 degrees. This is the main means of protection, since the chances of liquid aluminum getting on your hands are the highest. Goggles and a mask prevent hot elements from getting into your eyes. To be completely protected, you can carry out smelting work in a metallurgist suit with high fire resistance. A chemical respirator is used when cleaning aluminum with welding flux.
Melting aluminum at home is not difficult. The metal is heated in a previously prepared container. Slag is removed from the surface of the liquid substance, then pure aluminum is poured into the mold. Furnace design and temperature determine the melting time. When using a gas torch, the heat must be applied to the metal from above.
Making a forge from a bucket
The bucket forge is also designed for melting aluminum. To do this, you need a bucket with a capacity of 10 to 20 liters. In addition, gypsum and sand. This mixture is placed at the bottom of the bucket.
Step-by-step instructions for a forge made from a bucket with your own hands:
- The selected bucket must not be galvanized. This is due to the fact that zinc, when heated, releases harmful gases. The container is made of ordinary metal.
- A mixture of gypsum and sand, 5 cm thick, is placed on the bottom. The ratio is 1:2. First, such a mixture is formed at the bottom. After drying, the inner walls of the bucket are treated with it. Drying time is 15–20 minutes.
- A water squeegee is installed below, through which air is supplied with a hairdryer.
- A crucible is inserted into the bucket.
- The ignition process begins.
- Aluminum is placed in a crucible and melts under heat.
Small items can be cast in this way.
A hand-made blacksmith's forge is a necessary household device. However, first, you need to read the instructions for its use. Purchase the necessary drawings. The risk of fire must be completely eliminated. The right place has been chosen for it. Working with hot metal will bring not only pleasure, but also benefits.
Miniature furnace for melting aluminum
Miniature furnace for melting aluminum
The forum has already written more than once about the manufacture of small-volume electric stoves for melting aluminum. I want to share my experience in this matter. Actually nothing new, but maybe someone will be interested.
It all started with the need to fill several small parts with aluminum. The tiny volume could have been melted with a burner, but out of curiosity I decided to make an electric stove. What prompted this decision was a ceramic cone I saw at a flea market with a nichrome spiral wound around it from an antediluvian heater. The spiral was new, and the price was low (30 rubles) - I decided to try it. The design is simple and reliable, successfully tested by many craftsmen in the last century.
I wound the spiral, inner pin and base from the cone, since they were no longer needed and threw them away. The lower part of the cone was sanded down almost to the groove in which the spiral is placed, which significantly reduced its height. From a piece of stainless thick-walled pipe (outer diameter 76 mm) I cut a 90 mm long blank for the body. The pipe was bored to a wall thickness of 2 mm for a length of 87 mm. On a drilling machine, I drilled two holes for the exit of nichrome wire (diameter 12 mm). I turned the washer (bottom) out of stainless steel. Its outer diameter is 70 mm, thickness is 3 mm, hole diameter is 10 mm. In the washer I drilled three additional holes for legs with a diameter of 5 mm on a drilling machine and cut an M6 thread. The legs were turned from a 19mm hexagon. The fastening feature can be seen in the photograph. This design (in theory) should make it easier to remove the cone from the body to replace the spiral. You unscrew the legs and squeeze out a cone with thermal insulation together with the washer. I've done more than 10 heats so far and haven't needed it yet, so I haven't checked. The legs are not high, only 22 mm, otherwise the structure is too unstable. Total height without cover 112 mm. From a strip 17 mm wide and 180 mm long, I made a bracket for fastening the wire.
Asbestos is used as thermal insulation. With such dimensions of the body and cone, it can be considered purely symbolic, which is for the best - the spiral will last longer. Assembled the body. The asbestos sheet was soaked in water to a pulp and a shirt was molded from it inside the body. I molded it using a ceramic cone. I wound a spiral around the cone with a slight tightness, having first straightened 5-6 cm of wire from the ends. The ends of the spiral were secured by sealing them with fireclay clay. Then I completely coated the spiral with clay. I didn’t bother drying it, but immediately inserted it into the case. The asbestos compacted, pushing small dry pieces into the gap between the cone and the body. The water partially escaped through the bottom and holes for the wire. Dried it slowly on a gas stove while heating the bottom. Asbestos is considered a carcinogen, so I covered it on top with fireclay clay (a layer of about 5 mm). I turned a crucible out of steel (the size is along the inside of the cone with a gap). The volume is small, about 15 ml, but quite sufficient for my needs. I sealed the hole inside the cone with clay so that the crucible would not protrude and would not touch the walls of the cone. I threaded ceramic tubes onto the ends of the spiral and made rings on them to attach the wire. I added two more ceramic rings to the ceramic tube (then I put a cambric on them). I tightened the wires and ends of the spiral with screws and nuts. The attachment point was covered with a cambric tube. I attached the wire to the bracket as follows. I drilled a steamed champagne cork with a drill with a diameter two millimeters smaller than the diameter of the wire, and then cut it lengthwise on one side with a knife. The wire was inserted inside. I secured the plug to the bracket using a clamp. I cut the chamfers with a knife to bend the wire. The plug reliably insulates the wire from heat through the bracket.
The stove is ready.
I did the first calcination under the exhaust hood in the kitchen, the smell was still the same. Then everything burned out and there was practically no smell in the swimming trunks.
The lid was cut out from a piece of fireclay brick (light weight). Accelerating a cold furnace until the metal melts (D16) takes only 9 minutes. After the first test, tarnished colors appeared on the body - we had to paint the stove with heat-resistant spray paint.
All expenses except for what was on hand were about one hundred rubles (cone, wire, plug and two ceramic bushings).