Bicycle generator
8 minutes Author: Mikhail Skvortsov 2358
A bicycle generator is a device that allows you to generate electricity by rotating the pedals and transfer it to the bicycle’s lighting fixtures or third-party electrical appliances. By design, bicycle generators are divided into several types: bushing, bottle, carriage and contactless.
The current and voltage output are inextricably linked to the pedaling frequency - the speed of movement. The pattern is valid for all types of generators. The bicycle generator produces alternating current, which is stabilized into direct current using a bridge rectifier. Its role can be played by soldered diode lamps or special devices, for example, a full-wave rectifier.
What are bicycle generators and why are they needed?
A bicycle-mounted electric generator is a convenient, portable device that allows you to independently generate electric current to support the operation of headlights or other electrical appliances. For example, with its help you can charge your phone or GPS navigator for free on the go.
The operating principle is to generate alternating current, which is converted to direct current through a diode bridge. Facts about bike generators:
- depending on skills and riding speed, the cyclist produces 0.15-0.25 kW per hour;
- the record figure achieved in 24 hours was 12 kW;
- The higher the cadence, the more electricity is generated. A similar pattern is typical for both purchased and homemade bicycle electricity generators;
- pedal generators can be stationary: you can make the device yourself using an old and unnecessary bicycle.
On an industrial scale, the use of pedal generators makes no sense, since it takes about 10 hours to generate 1 kW of energy, but for personal use such a device is a good choice. After all, the main advantages: the ability to generate current for free both day and night, low cost of equipment and ease of maintenance. You can reduce the cost even more if you make a bicycle generator with your own hands.
A stationary pedal generator is also an alternative to solar tiles or batteries, which are not always possible to use due to climatic conditions. The device does not depend on the sun or wind in any way and can be easily placed in a house or apartment.
Hub dynamo as an electric motor
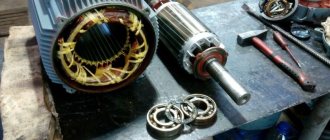
A hub dynamo, or hub generator, is a regular bicycle hub with a built-in magnetic mechanism. During rotation, eddy currents are formed; at the exit from the bushing, mechanical energy is converted into a current with a given force, voltage and power. On bicycle dynamos, the voltage reaches 6V and the power is 1.8-2 W.
The invention was patented by the English company Sturmey Archer. Nowadays, production is actively supported by other manufacturing companies - Shimano and Schmidt.
Features of the generator bushing design:
- fixed armature (winding) on the axis;
- a ring magnet fixed and rotating together with the bushing;
- terminals and double wires;
- high mass.
The bushing source of electricity does not use the bicycle frame as a ground and, together with the lamps, is isolated from it. In a full-wave rectifier, the AC circuit (output) and DC circuit (to the headlight) are completely separated from each other.
Hub dynamos are heavy, although lighter rare-earth magnets and an aluminum shell have made it possible to slightly reduce their weight. In operation, the device has low resistance to unwinding, and as the angular velocity increases, the frequency of the current increases. This effect smoothes out the voltage gain and allows the generator to operate over wide speed ranges.
The headlights that the bushing generator is equipped with have a built-in current stabilizer. When connecting another headlight, a separate rectifier is installed in the circuit so as not to burn the electrical appliance. The brightness of the headlight depends on its requirements for the energy source and, in fact, the output voltage of the bushing. The greater the discrepancy downward (the headlight is more powerful), the dimmer the light will be. In the opposite situation, the light source will not work.
The principle of operation of a contactless electricity generator for a bicycle
The MAGNIC generator works with all types of metal alloys from which bicycle rims can be made (aluminum, steel, magnesium). Aluminum and magnesium are not known to be magnetic metals, but they are conductive.
When the rim of a bicycle wheel moves relative to a magnet, eddy induction currents arise at the boundary of the conductive material from which the rim is made—in this case, the metal frame. These eddy currents have their own magnetic fields, which are absorbed by the coil in MAGNIC.
In this way, electrical energy is generated. Although there is no friction, the magnetic field of the eddy currents still has a minimal braking effect, but it is so small that it is not taken into account.
Advantages of a contactless electricity generator
- light weight; — quick installation and removal; — no batteries or accumulators needed; — no noise; - no friction; — no tire wear, as in a contact generator; - works with all metals from which the rim is made, except carbon - the size of the wheels does not matter - no wires - everything is contained in one sealed box; - can work in any weather conditions (rain, mud, snow) - the distance between the rim and the generator is 5 mm.
Also read on this topic:
Electricity generator for bicycle. The electricity generator or dynamo was invented in 1827 by A. I. Jedlik, a Hungarian electrical engineer and physicist. This happened six years earlier than Siemens presented the same invention to the world, but Yedlik did not patent it...
Bicycle headlight. In order for a bicycle headlight to fully perform the functions assigned to it, certain requirements are imposed on it...
LEDs came and won. In the 60s of the last century, LEDs (Lighting Emission Diodes) with very intense light emission were invented. Their use in everyday life was delayed for a long time due to high costs and at that time...
USB charger for bicycle. A USB charging system for a bicycle was designed by students from a technical university. There is nothing complicated about it, it was only necessary to adapt existing chargers to the bicycle. The only difference is...
Bottle bike generator: features, pros and cons
Let's get acquainted with another energy source - a bottle, or “bus” converter.
A bottle electric generator is a closed housing with a rotating rubber roller on the outside, attached to the front fork. The housing contains the direct converting device – winding and magnets. The movement of the magnetic field is achieved by engaging the roller with the tire and directly transferring mechanical energy from the wheel to it. The higher the speed, the stronger the polarity inside the generator and the greater the voltage output.
Advantages of "bottles":
- the ability to disable it as unnecessary - just move the roller to the side;
- easy to install on any type of bike;
- inexpensive compared to sleeve generators.
Weaknesses include:
- weight imbalance: weight about 250 g, the “bottle” is attached to one side;
- low efficiency in wet weather - the roller slips over the tire;
- noise, high friction at speeds;
- tire sidewall wear;
- It takes a long time to adjust the tilt and position.
Separately, it is worth mentioning the carriage bicycle generator. Its body is fixed in the area of the pedal assembly - the carriage, under the lower stays. The rotation of the magnetic device is set by a roller that is engaged with the rear wheel of the bike. The roller is secured to the tire by a clamping spring.
Contactless bicycle generator
The bottle and carriage generators produce electricity when they come into contact with the moving wheel. The hub dynamo is a built-in element of the wheel. The contactless generator does not touch the wheel in any way and does not create friction forces or resistance to rotation. Eddy currents are formed due to the close proximity of the plane of rotation of the magnetized rim and a strong magnet.
The headlights are built directly into the device, electricity is transmitted directly through the rectifier bridge. The undeniable advantages of this generator include:
- no cables;
- there is no friction force or resistance from the device;
- light weight of the structure – no more than 60 g.
The devices are attached in pairs: on the fork - the headlight, on the feather - the rear reflector. In fact, these are independent flashlights, only they do not work from batteries, but through the rotation of wheels in a magnetic field. The luminosity of the lamps is at the same level as or exceeds that of battery-powered lighting devices.
As the wheel slows down, the intensity of the eddy currents decreases, the lights should dim, and when the wheel stops, they should go out completely. To ensure uniform light and the ability to use the light even when parked, the design includes a capacitor (“battery” for generating electricity), which is filled when the bike moves.
Types of structures for cyclists
The following types of bicycle generators are distinguished:
- bottle dynamo;
- hub dynamo;
- contactless generator.
Each design has a number of advantages and disadvantages, so the cyclist should determine his priorities in advance: whether cost, ease of maintenance, noise level or other characteristics play a decisive role.
Bottle dynamo
The device is shaped like a bottle. It's essentially a small electric generator that attaches to the side wall of a bicycle tire. Operating principle: when the cyclist moves, the tire rotates the roller of the dynamo generator.
The table discusses the advantages and disadvantages of this type of structure:
| pros | Minuses |
| If you turn off the bottle generator for a bicycle or charging devices, headlights, the device will not create additional resistance while riding. | The device does not tolerate humid weather well and begins to produce less energy. |
| The device can be installed on almost any tire. | Making noise while driving. |
| On average, bottle appliances are cheaper than other types of designs, but there are exceptions. | When turned on, bottle dynamos make the cyclist's movement more difficult than hub dynamos and contactless bicycle generators. |
| It is difficult for a non-specialist to install the dynamo correctly: an important role is played by the angle and height of contact with the side wall of the tire. | |
| The device must be moved and turned on manually. Automatic mode is not provided. |
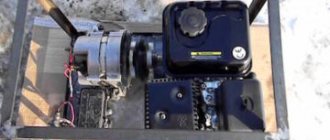
How to make a generator with your own hands
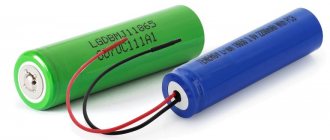
Now let’s try to make a generator for a bicycle ourselves. We will use a stepper motor as a basis. To power the lighting devices you will need a motor with the following characteristics:
- rated current – 2.4 A;
- resistance – 1.2 Ohm;
- output voltage is 2.88 V.
The dynamo should be installed near the rear wheel hub. To transfer rotation from the wheel to the flywheel (rubberized wheel) of the motor, a transfer ring is needed. To create it you will need flexible plastic tape. Manufacturing:
- Twist the ribbons into a ring, welding the ends.
- Cut mounting slots on the side for each wheel spoke. The depth of the slots is ¼ of the thickness of the ring.
- Place the ring on the knitting needles, fill the slots on the inside of each knitting needle with glue-sealant.
DIY electrical circuit
- Solder 1N4004 diodes into parallel bridges.
- Solder a capacitor between the “positive” and “negative” ends of the circuit.
- Install resistors and voltage stabilizer.
- Solder the LED (1W) and resistor to the headlight circuit.
- Connect the headlight to the capacitors through the wires, and then the electrical circuit to the generator on the rear wheel.
- To turn off the lamp even while riding a bicycle, install a switch in the gap between the capacitors that will close and open the circuit.
The housing with the electrical circuit is fixed on the bicycle frame, the wires are secured with clamps.
At the last stage, the operation of the system is checked: the wheel must move freely along the wheel and move synchronously with it. With a correctly assembled electrical circuit of capacitors, resistors and rectifier bridges, the headlight will turn on. True, at low wheel speeds its light will flicker.
"Wireless" generator
A wireless or contactless generator is perhaps the most interesting option of all discussed in this article. It is safe to say that it has the main advantages of those that have already been described above, and at the same time is practically devoid of all their disadvantages.
Of course, a wireless device is more complex and technologically advanced, so it will cost significantly more. But it weighs very little, and the headlights are built right into it, which greatly simplifies its operation and saves a lot of energy. In addition, such an electric motor does not have any wires or cables; moreover, it does not come into contact with the wheel in any way, which means it does not create any friction or resistance.
Application of electric generator
Where can a bicycle electric generator be used in our everyday life? You can, for example, charge your phone while exercising in the morning. Well, really, why not exercise and save energy at the same time? Measure how long it takes to charge your cell phone. Try to remember the time and try to beat it in the future. You can combine business with pleasure, so to speak - see if you can generate as much energy as the blender consumes. Then you can make yourself a sports cocktail.
If you have a technically adventurous child, why not try bringing this idea to life just for the experience. Use your imagination and maybe some other funny ideas will come to your mind.
It is possible that you will want to bring your ideas to life. What do you need for this?
- Bike. An old one that has not been used for a long time or has been lying around is perfect for these purposes.
- 12V DC motor.
- V-belt for connecting the rear wheel to the engine.
- Beam for stand 100*50 mm.
- Diode.
- Battery 12V.
- An inverter that converts direct current 12V into alternating current 220V.
If you do not plan to connect anything other than a DC light bulb to this device, then you can do without the last three points. And they will be needed to connect other electrical appliances. The reason for this is the uneven voltage that will come from the generator (electric motor).
IS IT POSSIBLE TO GET ELECTRICITY FOR YOUR HOME WITH A BICYCLE GENERATOR?
Even in the greenest renewable energy area there is still a significant amount of greenhouse gas (GHG) emissions due to consumption, as even hydroelectric installations are damaging to the environment and emitting methane.
You could literally drive yourself crazy if you overanalyzed your every move in terms of protecting the environment and reducing your climate impact, so when we came across a cool tech gadget, it's an easy way to be eco-friendly and look like fun then we love passing it on. Hence this post about a bike generator - instead of riding to the gym to exercise, how about charging your phone with a pedal at home?
You can use your bike to generate electricity at home just by doing a daily workout - sounds like the perfect way to contribute to climate change!
More about “historical” devices
EPG 1100 ET - Edge Power Generator - Energy Transmitter (1995), one of the first Chi generator® devices produced using orgonite.
FPG 2400 – Frequency Generator (1994), one of the first external modules combined with radio-electronic devices. Used with EPU (Edge Power Unit) generators.
LPOM 2400 – Low Pulse Orgone Module Frequency Generator (1995), one of the first external modules for use with EPU (Edge Power Unit) generators.
EPU 2200 HD – Chi Generator “Edge Power Unit 2200 Heavy Duty” Chi Generator® (1994) using orgonite. was driven by an external module.
EPU 2400 DL – Middle of the Line Chi Generator® “Edge Power Unit 2400 DeLuxe” Middle of the Line Chi Generator® (1994), using orgonite. was driven by an external module.
RAD 3000 HD is one of the first electronic devices (1995) with nine dials, 100 positions each, and three dials for setting the pulsation frequency of the built-in orgone generator.
How does a generator work on a bicycle?
When you press a pedal on a bicycle, the action spins a flywheel, which spins the alternator and charges the battery. A highly efficient home (such as one with LEDs) can meet basic lighting and power needs. Of course, other solutions will be needed to efficiently heat water, cook and heat.
A bicycle can also be used to reduce energy costs while eliminating the problem of excess weight.
Bicycling is also a clean way to generate energy.
So if the price was right, would you use a bike generator?
When looked at in detail, the reality is that the bike is designed for very small homes and actual use is limited to a few light bulbs at very low wattage, perhaps the occasional use of a small fan and charging portable devices like phones.
Let's do the math: an hour on a bike produces about 0.11 kWh (more or less depending on how fast you bike, but probably not much), and the average home uses 30 kWh per day. So an hour on the bike provides only 0.37% of the energy needed for 24 hours, or about enough for five minutes.
Types of bicycle generators, their features, pros and cons
Dynamo hub
A hub dynamo is a magnetically enhanced conventional hub. Its mechanics is the formation of eddy currents. At the output, the energy becomes a current corresponding to the bicycle in strength, voltage and power. For comparison, in a car the energy is 6 watts, and in a bicycle - no more than 2.
- Hub dynamos are popular because of their simplicity and small size.
- It is attached to the hub, not the wheel, and does not create unnecessary friction. The current is transmitted directly to the headlight.
- The disadvantages of this type include the slow speed of the front wheel and the heaviness of the bicycle. The weight is corrected with a light magnet.
When pedaling, the current flows in waves, accelerating or decelerating. Therefore, a stabilizer is installed in the headlights with a bushing generator.
If the headlight is different, then a rectifier will be needed for stabilization. The brightness of the lighting depends on the output power of the bushing. The more powerful the headlight and the less powerful the output, the dimmer the light.
The design consists of components:
- An anchor that wraps around an axle
- Ring magnet attached to the sleeve,
- Double wires with terminals.
Bottle bike generator
The bottle electric generator has this name because of its external resemblance to a bottle. It is attached to the wheel and is adjustable to increase or decrease power. When you move it, it turns off easily.
- The price of generators of this type is inexpensive.
- Almost no effect on the weight of the bike.
- But it rubs the tires of the wheels.
- At high speed, operation is accompanied by a characteristic noise.
- And in rainy times, energy is poorly generated.
A bottle generator is suitable for short trips around the city in good weather.
Contactless bicycle generator
A non-contact generator is the most expensive design of all analogues. This is justified by the almost complete absence of shortcomings. The principle of operation is to accumulate energy from wheel rotations through a magnetic field.
The electric generator is located close to the wheel, which has a built-in dynamo hub. This way there is no friction or resistance to movement as in other designs. The electric generator is mounted in pairs at the front and rear.
The whole principle is similar to how flashlights work. The electric generator has a direct current transmission bridge from the bushing output to the headlight. It turns out that the headlight works as an independent mechanism. Such a device does not have a stabilizer, so the light would dim when driving at low speeds.
But this deficiency was compensated by the accumulation of energy during the trip. Thus, the headlight can remain on even when the bike is completely stopped.
- No friction, rubbing, contact with bicycle components,
- Low weight,
- Energy saving system for headlight operation during stops.
- The disadvantage is the high cost.
Making an orgone generator from scrap materials
While browsing websites with specific products, such as Chinese chopsticks, souvenirs that ward off spirits, etc., you can come across a funny little thing - an orgone generator. This “device” is a crystal and iron bonded together with epoxy resin. According to the manufacturers, the thing is very interesting and has unique effects, cleanses the aura around, brings health and peace.
Whether this is true or not is difficult to say, because in fact, experiments do not show any impact: neither negative nor positive - emptiness. But eyewitnesses claim that such a generator undoubtedly brings a positive effect, health improves, and mood improves. Perhaps there is a placebo effect, but still.
Spending money on an orgone generator is a stupid idea, unless you buy a small one as a souvenir (they really look beautiful). Well, according to “experts”, in order for it to be useful, a large generator is needed. Yes, they say, it’s expensive, but it “works.”
Be that as it may, if you came up with the idea of having such a generator, I will tell you how to make it yourself!
The device of a vital energy generator (orgone) is not that complicated. As was written earlier, it consists of quartz crystals, iron and epoxy resin, all this “miracle” is made, as a rule, in the shape of a pyramid, because It has long been believed that the pyramid contributes to the accumulation of surrounding energy and concentrates it within itself.
So we will need:
— Epoxy glue (epoxy);
— Metal (metal shavings, small iron nails, computer bolts);
— Quartz;
— Molds in the form of a pyramid.
Now let's talk about everything in order. Buying epoxy resin is not difficult; you just need to go to the nearest radio and electronics store and buy the resin there. How to use it is written on the packaging, and the Internet is full of additional materials that explain how all this is done in the form of video instructions.
Any metal will do, but as the “professionals” say, you need to select the metal according to your horoscope to achieve the best effect! The same thing, the Internet is replete with descriptions of which metal suits which zodiac sign.
Getting quartz will be a little problematic. There are several options for how to do this in order to get the coveted large quartz crystal:
— Search in online stores. On the Internet, with the proper ability to use a search engine, you can buy anything. Therefore, choose the search engine that is closest to you and go ahead!
— Visit the nearest jewelry stores. Quartz is sometimes used in jewelry, and if you talk to a jeweler, I think he will be able to help you in this matter.
- Use rock crystal. Rhinestone. In fact, this is quartz, but is it worth breaking your favorite set for the sake of a dubious orgone generator?
Pyramid-shaped molds are best made from thin tin, and the edges are hermetically sealed. Epoxy glue, when poured into a mold, tends to generate a large amount of heat, which means that the plastic mold can simply melt.
Take the mold in your hands, lubricate it so that the epoxy does not stick, and pour a little epoxy glue. Then, pour in the metal, and again pour in a little epoxy glue, then the metal again. I think the algorithm of actions is clear. Somewhere in the middle, you will need to insert a crystal and also fill it with epoxy resin. Next, periodically mixing the metal with epoxy resin, fill the mold to the end.
The epoxy will take about a day to dry, so before you start pouring it into the mold, make sure the area is well ventilated. Do not work with epoxy resin without gloves.
Once everything is dry, carefully remove the orgone generator from the mold. He's ready. Read more about how to use such a generator in specialized literature.
Dear readers, comment on the article, ask questions, subscribe to new publications - we are interested in your opinion 
"Bottle"
This generator, which provides charge in the headlights, is called a bottle generator not so much because of its operation scheme, but because of its appearance. It is convenient in that it is attached to the outside of the wheel, which means that, if necessary, you can adjust it yourself, and you can also remove it without much effort if necessary, or simply move it temporarily if its work is not required now.
This device has its own certain advantages and disadvantages that are worth paying special attention to. Some of its strengths include the following:
- Affordable price;
- Easy to use and adjust by hand without the use of additional tools;
- Ability to disable, remove, replace if necessary;
- Minor impact on overall bike weight.
However, the “bottle” also has its own certain disadvantages, which are also quite sufficient:
- Wheel tires may be rubbed due to its operation;
- The generator hangs on one side of the wheel, thus creating an advantage;
- At high speeds, noise is generated during use;
- Efficiency is reduced in rainy weather.
This option is quite convenient and practical; the point is that you need to create a constant electrical voltage in conditions that are comfortable for driving short distances. In the case of those cycling enthusiasts who like to ride on any terrain and in any weather, using a “bottle” can entail certain difficulties. The same applies to those who like to drive at high speeds.
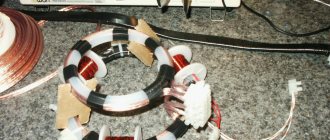
Tail light circuit with dynamo.
- Old relay
- Coil Contacts
- Mounting screw
In order not to waste time assembling the coil with your own hands, it is better to try to find some old relay. I took the panel in the picture above from an old PBX. The second picture shows a coil from a disassembled relay.
The coil resistance should be between 100 and 200 ohms. The resistance of the coil shown in the figure is 200 ohms. The higher the coil resistance, the more energy is generated, but at the same time the efficiency decreases due to increased losses in the coil.
- Stainless steel
Next, you will need to remove the neodymium magnets from the hard drive. My rear wheel dynamo uses three of these magnets, but you can use many more if you are able to mount them securely.
The first option is of particular interest; the operation of this type of device is distinguished by its simplicity and inconspicuousness. Unlike others, the dynamo hub is not fixed to the wheel, so it does not create unnecessary friction or any other problems. The voltage is created by the work of a magnet built into the bushing and is transmitted through alternating current circuits directly to the headlights.
Among the advantages of this option are the reliability, versatility and invisibility of dynamo hubs. At the same time, it cannot be said that the use of such a device affects the reaction speed of the front wheel and the overall weight of the bicycle. True, the last problem can be solved by using a lighter magnet.
What is it for?
It's probably no secret that a bicycle moves due to the efforts of the legs turning the pedals, which, in turn, set the wheels in motion. Therefore, this device is not needed to move the iron horse from its place. The generator in this case has a different purpose. With its help, the lamps on the headlights work, illuminating the road.
This is very convenient because it allows you to provide energy to the headlights without a charging or additional energy source. The device simply allows some of the energy generated by the cyclist while riding to be used to keep the headlights burning.
How to make a generator for a bicycle yourself?
You can make an electric generator yourself at home. For this purpose, a stepper motor is used as a basis.
The characteristics of the motor for the lighting device must be:
- Voltage – 2.88 Watt,
- Resistance – 1.2 Ohm,
- Rated current – 2.4 A.
This design can be installed at the hub on the rear wheel.
Required materials and tools
To create an optimal electric generator you will need the following materials:
- Plastic tape (flexible material) for the handwheel.
- Type 4 rectifier LEDs, 1N400 company – 4 pairs.
- Linear voltage regulator (stabilizing) from LinearRegulatorStandardRegulatorPos.
- One-watt resistor CF-100.
- Resistor 1206 by 820 Ohm.
- Resistor for diode up to 0.25 Watt.
- One watt diode.
- Postings.
- 1 µF capacitor.
- Container for placing the generator (plastic box).
- Plate for additional mounting space (if required).
- Glue gun (glue-sealant),
- Welding machine,
- Pliers,
- Sharp knife.