Author's rating
Author of the article
Elizaveta Krasnova
Stylist-image maker
Articles written
83
Autumn is a wonderful, colorful, bright time of year. Do not give in to despondency during this period, the “Golden” time is great for photo shoots in nature, and kindergartens and schools host various matinees, balls, and holidays dedicated to the time of year. These events require the use of suitable attributes. Let's try to make a headband of autumn leaves together.
Autumn wreath: how to make step by step
These two wreaths are made similarly to each other, but look completely different precisely because of the collected material.
In order to make such a wreath, you only need a wire base and strong thread.
You can make a more colorful version of the wreath using various natural materials. By hanging such a decorative element on your door, you will get a lot of positivity and add warmth and comfort to the interior.
The second way to use such a wreath is on the table. Place the wreath and place a large candle in the center, making a kind of candle holder out of an autumn wreath.
Wreath-candlestick to create the mood
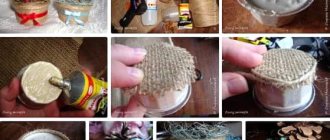
A beautiful wreath-candlestick will create a soulful atmosphere in the melancholy autumn season. You will need an armful of maple leaves, a cardboard circle, acrylic paint, a wide candle, floral wire and various decorative decorations (artificial pumpkins, bunches of rowan berries, spruce branches).
Glue a short tin can turned upside down into the center of the circle. We wrap it in corrugated paper and decorate it with burlap roses and other beautiful flowers. We divide the base of the rim into four parts and thread soft wire through these places. We wrap a large bunch of leaves and add decorative items.
Autumn wreath: master class
Necessary materials:
- Polymer clay
- Acrylic lacquer
- Black acrylic outline
- Modeling gel
- Brush
- Toothpick
- Wire
- Sisal
- Natural materials: leaves, branches, acorns
1. We make rowan berries from polymer clay
To do this, you need to make balls of the same size.
2. Make a cross on each ball using a toothpick.
3. Place each berry on toothpicks and place in the oven until the material hardens. Apply black paint from the outline into the recesses
4. Replace the toothpicks with wire using instant glue.
5. Twist a few berries together
6. Each berry must be varnished
7. Varnish the oak leaves. If they are very dry, then soak them a little before working so that they do not crumble right away.
8. Glue acorns with caps
We also coat them with varnish, just like rowan berries.
9. For the base of our autumn wreath made from natural material, we will need willow twigs or birch branches.
If you are making weaving from fresh branches, it is advisable to break them a little, only carefully so as not to break the bark. This is necessary so that the branches do not break during weaving. If you have dry branches to work with, soak them the day before in hot water (about an hour). And then break it a little too.
10. Wrap each branch around the next one, don’t forget to secure the edges. You can do this with thread or wire. Start with the thickest branches, and then add smaller ones.
11. Place bunches of rowan berries on your workpiece in several places.
12. Glue or gel on the wreath oak leaves and acorns
13. You can use sisal to fill in the empty spaces on the wreath.
This wreath is made in the style of minimalism, but if you like more lush work, you can add other leaves, cones, chestnuts.
Weaving wreaths: history and traditions
For our ancestors, wreaths were a real amulet. They paid special attention to the plants that were used in weaving, because each of them had its own sacred designation, suitable for a certain event in life.
- The ancient Romans wove wreaths of laurel leaves on the heads of their emperors to emphasize their power and glory.
- They placed wreaths woven from oak leaves on the heads of great warriors, symbolizing courage and fearlessness.
- Before the feast, Roman men wore wreaths of myrtle, which, according to beliefs in the Roman Empire, was considered a plant that relieves intoxication.
- But crowns of thorns were used to cover the heads of Romans who were sentenced to death. Approximately the same rituals with wreaths existed among the ancient Greeks.
The peoples of Asia also had several interesting traditions associated with weaving wreaths. For example, brides on their wedding day had to decorate their heads with a wreath of orange flowers, which symbolized fertility. And outstanding writers, poets and playwrights were awarded olive wreaths, which symbolized popular recognition and admiration.
For the Slavic peoples, the wreath was an integral part of their life. With their help, they demonstrated to society their status, marital status, illnesses and important events:
- Orphan girls wore wreaths with blue ribbons. People who met such girls on the street always tried to feed them and give them something.
- A woman who had just become a mother wore a wreath of fresh roses and green leaves.
- A cornflower blue wreath on a girl’s head meant that she was awaiting a marriage proposal from her beloved.
- A primrose wreath symbolized the loneliness of a beauty abandoned by a young man.
- Periwinkle wreaths were worn by engaged girls.
You could list the types of Slavic wreaths for a very long time, but the essence of each of them is the same - they were a reflection of what was happening in life, and of course, they played the role of decoration.
Modern girls decorate their heads with fashionable wreaths without even thinking about their meaning. They buy beautiful ready-made artificial flower products from the markets and wear them every day to complement their colorful look. In view of this, we have prepared several interesting master classes with the help of which any girl will be able to make wreaths from different materials with her own hands.
Very beautiful wreath made of natural materials
For it we will need:
- 2 twig wreaths
- 3 miniature pumpkins
- Bunches of berries
- Colored balls
- Crepe paper with leaves
- Several bunches of dry berries and leaves
- Cones
- Acorns
- Two branches
- 3 feathers
- Leaves and berries
- Wire
- Hot glue
Connect two wreaths together or weave a large wreath from twigs and branches.
Cover the wreath with bunches of small berries
To make the wreath beautiful, you can add artificial berries to it.
Attach small pumpkins and leaves in several places. Pumpkins can be pre-painted with glitter varnish
Complete the decor with pine cones and acorns
Natural materials are the most affordable and you can find almost everything on a walk in the park. But the result can sometimes exceed all expectations.
Using dried flowers to create an autumn composition
Dried flowers are a very light material, so it is better to choose foam or cardboard as a base. Stunning compositions can be made from straw, ears of corn, and lagurus. Wreaths in a rustic style with many different elements look especially beautiful.
Before starting work, you need to prepare all the materials. Collect dried flowers and spikes into bunches, trim the ends and tie with tape. We cover the wreath blank with fabric and glue dry elements, alternating types of plants and colors. After assembling the entire craft, the gluing points can be masked with sisal balls. You can complement the wreath with a decorative bow and braid.
Wreaths made from natural materials: base options
What could be more ideal for an autumn photo shoot than a wreath of leaves. If you plan to take some photos in the park, then you need to learn how to weave a wreath of autumn leaves with your own hands. A little patience, a lot of leaves and you are the queen of autumn.
You can make a wreath from maple leaves, but leaves from other trees will also work.
The base of the wreath can be different. Choose the best option for yourself.
Option 1: twigs, branches
Willow, birch, and pine branches are suitable for this. They must be young and strong.
The branches must first be stripped of bark to make them smooth. Pay attention to the size of the workpiece to choose the best option.
You can tighten the ring from the rod using twine, and then screw the rods onto it and secure it with a rope.
Option 2: made of paper
We cut strips from magazines or newspapers, roll them into tubes and glue them together. You can use tape to connect.
For strength, you can wrap the workpiece with tights.
Option 3: wire
This option will help make the wreath more elegant. Fold the wire several times, intertwining it with each other.
Wrap the workpiece with rope or twine. You can also use ribbon. This way the wire will not tangle the hair on your head.
Basic rules for creating interior wreaths
When starting to create a wreath, there are several important rules to consider. Its shape must be round. It is important to choose the correct proportions of the diameter of the outer side of the craft to the hole. The ideal option is if the diameter of the central hole is 1/2 or 1/3 of the size of the entire wreath. Dark felt, rim, cones used for decoration will visually reduce the decoration. A wreath made from light materials will appear larger.
Even a novice master who is far from floristry can make a reliable and beautiful craft. The product must be assembled tightly, with a clear distribution of the sizes of all parts. When preparing the base, it is necessary to take into account the characteristics of the material. If it is a wide sheet of cardboard, the holes must be enlarged.
For decoration, you can use any floral design that does not distort the round shape of the craft. The decor can be enclosed in the body of the wreath, assembled with a certain grouping of material, its uniform distribution. A scattered decoration scheme is also used when there are several groups of different heights.
If the wreath is assembled on a base, its reverse side should not be visible. It is necessary to decorate absolutely all technical means (glue, wire, thread).
Autumn wreath of maple leaves
Maple leaves are the most popular option for crafts and wreaths.
Cut off part of the cutting from each leaf
Fold the bottom edge of the first leaf so that a line parallel to the stem emerges.
Pierce the first leaf with a branch of the second leaf.
Also fold the second leaf. We perform the same operation with the third sheet. And we continue until the end.
Finally, pierce the first and second leaves with the cutting of the last leaf.
Crafts with children
Most often we go to the forest or park to admire the leaf fall with our children. We offer you a master class on how to simply make a beautiful wreath, involving your child in the creative process.
It all starts with the collection. Choose different colored leaves: red, yellow, green. Different types: maple, rowan, birch, etc.
Let's cut out the base from a disposable plate; how to do it is shown in the photo below.
Now it’s the turn of the child’s hands and his imagination. Let your child apply glue and place the leaves on the base in the order that his imagination tells him.
If the branches stick out, they need to be trimmed.
If you and your child have collected not only leaves, but also various cones, then make the next wreath.
For it, you can also use a base from a disposable plate, or you can cut it out of cardboard. Leaves should be glued in several rows and in a checkerboard pattern. For convenience, you can draw several circles.
Article on the topic: Summer openwork blouse with crochet lace
When you reach the inner circle, start gluing on the rest of the decor. To begin with, let these be large acorns, and between them small cones (for example, alder).
Place small acorns on top into the space between the large ones.
When all the additional materials have been glued or you are satisfied with the existing result, we will begin making the loop. To do this, cut out two rectangles from cardboard, and a loop from woolen thread, twine or ribbon. We place it between the cardboards and glue it together.
Glue the loop to the back of the wreath and that’s it, it’s ready.
Head wreath made of leaves and rowan
A wreath decorated with red rowan berries will look brighter and more luxurious.
To make a rowan wreath, you need to collect the berries in advance and dry them.
Berries can be attached to a wreath of leaves in any way: glued or strung on a thread and secured with it.
Such a wreath will definitely not go unnoticed.
Simple option
We will need:
- twigs;
- autumn leaves;
- wire;
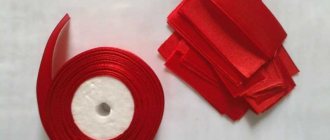
- ribbon.
We form a circle from the twigs and fasten it with wire. Then we begin to wrap the leaves in a circle; they should overlap.
To hang the wreath, make a loop of ribbon.
From felt
Felt is a dense sheet of felt made from natural wool. This is an ideal item for creativity. Volumetric, flat felt daisies, asters, orchids, roses are a small part of the ideas for headbands.
The easiest way to create a flower is to cut a circle out of felt. Next, it is cut, moving from the edges to the center. The resulting spiral is twisted into a bud and hemmed.
Wreaths with felt flowers are combined with woolen dresses, tweed jackets, and knitted sweaters.
Suitable for whom and for what occasions?
Almost all women can use a wreath to decorate their hair. Another question is the choice of floral composition and flower sizes. Teenagers and girls can safely try on any form. The main criterion is compatibility with the outfit. For women, discreet compositions of small buds are more suitable. The color scheme should consist primarily of pastel and light colors.
The main purpose of the wreath is considered to be special occasions and holidays. In recent years, there has been a popularity of using the accessory in the image of a bride. Little girls and grown ladies look equally good with delicate little buds on their heads. This emphasizes femininity and gives the appearance a delicate note and charm.
Folk festivals and holidays can also be an occasion to transform your hair by decorating your hair with a wreath. Today's youth love to celebrate Ivan Kupala. Girls with a floral arrangement on their heads look mysterious and charming. This holiday is not complete without an obligatory attribute - a wreath woven from fresh flowers.
When using a floral accessory, it is important to remember that it is appropriate in the spring and summer. Although some fashionistas manage to combine it with fur coats and high boots. You can adapt the accessory to the time of year using decorative elements that correspond to the flowering time. Fall decorations look beautiful and appropriate with yellowed leaves.
The wedding hairstyle can be complemented with delicate wreaths made of beads or flowers.
Wearing an accessory is appropriate even in everyday life. Little girls and grown ladies look equally good with delicate little buds on their heads
Cute little ladies can wear a wreath for a photo shoot
Headband with organza flowers
What you will need: organza (colors to taste), glue, headband, toothpick, sharp scissors, tulle, lighter.
- We take organza from which we cut several circles. Please note that they must be of different sizes. The rule for a beautiful organza flower is simple: the more circles of different sizes, the more lush and impressive the flower will be.
- A lighter is needed to carefully scorch each piece along the edges. Organza is a specific fabric that tends to unravel. If you burn the edges, this will not happen.
- Let's start with tulle. You need to cut out a couple of squares. Their sides should be equal in size to the already cut circles. The squares need to be folded into quarters and then trimmed along the edges. So the unfolded square will take the shape of a circle. We fix all the workpieces with glue.
- The flower is almost ready, all that remains is to gracefully outline its center. You can add one or more pearls. We also attach the flower to the rim using glue.
Useful links for you:
- Our fashion blogger inspected more than one store with hair accessories. As a result, I chose the best: in the fashion review it is presented for any occasion. Here are prices, photos and addresses of stores where you can buy them.
- In order to make a hairband with your own hands, you will need a lot of additional parts. Our author indicated all the best stores for handmade items. Stones, beads, ribbons, wires.... Everything you need at reasonable prices.
- In our catalog you will find almost all the stores in Minsk that sell accessories. See the link.
Origami Christmas wreath
This wreath is assembled from identical modules folded using the origami technique. To fold the modules, take several squares with a side of 8-10 cm. 1. Fold the top corner to the middle. 2. Repeat on the other side. 3. Fold the corner of the bottom layer forward so that it covers half of the top triangle. 12. 4. Repeat on the other side. 5. 4 pockets have formed in the top layer of each workpiece. 6. The sharp end of the workpiece can be inserted into any of the pockets of another similar part. 7. In this way you can collect wreaths of different sizes or spruce branches. stranamasterov.ru
Learning to make a headband
An old, shabby hoop is not a reason to throw it in the trash. You can give your jewelry a second life using a little imagination and simple means.
- We take the old hoop, remove the old fabric and decorative elements from it.
- To hide the ends of the headband, glue small pieces of lace onto them. We secure the remaining part of the lace ribbon with a clip and wrap it around the headband along its entire length. It is necessary to leave allowances of 1 cm at both ends for gluing to the inside of the hoop.
- The central detail in the headband will be a guipure ribbon, from which you need to weave a braid. To do this, fold the ribbon in half, tying a small bow in the center.
- Pressing the knot with your finger, pull the right ribbon so that one side of the bow unravels. From the same end we will form a loop and pass it through the remaining side of the bow. Repeating this sequence with the left side of the ribbon, we get a pigtail with a length corresponding to the headband.
- Glue the braid over the lace onto the hoop, decorate with single beads, pearl thread or flowers. That's it, the hair crown is ready!
We recommend reading: DIY flower stands: ideas and master classes
Kanzashi
Japan is considered the birthplace of the art of making flower arrangements from satin, organza, and silk. To make it you will need a minimum of tools: scissors, transparent glue, thread, ribbon, rhinestones.
By following the instructions on how to make headbands with flowers in the “kanzashi” style, you can get an original accessory:
- Squares of arbitrary size are cut from the tape - the basis for creating petals. I make sure to burn the cuts over the flame of a lighter.
- By bending the squares diagonally several times, you get triangles. To get a sharp petal, the edges of the triangles are closed to each other, fixing the joint with glue.
- Several petals are collected into an inflorescence, sewing them together. A decorative button, rhinestones, and stones are installed in the center. The finished element is glued onto the hoop.
Instructions
- Wrap the wire around your head twice to create a loose-fitting wreath.
- Use a wire cutter to cut off the excess and twist the ends of the wire.
- Cut off 15 cm of wire with wire cutters, fold it in half and twist it.
- Wrap the tape tightly around this wire stem.
- Use scissors to cut out the flower petals.
- Roll the petals lengthwise very tightly around the pencil, creating a curved petal shape.
- Place a dot of hot glue on the stem and glue on the first petal.
- Continue gluing petals in a circle (no more than 5).
- Wrap the ribbon around the base of the flower in a circle, going down the stem.
- Curl the ends of the petals using a round pencil.
- Do the same with the rest of the flowers and leaves.
- Braid the flower stems around the wire to form a wreath.
- Wrap the ribbon around the entire wreath, covering any exposed wire.
Grab your basic materials and office supplies and let's get started.
How to wear it correctly?
A headband with flowers is a very romantic accessory that most girls complement with appropriate clothing. These could be light, flowy dresses and sundresses, sandals with thin straps or ballet flats.
If you are a tanned girl, choose a brightly colored wreath, complement it with clothes with ethnic patterns and matching jewelry to get a boho-chic look. This could be a bright dress with a floral print, a sundress, or even jeans with an airy tunic.
The most win-win option for every day is jeans or denim shorts with a shirt or T-shirt. A modest wreath and a couple of stylish jewelry will complete the look.
A headband with flowers will look great on hair of any unnatural shade - pink, purple, green. An unusual hair color in itself is a statement of pretentiousness, so if you add a wreath to your hairstyle, it will look very organic.
To make flowers look organic even in an everyday look, it’s good if they match the color of at least one element of clothing. It looks especially impressive if the shoes are decorated with similar flowers. For example, you can transform old shoes this way, or glue a couple of artificial roses using superglue – it’s a matter of a few minutes.
Of course, a hoop with flowers will not always look appropriate. You can definitely go to a picnic or an outdoor festival in it – the flowers will look organic against the greenery background.
If you choose clothes in ethnic and boho style, then wreaths on your head will be the perfect complement to your look.
In combination with an evening outfit, a kokoshnik headband will also look appropriate.
You definitely shouldn’t wear it to school, to the office or to attend official events. At the very least, you may be misunderstood, and the combination of a business suit and flowers in your hair looks ridiculous.