Zoya Reasonable
Autumn basket. Master Class
Autumn basket. Master Class
Required materials and tools:
• Mayonnaise bucket
• Roses from maple leaves
• Vaseline or any greasy glue
• A piece of foam rubber or a brush
To work, we need a mayonnaise bucket.
We tighten the bucket with twine and fix it with a glue gun from time to time.
We tighten the bucket with twine until the end. In the end it turns out like this.
For the handle of the future basket, I used vine branches.
Intertwined with each other, shaped into a handle.
Using a glue gun, I glued the handle to the inside of the bucket.
You can put roses in the basket; it looks good this way. But this did not satisfy me, I decided to decorate both the basket and the bouquet
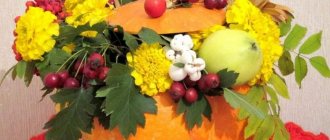
To decorate the handle of the basket I used physalis lanterns.
I glued the physalis lanterns to the handle at some distance from each other using a glue gun.
To decorate the basket itself, I used watermelon seeds (I dried them especially for crafts made from natural materials)
I glued the seeds in the form of flowers and leaves over the entire surface of the bucket, and decorated the edge of the bucket in the form of cloves.
Flowers and leaves were painted with acrylic gouache.
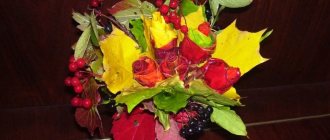
We place roses from maple leaves and maple leaves in the basket.
To keep the leaves color, I first ironed them between two sheets of printer paper.
Add twigs with rose hips and ironed almond leaves to the bouquet.
I used the basket to decorate the group.
Thank you to everyone who visited my page!
“Easter basket” (master class) Hello, dear colleagues! On the eve of the Orthodox holiday of Easter, the senior group of children and I performed a collective task.
Master class “Easter Basket” Like a bright coloring book, Easter came to our home, Brought it in its basket, Eggs, buns, cakes, Pies, pancakes and tea, Easter fun.
Flower basket. Master class This kind of basket can be made from ordinary colored cardboard. To make a basket, you need to take a sheet of cardboard 22 cm wide and high.
Master class “Fruit Basket” Autumn beauty. Not only a beauty, but also a rich woman. How many goodies, how many delicious vegetables and fruits she brings us. A few of us.
Master class “Basket with flowers” In order to make such a gift, you will need: a dish sponge, cotton swabs, satin ribbon (90 cm red and 2 meters 10.
Master class “Basket with apples” Good evening, dear guests of my page! Introducing children to the traditions of the Russian people, we also talk about the Orthodox holiday of Apple.
Master class “Basket with snowdrops” Dear friends, I bring to your attention a master class on making a gift for dear and beloved mothers, grandmothers and girls. Like this one.
Master class “Easter Basket” Easter is the most important Orthodox holiday. Translated from Greek, the word “Easter” means “deliverance.” On this holiday everyone is Orthodox.
"Autumn Basket". Master class on crafts using natural materials AUTUMN Autumn is coming in our park, Autumn gives gifts to everyone: Red beads - Rowan, Pink apron - Aspen, Yellow umbrella - Poplars, Fruits.
Save the pleasant and colorful moments of autumn! Master class “Autumn Basket” This wonderful time of year has come - autumn! When the rustling of leaves under your feet fascinates, and the beauty of nature dazzles with its abundance of colors.
Master Class. Maple leaf roses
Master class “Basket with roses”
Master class presented
for teachers and children of preschool and school age. The composition is intended to decorate a group and can be used as a gift to your favorite teacher or educator.
Target:
Learn to create beautiful, interesting crafts and decorations from natural materials with your own hands.
Tasks:
Develop the child's imagination and creative abilities. Instill aesthetic taste. Develop fine motor skills of the hands.
Raw material:
To make this craft you will need: maple leaves, red and yellow gouache, wood varnish, polystyrene foam, a basket, fern leaves, Christmas tree branches.
Step-by-step manufacturing process:
Maple leaves can be taken in any color; the leaves must be fresh, not dry.
Fold the edges of the leaf inward
Roll up the leaf
We got a small bud - the core of a rose
We take a second maple leaf, slightly larger in size than the first, and apply our core to the front side of the second leaf.
How to make a basket of flowers from leaves
We wrap the upper part of the denim trouser leg inside and also glue it to the walls of the pot.
We take any sheet of cardboard, cut a strip 2 cm wide and 28 cm long from it. If this is cardboard for children's creativity, then glue several strips together, since you need to get a strip of good thickness. We cut strips 2 cm wide from the jeans and glue them using a winding method onto a cardboard base. This will give us a handle for the basket.
Glue the ends of the handle to the inside of the basket.
We take old newspapers, crumple one sheet at a time and fill them inside the made basket. To cover the newspapers, glue thick plain paper or cardboard on top of them.
Let's start making flowers. They need large leaves, preferably oblong in shape. It is good to use chestnut and cherry. Poplar is not suitable; its leaf is too dense. It is advisable to collect from the floor (those torn from the tree may not roll well) and use fresh leaves (dry ones will break). Take a leaf and bend it along 1/3 of the back side.
We start twisting on one side.
We twist it to the end and fasten the tip of the resulting rose with thin wire or thread so that the flower does not unwind. It is better to immediately cut the wire (thread) and then twist the leaf and immediately tie it with a prepared fastening element.
We seal the inside of the basket and half of its handle on the front side with green leaves.
Crafts from maple leaves: large autumn leaf
You will need:
- plywood or thick cardboard
- a simple pencil
- many leaves
- PVA glue
- sponge or sponge brush
1.
On a large piece of plywood or cardboard, draw a large maple leaf with a pencil.
2.
Find fallen leaves in a park or forest and dry them on baking paper.
3.
Lay out the leaves in a pattern on the plywood, take a brush and PVA glue, apply glue to all the leaves and leave to dry.
After the glue dries, all the leaves will harden. You can trim off excess parts if necessary.
4.
Glue the leaf blank to plywood or cardboard. For better adhesion, use superglue.
5.
Use a straight branch as the trunk of your large leaf. It can also be glued with superglue.
Categories
- March 8 (14)
- Uncategorized (17)
- DIY jewelry (4)
- valentines day (14)
- baked goods (6)
- knitting (2)
- guests on the doorstep (1)
- country crafts (18)
- country houses (24)
- Children communicate (1)
- interior design (22)
- games for a walk (3)
- how to dress stylishly (49)
- pictures (49)
- painting nails (nail art) (23)
- new year (60)
- omelettes and casseroles (1)
- gifts (6)
- paper crafts (50)
- fabric crafts (9)
- natural material (32)
- Work and business (1)
- garden and vegetable garden (1)
- salads (1)
- wedding (8)
- sew it yourself (1)
- learn to draw (10)
Combinations of vegetables and fruits
Next, we will look at several unusual options for how to collect and decorate an autumn bouquet with your own hands. Ripe fruits and vegetables look no less presentable than exquisite flowering branches or skillfully dried crops. This combination pleases with its freshness for a long time and can surprise the most sophisticated nature with its variety of colors.
For example, you can combine orange tangerines and scarlet rowan clusters in beautiful paper, supplementing them with sprigs of luxurious fragrant mimosa or gypsophila. Citrus fruits are attached to skewers, which are attached to the other elements with tape or special floral tape.
It is interesting to play with the combination of white apples with viburnum, coniferous branches and bright buds: blackbirds, asters, dahlias.
A basket filled with red apples, scarlet flowers or small berries surrounded by bright green foliage looks festive.
Any idea can be realized to order. Corn, lemons, plums, peaches, pears, nectarines, fruit branches, decorative sunflowers and rowan berries can easily coexist in floral paper. Florists went even further. Silver or golden colored apples with red leaves and berries look fabulous. Decorating with cones, spikelets, chestnuts and even straw would be appropriate, and the composition, instead of the usual vase or basket, can be placed in a trimmed pumpkin or zucchini.
An autumn-themed bouquet of vegetables will appeal to a lady who is often busy in the kitchen. The simplest, most contrasting option is bitter red pepper pods, snow-white heads of garlic and fresh parsley collected together.
A set of small vegetables evokes genuine joy - thin carrots, a head of cabbage, beets and plum-sized onions, wrapped in colorful leaves of autumn trees and shrubs.
If you want a modern present, use craft paper. Wrap bell peppers of several shades, yellow zucchini, red and white onions, and garlic in it. And fill the gaps with small bunches of rowan or physalis.
A delicate, light emerald-lilac set is obtained by a combination of succulents and young cabbage.
Consider options with a pumpkin instead of a vase. Red chrysanthemums and creamy-orange roses look especially authentic in it. When you don’t have the imagination to create a masterpiece yourself, but you want to please your friends with a similar craft, you can use the help of the online store “Tsvetochnyray.rf”. In our catalog you will find a variety of compositions for any occasion.
DIY autumn COMPOSITIONS - 28 photo ideas for crafts.
Good afternoon - we continue the theme of autumn crafts for interior decoration . And today we will talk about compositions and pumpkin ... about elegant flower and fruit compositions with wicker baskets ... about how you can make beautiful autumn mounds in transparent vases ... and I will give a large selection of compositions with candles and candlesticks decorated in autumn style. In short, there will be many interesting interior ideas for creating an autumn atmosphere in the house, for decorating a wedding in the fall.
Autumn compositions - crafts with PUMPKINS.
Pumpkin is, one might say, a SYMBOL OF AUTUMN . And pumpkin crafts for interior decoration can be very different. You can paste over a white pumpkin with yellow autumn leaves (if they don’t stick well to PVA glue... you can put them on acrylic varnish )... Or you can stick the leaves on - and just apply paint on them - and apply it to the side of the pumpkin AS A STAMP... and it will remain on the pumpkin skin sheet imprint.
Or you can make a PUMPKIN CARVING. To do this, you need to... attach an autumn leaf to the pumpkin - trace the outline with a pencil... then cut out the outline with a knife - and peel off the skin inside the outline - you will get a beautiful CARVED PATTERN on the pumpkin (as in the left photo below).
You can put several pumpkins on the table and braid them with branches of a berry bush...
Or you can make beautiful LAMPS from pumpkins. To do this... you need to cut off the lower part (bottom) of the pumpkin... cut through this cut and remove all the pumpkin pulp - so that only the walls remain. Then we need to cut out round holes - for this to work out well - it is best to use metal tubes with thin sharp walls and a hammer. We apply the cut of such a metal pipe to the side of the pumpkin from the INSIDE - (that is, we put the tube inside the pumpkin... and the pumpkin should lie on the side that we are going to pierce). And so we apply an iron tube to the side - and hit it with a hammer (or press hard) - and the sharp edges of the tube perforate the pumpkin side (just like a cookie cutter perforates the rolled out dough).
You can choose the patterns at your discretion... if you take tubes of different diameters, you will get holes of different sizes.
If you have miniature decorative pumpkins growing in your garden beds, then you can use them to make a beautiful wreath arrangement with asters cones and bright ribbons (as in the photo below).
If the pumpkin does not have a convenient tail to tie a ribbon on, then you can drive a construction dowel with a metal eye into the pumpkin... or simply a long nail bent into a loop
To get such a bent nail, you first need to hammer it 1 centimeter into the board - and then hit it with a hammer at a crooked angle - so that the nail bends - and then remove it from the board and hammer it at an angle into the pumpkin - and you get a metal grip for tying a ribbon .
YOU CAN STILL make a wreath like this from small pumpkins and pumpkins (photo below).
For such a wreath you need a metal rim (quite strong) - you can screw dry branches in a circle - wrapping them with wire.
And then use the same wire to attach the pumpkins. To do this, each fruit must be holed - from one side with a through hole (like a button) - so that there is an entry hole for the wire and 3-7 cm from it an exit hole for the wire.
To get such an “underground passage” you just need to make a hole in the pumpkin with a bent nail ... the nail bent in the form of an arch will go into the pumpkin and come out immediately next to the entrance hole. And we will get an EYE like a button. We will thread a wire into this eye, and the pumpkin will be strung on it like a mushroom - and it can be tied to the wreath base.
And if you have small children and need an autumn craft for kindergarten or school, then I invite you to my article “ 85 photos of children's PUMPKIN crafts - for kindergarten and school. "
Autumn compositions - IN BASKETS.
Ordinary wicker baskets can also participate in the creation of autumn interior crafts.
Basket filled with autumn gifts
The next way to make an autumn basket is to take a ready-made wicker basket as a basis and beautifully fill it with various autumn gifts of nature. What is needed for this:
Related article: Do-it-yourself bench made from a profile pipe
- We take an ordinary basket (with which we go mushroom hunting) and put a floral sponge inside (you can buy it at any flower shop);
- We place all the autumn flowers and everything that requires care and watering there.
If we want a fake - to make a durable basket, then it is better to use dry materials: acorns, cones, fallen leaves, twigs, tree bark.
Advice : if the original appearance of the basket leaves much to be desired, then it can also be revived using natural materials. Take acorns or small cones and cover the front side of the basket with them.
So, let's decorate the basket:
- if the basket is too deep, put the fabric on its bottom;
- we lay leaves of different colors (oak leaves will look especially harmonious) and scatter acorns on them;
- You can place a small pumpkin in the middle, with apples and bunches of rowan berries nearby.
All these components have bright autumn colors and will delight and remind you of this wonderful time for a long time!
How to prepare leaves
Before making crafts from leaves, it is useful to study information on how to properly prepare them. Most often, dried material is needed.
If the product does not require ideal evenness from the raw material, then it is recommended to dry the leaves collected from the garden in a cardboard box in a warm, well-ventilated room.
Otherwise, the leaves need to be spread between book pages and weighed down with something heavy. They will dry completely in two weeks.
You can use an iron to speed up drying.
Decorative candlesticks and lamps
Colored autumn leaves look especially beautiful when illuminated with a candle or lamp. There is nothing complicated here. Instructions:
- Take an unnecessary container and coat the outside with PVA glue.
- Glue the leaves (they should not protrude to the top).
- After the glue has dried, apply another layer of the adhesive mixture directly to the leaves.
- Place a small candle inside the container.
- Decorate the top with twine.
Such a craft can become the highlight of your kitchen, especially if the room is decorated in a country style.
An autumn lamp can be created in another way. It is enough to place the Christmas tree garland in a basket with maple and rowan leaves. It is appropriate to supplement the composition with coniferous fruits, and for lightness and volume, use balls of twine.
Autumn bouquets, compositions for school from various natural materials
Primary school students or kindergarten children may not be able to use the origami algorithm or the methods of drying ikebana. To help them build a worthy present, you need to use simpler ingredients that can be found in the forest, park or garden. Everything will be used - from seeds to nut shells, acorns, chestnuts and other gifts of nature.
From the cones
They are used in their natural form or painted with various colors. To make the set look complete and complete, you need to find several types of coniferous fruits that are different in size and shade. As you work, experiment: show the children how wide their “petals” open in water and how they narrow when heated and dried.
You need to attach the cones with silicone sealant or glue to barbecue skewers, sushi chopsticks or regular toothpicks. You can combine them with small dried or fresh flowers. A burlap wrapper looks interesting, however, provided that the coniferous elements are not painted. An unusual round composition is obtained by gluing the tips of the cones together. On the outside is the part that is usually attached to the branch. It is additionally decorated with beads, bows, sequins or rhinestones.
From coniferous gifts you can build a basket that will accommodate any bouquet of golden autumn created by yourself.
Pine and spruce fruits lend themselves well to coloring. If you remove the inner petals, the inflorescence will be more open, with a pronounced middle.
From pumpkin seeds
Neat, uniformly sized pumpkin seeds can be used as petals to make a flower. To do this, you need to cut out a circle of the required diameter from cardboard and start gluing the components along the edge, then fill the middle with them. The result will be a voluminous bud. The center is filled with colored cotton wool, beads, and decorated with plasticine or self-hardening clay.
From peanut shells
By using nut shell boats, you will get an original bouquet of autumn material. From the peels of legumes and pistachios, dense inflorescences or branches of delicate hydrangea are obtained, wildflowers with five petals in the middle with a pea. You can also make a cone out of them if you use plasticine as a base, onto which the slices are attached.
With walnuts
The easiest option is to use a small pot and a hot glue gun to make a topiary out of walnuts. However, the composition will look more presentable if you make it up from several elements of the same color scheme, but different in shade: pistachios, acorns, cones and nuts, supplemented with ears of wheat and wrapped in craft paper.
From dried flowers
Dried flowers are ideal for creating autumn flower arrangements. Of course, in order to create an appropriate bouquet, you will have to work hard in the spring and summer: dry the plants using any suitable method. Cereals, cotton buds, roses, physalis boxes, solid inflorescences of tree peony can become part of a floral masterpiece.
Vases for plants
Most flower arrangements are wrapped in beautiful paper and tied with floral ribbon. However, it is much more pleasant to receive an armful that is already in a jar or basket, made with your own hands, and the bouquet is decorated on an autumn theme.
The most suitable and simplest option for this are citrus fruits and pumpkin - their dense peel does not deform and does not allow liquid to pass through. To prepare the container, you just need to carefully cut off the top, take out all the pulp and fill it with water. Even a head of cabbage is suitable as a vessel, but there is a chance that the leaves will soon leak. In this case, you can make a small notch in the head of cabbage and insert a ready-made glass glass of water into it.
Of course, the best pedestal for the composition is a pumpkin. In addition to the classic round or oval pumpkin, squash, zucchini and other decorative pumpkin plants with an unusual shape will serve as containers. Even if they are unstable, you can lay the fruit on its side or hang it and cut a hole in a convenient place.
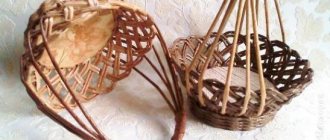
How to weave a basket. Master class :: This is interesting!
By popular demand