It's time for autumn children's crafts. Here you will find two dozen examples, how to make a hedgehog from pine cones, this is the most popular craft in this topic. There are different ways, depending on your imagination. The easiest one is to do this hedgehog made of cones and plasticine, if you want a more thorough craft, make hedgehog made from cones and a plastic bottle, see this article for step-by-step instructions. You can use anything – cardboard, felt, felt, even your mother’s tights.
Just don’t show your child “how to do it right”, let them use their imagination, do as they want, you will only help with technical issues. And of course, do everything together, for children this is an experience, for you an opportunity to spend more time with your child.
How to make a hedgehog from pine cones
A simple and quick children's craft, a do-it-yourself hedgehog made from pine cones . Prepare felt, a small pom-pom, eyes (you can buy them, but they don’t sell anything right now), glue and scissors.
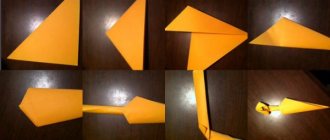
- Cut out triangular faces from felt
- Glue your eyes
- Glue the pompom (nose)
- Attach the felt with the image of a face to the cone part of the pine cone
- The hedgehog from the pine cone is ready
Remember, when you do crafts with little ones, they will have an experience they will never forget.
Photo source: www.annmariejohn.com/2015/10/pinecone-hedgehogs-craft.html
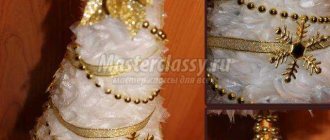
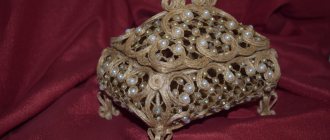
“Edible” hedgehogs for decorating the New Year’s table
Nothing will please children more than making a New Year's hedgehog craft from candies with their own hands.
We will need:
- golden food foil;
- sheet of foam plastic or penoplex;
- wooden skewers;
- chocolates in shiny wrappers;
- glue and sandpaper;
- plasticine;
- tinsel for decoration.
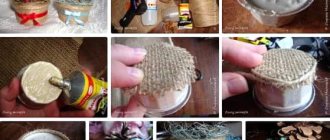
Cut a rectangle from a thick sheet of foam plastic. Using sandpaper we will give it the shape of a hedgehog.
We cover our workpiece with foil.
Let's make the spines by threading the wrapped candies onto wooden skewers. Decorate the back and sides of the hedgehog with them.
We will make eyes and a nose from plasticine and glue them to the muzzle. Let's decorate the New Year's hedgehog with tinsel and confetti.
To make a “fruit” hedgehog, we take a peeled pear or half a melon as the basis for the body. Place them on a plate, core side down.
We string any fruits to taste onto wooden skewers (grapes, tangerine slices, pieces of bananas, pineapples, etc.).
Let's decorate our hedgehog with these “thorns”. For the eyes, you can take dry cloves, and make the nose out of an olive. A healthy and beautiful treat for the table is ready.
Such “crafts” will not last long, but photographs of edible hedgehogs will help preserve warm memories for the family archive.
Ideas for a summer residence
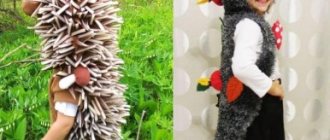
Those who are interested in country house design may like ideas on how to make a hedgehog to decorate the landscape, spending a minimum of money.
A hedgehog made from plastic bottles will decorate any garden and fit harmoniously into any landscape design.
Master Class
To successfully solve the problem, you only need free time and a little imagination.
- We choose a cone. For this craft you will need a large copy, without broken edges. Examine it, it is best if the cone is not too mature and the scales are still tightly adjacent to each other.
- In order to make a muzzle, you need to attach light-colored plasticine to the side of the pine cone that was facing the tree. You can simply pull it out with your hands.
- To make a nose and eyes for a hedgehog, it is enough to roll several balls from plasticine mass and place them in their places. Ears won't hurt either.
- Now the paws. In this case, you don’t have to think about how to glue the pine cones together for crafts, because even if you plan to house a whole family, it will consist of individual figures. They are made from plasticine of the main color. To do this, glue the hedgehog to the base.
- Make an apple, a mushroom or a leaf and place it on the prickly back.
Useful tips
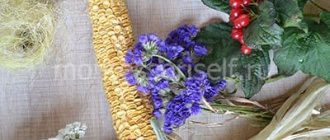
It’s great if you can get dried flowers, this is a wonderful decoration for your creation. A craft made from pine cones will look especially advantageous in a clearing of flowers and leaves.
Interesting fact: all hedgehog needles are hollow and filled with air inside, and regularly fall out. The animal spends about a year growing a new needle. The spiny nocturnal inhabitants eat not only berries, mushrooms and fruits, but are omnivores and feast on insects and sleeping reptiles.
Before you start making a hedgehog from pine cones, it would be a good idea to tell your children about the creatures. This will open up more space for creativity for little craftsmen. The fact that young pink hedgehogs have quills will inspire the creation of babies, which hedgehogs carry for only 49 days. And in winter they hibernate, preparing a winter mink bed can be a winning solution when it comes to competition.
Combine with other animals
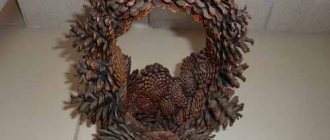
In case too much material was collected in the forest, squirrels, bears and other inhabitants of the forest will dilute the company of needle-like animals from cones and acorns. The principle is the same: you can exploit everything, the main thing is your imagination. Beads, garlands and wreaths will complement the interior of the house and add a special autumn atmosphere with their appearance and light forest aroma. Natural “building materials” will lie in the jar for a long time and will serve as a good addition to the arsenal of a young creator.
Autumn craft
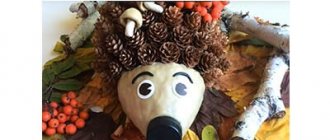
To create the “Hedgehog” autumn craft, you will need tree leaves, pine or fir cones, foil, waste newspaper or paper, a glue gun, a plastic eggplant lid, acorns, a sprig of rowan, chestnuts and other natural materials, plastic fruit, 1 sheet of cardboard.
Leaves from trees can be pre-dried between the pages of books. If the leaves have just been collected, they need to be ironed through a sheet of paper with an iron at medium power. The leaves will become smooth and will not wrinkle when dry.
Newspaper or unnecessary paper needs to be crumpled and formed into a lump in the form of a drop. Wrap this form well in foil so that it does not unfold. The result is the body of a hedgehog - the basis for the craft. Using a glue gun, glue the lid of the eggplant onto the thin edge of the base - this is the spout. Make eyes from acorn caps or cut out 4 paper circles: 2 larger white ones, 2 smaller black ones.
Let's start putting together the composition. Glue tree leaves onto the cardboard so that the outer edges of the leaves face outward and cover all the edges of the cardboard. If the leaf petioles are long, they need to be trimmed. Glue the hedgehog's body into the middle using a glue gun, lubricating the bottom well with glue. It's the turn of the cones.
Glue must be applied to the blunt end of the cone and pressed well to the base. You should start from the hedgehog’s forehead and gradually fill the entire back so that there are no gaps. So, where there are gaps, add acorns, chestnuts, maple seeds, other natural material, plastic fruits. Decorate the top of the hedgehog with a sprig of rowan.
Let's play farm
You can make a huge number of little animals from pine cones. A popular option is the funny cow. To do this you will need:
- Pine and spruce cone.
- Plasticine.
- Matches.
- A little imagination.
First of all, design the torso. This means that you will have to solve the question of how to glue the pine cones for crafts. There is a simple and original option that will help out if you run out of plasticine. Prepare a piece of salt dough. To do this, simply mix half a teaspoon of fine salt and 15 g of flour. Add a little water to make a thick dough. Now you can start assembling. When it dries, the craft will hold up just fine.
So the little pine cone is the head. Now you need to decorate it with the missing details. Make horns, a muzzle, and an udder from plasticine. You can continue creating with salt dough. Make legs from four matches, and don’t forget about the hooves. They also come out great in the dough. In this case, all parts can be painted after drying. The plasticine is already colored, which is its advantage.