A cute hedgehog made of cones will become a true friend for your child, and an excellent souvenir for you! How to make a hedgehog from pine cones?
By following our instructions step by step, you can easily make this prickly forest dweller.
How to make a hedgehog from pine cones: master class with step-by-step photos
Hedgehog made from pine cones and salt dough
Before making a hedgehog, we remove the scales from the cones - just carefully separate them from the core and put them in one pile. You can use tweezers or nail scissors.
We take out the scales
This is where the preparation ends, now let’s get started with creativity. First of all, roll the dough into an even ball.
Dough ball
We fashion the body and head of a hedgehog out of it, sharpening its nose a little.
Sharpening the nose
We should get a completely recognizable silhouette.
Hedgehog silhouette
Carefully, in even rows, insert individual scales into the body. First we make a row around the circumference of the hedgehog’s body.
Row around the circumference
And from there we go inward, trying to select scales of a similar size so that the hedgehog’s “hair” turns out smooth and neat.
We insert the scales in even rows
We roll another one out of the dough, this time, a small lump - a spout, and attach it. You can moisten it a little to ensure a stronger attachment.
Spout
Our hedgehog is almost ready, all that remains is to bake it in the oven at minimum power. You can dry the craft under normal conditions, but it will take more time.
Drying the craft
When the hedgehog dries well, all that remains is to draw its eyes and paint its nose with oil paint or acrylic.
Coloring
We have a charming hedgehog made from pine cones!
Hedgehog from a cone
The simplest way to make a hedgehog from a pine cone is to add paws and a muzzle to the pine cone and glue an apple.
Hedgehog made from pine cones and plasticine
The craft can be based on a foam ball and a cone. More details in the video:
Painting of products
There are two ways to color salt dough. After sculpting and drying, the finished product is simply painted with acrylic paints or simple gouache. With preschool children, this method is the best.
If you want to make interesting crafts for decorating your premises, you can buy food coloring and add it at the stage of kneading the dough. Then the color of the dough will be uniform, and the decor item will be bright.
It is easy to work with salt dough, since its structure is plastic and soft. Imagine and create for your own pleasure with the kids!
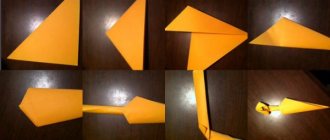
Hedgehog made from pine cone and paper
Cut out a small circle from brown paper and make one radial cut in it.
Cut out a circle, make an incision
Using a stapler, we overlap the edges of the cut - we get a cone with a wide base.
Making a cone
Glue on the eyes, draw ears and a nose. The result is the face of a hedgehog.
Glue the eyes, draw a muzzle
Glue the paper face to the pine cone.
Glue the paper face
We sit the hedgehog on paper grass. Ready!
Hedgehog made from pine cone and paper
From one fir cone and plasticine you can make a very charming hedgehog standing on its hind legs.
Hedgehog made from fir cones and plasticine
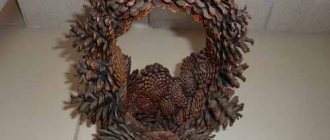
Simple hedgehogs made from cones can be used very surprisingly well in an autumn meadow made from natural materials. Here you have a simple and bright craft made from natural materials.
Hedgehogs made of cones in an autumn meadow
How to make salt dough
Absolutely everyone can afford to prepare this material, because the ingredients for it are available in every kitchen.
To prepare salt dough you will need:
- 200g salt;
- 2 cups of flour;
- an incomplete glass of water;
- 2 tablespoons of starch (if you are sculpting relief figures).
Mix salt with flour and, if necessary, starch, add water, mix, add one tablespoon of sunflower oil and start kneading. The dough should not crumble or stick to your hands - watch this, adjust the readiness of the dough with water and flour. Properly prepared dough should stick together well. Wrap the finished dough in a plastic bag and refrigerate for a couple of hours. After this you can start sculpting.
Crafts from waste materials: original ideas
How to make original pillows with your own hands: instructions, lots of photo ideas
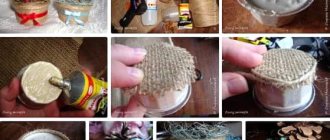
Hedgehog made from cones and a plastic bottle
A very cute hedgehog can be made from a plastic bottle and pine cones. For this craft, a plastic bottle with a round cap is best. Color the end of the bottle with a black marker.
Color the bottle with a marker
Wrap the remaining part with fabric.
Wrap the bottle in cloth
Glue the cones to the rag, forming a hedgehog's fur coat.
Glue the cones
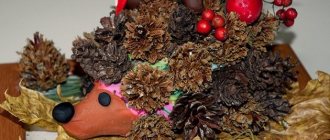
When the cones are glued all over the bottle, we complement the composition with apples, spruce branches and rowan berries.
Hedgehog made from a plastic bottle, pine cones and other gifts of autumn
Hedgehog made from cones and a plastic bottle (large)
To make a hedgehog, we will need natural materials: cones, rowan branches, leaves, birch sticks. The craft is based on a plastic bottle, which we cut off.
Hedgehog made from cones and a plastic bottle
For a detailed master class, watch the video:
This hedgehog is also based on a plastic bottle. Thanks to this, the muzzle is rounded and the base is strong.
Hedgehog made from cones, plasticine and a plastic bottle
This hedgehog made of cones was “revitalized” with the help of factory-made eyes.
Hedgehog made from pine cones with factory eyes
The hedgehog's face can be sculpted from plasticine, and the basis can be a cardboard cylinder or a small box.
Hedgehog made of cones and plasticine
You can make a hedgehog from cones a little differently. This craft is based on the bottom of a plastic bottle. The cones are attached to it using plasticine.
Another popular option for decorating a craft is to wrap threads around its face. We make the nose and eyes from buttons. This hedgehog looks very cozy and cute.
Hedgehog made of cones and threads
The bottle can be wrapped with jute rope around the muzzle.
Hedgehog made of pine cones with jute rope and bottle
DIY hedgehog made from seeds
A lump of plasticine, a handful of seeds and three peas of allspice in your hands can turn into a charming prickly hedgehog! Soften the plasticine well so that the bases of the seeds and peas can be easily inserted into it. Let the plasticine harden, and then attach a walnut or hazelnut to the “needles”. The hedgehog will immediately turn into an active forest dweller.
DIY hedgehog made from seeds and plasticine
It will be easier for kids to insert the seeds not with the bases, but with the point down. But the hedgehog will not lose its charm from this approach!
Insert the seeds point down
A master class on creating hedgehogs from seeds is in our video.
Mommy and Me Salt Dough Hedgehog Craft
We're taking a quick break from Christmas with this lovely Mommy and Me Salt Dough Hedgehog Craft !
It's the season for salt dough decorations, after all, but not all of them have to be Christmas-themed.
Mommy and me made from HedgeHog salt dough
Use the salt dough recipe from the Santa Claus Salt Dough Ornament. To create this hedgehog, you need to print the hands of mother and child, and then put them on top of each other.
Instructions
Prepare the salt dough recipe - you can see the recipe we use here. Roll out the dough into 2 circles. The circles should be about 1/2 inch thick and large enough for each hand you will use. Press each hand firmly into the circle and quickly lift.
Trim the handprint from each one, removing the thumb from the larger handprint. Place the smaller handprint on top of the larger one right in the middle.(see photo) Press down lightly until they stick together. Bake at 300°F for at least 1 hour. The dough should begin to dry and harden.
Using craft paint, color the bottom handprint light brown and the top handprint dark brown. Create a face (see photo), get a little crafty and make it yours!.
Now that Mom and I made a keepsake, why not make one for Dad and I? This would be a great gift for grandparents - you can use the left hand for one parent and the right hand for the other.
Unlock VIP Prints - Become a Member
Become a member of Easy Peasy and Fun and get access to our exclusive craft templates and printable tutorials. With new resources added weekly, you'll never run out of fun things to do with your kids (whether you're a parent or a teacher).
.