How to make a vase from threads with your own hands
A do-it-yourself vase made from thread is an easy-to-make and elegant souvenir. It can be made in two ways - on a balloon or using a solid frame. Even a child can master the creative process. The principle is based on the fact that the threads are wetted with glue, which then hardens. The structure hardens into the shape you gave it.
Garland of acorns
An excellent decoration would be a garland of acorns made from twine, Kinder Surprise containers, wire and coffee beans.
Instructions on how to make a craft with your own hands are as follows:
- Make the required number of acorns: take a container, glue the wire, coat it with glue and tie it with thread, from bottom to top, fix the grains like a cap.
- Connect the acorns in clusters, which in turn are strung on a single wire or twine.
- If desired, supplement the composition with “oak leaves,” which are made from pieces of burlap covered with twine around the edges.
What you will need
To make the product you will need:
- Threads - knitting, floss, twine or even sewing. The thinner they are, the longer it will take to wrap the structure.
- Balloon. It’s better to have several at once, in case something goes wrong.
- A plastic or glass container (if you are using a solid frame) onto which the thread will be glued. The base needs to be wrapped with cling film.
- Stationery glue or potato starch paste. For strength, you can add a little PVA to it.
- Decor that depends only on your creative imagination. The lace trim, bows, and flowers look cute and touching.
To attach decorative elements, it is convenient to use a glue gun with silicone.
Candlestick "lotus"
It's not even a craft. A real stylish decor item! Despite the fact that the candlestick is made from scrap materials, it looks amazing.
The base is a short, pot-bellied glass made of transparent glass.
Take about a couple of dozen spoons, break off the handle, leaving only the oval part.
Using a glue gun, starting from the top, glue the spoons in a circle onto the walls of the glass, so that the lower part of the spoon is hidden under the upper part of the spoon going below.
To make the bottom of the candlestick look neat, you can wrap it around the very edge with twine or white satin ribbon. Place the candlestick on a ceramic saucer. Several glasses decorated in this way will create a beautiful floral arrangement with Japanese notes.
Popular articles Snowman - amigurumi
Step-by-step instruction
The process of creating a vase is as follows:
- The first step is to inflate the balloons. You can create vases that are quite large in size - the glued thread will hold its shape well. Naturally, the more the product is needed, the more the balloon is inflated.
- From a tube of glue you need to build a structure through which the thread will pass, wetted with the composition. It will be convenient for someone to soak the entire skein in the mixture or come up with another way. It is important that the threads are attached to the ball and that their entire mass is well saturated with glue.
- After careful wrapping, the structure is sent to dry. It is better to do this in the sun, but you can do it near a radiator or with a hairdryer.
- After all the threads have dried and the workpiece has hardened, you can remove the ball. First the tail is cut off. Then the ball is pierced with a needle. You will hear it hissing and crackling, gradually deflating and separating from the walls of the thread frame.
- You can remove the ball after the hole is cut. The frame cuts very well. You can give the vase any look - a shallow bowl, a spherical vase, a basket, a house with a window. From one oval blank you get two products if you cut the frame in half.
- After the hole is made and the ball is removed, it is time to decorate. You can decorate the surface of the vase with flowers, lace, and attach butterflies or ladybugs to it.
If the vase is made on a solid frame, then threads moistened with glue are laid out on the outside of the container. Then everything is exactly the same as in the first method - drying, removing from the base, decorating.
Progress
1.
Tear the toilet paper into scraps. Moisten it with water. To avoid overdoing it, use a spray bottle.
2.
It's better to use paste, but I'm out of starch. But there was PVA construction glue left. It should be diluted with water to make it more liquid.
Mix wet paper with glue until smooth. Leave for half an hour for the mixture to soften. Then stir. It should look like this “dough”.
Paste-mâché mass. Workshop Xev
Paste-mâché mass. Workshop Xev
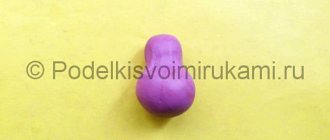
3.
A mass of papier-mâché is needed to give the future vase its shape. To get rid of the typical appearance of the bottle, cover it on all sides with the prepared composition.
Forming a vase using papier-mâché. Workshop Xev
4.
Wrap in one layer of whole paper so that the mass does not deform while still wet. Place on a flat surface until completely dry.
Drying time depends on the layer of papier-mâché applied. Mine took a day to dry. A hair dryer helped speed up drying. Otherwise, it would take even longer.
Forming a vase using papier-mâché. Workshop Xev
Forming a vase using papier-mâché. Workshop Xev
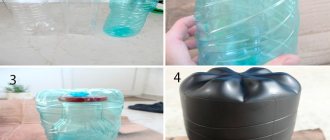
5.
Next, let's work on the bottle. Cut the neck to the desired height.
Blank for a vase from a plastic bottle. Workshop Xev
Blank for a vase from a plastic bottle. Workshop Xev
6.
Now the most interesting part is the decor. Wrap the jute twine in a spiral around the entire workpiece. Start from the middle of the bottom.
Use construction adhesive. It must be transparent. Apply glue boldly without fear of staining the rope. Now it is white, but when it dries, there will be no visible traces of it. And the twine will sit very tightly.
The glue should not be applied to the entire surface at once, but as the turns are completed. It dries quickly.
Scroll through the photos to see every step.
Vase decor with twine. Workshop Xev
7.
Once you have finished winding, secure the end of the twine like this. Secure the base well with glue and cut off the tail.
Vase decor with twine. Workshop Xev
Vase decor with twine. Workshop Xev
This is how it should turn out. We could have stopped there. But I would like some more details.
Vase decor with twine. Workshop Xev
Vase decor with twine. Workshop Xev
8.
Add decorations with the same twine. Apply clear mounting glue to the line of the planned pattern. Lay the thread, pressing it tightly. The glue sets quickly.
Vase decor with twine. Workshop Xev
Vase decor with twine. Workshop Xev
Here is the result.
Recommendation
If you don’t want the jute fibers to stick out in different directions, lightly coat the surface with the same transparent mounting glue. At the same time, this will further strengthen the product.
Look at the photo of the vase from all sides - scroll to the right.
Vase made of a plastic bottle and twine. Workshop Xev
I hope this material was useful to you, if so, like it and check out my channel. There you will find master classes on making various interesting decorative products.
DIY vase made of thread and glue
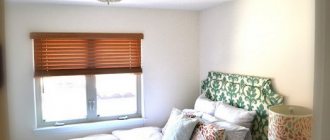
The apartment will look much more comfortable if you add a few homemade decorations to the interior.
Things made with your own hands accumulate the energy of the person who made them, and look much more attractive than items produced in millions of copies. Making does not take much time, but the result is worth it. This product will fit perfectly into the interior and will arouse the interest of guests.
We suggest making your own vase from yarn and PVA glue.
Round vase decorated with a braid
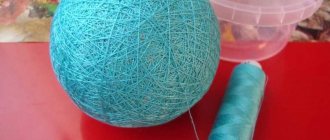
If you have a round vase of small diameter, you can cover it with a braided braid of twine. This can be done as follows:
When wrapping the base for the vase with threads, they need to be firmly fixed with glue, making sure that each stitch lies parallel to the previous one, and there are no visible gaps between them. At the end of the work, trim all the ends of the threads with sharp scissors and hide the visible seams under an additional layer of twine.
Vase made of threads and glue in the interior. Interesting models
We also offer a master class on an original heart-shaped vase. It is especially relevant on the eve of Valentine's Day. In such a vase you can store sweets, tea bags, and cute trinkets. Children will also be delighted with the vase. This craft will help you express your feelings for your loved one.
List of required materials :
- First you need to make the bottom. To do this, you need to cut out a piece of cardboard in the shape of a heart. You can print the finished template if you doubt that you can draw an even heart.
- We cut each toothpick on both sides so that there are no sharp ends on them.
- Toothpicks are glued along the edge of the heart. In order for the vase to stand, it is necessary to retreat 1 cm from the edge.
- We braid toothpicks with threads. You can use beads and sew-on rhinestones as decoration, weaving them into your work.
- We decorate the vase with rhinestones, ribbons, and beads. Feel free to use your imagination and then you will definitely end up with a beautiful vase. This interior decoration will delight your family and friends.
- You can put an embroidered napkin or just a beautiful piece of fabric in the middle of the vase. You can also make a lid for the vase, and then you will get a box for jewelry and various small items.
Vase decor: 10 best ideas
Have you been given a bouquet or flower, but there was no suitable beautiful vase for it? No problem - you can do it yourself. To do this, you only need a container of suitable size, simple materials and a little imagination. We have prepared a selection for you that will inspire you to decorate your vases. Glass or plastic bottles, glasses - anything can be used. We advise you to look through all the ideas to choose the most interesting one.
Cozy jar
You probably have an old sweater that you won't wear anymore. Or a knitted sock with a worn out sole. Why, even thick tights will do! In short, you can make a textile vase at home from anything.
As a base, you can use a liter jar, a beer glass or a plastic milk bottle - whatever.
The thinner the base chosen, the thinner the fabric can be. For example, for a vase made from a glass jar, it is more reasonable to choose a decor from a knitted sleeve or sock, and for a bottle with a narrow neck - tights or a sleeve from a synthetic shirt.
You can glue the fabric to the vase or use it as a cover. If it “sits” tightly enough on the container, additional fixation is not necessary.
Satin ribbons
Even the most ordinary glass bottle of wine and other alcohol or an old inconspicuous glass can turn into an original flower vase!
Wash and dry the bottles. Measure the tape or unwind it from a continuous spool - it is important that it does not break halfway. It is more convenient to apply the glue to the bottle itself in a thin layer. The tape must be wound at the same time so that it does not move off the intended path.
In this way, you can make several vases from bottles with your own hands at once, and then fasten them into one large structure. The result is a creative flower arrangement.
Custom decoupage
Previously, we already told you what decoupage is and how to work correctly in this technique. Try using it to make a beautiful vase out of a bottle.
Choose a bottle of a suitable shape. It can be an ordinary glass - the shape is not important. Tear the newspaper into small pieces. Dip each of them in glue and attach to the surface of the bottle. Each layer must be allowed to dry thoroughly, and only then move on to a new one. The last layer should be applied with a water-repellent varnish so that your vase does not get wet from random drops of water.
Master class: vase made of threads - fast, easy, beautiful!
Hello, dear readers! In today's master class, I want to tell you how to make a vase from threads. The process of making a vase will not take much time and effort, and the result will definitely please you. Such a vase made of threads will definitely fit perfectly into any interior and will arouse the interest of your guests... Well, let's get started!
For work we will need:
- Salad bowl, bowl or plate (that is, select a suitable plate);
- Glue plate;
- PVA glue;
- Scissors;
- Threads (preferably wool);
- Foil;
- Spray paint.
Cover the selected salad bowl with foil, fold the edges of the foil inside the plate.
We cut wool threads; the pieces of thread can be absolutely any (I cut them about 20 - 30 cm).
Pour PVA glue into a plate and soak the cut pieces of thread in it.
We begin to apply the threads to the salad bowl covered with foil, you can glue the threads in a mess, as it turns out... I tried to recreate something similar to a nest, so I glued the threads first across, then along.
When all the prepared threads are glued, leave the vase to dry. A vase made of thread and glue will dry for about 24 hours.
After that, we remove the wicker vase from the salad bowl and begin to carefully separate the foil from the threads. We begin to separate along the edges, from top to bottom, moving along the perimeter of the product.
When the foil is completely removed, cover the surface of the table with newspaper, place the vase bottom up, arm yourself with a can of paint, and begin spraying paint over the surface of the vase. By the way, a DIY vase made from thread looks much more impressive with a glossy sheen, so it’s better to purchase paint with shimmering particles (I used chrome paint).
When the paint dries, turn the vase upside down and paint the inside of it, then leave the product to dry again.
Since a vase made from threads turns out to be extremely light, it can be weighted with small stones or one large cobblestone, pre-painted to match the vase.
Simple crafts with jute patterns for beginners: photo frame with filigree pattern
The first work in the jute filigree technique is the design of a photo frame.
In order to make this jute product with your own hands, you will need:
- a small piece of stiff cardboard (you can use cardboard from a shoe box);
- a piece of paper of any dark color;
- wooden skewers;
- a small piece of wire, suitable in cross-section to the thickness of the skewer;
- jute twine;
- any beads for decoration;
- glue;
- tweezers;
- scissors, stationery knife.
A photo frame with an openwork filigree pattern will have a rectangular shape, rounded like an arch at the top. The external dimensions of the frame are height 13 cm, width 11 cm. The internal window for the photo is 7 cm wide and 9 cm high. The height of the upper part of the frame is 6 cm. We draw a drawing of the frame on cardboard and cut out the blank. This will be the basis for the openwork pattern. You can cover the blank with any colored paper. It must be kept in mind that an openwork pattern looks better on a dark background.
The width of the side openwork jute filigree pattern is 1.5 cm. We mark the scan and make a pattern. Place the drawing in a file folder.
When making this jute craft, you first need to work with the cardboard base.
We will decorate a cardboard frame covered with colored paper along the outer edge and inside the photo window with borders.
To do this, we wrap skewers coated with glue with jute twine. We do the same with a piece of wire. We cover the upper rounded edge of the frame with this flexible border.
Cutting the resulting borders to the required length, glue them directly to the ends of the frame. To cover the gluing area between the border and the cardboard frame, glue a piece of jute between them along the entire length, both on the front and back sides of the frame.
Popular articles Congratulations on April Fool's Day
Using the jute filigree technique, we will make a pocket for a photo on the reverse side of this product. Glue the skewers, stepping back from the window 5-7 mm from the bottom and sides. We glue a piece of cardboard on top that is suitable in size so that the photo does not fall out of the pocket.
Let's move on to more interesting work - a set of openwork patterns made of jute. We remember that you need to cut the cord at an angle so that the cut ends of the elements do not puff up and stick together more tightly.
Let's start from the bottom of the frame and then move to the sides. First we make the large elements of the drawing. After they are glued, we will move on to a set of smaller elements.
Using a toothpick or the thin end of a skewer, spread the glue along the pattern line for the jute product.
Glue the curls to this place. We supplement large curls with loops and smaller curls according to the pattern. We make all the elements from separate pieces of jute, firmly glue them to each other, and press the gluing points with tweezers or a finger. If you have squeezed out a lot of glue, you can spread it over the surface of the design or remove it and spread it on jute twine to make it less shaggy. If the excess is not removed, the elements may creep and begin to bulge.
After a set of sides, we proceed to the jute pattern above the top. We start with the central small curls. Then we glue the arched crossbar between the curls.
While this part of the drawing for a DIY jute craft is drying, we begin to make large petals.
It's better to start from the center. We form each petal from two pieces of cord.
In the upper, pointed part of the element, use tweezers to press the ends of the rope against each other so that they stick together tightly and do not move apart.
While we were making the contours of the petals, the central part dried out, and its contours did not spread to the sides. We fill it according to the drawing with small elements in the form of loops.
Next we will continue working with large petals. We do the internal filling according to the drawing. Smaller petals are placed between the large petals.
When the set of designs for crafts made from jute twine is ready, we place it under the press so that later the design remains even and the elements are on the same level. Let it dry for three to four hours.
Then we remove the work from the film. All visible glue drips along the edges and between the elements are cut off with a stationery knife from the wrong side.
This is a painstaking but very important stage. Excess glue must be carefully removed so that the work looks neat and beautiful. We carefully inspect the cleaned work.
We apply it to the cardboard blank.
The openwork pattern does not fit closely to the cardboard, but is located slightly above the colored background of the frame. It sticks to the curbs. And this creates an even larger volume of openwork pattern.
And now you can decorate the openwork pattern with beads to your taste, as your imagination dictates.
Ball-web
Before starting work, you should prepare the material for work. Glue can be purchased at the store or made independently. If the adhesive composition is thick, it should be diluted with water.
The web ball is a light, airy product, so the threads are taken natural, thin.
- The bottle of glue is pierced lower to the bottom with a thick needle and thread.
- The balloon is inflated to a diameter of 15 cm and coated with cream or Vaseline. This procedure is necessary to prevent the yarn from sticking to the rubber base.
- Glue with threads is placed in a bowl or other container so as not to stain the table surface. The thread is gradually wound around the ball in a chaotic manner.
Do not apply strong force to winding, otherwise the evenness of the finished product will be disrupted.
- The wound ball must dry completely.
- Only after complete drying is the balloon pierced with a needle and carefully removed.
You can decorate balls of thread with various ribbons and sequins. If sparkles are used for decoration, they should be applied immediately after winding the wet yarn.
The snowman's body is made in the same way as spider web balls:
- An adhesive mixture with white yarn is prepared.
- Two balloons of different diameters are inflated and wrapped with threads, only a little more than on a regular balloon.
- Drying will take about ten hours. Then pierce the base and remove. Sew two pieces together.
- For hands, use two sticks of the same size or make your own by wrapping a plastic or aluminum rod.
- The eyes are sold in pairs at craft stores. They are made independently from circles of black and white paper. Nose and mouth made of colored orange or red paper. The nose is made in the form of a cone.
- You also need to sew mittens, a scarf and a hat. The snowman is ready.
This toy is suitable both as a gift and as a room decoration for the New Year holidays.
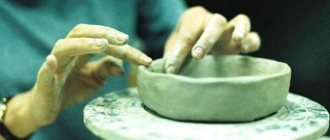
Vase or bowl
Before work, you should cover the surface of the table with oilcloth or newspapers. Materials are prepared: thin rope, cling film, glue, scissors, a bowl or vase with low sides.
Step-by-step instructions for making a vase from threads and glue:
- The rope is cut into pieces. The size should be three circles of the chosen shape. The glue is poured into the container.
- Place the rope pieces in a container with an adhesive composition for impregnation.
- Wrap the bowl in cling film. The surface must be well leveled. Excess is removed inside.
- Turn the bowl upside down. Remove the soaked pieces of rope from the container and place them in a chaotic manner.
- Leave it there for a day. Then turn it over, remove the edges of the cling film from the bowl and remove the container itself.
- Carefully remove the film and the vase made from threads and glue is ready.
You should not overfill such a vase with fruits and other things; take it by the edges with care so as not to damage it.
Making an unusual vase
Such simple and boring things as ordinary glass jars, bottles and glasses can be transformed and become an excellent decorative item. You can turn them into a vase, or into a container for small items with the help of a fantasy of jute twine. The manufacturing process is simple:
- You need to find the necessary tools in advance, which will become simple things stored in every home. Among them are a rope-sword, reliable glue, and ordinary scissors.
- The container that we will decoratively wrap should first be washed and dried.
- Next, the container or container is carefully treated with good glue.
- The next stage of manufacturing will be the direct wrapping of the product using twine rope. We carry out the winding carefully, and slowly move from the bottom of the vase to the top.
- After the winding is completed, the thread should be cut. This must be done in such a way that its end does not unwind. Next, we hide it by smearing it with glue and attaching it to the vase itself.
- After the glue has completely dried, you can give free rein to your imagination. Whether you decorate the product with artistic painting or use the appliqué technique – it’s up to you!
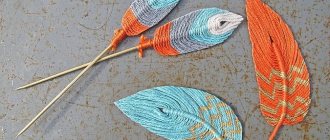
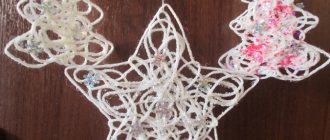
Star made of threads
To make a star, you need to take yarn for knitting to make the product more dense.
- Pour PVA glue into a container, put yarn for impregnation.
If the PVA is thick, then dilute it with water in a ratio of 1 to 1.
- Print or draw a star, cut it out. Place on a piece of foam plastic or board. At each corner of the star (inner and outer), insert a match, a toothpick, or drive a nail.
- Remove the paper layout. Secure the edge of the thread to a match. Pull the yarn itself through matches, as indicated in the photo.
- Once the outline is ready, fold the yarn tightly in curls inside the figure.
- Drying will take a day and a half.
- After complete drying, the matches are removed and the star is disconnected from the foam and board. The star made from threads and glue is ready.
Such a star will decorate the top of the Christmas tree for the New Year holidays.
Thread wall decor
There are a lot of options for decorative wall decoration using threads. For example, making letters that will be a wonderful gift and room decor.
To make it you will need: yarn of certain colors, glue, a mock-up letter made of cardboard, decorations. The beginning of the thread is fixed with glue on the layout. The cardboard is gradually smeared with glue, on top of which yarn is wound in a horizontal direction. Then it is decorated with flowers.
Based on the principle of making a star, inscriptions and entire paintings are created.
Instead of matches, decorative carnations are inserted. Only the product is not removed, but remains on the canvas.
Algorithm for making toys from pompoms
To begin, you will need to cut out two equal-sized circles from cardboard and make the same size holes inside. It turns out that in front of you there should be two exactly identical circles with a hole in the middle. Two circles should be cut in one place; you will wind the thread through this hole.
Now take the thread and wind it over the cardboard base. It must be wound tightly. Carefully holding the thread turns, cut along the top of the cardboard base with scissors.
To do this, move the cardboard circles slightly apart. Using a piece of thread, pull the pompom together in the middle. To do this, lay the thread between the cardboard circles and wrap the skeins of thread.
Now you have a pom-pom in front of you, with which you can create further. You will have to make several of these, depending on your idea. You can attach eyes, ears, and a tail to one pom-pom to create an animal.
Vase made of thread and glue
To make an original vase from threads and glue with your own hands, you will need very little time and materials that are always at hand. The work does not require complex skills, you just need to try a little - and a spectacular product that no one else has will decorate your home.
To make a vase from threads, you will need:
- thick threads (or thin ropes, for example, twine),
- food storage film,
- paste or starch for its preparation,
- scissors,
- a bowl or other item of similar shape and size.
An easier option
But here’s a simpler master class for you - do you want to quickly make a cute bright yellow bouquet of fluffy flowers from yarn? To do this, you need very little - in addition to a skein of wool threads in a rich sunny color, take a long piece of thick wire or a few metal skewers. Tools you will need are wire cutters and thread scissors.
Choose the optimal size for the length of each stem. It can be different - it will look more natural. Use wire cutters to cut the wire or skewers into pieces of the desired length.
Popular articles Flower heart
Wrap the thread around your index and middle fingers, making about 30 turns. Leave the tip long enough. After removing the resulting skein from your fingers, tighten the thread in the center of the resulting small ball, dividing it into halves. All loops should be cut simultaneously with scissors.