The screw cap opener will easily uncork a jar or bottle of any diameter. It is durable, easy to use, and does not damage the container being opened. In addition, universal plastic models are not expensive - from 150 rubles, and will last for several years.
A screw cap opener will help you easily open a screwed-on jar or plastic bottle with just one movement of your hand. The tool is made of high-quality food-grade plastic and silicone, which ensures a tight fit and safe use.
Description
An opener is a device with a long handle and a rounded element - a clamp that wraps around the neck of a can or bottle. The clamp, in turn, is equipped with a silicone pad with teeth, which ensures a tight fit of the tool.
The key works on the principle of a lever
By pulling the long handle, it is easier to move the stopper or cap out of place.
Materials and tools
So I needed the following supplies:
Materials and fasteners:
- Wooden plank 1.2 cm thick, 4 cm wide, and 15-20 cm long;
- One screw with a press washer 4x15 mm;
- The collar itself.
Tools:
- Drawing and measuring tools (pencil and square);
- Awl;
- A jigsaw with a file for shaped cutting;
- Electric drill-screwdriver;
- Metal drill with a diameter of 2.5 mm;
- Sandpaper.
The lineup
In hardware departments or online stores you can find openers of different models:
- a simple tool with a hoop, handle, fixed diameter;
- universal wrench with several clamps of different sizes;
- mechanical device with a metal holder;
- electronic gadget powered by batteries.
Simple designs made of plastic with silicone gaskets
Complex mechanical or electronic models are made of high-quality metal.
How to open the lid
The simplest, but at the same time “barbaric” way: pierce the lid with a sharp object (knife, awl, scissors). The pressure is equalized and opening is easy. In this case, the lid cannot be reused and will have to be thrown away. I will tell you about several methods that are gentler and leave the lid and jar intact.
Special key for screw caps
Factory key for opening cans and bottles with screw caps
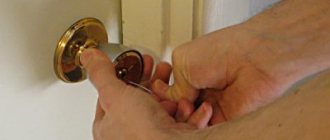
Hardware stores and markets sell a device for opening jars by screwing on the lids. It is a U-shaped semi-arc made of non-solid polymer material. This is a special key in which holes are made for different sizes.
It is used like this: the key is placed on a lid of a suitable size, the ends of the key are squeezed with one hand, and the can is held with the other. Then, by rotating the key, the bank opens.
As a result, the lid remains intact and can be reused. The cost of such a key is about 300 rubles.
Car oil filter wrench or belt
Car key for opening screw cap jars
To open the can, you can use a wrench to remove the oil filter in a car. It is a handle with an adjustable loop made of soft material.
The loop is adjusted to the size of the lid and clasps it. We rotate the key with one hand and hold the can with the other. After unscrewing the lid, it remains undamaged and is ready for further use.
Of course, if such a key is not in your garage (or maybe there is no garage), it is not worth buying it specifically just for opening cans (price from 3,000 rubles). You can make it yourself from available materials, as the following video shows.
Homemade key for screw caps
We use a trouser belt as a bottle opener.
Using a belt to open screw caps
The simplest and cheapest method is similar to the previous one. A loop is made from the trouser belt and, as in the previous case, we open the jar with the blank.
Using a knife
One of the most accessible ways is to use a knife; it can always be found among kitchen utensils. It is necessary to ensure a flow of air into the jar, then the pressure inside and outside will equalize and it will open freely.
Method of opening a can using a knife
To do this, insert a knife into the gap between the edge of the lid and the jar and slowly press the edge of the lid away from the glass in several places around the circumference. When you hear a characteristic pop, you can open the jar: air has got inside.
If you are thinking of using this lid and jar in the future, then this operation must be carried out carefully, without making any extra effort. It is better to use a knife with a blunt rounded end, although any knife or screwdriver will do. But then there is a possibility that the jar or lid will be damaged and will have to be thrown away.
Let's use oil
In the case of cans of sweets, when the lid is “stuck,” vegetable oil can help.
Method of opening a can using oil
Place the jar upside down and pour a few drops of oil behind the lip of the lid. We leave it like this for 10 - 15 minutes, then try to open it.
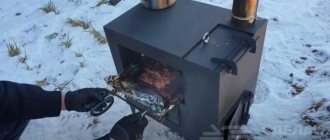
Hot water or a hairdryer helps
Hot water works well for opening. The top of the jar can be lowered into a cup of hot water or placed under the stream. The temperature coefficient of expansion of metal is higher than that of glass, so the jar will easily open in ten minutes. A hairdryer can be used for the same purpose.
Using a hair dryer to unscrew the lid
Mechanical methods
Using a knife handle to open a can
Opening the lid by rolling it on the table
To open a can, you can use mechanical actions:
- hit the bottom of the can, which must be held suspended. Water hammer in the can will cause air to get inside and the can will open;
- tap the lid from the sides and top with the handle of a knife or similar object. The thread will weaken and the can will yield to opening;
- roll the jar along the edge of the table back and forth several times, pressing the edge of the lid with your palm. The sound of a quiet pop will mean that air has entered and the jar can be opened. Carefully cover the table with a towel to avoid damaging the tabletop.
Eliminating jar slipping
Opening a jar with rubber gloves
Using tape to unscrew the lid
Method for unscrewing the lid using rubber bands
Using sandpaper to unscrew the cap
To prevent your hands from slipping, you should use:
- dampened towel, napkin or rag. They cover the lid and then try to open it;
- rubber gloves or construction gloves (with pimples);
- tape or cling film, covering the lid with them;
- bank elastic bands;
- strip of sandpaper.
3 ways to open a screw top jar
Application
To open a can using a key opener:
- Wrap the tie belt around the cork.
- Tighten the lock if provided by the device design. If there is no latch, firmly hold the silicone pad in your fist.
- Pull the handle counterclockwise.
When using mechanical or electronic models:
- Install the device on the jar.
- Lock it in. The key should fit snugly around the neck.
- Activate the mechanism by pressing the button or turning the handle counterclockwise.
Detailed instructions for use are included in the packaging of the device.
Important ! Mechanical and electronic models damage the cover. It will not be reusable.
Making a fixture
First, using a jigsaw, I cut out a wooden blank for the handle.
Then, in the upper part of this workpiece, I drilled a blind hole with a diameter of 2.5 mm for a screw so that the handle would not crack.
The handle itself was treated with sandpaper.
I drilled the same hole in the tip of the collar.
Then he screwed the collar to the handle using a screw and a press washer.
Moreover, I screwed it so that when forming a loop from the collar, there was a leather layer inside to provide better friction between the collar strap and the lid of the jar.
Since I will not be securing the free end of the collar so that I can adjust the size of the loop, I will have to hold this end with my hand. To make it easier and more convenient to hold, I sawed a notch like this in the handle.
Now the free end of the collar can be easily held with the thumb of your right hand.
In addition, so that the collar would always be folded into a loop, I decided to additionally make a small bracket out of wire.
For this I needed a small piece of wire with a diameter of 1 mm, as well as a hammer and pliers.
I made a bracket from the wire, which I attached by simply hammering the ends on both sides of the top of the handle.
The bracket, of course, turned out to be rather frail, but on the other hand, it will not bear a large load.
And now my device is ready!
Decoupage glass jar
In the kitchen, the housewife uses jars and jars to store bulk products and spices. It’s boring to store food in simple glass containers, so try to create a decoupage glass jar that will support the style of the entire room and become a functional and attractive decorative item.
To work you will need:
- any jars you want to transform;
- acrylic primer;
- napkins with a pattern;
- PVA glue or special decoupage glue;
- varnish
Step-by-step instructions for beginners
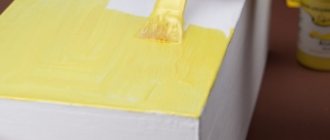
First of all, clean and dry jars will need to be degreased using any alcohol-containing product. Then cover the outer surface of the jar with soil using a sponge. To make the drawing brighter, you need to apply the primer in a few words.
Second step: using fine sandpaper, level the surface of the container.
Cut out the fragments you like from a napkin or decoupage card and make a rough composition. Apply PVA glue to the primed surface, then apply a napkin.
Place a piece of polyethylene or a stationery file on top of the napkin, gently press and smooth the picture, starting from the middle and moving towards the edges.
After drying, you can add new fragments or paint the background with acrylic paints. If the jar has a lid, coat it with primer, then decoupage the lid with acrylic paint or the above method.
The last stage is varnishing. It needs to be done in several layers. This will preserve the craft for a long time and allow you to wash the jar.
In the same style, you can decoupage coffee cans to store tea, bulk products or spices: they will add a special flavor to your kitchen.
Original decor of cans. Ideas, tips and DIY master class
Pickle jars, jars of Nutella or baby food, three-liter jars - this is a very short list. We constantly buy things in glass jars, and then we regret just throwing them in the trash. In fact, if you don’t do anything, then these cans have every chance of taking over the house.
DIY crafts from jars
Promo code OZONMG1D43
Table with CLOSED OZON SHARES using promotional code OZONMG1D43 follow the link
Use your personal Manager's referral promo code OZONMG1D43 to get 300 points for your first order or access to closed offers.
See how to place an order for OZON step by step here
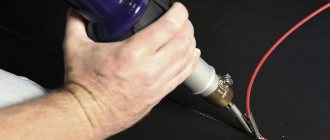
Making a bottle cap
To prepare the mixture to create an airtight bottle cap, you need to do the following:
- put on gloves;
- pour a little concentrated dye into a plate;
- squeeze soft silicone from the tube onto the dye in the required quantity;
- thoroughly mix the dye and silicone mass;
- lubricate your fingers with Vaseline - this is necessary so that the silicone does not stick to the gloves;
- transfer the silicone mixture into the mold;
- press, spread over the mold and smooth out the silicone with your fingers;
- leave to harden.
After the silicone has hardened, you need to remove the plug from the mold and carefully trim the product.
Precautions when opening canned food using improvised means
In fact, you can use any hard, sharp object to open canned food (as long as it is made of a material harder than a metal can).
In addition to the methods listed, many people use other, more non-standard instructions:
| Item used | The essence of the method | Advantages | Flaws |
| a cobblestone with a rough surface or a piece of concrete | acts similar to sandpaper in creating friction | the edges of the open lid are not sharp and less dangerous | requires long, consistent effort |
| pocket knife and stone | Use the tip of a knife to punch a hole in the edge of the lid, then knock it out with a heavy stone (after depressurization) | can be used outdoors or in unusual conditions | there is a high probability of contaminating food with small pieces of stone or other foreign particles |
| fork | You need to position the fork so that one of the tines is on the inside edge of the lid and press down firmly to pierce it, then repeat this step along the edge in a circle, punching holes. | a useful method in the absence of other tools | The plug may break and become stuck in the lid, making it even more difficult to open the jar. |
| pliers | you need to hook the side edge of the lid and turn until a hole appears | the lid can be damaged quite quickly | Fragments of metal shavings often end up in food |
Opening cans using improvised means is nothing new, as the can opener was invented more than 50 years after the first sealed tin food cans were introduced. Moreover, some methods have a long history and are considered very reliable. Therefore, it is recommended to resort to the most practical and safe proven methods, and only in extreme cases, open cans with bare hands or with traumatic objects.
Other precautions may include the following:
- Do not try to saw off the lid with a bread knife. As a result, metal shavings will remain in the contents of the jar.
- Any method that does not involve the use of a special opener may result in metal shards or dirt particles getting into the food. Therefore, it is necessary to exercise caution and inspect the product carefully before use, in good lighting.
- Food from cans that have burst or been punctured for 1 day or more should not be eaten, since there is a high probability that dangerous bacteria have multiplied in them.
- None of the methods for opening canned food with improvised objects is ideal, and each of them carries a risk of injury. Therefore they should not be used by children. You should take proper precautions and take your time when trying to open a jar without a can opener.
The procedure for making an opener
To make an opener, we need to perform only one operation.
Using a screwdriver or even a simple Phillips screwdriver PH2, we screw the self-tapping screw with a press washer into the side of the board at a certain angle, stepping back from its end by 20-25 mm.
And that's basically it! Our opener is ready!
Of course, my opener handle turned out to be a little long and, in principle, it can be slightly shortened by sawing off 5-6 cm. In addition, for greater ease of use, you can further process the wooden handle of our opener, for example, by chamfering it or sanding it with sandpaper.
However, if this opener is needed to open only one or two cans, then you can do it this way.
Alternative options for making stoppers in 5 minutes
If you need to close the container urgently, but there is no time to dry the silicone, you can build a plug from a plastic bottle with a lid. The main thing is that the diameter of the cap from the latter exactly matches the diameter of the neck of the bottle.
Bottle stopper with silicone cap
The product is obtained in this way:
- Fill a plastic container halfway with water and screw on the lid.
- Turn the bottle over.
- Lower it with the stopper down directly into the neck of the bottle and press it tightly.
- If wine is poured into the container, holes are made in advance in the lid and bottom of the plastic container and a hose is passed through.
If you have an unnecessary cork stopper that is too large in size, you can also prepare a device for closing the glass container. The diameter of the neck is accurately measured with a caliper, after which a cone is made from the cork using a knife (it should tightly close the hole).
Any decor, for example, a spool of thread, is glued to the upper, extended edge. This will help make the cork more interesting and unusual in appearance. Homemade stoppers are very convenient and practical, because they last for years, cost pennies and can be made in a few minutes.