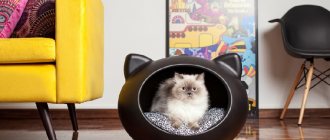
Our cat Martha is constantly looking for a suitable place to sleep. For some reason, she didn’t like the expensive house she bought with a scratching post, and she constantly tries to climb onto the owner’s bed.
Mom, naturally, is not happy with this state of affairs. So she decided to make a cat house from available materials - her own T-shirt and an ordinary metal hanger.
- In order for the new “bedroom” to attract Martha and smell like a housewife, mom did not wash her home clothes before making the house.
The process of “assembling” the house turned out to be so simple that my mother decided to share this solution to the problem with everyone, maybe it will be useful to someone.
What will you need?
In fact, we didn’t even have to buy anything to make the bedroom; everything was already in the house.
- Two hangers made of wire - preferably not of the best quality, so that the metal bends easily.
- Pliers with wire cutters.
- Scotch tape of any thickness.
- The T-shirt is spacious, so that the house for pets turns out to be spacious (especially important for owners of 2 or more cats).
- Thick cardboard - approximately 40*40 cm.
- Thread with a needle or pins.
It is clear that no self-respecting cat will sleep on “bare” cardboard, so mom decided to make a cozy soft pillow, which she then placed on the bottom of the house.
- Any fabric - you can take another old T-shirt.
- Sintepon from an old pillow or from a jacket - whoever has what.
- Threads with a needle.
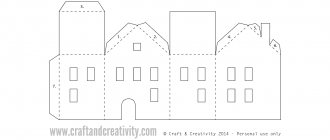
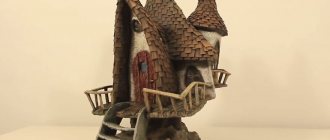
Craft using a stencil
If you found the previous product very difficult, but still want a cat figurine. And you are ready to learn how to make something out of paper. We offer you a simple stencil manufacturing option.
For creativity, prepare:
- the stencil we offer;
- thick cardboard;
- PVA glue;
- scissors.
Procedure:
- open the finished template on your computer, print it (if the printer allows, this can be done directly on cardboard);
- cut out the cat’s paws and press the fold lines;
- roll up the material;
- using PVA, connect the head and torso;
- Using a small strip of cardboard, you can twist the tail and glue it in place.
The cat will turn out even more interesting if you make it an unusual color. By the way, modern creative stores sell paper with interesting pigmentations. If you want to not only learn how to make something out of paper, but also create an interesting craft, buy paper, for example, with leopard print. Then your cat will be unique.
Preparing hangers and cardboard
In order to use the full length of hangers (for a more spacious house), you can bend the top hook and “unwind” the metal at the point where it passes from the hanger to the top. Mom decided to do it simply - she “bite off” the hooks with pliers.
One of the most beautiful nations: photos of Ossetians from which you can’t take your eyes off
Why hysteria is a stage of development, and how to help your child survive it
How to grow strong tomato seedlings with the right fertilizer?
If you have time and desire, the edges can be additionally filed with a file so that there are no sharp ends. This is reinsurance for owners of kittens or very nimble cats. Our Martha is a calm “lady”, so we skipped that part.
Then we bent the hangers to their full length - turning them into identical, even rods.
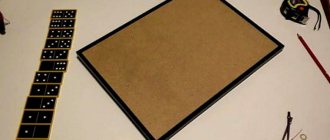
A piece of cardboard was cut straight and all corners/edges were covered with thick tape so that the paper would not fray after some time of use.
- You can use insulating tape if you don't have tape.
Origami sitting cat
The previous method explained how to make a paper cat using a simple method. Let's not depart from origami art, and consider another interesting product.
You will only need one A4 sheet, scissors, and PVA glue.
Let's get started:
- We take the material, fold it so as to get a rectangular shape. We run our palm along the folds, aligning the workpiece on each side. On one side we cut off a strip ten centimeters long. You will get a shortened rectangular shape. Unfold the paper and divide it in half. From the received elements, you can make several cats.
- Take one half of the material and fold it into a rectangular shape. Carefully press down the folded side. Turn the rectangle with the open side facing you. We wrap one of the halves up. Turn the workpiece over and repeat this action again. It should look like a blank for an accordion. Iron everything again to get pronounced folds. We return the previously bent figure to its original open position.
(Step 2) - Fold the top and bottom of the sheet towards the middle to form a rectangle. Place the figure with the open side facing you. We bend the corner of the leaf located on the left side. Unfold the material so that the edges are at the top. On the left side, a triangle should form from the previously bent lines.
(Step 3) - Fold the left side of the workpiece and open the figure again. It should look like the face of a future animal.
We've made the muzzle, now we'll find out how to make the cat's body.
Let's get started:
(Step 4)
- We place the previously obtained figurine with the edges facing us;
- we compress the product and iron the folds;
- press the resulting triangle with your finger;
- place the product on its side so that the unfolded part is in front of you;
- fold the half up;
- try not to touch your head;
- turn the workpiece over and repeat the steps again.
The body is ready, all that remains is to improve the head and add a tail to our cat. For this:
- We unfold the figure so that the muzzle “looks” at you. We push through all the lines. Forming the head. Press the triangle against the folded line located on the edge.
- We form the ears. Determine where the vertical line is. There will be small corners there. We bend them up. We level the entire made area. The head and ears are completely ready.
- Let's return to the calf. We bend it in half. We bend the area in which the tail will be located to the right. We return the body back and unfold the product. There should have been four folds on it.
- Place the cat on its side and fold it horizontally. Let's expand. We bend the lower zone back, unfold the upper zone and you will get paws.
We've almost reached the end. If you followed exactly the instructions on how to make a cat out of paper, then you should notice that it already matches the cat’s image exactly.
Let's continue working:
- Based on the results of the previous steps, you should have a figure that looks like an accordion. Fold at an angle upwards. Due to such actions, the body will turn back. The bent part will serve as a tail. It will help make the figure stable on the plane.
- We fold the tail blank into a ball so that the product looks close to natural. Unravel the resulting ball slightly.
- We open the previously made paws. Try to do this so that the neck remains unaffected. To make the figure stronger, you can lightly grab it with PVA.
Through much action and work, you learned how to make a kitten out of paper. The finished product can be made even more beautiful by adding antennae, eyes and a nose to the face. Place the finished product on the table and admire the interesting craft.
In a separate article, we looked at several interesting options for paper origami crafts for beginners
Frame making
We made the basis for the house together. While mom bent the wire in a semicircle, I made holes with the remaining “heads” from the hangers.
- The holes are the future locations for fixing the edges of the wire. They must be done on all four corners of the cardboard square. To prevent the holes from being too large, you can use knitting needles or an awl.
After the bottom of the future cat house is ready, you can insert wire arches into it - crosswise (from corner to corner). The edges of the twigs protruding from below should be bent with pliers and “closed” with tape.
In Russia they are asking to cancel the mandatory fee for choosing a seat on an airplane
On March 20 they launched a burning wheel: rituals on the day of the spring equinox
When to collect birch sap in 2022 and how to choose the right tree
To make the cat’s home durable, the mother additionally tied the upper parts of the arch (the places where they touch) with thread and wrapped it with tape on top.
Making walls
Now it's time to “dress” the house. To do this, you need to put a T-shirt on the resulting structure so that the neck is on the lower side of the house - this way it will be easy for the cat to enter its bedroom.
You need to act carefully, constantly adjusting the fabric without pulling it. The structure, until it is wrapped in a T-shirt, is still quite fragile - it can be easily broken.
Once the frame is wrapped in an elastic soft fabric, you don’t have to worry about its strength - the T-shirt itself is an additional element of fixation of the entire house.
“Creative thinking”: Rosobrnadzor assessed the possibility of transforming the Unified State Exam
Alexandra Shoua's eldest daughter grew up without him, but forgave him all his insults
You can make a pet bed with your own hands. It is soft and very comfortable
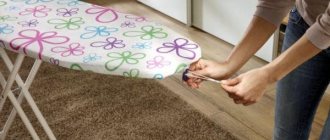
Mom folded the extra pieces of fabric, sleeves and folds down, under the cardboard, and secured them with pins.
Then she hand-stitched these parts so that if the pin were accidentally opened the cat would not get hurt, she removed them.
Cardboard box house
Cats do not always recognize a house that is bought in a store. Alien smells repel them, and animals are afraid to climb even on the most comfortable bed. Therefore, it is advisable to make a cat’s home with your own hands.
The house must have a solid foundation and not fall or tip over when the animal moves. An excellent basis for its manufacture will be an empty cardboard box, from which you can build a home of any configuration.
To work you will need:
- large cardboard box;
- stationery knife;
- pencil and ruler;
- scotch;
- water-based paints;
- tassels.
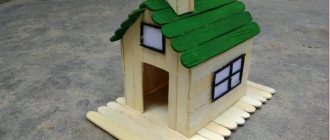
House for a cat from a cardboard box: YouTube/eHow
To build a house for a cat in the shape of a bus cabin, proceed as follows:
- Choose a four-flap box that is the right size for your cat.
- Lay the box on its side and secure the bottom with tape.
- Cut three flaps (2 large, 1 small) from the opposite side of the box. Place the remaining flap on the box and secure it with tape at the joints with the walls.
- Measure 3 cm on each side of the upper wall above the valve, connect with straight lines to the points where the closed valve begins.
- Cut the slopes from the valve to the top wall, cut off the top strip.
- On a narrow cut valve, cut two window openings with a partition in the middle.
- Tape the window sheet to the hole in the box.
- Using a utility knife, cut out a double door with windows on the side of the box and another window along the slope.
- Make windows on the opposite side of the box.
- Paint the box with water-based paint: white on top, green on bottom.
- Decorate with painted wheels, headlights and emblem cut out from cardboard and attach them with glue.
- Place a piece of soft fabric inside the box to make the cat feel comfortable and cozy in the house.
If the cat does not want to recognize the house right away, use the advice of Ekaterina Mishanenkova, author of the book “Tests for your cat. Measure your pet’s IQ and understand its psychotype”: throw a treat (toy) inside the house so that the cat can see it. Repeat several times until the cat masters the new territory.