Headphones as a camera shutter button
Practical camera shutter button The in-ear headphones that come with most smartphones are rarely considered a breakthrough in audio reproduction.
Therefore, music lovers prefer higher quality alternatives. However, a second life is also available for the original headset, for example, as a camera shutter button. This can be useful both for selfies and when shooting with long exposures, that is, when the camera needs to be held as still as possible.
Already in iOS 5, Apple has adapted the software in such a way that pressing the “+” button on the headphone cord triggers the iPad or iPhone camera.
Smartphones running Windows Phone (manufactured by Nokia and Microsoft) also have this feature. In the case of Android, it all depends on the manufacturer and series of the device.
Labor intensity: low; costs: no
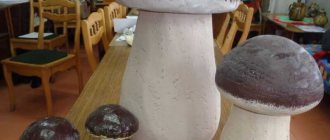
Upgrade a point-and-shoot to a microscope
In this topic I’ll tell you how I made a tool for microphotography from an old digital camera and a lens from a CD-ROM.
So, it all started with the fact that in the process of implementing the idea, various variations of the camera (Olympus C-350) with lenses from CD-ROM, DVD-ROM and a couple of others, taken from different optics, were tried. In terms of magnification and image quality, CD and DVD-ROM lenses were close, but in the end the CD lens was chosen due to its more convenient design (it was easier to make a frame for it).
In the photo on the right, this lens (not to be confused with the ashtray) was photographed through another lens, which has a longer focal length and is therefore more suitable for macro photography.
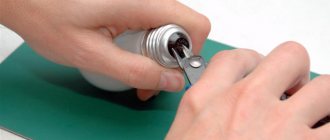
To attach the lens to the camera lens, I made a frame out of foam plastic and colored it with a black marker to make it more opaque:
Already at the beginning of the experiments, it became clear that holding a digital camera in your hands would not allow you to take a high-quality photo due to strong vibration, so a tripod with hydraulic focusing was made from scrap materials over the course of the evening (it sounds like a damn thing).
The stand is assembled from a piece of plastic pipe as a frame, two syringes of different diameters, a syringe with a larger diameter is used to attach the object stage to it, and a syringe with a smaller diameter is used to control the movement of the object stage. The table itself is cut from a CD case. To secure the whole thing to the table, I found a mounting bracket. I made 2 holes in the plastic tube, on the top for the bolt that secures the camera (by the way, an ordinary furniture bolt, which I borrowed from the table for the sake of science, worked perfectly), and on the bottom for the mounting bracket. I connected the syringes using a dropper, filling the whole thing with water. The large syringe was, without further ado, taped to the tube.
The end result is this tripod:
Now we screw the soap dish to the tripod and the device is ready for microphotography!
I apologize for the quality of the photo, I had to use my phone.
Here are a few photos that were taken during testing of the device:
Photos of LCD matrices, Nokia E51 on the left, HP iPAQ hx2190 on the right. The vile Chinese spared LCD molecules for Nokia)
Hair from my head (it turned out so creative due to the need for side lighting)
And the classic - onion cells.
According to my profane calculations (I compared the real pixel size and its size in the photograph), the magnification reaches x500, although, of course, the useful magnification is less. I take photographs without flash, illuminating the subject with a flashlight. In order to eliminate vibrations when releasing the shutter, I use the shooting delay function. It’s a pity that the C350 doesn’t have autofocus off, because... Having fine-tuned the focus using syringes, autofocus throws it off a little. The quality of shooting also deteriorates significantly due to spherical aberration, but my knowledge of optics was only enough to add an aperture, which did not provide a noticeable improvement. Another disadvantage is that photographs of opaque objects turn out poorly, due to the fact that you have to illuminate them from the side, which leads to such consequences as in a photograph of a hair.
PS In the process of searching for a blog to publish, I came across a post describing a similar combination of “telephone camera + DVD lens”, but I did not refuse to publish it, after all, it describes not micro, but macro photography.
High quality audio playback via Bluetooth
Stream music
A high-quality hi-fi system with high-quality speakers and a powerful amplifier still provides excellent sound over the years. But the equipment of modern models is undoubtedly better.
However, you can provide at least Bluetooth music streaming quickly and inexpensively. For this, the market offers audio-Bluetooth adapters at prices starting from 1,400 rubles. The compact devices have their own power supply and can be connected to the analog input of any stereo system using a 3.5 mm Mini-Jack plug or RSA cable.
Pair in the Bluetooth menu of your devices (smartphone, tablet, PC), after which streaming can begin. A particularly large number of interfaces are offered, for example, by the Philips AEA2700/12 (about 5,000 rubles on eBay), which can be connected via MiniJack and a digital connection (optical and coaxial). In addition, it supports NFC technology.
Labor intensity: average, costs: 1400 rubles.
How to use a digital point-and-shoot camera for other purposes?
Well, let's start with what you don't need to think about. With built-in functions. In addition to “taking pictures,” my RoverShot RS-6000Z camera can also:
1. Record video. 2. Record sound. 3. Play sound files in mp3 format. 4. Has removable storage capacity of 2 GB.
So, the first thing that comes to mind is using the camera as an mp3 player. We buy (if we don’t have them in stock) earbuds, download music or something else to half (or more) of the memory capacity, and off we go! It’s especially useful to listen to any educational audio programs on public transport or where you have to wait a long time - and you learn, and time passes faster, and it’s not so boring and irritable, and... Listen to good music, you can now download audiobooks from the Internet... In general - the owner is a gentleman, it all depends on your personal preferences.
The second useful function that I use quite often is the voice recorder. Allows you to “catch someone in the market” when the interlocutor in an important conversation begins to refuse something. Like: “I didn’t say that.” And it’s better to write down simply important “noises” such as negotiations, lectures, etc., otherwise the nuances are forgotten very quickly. And the devil is always in the details... A small note: to use the voice recorder as discreetly as possible, turn off the confirmation sound for turning on the camera and practice turning the camera into voice recorder mode as discreetly as possible.
The third useful thing is memory. Not using the huge 2 GB capacity is simply a crime. My computer geek friends always have something to copy, and there is often not enough space on the flash drive that I carry instead of a key fob. This is where the camera comes to the rescue. Connected it to your computer, downloaded what you needed - that’s happiness for you. True, you should always carry a computer-camera connecting cable with you, but if you always carry a purse or purse with you, buy a spare cable and just carry it with you. Someday he will definitely help you out!
The quality of the video image that my camera shoots leaves much to be desired, but sometimes there are such interesting scenes that you don’t pay attention to it when watching!
But these are just flowers! Any fool, sorry, user, can use what already exists.
Here's how else you can use your camera to solve everyday problems.
Here's how I solved a problem that was plaguing my life with the help of my soap box.
For example: you need to go buy groceries and other goods. We shop for the week at once, and the shopping list is constantly changing.
I don’t know about you, but I used to either forget a piece of paper with a list at home, or lose it halfway, and then painfully remember what I didn’t buy... Either I called my wife, or I bought the wrong thing...
Now I use a camera instead of a piece of paper. I detect its presence automatically, and I don’t leave the house without it (by the way, you can also use a mobile phone camera if you have one on your phone). And I definitely won’t lose my camera or forget it somewhere on the counter...
At first I just started taking pictures of the shopping list. But, firstly: the list is large, the letters are very small; secondly: you need to cross out what you bought. How to cross out?
And now, as a result of long optimization, I use this technology. I'm making a shopping list. I photograph it first. Then I remove the items (or packaging for items) that need to be purchased. Or just names on separate pieces of paper. Once I even removed breadcrumbs... Then, when purchasing, I delete the photo, and so on until I get to the general list.
By the way, sometimes it’s enough just to ask the seller, without having to explain for a long time: show a photo and ask if “This” is on sale. This is what I do when I buy DVDs with new films - I download the picture from the Internet, and then just show it to the seller at the kiosk.
By the way, you can also attach a voice message to the pictures to replace “This” if suddenly “This” is not on sale...
How else can such a “soap box” help? I’ll reveal another application that few people think about.
Any person who frequently uses a digital camera gradually acquires the habit of removing it from the camera very quickly. This skill can be useful when using your “soap box” as... a self-defense weapon. After all, a hand with such a “fist” hits much more painfully than an empty fist, and you will look much more menacing. True, this does not apply to all cameras, but, for example, my RoverShot RS-6000Z fits very comfortably in the hand. True, I have not yet had to use this gadget in such an unusual way. God bless! But I did practice at home on a makiwara (punching bag). It turns out very well!
So, if you use your brain, you will probably come up with how else you can use the camera to solve your pressing problems.
Just don’t forget in the heat of invention about its direct purpose - to take photographs, to capture the moments of life that interest you.
Magical moments...
Tags: digital camera, benefits, application, tips, camera, equipment, camera
About equipping with the “smart TV” function
Old TV becomes smart
Your old Full-HD TV could work for several more years - provided it is equipped with smart TV functions. Similar options can be easily implemented using media players. For example, the Amazon Fire TV Stick (about 7,000 rubles), connected to an HDMI port and supplied with power via an adapter, offers a smart TV interface with access to media libraries and streaming services. Control is carried out using the included remote control. Models such as Google Chromecast (about 2,500 rubles) serve as links between TV and mobile devices: with their help, you can broadcast any content from a tablet or smartphone to the big screen.
Labor intensity: average; costs: 2500 rub.
Homemade video surveillance system assembled from several components.
Greetings to all! Shouldn’t I make a video surveillance system instead of the usual door peephole, I wondered... - Don’t! - the wife snapped, it’s expensive! - Do it, do it! said the Tmart store. ))) And I decided to do it! Conventional video peepholes were immediately discarded as being contrary to the spirit of double doors. How can I see the monitor if it is behind the door? What is good for single doors is death for double doors. ))) That's why I was inspired by my doodles)))
and at my home I now have four components for self-assembling a video surveillance system:
1. Video camera: “2.8mm CMOS Wide Angle Door Eye Surveillance Camera (PAL)”
www.tmart.com/2.8mm-CMOS-Wide-Angle-Door-Eye-Surveillance-Camera-PAL_p220983.html?cc=USD
Cost $19.27.
Specifications:
Specifications Image Device 1/4″ CMOS Video Sensor Auto Electronic Exposur 1/50-1/6000 Sec TV System PAL View Angel 92 Degree B/W Illumination 0.5Lux Color Illumination 2Lux S/N Ratio 46dB Operation Voltage DC 8 — 12V White Balance Auto Current consumption <35mA Power Supply AC100~240V DC12V DC (Not Included) Dimensions (4.2 x 2.5)cm / (1.65 x 0.98)" (L x Dia) Weight 118g / 4.16oz Package Includes 1 x Door Eye Hole Color Camera 1 x Power Cable
2. Monitor: “4.3″ Desktop Sunshading LED Screen Car LCD Monitor”
www.tmart.com/4.3-Desktop-Sunshading-LED-Screen-Car-LCD-Monitor_p192996.html?cc=USD
Cost $23.08.
Specifications:
Specifications Color Black Weight 8.64 oz / 245g Dimensions 12 x 7.5 x 1.8 cm / 4.72 x 2.95 x 0.71 "(L x W x H)) LCD Screen Size 4.3" 16:9 Resolution 480 x 272 System PAL / NTSC Power DC 12V Consumption 3W Package Includes 1 x Power Cable 1 x User Manual 1 x LED Screen 1 x Accessories
3. Power supply: “12V 2A 24W AC Power Supply Adapter For LCD Monitor”
www.tmart.com/12V-2A-24W-AC-Power-Supply-Adapter-For-LCD-Monitor_p169389.html
Cost $7.34.
Specifications:
Specifications Input AC100-240V Output DC12V 2A Power 24W AC/Dc cablelength 90.94″ / 231cm Weight 198g / 6.98oz Package Includes 1 x 12V 2A 24W AC Power Supply Adapter For LCD Monitor
4. Adjustable DC-DC voltage converter: “LM2596 BUCK DC 4.5-35V to 1.25-30V Adjustable Reduction Voltage Power Module”
www.tmart.com/LM2596-BUCK-DC-4.5-35V-to-1.25-30V-Adjustable-Reduction-Voltage-Power-Module_p216018.html?cc=USD
Cost $3.01.
Specifications:
Color Red Material Fiberglass Module Properties non-isolated step-down module (buck) Rectification Asynchronous Input Voltage DC 4.5 ~ 35V Output Voltage 1.25 ~ 30V (adjustable or fixed) Rated Current 2A Output Current 3A Conversion Efficiency 92% (max) (higher efficiency with higher voltage difference) Switching Frequency 150KHZ Minimum Dropout Voltage 2V Operating Temperature Industrial (-40 ~ 85 'C) (output power <20W) Full Load Temperature -40 ℃ Voltage Regulation + / - 0.5% Load Regulation + / - 0.5% Dynamic Response Speed 200us 5% Output Ripple Input 12V, output 5V 2A 100MV (max), 20M Bandwidth Package Includes 1 x Module
The total cost of all components was: $19.27 + $23.08 + $7.34 + $3.01 = $52.70.
The order was sent on February 21, and on March 20 I received the package at my post office.
And here are the heroes of today's review:
Realizing that the review would not be complete without a fully assembled and operational video surveillance system, I did not publish the review until it was completely ready. But let's talk about everything in order:
Here are all the 4 components sent for assembling the video surveillance system:
We add to the pile everything that is required for preliminary assembly and testing:
Now let's look at each component of the system in more detail:
Monitor.
The 4.3-inch monitor is equipped with a removable plastic visor that protects it from sunlight, since on the store’s website it is positioned as a car monitor:
At the back, the monitor is equipped with an adjustable stand that allows you to select the vertical angle of the monitor. The base of the stand has double-sided tape for fastening to the surface to be installed. There are also three buttons on the back of the monitor. The middle button brings up the menu. And there is only one menu - “Brightness”. The top and bottom buttons perform the + and – functions in this menu.
Now let's move on to the monitor connectors:
As you can see, everything is standard. Two “tulips” (RCA) and a power connector. Two tulips because this monitor has two video inputs. For example, you supply a signal from the radio to the second video input in your car, and the signal from the rear view camera to the first. First entry has priority. That is, when you engage reverse, the camera turns on and the image on the monitor instantly switches to it, while turning off the signal from the radio. The function for this application is very useful, but completely unusable on my system.
So, the monitor will turn on only when a video signal reaches it, and it does not matter from which input. Therefore, simply by turning on power to the monitor, we will not see any signs of its life. This point must be taken into account. The monitor comes with a power cord and connector.
Well, here are the instructions that come with the monitor:
Go ahead. And next we have a video camera
– peephole with a viewing angle of 92 degrees:
Camera Connectors:
On the camera cord there is a 4-pin S-Video connector, which, in fact, is not S-Video. Only the form. 2 pins are used for video output and 2 pins for power supply. An extension cord is included with the camera. At one end there is an “S-Video” connector for connecting to the camera, and at the other there is a standard “tulip” (RCA) for connecting to a monitor and a connector for powering the camera.
Let's take a closer look at the camera. The camera has a metal body:
The protective glass of the camera is unscrewed, allowing you to install a peephole in the door hole, as well as remove the metal spacer:
The peephole has an adjustable length, which allows it to be installed on a door with a fairly wide range of thicknesses. From 6 centimeters:
Up to 3.7 centimeters. And if you use the metal spacer described above, then up to 3 centimeters, since the spacer is 7 millimeters wide:
The diameter of the peephole, and therefore the required hole in the door, is 18 millimeters:
A passport is attached to the video eye:
Now let's look at the power supply
:
The power supply is made of very high quality, the case is free of defects, and does not heat up when working as part of the system. When turned on, the green LED on the case lights up. The cords are long and elastic. True, there is a Chinese plug on the power cord, which requires replacement or an adapter. I just had an adapter in stock, purchased at one time for 1 cent at a sale at the Tmart store. )
On the underside of the power supply there is a factory marking:
Now let's move on to the last component of the video surveillance system, namely the adjustable DC-DC voltage converter
made on the popular LM2596 chip:
Reverse side of the board:
A typical circuit for connecting the LM2596 as a step-down converter: a powerful bipolar switch is located inside, all that remains is to add the remaining components of the regulator - a fast diode, an inductance and an output capacitor, it is also possible to install an input capacitor - a total of 5 parts in total.
Internal structure of the LM2596 chip:
Chip characteristics:
Input voltage - from 2.4 to 40 volts (up to 60 volts in the HV version) Output voltage - fixed or adjustable (from 1.2 to 37 volts) Output current - up to 3 amperes (with good cooling - up to 4.5A) Conversion frequency - 150 kHz Housing - TO220-5 (through-hole mounting) or D2PAK-5 (surface mounting) Efficiency - 70-75% at low voltages, up to 95% at high voltages
You may ask, why is this needed for a video surveillance system? But why. At 12 volts, on devices that are switched on continuously, heating occurs, which can, for example, lead to a deterioration in the quality of the camera due to thermal expansion, and the camera starts working stably at 8 volts, as indicated in the description. Therefore, it is better to reduce the supply voltage a little.
Now let's move on to probably the most interesting part. For assembly and testing.
We turn on the power supply without load to the network and see what we have. And we have a voltage of 12.18V.
It will be too much! ) Therefore, we take side cutters and mercilessly bite off the cable in the middle.
Do not forget to first disconnect the power supply from the network.
It would also be a good idea to mark the plus on the cable:
Now we solder the output from the power supply to the input of the converter, and the bitten off piece of cable with a plug and the cable supplied with the monitor to the output. We connect the multimeter, adjust it a little and here is the result, 10.02V at idle. With the system connected there will be approximately 9.5V:
We insert the power connectors into the monitor and into the camera and here it is:
Let's try to look out the window:
Clock on the wall:
And here is the only on-screen menu in the monitor that I mentioned above:
Let's check the consumption of the resulting design:
The voltage in my house is always too high:
Well, now it’s time to install the video surveillance system in its rightful place, namely on the front door.
Everyone will decide for themselves how to do it better. I had to face several difficulties. Firstly, there was no outlet anywhere near the door, we had to buy an outlet, cable channels and make changes to the wiring. When this problem was solved, another one arose. The old peephole had a wider eyepiece than the video peephole, but was only 10mm thick. I had to go to the store again and buy an 18 mm Lewis drill, since there was already a hole in the door, which meant that a feather drill for wood was no longer needed. And the problem of a smaller eyepiece was solved by purchasing a metal washer with an internal diameter of 18 mm. To reduce drilling and smashing, I glued all the cable channels, as well as the power supply to the wall, using liquid nails. Since I was mounting the monitor on a vertical wall, and not on the dashboard of a car, I didn’t dare to stick it with tape. A hole was drilled in the base of the stand and the monitor was screwed to the wall with a self-tapping screw. And, naturally, an additional RCA-RCA cord was used to connect the monitor to the camera. The distance turned out to be quite large.
Installed video surveillance system:
At the end of the review, it remains to say that I am very pleased with the resulting design. The picture quality is even better than I expected to see. I was prepared for the worst. I'm glad it turned out the other way around.
The product for review was provided free of charge by Tmart, for which many thanks to them!
And also many thanks to those who were able to read this review to the end. 
Now my future plans are to equip this video surveillance system with a video recorder so that I can know who tried to ring the doorbell in my absence, and in terms of security, this is very good.
With that, I’ll bow out, until new reviews! Peace and goodness to everyone!
Return of the player
Turntable Amplifier
Do you have an old turntable and a dusty record collection that you haven't digitized but don't want to throw away? If so, put it back into service even if your stereo doesn't have a dedicated Phono input.
All you need is a Phono amplifier that converts the Phono signal into an acceptable line level signal and connects it to any input on your Hi-Fi system using a cinch cable. A good choice, for example, would be the Hama PA 506 model (about 5,000 rubles on eBay) in a solid metal case.
Labor intensity: average; costs: 5000 rub.
Tripod for the camera
There are times when, when shooting video or photography, it becomes necessary to fix the camera to prevent vibrations and shaking. But you don’t always have a tripod at hand, and many amateur photographers don’t buy one because they rarely use it.
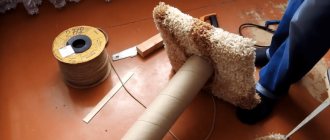
From a plastic bottle
This is an elementary option for making a tripod for a camera. You will need a plastic bottle, a bolt, a nut and 2 washers.
Important! The thread on the bolt must be inch. Typically, the thread on a camera for a tripod is 1/4 or 3/8 inch. Do not screw a bolt with a metric thread into the camera, as this can damage the tripod mount.
Drill or burn a hole in the cover for the bolt. Next, put a washer on the bolt, insert it into the hole made, put another washer on and tighten the nut.
To ensure stability of the entire structure, fill a bottle with water (you can add sand), screw the bolt into the camera and screw the lid with the attached device to the bottle.
You will have a primitive tripod made in 10 minutes. The disadvantage of this device is that the camera can only be rotated in a horizontal plane; you cannot raise or lower the camera.
A more “advanced” tripod from a plastic bottle is made in the following way.
- Prepare a plastic bottle, a glue gun, a nail, a block of wood and an inch threaded bolt.
- It is necessary to make a cut in the neck of the bottle, for example, with a grinder. You can also burn the grooves with a hot nail, as shown in the next photo.
- Next, clamp the nail in a vice and bend it into a “P” shape.
- Make a small block of wood and drill a through hole in its center slightly larger than the diameter of the bolt.
- On the other side of the block, drill 2 blind holes to insert a bent nail into them.
- Add a little glue to the side holes and insert the U-shaped piece into them.
- When the glue has hardened, insert a bolt into the central hole and attach the block to the camera.
- Next, insert the U-shaped piece into the cut grooves on the neck of the bottle and screw on the cap.
- If you tighten the plug more firmly, the camera will be held at any angle.
Advice! For larger cameras, you can use the top of a 5 liter plastic bottle.
Razor stand
To make this simple tripod with your own hands, you will need 3 identical razors (possibly with floating heads), a wooden block and a bolt with a suitable thread. First you need to make a small triangle from wood or thick plywood, then drill a hole in its center and insert a bolt into it, as shown in the photo below.
Next, you need to glue the machines to this triangle using a glue gun. If it is not there, then the razors can be fastened with small screws.
When the tripod is ready, install the camera on it.
Made from aluminum tubes
You can make your own camera tripod from a small piece of board, metal rods or aluminum tubes. The length of the tubes can be arbitrary, depending on how tall you need the tripod.
It is made in the following way.
- Draw two circles on the board, divide them into 3 parts and make markings similar to those shown in the following figure.
- Attach a narrow board to the marking and draw a rectangle opposite it, slightly wider than the last one. Measure down a few centimeters (depending on the overall dimensions of the tripod) and draw another line. This will be the length of the part.
- Cut out all the parts and sand them. Next, drill side holes in the narrow planks and in the protruding parts of the base, and then connect all the elements with bolts, as shown in the following photo.
- Trim the aluminum tubes to the same length. At their ends you can put rubber tips from a rubber hose or heat shrink tube.
- Drill holes in the tubes and screw them to the movable wooden parts of the base.
- Next, cut out a strip from an aluminum plate (3 x 6 cm) and bend it in the shape of the letter “U”. Drill one hole in the center of the plate and 2 holes along its edges, then insert the previously prepared bolts into them.
- Drill a hole in the center of the wooden base and secure the previously made tripod element.
Inexpensive solution for macro photography
Macro
Photography Macro lenses allow small objects to "become" large - this can help you realize great photography projects. But even without using macro optics, you can get close-up shots. All you need is a so-called macro ring for your DSLR or system camera.
This adapter is mounted on the camera mount, and any lens is mounted on the adapter. The shorter the focal length, the larger the image scale becomes. Rings with electronic contacts (from 4,500 rubles) are more comfortable to use and allow automatic exposure metering and autofocus. With cheaper rings, setting these parameters is only possible in manual mode.
Labor intensity: average; costs: 4500 rub.
What can you use a homemade thermal imager for?
Any living or nonliving objects with a surface temperature above zero emit heat. It is impossible to distinguish it with the naked eye, since we are talking about a glow in the infrared range. But a special device, a thermal imager, allows you to see such radiation. It provides a color image where warm objects are highlighted in colors ranging from purple to red depending on the specific temperature.
The cost of professional thermal imagers is quite high, but you can make a useful device yourself from old equipment, for example, from a digital camera.
Important! The device will be less functional than a purchased one, but it will cope with the main task.
A thermal imager can be useful for several purposes.
- Control of heat leaks. Using the device, you can evaluate the quality of thermal insulation and find out exactly where sudden temperature changes are observed.
- Diagnosis of energy leakage. A thermal imager will help identify weak points in electrical appliances and understand where excessive heating of conductors occurs due to poor contact.
- Night vision. A thermal imager from an old camera can be very useful on a dark street or in the forest to help detect people and warm objects.
Infrared spectrum devices are also used in mechanical engineering, metallurgy, medicine and rescue operations. But here we are talking about professional devices with a high level of reliability and advanced functionality.
Using third party lenses
Continued use of lenses
Even the most committed photographers sometimes change the platform and switch, for example, from Nikon to Canon. However, what to do with lenses in this case? Of course, use it, but in a new way!
Specialized stores today offer adapters that, for example, allow the operation of old Nikkor optics on a Canon-EF mount. This is a particularly practical and balanced solution when using expensive lenses.
Labor intensity: average, costs: 800 rubles.
Thermal imager from a camera
A thermal imager is a rather complex device capable of detecting infrared radiation emitted by surrounding objects at a distance. This device is mainly used for repair and rescue activities, and it is also used by professional hunters to search for prey. A thermal imager is similar in design to a digital camera.
Despite its similarity to a digital camera, it cannot be used to make a full-fledged thermal imager. On the Internet you can find many tips on how to make a thermal imager from a camera. For example, it is advised to remove the infrared filter from the matrix, after which the device will supposedly begin to detect thermal radiation. But in practice, you won’t get anything other than breaking your digital device. This video shows what happens if you remove the filter from the camera sensor.
Assembling a 3D camera from two cameras
3D camera at home
Even novice photographers can use 3D technology with a little work with their hands. If you already have a used camera that is still functional, you will need another identical copy to complete this project.
The eBay platform may be a good place to find it. Attach both cameras to one bar so that the distance between the lenses is about 6 cm. To fire the cameras simultaneously, use the IR remote control; when shooting stationary objects, press the shutter buttons one by one. For image processing, we recommend using the StereoPhoto Maker tool.
Labor intensity: high, costs: 4000 rubles.
Photo: manufacturing companies
What can you do with one camera?
Old USSR cameras are famous for their special quality. Even today they are suitable. Or rather, not the cameras themselves, but their optics. Unlike modern Chinese lenses, they are made of glass with special grinding.
For example, you have an old Smena or Zenit camera, as well as an unnecessary matrix or webcam. At first glance, incompatible things from different eras can work in pairs. The main task of this process is to install the matrix at the place where the film passed. With a little patience, the result is a digital camera with a good lens.
Reference! Instead of gathering dust on distant shelves, old things get new life and benefit their owner. And this is the most important thing.
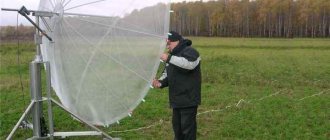
Every person at least once in his life dreamed of becoming closer to the stars. For this purpose the telescope was invented. Using the camera you can take beautiful and entertaining pictures. How to make a telescope with your own hands? In this case, photographic lenses are needed. To create a homemade telescope, old cameras will do; all that matters is the presence of lenses. For assembly you will need:
- Spectacle lens 1 diopter, diameter 30mm;
- Old camera lens;
- Sheet of paper or Whatman paper:
- Black mascara.
First you need to paint over a sheet of paper. After drying, roll the painted side inward so that the spectacle lens fits into it. The length of such a pipe is 90 cm. The second sheet is used for the lens – 40 cm. Maintaining the alignment of both parts of the telescope, the second pipe is placed inside the first.
Why a homemade hidden camera can be useful
- To monitor children;
- To ensure the security of the entrance door to a house or apartment;
- To monitor and protect the space under the windows;
- For additional protection of expensive property, use a camera aimed at safes, computers, other expensive equipment or jewelry stored in the house.
How to make a hidden video camera from a broken laptop
One of the good ways to do video surveillance yourself is to use a web camera from a laptop. This is one of the smallest cameras used in improvised equipment. It is slightly smaller in size than a regular lighter in length, and three times thinner in width. Such cameras can be pulled out of a broken laptop that cannot be repaired.
The camera must be removed carefully through the body, trying not to damage the mechanism itself and the wires going to it.
You can set up a camera from a laptop and connect it through its wires. Of the many wires that connect the camera to the computer, you need to use 4, which are responsible for transmitting the image. Each of the cameras has its own wire colors, they are determined by the laptop manufacturer, each of which uses unique color designations.
What else do you need besides a camera?
One camera pulled out of a laptop will, of course, not be enough. It is also necessary to obtain tools that will help you remove the camera from the laptop, and in addition, those that will be needed to connect the camera to the USB so that this device can be used again. In addition, you will need the USB cable itself.