While sorting it out in the garage, I discovered a large number of old files. Having restored them with citric acid, I encountered a slight difficulty. Where can you get so many tool handles and how to make a reliable handle for a file?
A solution was found, which I want to share with you.
How to make a rivet from a nail? | The cheapest way to bring a broken knife back to life?
Now everything is correct - you can use it
How and from what to make a handle for a file is not a question - there are always scraps of a wooden block or a handle from an old mop. The main difficulty is where to find crimp rings for the handle, without which the handle will not last long - if it does not crack when inserting a file, it will certainly break a little later.
Thin-walled metal tubes are used for this purpose, but I didn’t have them in stock. But empty plastic bottles caught my eye. The idea immediately formed - to use their necks as pressure rings.
How to restore a screwdriver bit: an easy way
Step-by-step instruction
Handle, file and bottle
For work you will need:
- mop handle - it is quite thin, and therefore fits comfortably in the hand
- plastic bottles with a narrow neck - future rings
- universal glue - can be used on wood, or without it
From the tool:
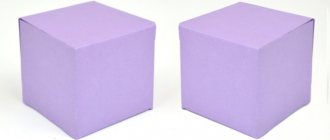
Step No. 1 - make crimp rings
Sawing off the neck of the bottle
1
We fix the bottle in a vice.
2
Using a hacksaw, cut off the upper part of the neck of the bottle. The material is very durable, and therefore the handle will be reliably protected from the formation of cracks in it.
Handle preparation
1
We apply the sawn-off neck to the end of the wooden workpiece and make markings of the required diameter.
2
Using a knife, we cut off the end of the wooden blank along the outlined markings - this is necessary for control in the next step.
3
Using sandpaper, we select a seat for the crimp ring in the wooden blank - in order not to grind off excess, we focus on the hewn end. You need to sharpen it a little with a cone.
4
If you don’t have emery, you can make shallow cuts at the end of a wooden piece, to the distance of the width of the seat ring. Then remove the excess from the end with a knife or chisel and clean it with a file.
Crimp ring in place
After fitting, we place the ring on a wooden handle.
1
We treat the seat with glue.
2
We attach the ring to the handle.
3
We drive the ring into place.
The ring should fit into the handle with force, but if it settles easily, then it’s okay. The glue provides additional fixation, and, in addition, when the file is installed, it will somewhat wedge the structure.
Step No. 4 – install the handle on the file
Baiting the file
1
We drill a hole in the end of the handle - the diameter should correspond to the size of the tip of the file shank.
2
To securely fix the tool, pour glue into the hole - optional.
3
We attach the handle to the file.
Almost done.
Step No. 5 - final fixation of the tool
Only this way and nothing more
1
Many people do this step incorrectly - some fix the files by hitting the work blade from above with a hammer; others, holding the handle, are driven with a blow to the table. In the first case, the tool deteriorates - the metal breaks off, and in the second, they cause serious injury to themselves: upon impact, the file can slip out of the handle and the hand strike falls on the sharp part of the shank.
2
This is done correctly as shown in the figure above: a) and b) – seating the file, c) – removing the handle.
10 Total Score
Feedback from our readers is very important to us. Leave your rating in x with the reasoning for your choice. Your opinion will be useful to other users.
The right approach to choosing a hacksaw
Works in which hacksaws are used are divided into carpentry and joinery. In carpentry, accuracy is more important, while in carpentry, speed is more important.
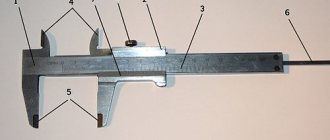
First of all, you should pay attention to the quality of the metal of the blade; to do this, we take the hacksaw in our hands and bend it 30-45 degrees. This must be done as carefully as possible, since low-quality metal is very easy to break.
After carrying out this operation, let's look at the bend; if a slight deviation appears there, then the metal of this product is of very low quality.
Beautiful handles for files with your own hands
- no
- no
- no
- no
- no
- no
- no
- no
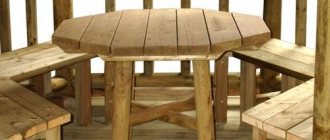
Handles for files and chisels can be inexpensively purchased ready-made in a store or market. Attach the file and you're done! But why not make them yourself? If desired, even from ordinary logs you can make very beautiful handles for files.
To make simple wooden handles truly original, you will need epoxy resin with a hardener. Thanks to the combination of natural wood and epoxy, a stunning visual effect is obtained.
Main stages of work
First, we cut a log of suitable length into small pieces, from which we will then make original handles for files. This operation can be performed on a circular saw or band saw.
Converting a grinding attachment for a drill into a grinder
Next, we drill holes in the wooden blanks for the file shank, after which we cut out two triangular wedges on one side (in different planes). We make “formwork” from plastic lining or other materials.
Mix epoxy resin with hardener, add dye and fill the wooden blocks. After the epoxy has hardened, we disassemble the disposable “formwork”. Then we process the handles on a belt sander, giving it a round shape.
At the next stage, we process the workpieces on a lathe. We make crimp rings for them from copper or brass. Then we place the finished handles on the files. The result was truly amazing.
How to make a sharp miniature shell knife
For a detailed process of making beautiful wooden file handles, watch the video on the website.
Currently reading:
Top
Narrow hacksaw
A small narrow hand saw, consisting of a straight thin blade and a handle. It mainly serves for various thin. Most often, it has a blade with triangular double-sided teeth.
One of the main disadvantages of this type of hacksaw is the possibility of deflection during your work with a wooden product.
What types of file handles are there?
The file handle is an important component that affects the ease of use of the tool and its functionality. Wooden and plastic models for needle files are considered traditional, but there are also rubberized versions, as well as those made from other materials. It will be useful for every novice craftsman to learn how to make and attach a handle for a file from a pipe or an old screwdriver with your own hands.
The handle for a file or for a needle file must meet certain parameters. Strength and hardness, resistance to mechanical abrasion and stress are important for it. Products made from several materials fully possess all these qualities.
- Made of wood. This is the most common version of handles, made from hardwood material. The wooden handle is durable and can be customized to suit your specifications. Usually birch is the main raw material, but maple, walnut, sea buckthorn, linden or ash can be used.
- Made of plastic. The plastic handle is vulnerable to operation at low and high atmospheric temperatures. It is molded with a ribbed surface that improves the contact of the palm with the polymer base. Plastic handles are typical for lightweight files.
- Made from composite materials. The most commonly used option is one in which a plastic base is combined with a rubberized surface, which improves the grip and reduces the sliding of the tool in the palm. This is the best option for small and medium-sized files, as well as for large ones with a flat working surface. The composite handle provides comfort when working in any operating conditions.
When making a file handle yourself, more exotic materials are also used. For example, pieces of metal pipe, lead bars, pressed paper waste.
When choosing non-standard solutions, it is worth considering their strength and functionality. Not all handicraft pens are comfortable and durable.
There are several types of file handles. Most often they are made in the form of simple cylinders, with a rounded end on one side and a collet on the other.
For thin and light sharpening-type files, more ergonomic pear-shaped handles are used, tapering towards the working part of the tool.
Flat versions are used with pointed and blunt-nosed instruments of the same shape.
The standard dimensional parameters of the handle are selected individually, taking into account the width of the master’s palm. It is important that the length of this element is at least 1/4 of the working surface. Otherwise, holding the instrument will simply be uncomfortable. The usual length ranges from 80 to 160 mm, but there are options of 200 mm in combination with a particularly large-format file.
According to the mounting method, there are variants of handles for files with a collet clamp or ring and solid-cast ones , into which the base of the tool is fused under production conditions. The second option is typical for plastic and composite products.
In addition, universal quick-release versions with a conical shank are available. They easily adapt to the desired size.
Homemade handles for files often do not require the creation of even a primitive drawing. The work takes a minimum of time; you can use any available materials as a base.
For example, there are homemade handles that craftsmen were able to make from a pipe or a plastic bottle.
Some options that deserve special attention are worth considering in more detail.
Such options can most often be found in sets, where miniature inserts with different widths and types of tips are placed in a larger handle. Over time, the edges of the base are erased, the contact abilities of the accessory deteriorate, but it may well serve as an attachment for other tools.
To adapt to the new base, you just need to fill the handle cavity with hot hot melt adhesive, while simultaneously heating the file shank using a hair dryer.
After this, all that remains is to combine the parts and wait until the hot-melt glue sets. If necessary, it can be added directly during the filing process.
To make a simple handle for a file from scrap materials, you need to take a piece of handle 80-160 mm long, plastic bottles with a narrow neck, carpenter's or universal glue. The operating procedure includes several points.
- Making a ring. The neck of the bottle is fixed with a vice and sawed off at the top with a hacksaw. The resulting element will act as a crimp ring.
- Preparing the cuttings. It is cut to the specified length and fitted to the crimp ring. Part of the wood is removed from the surface to make the plastic part fit more tightly, then it is sharpened with sandpaper so that it acquires a slightly cone-shaped shape.
- Fitting the ferrule onto the handle. It is made using glue. It is important that the ring fits tightly enough even without additional clamps.
- Installing the handle on the file. A hole is drilled at the end of the auxiliary element to match the diameter of the tool shank. You can pour a little glue inside before the nozzle. After this, the handle will easily sit on the file.
This is a simple solution suitable for most types of files, from miniature files to large format models.
When you don’t have a wooden block or other more conventional materials at hand, you can even use a piece of plastic pipe. It is best to use polypropylene options. The section is fixed horizontally in the frame. On one side, a shank is inserted into the hole, on the other, molten plastic or hot glue is poured.
After the composition has hardened, you can drill a hole in the handle for hanging storage.
Fitting a file onto the handle correctly is a difficult task for a beginner. It is important to ensure that every stage of this process follows all the rules.
- Preparing the hole. It is burned or drilled into the base of the handle. To prevent cracking of the material, a metal ring is first put on it. The depth of the hole must correspond to the length of the shank.
- Pre-installation. At this stage, the elements are fitted to each other. The shank is placed in the prepared hole.
- Nozzle. You need to take the file by its working part with your right hand, and then lightly hit the outer end of the handle on the workbench. You can also rest the tool with its working edge on a hard surface. After this, a hammer strikes the handle, completing the mounting process.
It is important to remember that accessories and auxiliary components for files are rarely made reusable. Experienced craftsmen prefer to make their own handle for each tool, since when changing the base it is impossible to ensure a sufficiently tight fit.
You can learn more about the process in the following video.
Classic saw
A simple hacksaw is, of course, equipped with a completely different types of teeth, as well as different blades that can be changed.
DIY file handle, manufacturing technology
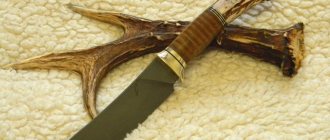
Many home craftsmen are from time to time interested in the question of how to make a beautiful and comfortable wooden handle for the file they are using.
First of all, it is worth noting that it is better to take as a basis such types of wood as patterned walnut, and suvel maple is also suitable.
These are quite durable materials that have an attractive texture, high strength ratings, and they also contrast optimally.
In addition to properly selected wood, you will need to prepare materials such as plastic and brass. To connect parts, it is better to use special epoxy glue. There is no need to prepare the file itself, since the work is carried out with a tool already used in the work. When deciding how to make a handle out of wood, a file may only be needed during the final work.
Preparatory processes
If the prepared blanks are made of walnut or maple, then the wooden handle for them is cut out using a hacksaw. You can also use a regular jigsaw or a small circular saw, which is equipped with a special planing disc. These tools give the most even cut, which will greatly facilitate all subsequent processing.
Important! During the sawing process, it is important to choose the correct angle in relation to the wood fibers. This will help to get a beautiful texture on the cut.
All resulting workpieces are carefully sanded using a special sanding grid or using sandpaper.
When carrying out this process, special attention should be paid to the careful adjustment of two wooden blanks relative to each other. This is not a wooden shovel, where the handle is made from one single piece.
They should fit very evenly to each other, without forming any gaps. If the edges are a little loosely connected, this is not a problem, since everything can be cut off during subsequent processing.
Drawing of a handle for a file.
After this, take a blade with a bolster previously put on it, place the shank on a piece of wood and outline everything with a pencil. Then, using a regular square, the markings are transferred to the ends of the finished parts, and you get a finished handle for a wooden file or a faucet for a bathhouse.
Once the hole for the shank is completely marked, the drilling process can begin. To do this, you will first have to measure the thickness of the shank and select a drill of exactly the same diameter.
When carrying out work at home, it is better to carry out the drilling process using an electric drill, having previously clamped the prepared workpieces in a special vice.
Thanks to these actions, you can get two parallel holes, between which a thin partition is formed.
It can be removed using a file or a special tool - a needle file, which. When carrying out this process, you will need to carefully check the degree of relationship between the axes. For this purpose, you will need to put the blanks on the shank several times and grind them from the desired sides.
Assembly of the structure
The next step is to prepare a package of all the necessary parts.
Their sequence should be as follows:
- File;
- Suvel;
- Brass;
- Tree.
When assembling such a structure, it is important not to forget that special gaskets made of plastic are placed in each connection; the same applies to such a device as a bath faucet.
Important! All parts of the handle must fit very tightly and without gaps to each other. This is important, as it affects the overall quality of the gluing performed and the future aesthetic appeal of the resulting product.
Glue works
When gluing the main structural elements, it is recommended to use your own epoxy adhesive. Mixing it is carried out on the basis of the instructions, and to give an attractive color tint to the composition, you can add a small amount of black toner, which is used for ordinary cartridges, to the glue. There are several rules for gluing a future structure:
All parts necessary for gluing must be prepared in advance, since the prepared glue can be used for no more than an hour.
Each part must first be thoroughly degreased. For this purpose, you can wipe it with ethyl alcohol.
In the process of coating workpieces with glue, it is important to ensure that it penetrates well into the hole of the workpiece made of wood.
After processing the parts with an adhesive composition, the set is firmly clamped in a pre-prepared vice and remains there until the glue dries completely. As a rule, this takes a day, and the end of the drying process can be judged by the hardened drops of glue. If this is a bath tap, more time is needed. After this, all planes are carefully leveled using a file.
Final actions
The glued handle must be carefully ground to give it the required shape and neat appearance. This is a fairly responsible and lengthy process that requires patience and perseverance. For this purpose, you can use a hacksaw for wood, if the shape is as close as possible to the correct one, or a hacksaw for metal, if the layer of materials intended for erasing is large enough.
The final shape is achieved using a file or simple sandpaper. The finished file handle is impregnated several times with pure mineral-based oil and then the product is covered with a layer of carnauba wax. Treatment with this composition is necessary for the reason that it protects the craftsman from receiving wounds in the form of splinters, for example, if it is a bath faucet.
This technology is universal; it can be used if a wooden shovel, sledgehammer holder or other product with a wooden handle is required.
A wooden handle made by yourself can be made as quickly and simply as possible if you follow the instructions presented and tips for implementation.
The result is a product that will make working with a file convenient and very comfortable; it will be possible to make any desired product from different types of wood - a handle for a sledgehammer or a faucet for a bathhouse.
Video: technology for making a file handle
Bow saws
This is a heavy-duty hacksaw. The main advantage of working with this type is the ability to work with the product you need from absolutely any angle. Using a bow saw, you can process the material from any side, lengthwise and crosswise, and make complex workpieces alone.
A small hacksaw is perfect for small jobs in the garden; it is not recommended to use it when sawing large materials.
Types and sizes
There are several types of file handles. Most often they are made in the form of simple cylinders, with a rounded end on one side and a collet on the other. For thin and light sharpening-type files, more ergonomic pear-shaped handles are used, tapering towards the working part of the tool. Flat versions are used with pointed and blunt-nosed instruments of the same shape.
The standard dimensional parameters of the handle are selected individually, taking into account the width of the master’s palm. It is important that the length of this element is at least 1/4 of the working surface. Otherwise, holding the instrument will simply be uncomfortable. The usual length ranges from 80 to 160 mm, but there are options of 200 mm in combination with a particularly large-format file.
According to the mounting method, there are variants of handles for files with a collet clamp or ring and solid-cast ones , into which the base of the tool is fused under production conditions. The second option is typical for plastic and composite products.
How to plant it correctly?
Fitting a file onto the handle correctly is a difficult task for a beginner. It is important to ensure that every stage of this process follows all the rules.
- Preparing the hole. It is burned or drilled into the base of the handle. To prevent cracking of the material, a metal ring is first put on it. The depth of the hole must correspond to the length of the shank.
- Pre-installation. At this stage, the elements are fitted to each other. The shank is placed in the prepared hole.
- Nozzle. You need to take the file by its working part with your right hand, and then lightly hit the outer end of the handle on the workbench. You can also rest the tool with its working edge on a hard surface. After this, a hammer strikes the handle, completing the mounting process.
It is important to remember that accessories and auxiliary components for files are rarely made reusable. Experienced craftsmen prefer to make their own handle for each tool, since when changing the base it is impossible to ensure a sufficiently tight fit.
You can learn more about the process in the following video.
Source
Handle processing
After you have given the handle the required shape, you need to sand it with sandpaper (sand the surface).
If there are shells left, you can seal them with something: glue with soda, silicone, etc. Or you can fill the recesses with plastic by melting it using a hair dryer.
For details on how to make a plastic handle for a file with your own hands, you can watch the video below. An idea from the author of the YouTube channel “MANUAL ASSEMBLY”.
Source
Assembly of the structure
The next step is to prepare a package of all the necessary parts.
Their sequence should be as follows:
- File;
- Suvel;
- Brass;
- Tree.
When assembling such a structure, it is important not to forget that special gaskets made of plastic are placed in each connection; the same applies to such a device as a bath faucet.
Important! All parts of the handle must fit very tightly and without gaps to each other. This is important, as it affects the overall quality of the gluing performed and the future aesthetic appeal of the resulting product.
File.
Main stages of work
After this, we place the metal blank on the wooden blocks prepared in advance, and trace the outline of the product. Using a jigsaw, cut out a wooden handle.
The next step is to assemble the hacksaw using epoxy glue and pieces of reinforcement. Next, we sand the overall surface until it is comfortable to hold in the hand. Coat with mineral oil.
After this, we insert the blade into the groove and secure it with a bolt and a clamping nut. A detailed device and manufacturing can be seen in the video below.
If you set out to find a bow saw, then searching on the Internet will not lead you anywhere beyond garden saws. And for a thin sheet of 4-5 mm, you can immediately go to Ebay or Amazon, because in Russia there is definitely no such thing. A bent pipe beam is not at all what I needed.
A bow saw in its classic wooden version has much more capabilities when working correctly. These include curly cuts, cutting deep tenons, and cutting lengthwise (for example, sawing a 50 mm thick board into two 25 mm boards), if necessary, you can use blades of different lengths, changing only the size of the support bar. A bow saw is essential in the workshop even if you have a band saw as a machine tool, as there are situations where only a hand tool can do a job. The wooden bow saws that I managed to find were not to my liking for their performance... they are rough and the price is very inadequate. Therefore, as usual in such cases, I tried to do it myself. The prototype was a saw made by guys from New York under the Gramercy Tools brand. On their website there are freely available 1:1 drawings in pdf. I took the general appearance from them, and used my own dimensions, modifying the shanks. Material oak 30 mm. I cut it to spare.
I planed the width of a template that I made from cardboard.
Before cutting out the saw posts, I drilled holes for the handles and used a chisel to make a recess for the tenon of the spacer bar. All irregularities after the jigsaw were removed with a plow.
Then I used a hand plane to narrow the upper parts of the posts, having previously marked the center for reference.
At the bottom I worked with a rasp and a file in the area of the holes for the handles, and then used a plane to make a narrowing towards the bottom. It turned out like this.
Most of all I had to tinker with the handles. Since I don’t have a lathe, I got out of the situation using a jigsaw. I applied a profile to 4 sides of the block, and then sawed it off on all sides to the marking line. Use a chisel to knock down the resulting comb. I straightened the corners with a rasp. I drilled holes for the bolts before this procedure.
I covered the saw with water-based stain “like old oak” and teak oil. My bowstring is made from postal twine.
As shovok I used a furniture bolt with a diameter of 7 mm, in which I made cuts for attaching the canvas with a pin. I drilled a hole in the canvas and used stainless steel wire with a diameter of 1 mm as a pin.
The ends of the spacer (middle) were rounded, having first cut out a tenon, and at the junction at the post, a recess was made with a rasp. It turned out to be a kind of joint.
The blade I used was from a regular band saw, 6 mm wide. There are several cuttings with different tooth frequencies 4 and 6 tpi I will try. The first tests with a blade at 6 tpi showed that the blade requires regrinding because the tooth angle is too aggressive and sawing is not easy, but quite possible. At small radii the saw cuts perfectly. The cut cannot be called clean, but that may seem to some.
Woodworking masters make the handle for their own tools themselves: no matter how good the factory handle is, it is made according to the template of an average brush.
To make a pen “on your own,” you need to take a cast of your own hand on soft clay or plasticine, lightly squeezing it with your fingers. Usually the handle is made from layered plywood, but a handle made from a single piece of softwood is much better and, although soft, is as strong as plywood.
1-2-3-4-5 - WE START PLANING
First of all, prepare a planed board 1 of the required thickness, apply a handle pattern 2 on it so that its fibers are located along, and not across, the cutting blade. Cut off the excess part of the workpiece along the edge of pattern 3. From the end of the cut side, use a circular saw to make 2 cuts 4 with a depth of 4-5 cm. Insert slats 5 coated with PVA glue into them and clamp them in a vice for a day. After drying, cut the workpiece 6 along the line, make a cut 7 to the depth of the canvas. The width of the cutout does not really matter, because... Gaskets will be inserted on both sides of the canvas.
HOLD ON, CANVAS!
If the canvas does not have holes for fastening, and you plan to change it periodically, they can be replaced with longitudinal cuts 8, making them with an emery wheel.
The width of the cutouts must correspond to the fastening bolts. For permanent fixation of the blade, cuts 9 will be used. You cannot use rivets (even aluminum ones) - the wood may split. Their role will be played by bushings 10, the length of which is slightly less than the thickness of the tree, so washers 11 will be additionally needed. The bushings can be cut from a thin-walled tube or made of tin.
Cover the surface of the handle with PVA glue, and after it dries, with varnish. To prevent the handle from becoming “speckled,” before using colored varnish, cover it with 1-2 layers of tsapon varnish.
Yusup Gelazov Based on materials from the Toloka newspaper. We do it ourselves"
- This simple, stylish and durable connection can enhance any frame, from cabinet fronts to photo frames. Some connections are made by machines, others by hand. Combine both
- An old door handle can fail for two reasons. The quadrangular rod passing through the door is worn out, or the sockets placed on the rod do not hold firmly. In both cases
Many home craftsmen are from time to time interested in the question of how to make a beautiful and comfortable wooden handle for the file they are using. First of all, it is worth noting that it is better to take as a basis such types of wood as patterned walnut, and suvel maple is also suitable. These are quite durable materials that have an attractive texture, high strength ratings, and they also contrast optimally.
File handle
In addition to properly selected wood, you will need to prepare materials such as plastic and brass. To connect parts, it is better to use special epoxy glue. There is no need to prepare the file itself, since the work is carried out with a tool already used in the work. When deciding how to make a handle out of wood, a file may only be needed during the final work.
Final actions
The glued handle must be carefully ground to give it the required shape and neat appearance. This is a fairly responsible and lengthy process that requires patience and perseverance. For this purpose, you can use a hacksaw for wood, if the shape is as close as possible to the correct one, or a hacksaw for metal, if the layer of materials intended for erasing is large enough.
The final shape is achieved using a file or simple sandpaper. The finished file handle is impregnated several times with pure mineral-based oil and then the product is covered with a layer of carnauba wax. Treatment with this composition is necessary for the reason that it protects the craftsman from receiving wounds in the form of splinters, for example, if it is a bath faucet.
Preparatory processes
If the prepared blanks are made of walnut or maple, then the wooden handle for them is cut out using a hacksaw. You can also use a regular jigsaw or a small circular saw, which is equipped with a special planing disc. These tools give the most even cut, which will greatly facilitate all subsequent processing.
Important! During the sawing process, it is important to choose the correct angle in relation to the wood fibers. This will help to get a beautiful texture on the cut.
All resulting workpieces are carefully sanded using a special sanding grid or using sandpaper. When carrying out this process, special attention should be paid to the careful adjustment of two wooden blanks relative to each other. This is not a wooden shovel, where the handle is made from one single piece. They should fit very evenly to each other, without forming any gaps. If the edges are a little loosely connected, this is not a problem, since everything can be cut off during subsequent processing.