New Year's crafts from plastic spoons
When the New Year's mood is clearly expressed in the house and you want to fill the whole house with holiday, release your energy while spending pleasant time with your little family members by making wonderful Christmas trees from disposable spoons.
This is one of the simplest products; you will need plastic tools, a paper cone, special strength glue, and watercolors. We cut the devices, leaving only the oval parts.
We glue the frame, placing rows on top of each other. At this stage, everything is ready and, if desired, you can decorate the Christmas tree in any shade. The toy is suitable for a school project or home decoration.
Snowflake
An ordinary snowflake will become a New Year's toy made from disposable spoons, which will decorate the apartment and give it a winter atmosphere. To make such a craft from disposable spoons you will need: a rosette core, a specially strong adhesive, scissors, and a small circle of cardboard.
We cut off the ends of six scoops, place them on a cardboard circle, and glue them together. We take three ladle, cut off everything except the oval component, connect them with the already glued devices.
Glue the core into the center. If possible, decorate with snowflake stickers. Such snowflakes will look great on the New Year tree and add white shades to the apartment.
Note!
- How to properly make a birdhouse with your own hands from scrap materials: we create an original birdhouse according to sketches
- How to make candles with your own hands: instructions for making wax, gel, scented, homemade decorative candles with a wick
- What you can make from foamiran with your own hands: we create flowers, Christmas tree decorations, snowflakes, three-dimensional paintings (photo + video)
What kind of spoons are crafts made from?
To make crafts, you can take plastic and metal products of different sizes - tea, dessert, tableware.
Metal ones are left untouched or partially painted. Plastic white spoons are preferably painted with acrylic dyes. Coloring gives unlimited possibilities for composition with an unusual design.
It is necessary to take into account that the spoons can be left whole, or certain parts can be separated from them. More often they use the spoon itself, without a handle.
Decorating with plastic
With a small budget you can create a beautiful, original design in your home. It is enough to have the desire and free time. Decor made from plastic spoons includes many elements.
Of these, the following stand out: paintings, flower pots, vases, candlesticks, clocks, decorative roses, signs with plant names, garlands and much more.
The most uncomplicated of the many products are: a lamp in the shape of a pineapple, a frame for a mirror, a candlestick.
Watch master class online: Recycling 2! (Water lily from disposable tableware.)
I do not claim authorship - it was taken from the Internet and made in my own way. Again, I bring to your attention the option of recycling everything that is always at hand.
- We glue a water lily from used spoons. I used a desik cap as a basis - white, spherical, durable and resistant to hot glue (the glue does not melt), so I glued the petals to it, and besides, it is light and hollow, which means it will not sink... Glue- Using a gun (or hot glue, as it is also called), we glue each spoon with its base to the cap - we already create the shape and “lushness” as desired - I wanted a very lush lily - I tried to make the spoons closer to each other and more rows.
- I cut out the leaves from green disposable plates, cut out exactly the same ones from the ceiling tiles, poked holes in them along the edge with a hot awl, tied a nylon thread around the edge for beauty and sewed them together.
- Using the same nylon thread, I sewed it to the round foam plastic base (since the glue would definitely burn through the tiles, and it’s safer to sew it with thread) and the leaves and the water lily itself in the center (at the base of the cap on which the petals were glued, I also pierced a couple of holes with an awl and simply sewed them to the foam plastic ).
- But the seaweed was made from a plastic bottle. I cut out small triangles and melted the edges over the candle.
- I simply collected the leaves on a wire with bugles - I got a very realistic seaweed at the end of which there is a tiny flower made of sequins with a beaded center.
- It was a pity to throw away the old wooden ladybug, I also planted it on a water lily - for beauty...
- Now this whole structure floats remarkably well in our mini-reservoir and is pleasing to the eye.
- And my sister has already had her eye on it, she also wants to throw one into her container as a help for frogs who jump in there and then can’t get out... So such a beautiful little thing can also be useful... :)
- OK it's all over Now! A trifle, but cute - cheap and cheerful, as they say.
Pineapple made from plastic utensils
An original piece of decoration in a child's room. It is easy to make, practical and fits into almost any room interior. To make it you will need: an oval lamp, a glue gun, spoons, yellow gouache, a knife, green cardboard, a bottle.
We cut out a cylinder from the bottle, cutting it off on both sides. We paint the devices in a yellow shade, after cutting them and leaving only the top side. We take the deep sides of the tools and attach them to the bottom row.
Glue another layer to cover the gaps between the petals. Thus, we glue the entire bottle. We make leaves from green cardboard and glue them to the base of the bottle. Finally, place the pineapple on a suitable lamp.
Pineapple lamp
Another idea for crafts made from plastic spoons is a lamp in the shape of a pineapple. To make it you will need quite a lot of spoons, it is advisable to use small products.
It is also important to choose high-quality glue that will not melt from the heat of the lamp.
Tools and materials:
- Compact oval lamp;
- About 100-150 plastic spoons (depending on the size of the lamp);
- Wide plastic bottle;
- A sharp knife, you can use a stationery knife;
- Green cardboard paper;
- Acrylic paint.
Instructions on how to make a craft lamp from spoons:
- Cut off the base and neck of the bottle. You need to get an even cylinder.
- Paint the spoons yellow. There is no need to paint the handles; they are not required in this craft, but there is no need to rush to cut them off; they make it easier to apply paint.
- Cut off the handles.
- In a circle from the bottom row, glue the spoons to the bottle with a glue gun. The spoons of each next row should slightly overlap the previous ones and be located between them.
- Cut out a sun-shaped figure from green cardboard. The figure will imitate pineapple foliage.
- Glue the cardboard blank to the top of the bottle.
- Make long leaves out of cardboard and glue them so that they point upward and bend slightly towards the outside.
- Place the resulting lampshade on a lamp of a suitable size.
As you can see in the photo of crafts made from spoons, such a lampshade can be built for almost any lamp: floor lamp, sconce, table lamp, etc.
It is not necessary to imitate the appearance of a pineapple; you can simply make a decorative ball from multi-colored spoons.
Mirror frame
This frame will refresh your old mirror and give it a new look, and most importantly, you can choose the color to your taste. To create such an element you need: plastic scoops, hot glue, scissors, spray can, cardboard.
We take measurements, transfer them to cardboard, and cut them to the desired shape. We take the power tools and cut off the main side. We connect the spoons with the cardboard with the concave side, in several rows, to add fluffiness.
When the structure is dry, paint it in the desired color. Then we glue the mirror into the center and enjoy our design move from plastic devices.
Mirror frame
Plastic spoons can be used not only to create crafts, but also to make unusual accessories and interior decor. It will be very easy to make a frame for the mirror.
You will need:
- Plastic spoons (the quantity depends on the size of the mirror);
- Several sheets of thick cardboard;
- Paints (aerosol);
- Glue;
- Scissors.
Measure the parameters of your mirror and transfer them to cardboard.
Draw a circle on cardboard and cut it out. Cut off the stems of the spoons.
Cover the entire space of the cardboard with the oval parts of the spoons (concave side up). Use spray paint to color the resulting mirror frame.
Candlestick
Another opportunity to recycle scoops would be a decorative candle stand. For such a product we will need: several oval pieces of disposable tableware, a scented candle and super glue.
We create a decoration in the form of a lotus flower, gradually gluing the spherical parts. At the end, you should definitely glue the candle itself to the center of the flower. This trinket is made quite quickly and quite simply, but at the same time it will creatively improve your life. It is recommended to use spray paint as it will go on smoothly on the frame.
Christmas tree
One of the most simple products. You will need:
- Plastic spoons (the quantity depends on the size of the tree);
- Cone made of plastic or paper;
- Glue;
- Paint (optional).
Cut off the stems of the spoons, leaving only the oval parts. Cover the cone with chessboard. At this stage, your product may be ready. But if you wish, you can paint your plastic Christmas tree any color.
Products for kindergarten
When children start going to kindergarten, parents understand that they cannot do without products. Especially for such an occasion, there are several trinkets that will delight everyone, especially adults, because they are so simple that even a child can make them.
This does not mean that the child will do them himself, but he will do most of the work himself. The main thing is to make sure that he does not eat the adhesive. In this article you will learn how to make cones, a snowman and a peacock from plastic scoops.
Tulips
The easiest way to make tulips. Especially if you are new to such experiments.
You will need:
- Plastic spoons (5 spoons for 1 product);
- Colored paper (corrugated);
- Glue, scissors;
- Green electrical tape;
- Cocktail tube.
Cut equal, even squares of colored paper. Wrap spoons in them and seal them so that they resemble tulip petals. Pre-cut the legs of the spoons.
Clamp all the spoons together to collect the flower. Secure the result with duct tape and attach a stem from a cocktail tube to the flower. Cover the stem with green electrical tape and glue colored paper leaves to it.
We recommend reading:
Crafts from isolon - a manufacturing master class, nuances of working with the material and step-by-step instructions on how to make a craft (85 photos)- Crafts from saw cuts: stylish and beautiful options for decorating the garden and interior with your own hands (130 photos)
- Crafts from toothpicks - interesting ideas, manufacturing examples and the best crafts for children (120 photos)
Even a child can do what is described. Save all children's crafts (even unsuccessful ones) from plastic spoons: over time, you will be curious to track the progress of the little inventor.
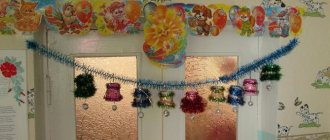
Cones from disposable spoons
It is important that the design will be suitable not only for kindergarten, but also for home comfort.
You need to find: paper, plastic scoops, glue, braid for a loop. We crumple the paper until it forms an oval shape, then attach the loop. The next step is to cut off the main side of the spoon, and row by row we completely cover the paper ball. We wait until it dries, then we paint it in a natural brown color and enjoy your child’s work.
How to make a tulip out of paper with your own hands: step-by-step diagram
A handmade paper tulip can be a wonderful souvenir or addition to a gift for any occasion. Mom or grandmother will be very happy to receive such a beautiful gift for March 8th or birthday. Try making a bouquet of tulips out of paper.
Such paper exercises will not only help you make a beautiful gift for your loved one, but will also develop children’s fine motor skills, as well as perseverance and attention. They master paper from an early age, because to make a paper tulip you don’t need scissors or glue. But in any case, you can help your child cope.
How to fold a paper tulip: diagram
To make a paper tulip, double-sided colored paper is perfect. You can create a huge bouquet of tulips of different colors and arrange them into a bouquet that will serve as an excellent decoration for the room.
Funny snowman made from devices for one time
Such a snowman will not leave anyone indifferent. First you should go through the most difficult step - sewing clothes, but here you can use your imagination and make whatever you want, starting with a hat and scarf, and ending with a complete set of clothes.
Next, you need to revive the snowman, draw a face on the round part of the scoop. After these processes, it is enough to insert it into the lid with plasticine. The spoon snowman is ready.
How to make a tulip out of paper with your own hands step by step
You will need a sheet of A4 paper.
Make a square: fold the sheet diagonally, fold the excess and tear off.
What else to read: Didactic math game for preschoolers 3-6 years old
Next, the square needs to be expanded and folded along a different diagonal.
Fold the paper and fold it in half.
You should have 8 triangles.
Follow the fold lines to make sure the lines are clear.
Turn the product over with the cross fold facing up. Fold the side triangles inward. It is necessary to navigate along the fold line. This will create a two-layer triangle.
Fold the edges up. You will end up with a diamond with parts cut out in the center.
Roll out the paper craft with the uncut part. We turn the corners so that they cover two-thirds of the figure and we get an overlap along the middle line. To do this, you need to retreat from above by 0.3-0.5 mm.
We pass the corner and the pocket of the other corner. Do this on both sides.
Give away your piece. Blow through the resulting hole, bending it to straighten it. The figurine is voluminous.
Remove the paper tulip petals.
Create a stem by twisting a long tube. Insert it into the bottom of the tulip.
Only once having tried to make a tulip out of paper with his own hands, even a child will learn how to make a second flower and more. You will not notice how you will receive a huge bouquet of paper tulips as a gift.
Step-by-step instructions: how to make a tulip from paper
For those who are good with visual explanation, you can see another description of how to make a paper tulip with photos.
Necessary materials:
- paper
- scissors
- pencil
1. Fold a paper triangle.
Cut off the extra strip, you will need it later to create the stem. But you can also make it from a piece of green paper to make it look more natural.
How to fold a paper tulip
Unfold the resulting triangle and fold it the same way, but in the other direction.
It turns out like a square with diagonal lines
Turn the resulting piece towards the center
Fold the paper in half. Fold the corner to the fold line.
We get a new triangle. Let's do the same with the second corner.
Connecting the sides of the tulip
Turn the piece upside down
Fold the wings of a piece of paper so that they meet at the corners
Turn the piece over and do the same on the other side
Turn the paper wing to the right on both sides
One wing must be hidden in the other
Do the same on your back. Don't forget to iron the folds well.
You will see how to make a three-dimensional tulip out of paper. Hold the wings with your index finger and press with your thumb
The last point that will help you create a voluminous tulip from emptiness.
There is a hole at the base that needs to be blown out or hit hard to fill the tulip with air.
Clean the tulip leaves
All that remains is to make a stem from a strip of paper
Plastic peacock
In ancient times, peacocks decorated the estates of nobles. Nowadays, it is called the royal bird. This peacock is not very easy to make, but if you make it, it will decorate your family nest.
First, paint the spoons white so that the paint lies evenly on the surface. When the dye dries, we begin to draw multi-colored patterns. While the paint layer is drying, cut out a bird carcass and an even circle from cardboard. Cut to any size, but keep in mind that the larger the size, the more raw materials required.
Color the circle yellow. The next step is to paint the cotton swabs blue, after which we paint the bird carcass. Also in blue. After drying, cut off the blue part from the cotton swabs. We glue the cotton elements to the body of the peacock until a three-dimensional surface is formed.
We assemble the head from the main parts of the instrument, paint it blue and attach it to the neck. The spoons are glued to the yellow circle, and thus we create a tail. We make a tuft of blue cotton wool and decorate it with glitter. We draw on the eyes and beak. We attach the body to the tail, and we get a beautiful bird - a peacock.
Watch design
Plastic spoons can be used to decorate a simple round clock. Such a decorative element will look great in the kitchen.
For production you will need:
- A relatively compact watch with a round shape and no protrusions on the outer part of the case;
- A4 paper;
- Compass;
- Pencil;
- 30 plastic spoons;
- Hot melt adhesive;
- Pasta in the shape of small circles;
- A can of spray paint in the desired color.
The order of decorating the watch:
- Cut a circle out of paper in the shape of a clock. To make the circle even, you will need a compass. The blank is needed to protect the dial from paint.
- Glue plastic spoons along the entire perimeter of the body. The scoops should be directed outward, and the handles should be glued.
- To decorate and separate the handles from the dial, make an inner circle of pasta.
- Cover the clock with paper and color the pasta with spoons in the desired color.
You can use more than just spoons. To make them more attractive, you can alternate them with other cutlery, for example, forks and knives.
Photos of handicrafts made from plastic utensils directly at the master class
Please repost
0
Beaded brooch Tulip: weaving master class
If you love tulips so much that it’s not enough for you to see them in a vase, then you can make a beautiful and original tulip brooch with your own hands.
This is not just a manifestation of your love for flowers, it is a very interesting accessory. Brooches are not difficult to make, but they require skill and patience.
For a beautiful brooch, you will need beads of different shapes, but you should buy only high-quality beads. After all, it must be calibrated, the same in shape and size.
Necessary materials:
- small beads with a good hole
- shiny or matte beads
- pipe
- some medium or large pearls
- half beads
- rhinestone
- decorative beads will also be used
You will also need additional material:
- had tried
- thick fabric
- discussions
- bead line
- needles
- tweezers
- hot glue
The principle of creating a beaded brooch consists of several stages:
- 1. Make a paper template with all the lines of the flower.
- 2. Transfer the pattern to felt or thick fabric.
- 3. Place the beads on the felt to create a beautiful arrangement.
- 4. Sew on one bead.
- 5. When the entire flower is embroidered, you need to create a clasp.
- 6. Cut the base from leather or other dense fabric to the shape of your tulip.
- 7. Glue the resulting tulip to the base with a hot gun and do not forget to attach the buckle.
Beaded tulip: weaving pattern with step-by-step description
For those who are already accustomed and comfortable working with beads, you can try making a voluminous tulip from beads with your own hands. In this regard, the tulip is one of the simplest beads.
The tulip is easy to assemble and does not require a large number of beads.
Necessary materials:
- Rigid wire 0.3 mm thick, two colors: pink, green
- Wire 0.8-1 mm
- large bead to the center
- Flower beads: pink or other color
- Green leaf beads
- Wire 1.8-2 mm for the rod
- Green thread for embroidery
- Glue
What else to read: Master class “Multifunctional educational panel for preschool children”
If you can't find the color you want, silver or copper will do.
Our beaded tulip consists of two petals and a center.
For this you will need 12 cm of green and 65 cm of pink thread.
Throw 10 beads onto the base.
Tip: bend the end of the thread so that the beads do not fly off
Beads can be strung on the working thread gradually or all at once. Attach the end of the wire to the base with coils. Using the French weaving technique, make a petal of 6 pairs in the form of half-arcs.
Attach each bow to the base at an angle so that the tips are in the center.
The work cable must overlap the base cable.
Use your thumb to create a convex shape as you weave. When finished, bend the top of the base wire, leaving an edge of 2-3 mm, and cut it off.
So, we make 2 petals.
Attach the large center bead to the 10-inch thread.
For strength, do 6-8 curls.
Attach the thread with this bead to the base of the petal, secure the thread and then attach the second petal. The thread must be tightly attached to the base; glue can be used to strengthen it.
Grasp the beaded flower at the bottom of your index finger and thumb. With your other hand, rotate the top while pressing down. This will create volume.
Pass the thread through the dough, you can take a thick thread by the rod and secure the thread.
To make a leaf you will need approximately 16-18 cm of thread for the warp and 85 cm of working thread.
We string 12 beads onto the base, fixing the working thread, and make 12 pairs of bows using the same technique as before.
We put a bead on the base at the top and bottom and make another set of arches.
Add the bead again and again. We get 6 rows, but do not add a bead in the seventh row.
Tip: If you add more than one bead, you will end up with longer petals.
The thread can be wrapped with floral ribbon or green thread.
Wrap, moving 2 cm away from the flower, rising higher and then lowering 6-8 cm.
Attach the leaf, then work your way down to the end of the stem, wrapping it carefully.
It can be secured with glue at the beginning and end of the tape.
Drawing cutlery
Many people love to draw, so why not depict on canvas or paper what surrounds us every day. The drawing of a fork and spoon is another option for the flight of creative thought. Pens, pencils, crayons, markers. You can take all this in your hands and depict what is part of our life, what we encounter three times a day, at breakfast, lunch and dinner.
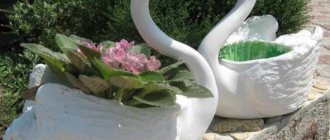
step-by-step master class with photos and videos
The water lily is a beautiful and delicate flower, and a hand-made lily from plastic spoons will serve as a wonderful decoration for your apartment. This interior detail will add a cozy atmosphere to the house. In addition, this unusual flower will be a good gift for loved ones.
Interesting idea
The process of making a water lily from plastic spoons with your own hands can be traced using the example of a master class with step-by-step photographs. In order to make such a lily, you will need about three packages of disposable plastic spoons, a plastic bottle, a glue gun and sticks for it (or Moment waterproof glue), a yellow binder, green waterproof paint, a brush, and scissors.
Take scissors and cut the sticks into the plastic spoons.
Next, heat up the glue gun. Overlapping each other, as shown in the photo, glue together two spoons using a gun (or use Moment waterproof glue).
After that, glue the third finished spoon without a leg to the previous ones. The work must be done so that the third spoon is inside. The photo shows the view from above.
In this way we glue the spoon between the already glued spoons. We continue to work, descending one by one into the lower tier of the flower.
When gluing the spoons, do not forget to form a certain opening of the lily petals.
This is the kind of water lily you get at this stage. It is quite large and voluminous.
For the next process we will need a folder. Cut a strip 5 cm wide.
We make parallel small cuts, not reaching the edge of the strip.
Now you need to twist the resulting fringe as shown in the photo.
Coat the uncut part with glue.
We insert this part into the center of the water lily, pressing it well inward.
Now take a plastic bottle and draw a leaf on it. Then cut it out.
Paint the resulting leaf with waterproof green paint.
Next, gently glue the finished flower to the leaf. You can use not just one leaf, but three!
This beautiful water lily made from disposable plastic spoons is ready.
Lily candlestick
If you want to create a cozy and romantic atmosphere in your home, just light the candles and turn on your favorite tune. This environment will help you relax after a busy day, relieve stress and tension. In this case, an important point is the candlesticks in which the aroma candles are located.
You can buy original candle stands in many stores and shops. But you can surprise your friends with an original candlestick made by yourself just as easily and simply. You just need to show a little creativity - and at minimal cost you can make a beautiful interior item with your own hands.
To make a candle holder in the shape of lilies, you will need:
- glue gun,
- white plastic spoons;
- a low glass made of thick glass;
- acrylic paints;
- small glitter (for sprinkling);
- mini candles.
Step-by-step instruction
Having prepared the necessary materials, you can begin to work.
- Paint the back of each spoon. While the paint is still wet, you can sprinkle glitter on top.
- Leave the spoons to dry. When the paint is completely dry, cut or break off the handles. Try to make breaks close to the spoon itself.
- Using a glue gun, glue the first row of spoons to the glass. Place the pieces at the top of the glass close together.
- Increase each subsequent row by several spoons and glue in a checkerboard pattern.
- After 2-3 rows of petals, change the color of the blanks.
- Finish the job by covering the entire surface of the glass.
- Place a small candle inside the candlestick.
A romantic atmosphere in the house is guaranteed!
This decoration can be used not only indoors, but also outdoors in windless weather. The fire will create a warm, spiritual atmosphere and repel annoying insects.
Lilies give peace of mind and balance. It’s not for nothing that, according to Scandinavian legend, in every lily flower there lives an elf who is able to ward off evil spells and dispel bad moods with the flutter of his wings. Give yourself the opportunity to admire marvelous flowers by making them with your own hands!
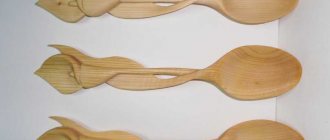
DIY spoons
To create kitchen utensils from scrap materials at home, you need to use your creativity and creativity, and there are plenty of sources. Any bottle, plastic packaging, paper can serve as the basis for a future product.
A spoon made from scrap materials can complement its stainless steel counterparts, or add to the collection of children's toys when playing mother's daughter.
Making it is very simple, first we decide on the shape and color, then we make a blank from the available raw materials and cut out our device.
A couple of manipulations and the result is obvious. A DIY folding spoon will be useful in any situation, from a hike to a picnic or barbecue.
Types of crafts
So, what can you make from unwanted plastic spoons? In general, these can be either flowers or all sorts of elements that can be used to decorate the house. Moreover, this type of crafts can definitely interest children.
Crafts made from disposable spoons can be very different, but first you should focus on creating a bouquet of flowers. This time we are talking about tulips. To create such a bouquet we will need electrical tape, corrugated paper, plastic spoons, glue and a brush.
The creation process should begin by cutting the paper into squares, wrapping spoons in squares and finally fixing the structure with glue. The blanks should come out, and then you need to collect the flowers.
The process is quite simple, we fasten two spoons together and add a third on top. We fasten the whole thing with pre-prepared electrical tape.
Cut out leaves from paper. To complete our craft, we need to fasten the flowers and tie them with ribbon.
Decor
Thanks to plastic spoons, you can not only create crafts from them, but also transform old and boring things. For example, a mirror into which you can breathe a second life. The essence of this decoration is to make a new frame for the mirror.
- In order to create such a frame, you need a fairly large number of spoons, glue, a brush, scissors, paint and a piece of cardboard.
But before you get started, you need to take some measurements. We transfer the measurements onto the cardboard, then cut it out into a shape (in a circle) that we will interact with later. Take plastic spoons and separate the main part. Now you need to glue these same spoons to the edges of the cardboard, and you need to do this with the concave part.
Once the design is dry, you can add color to it by simply painting the spoons. It is recommended to use spray paint as paint, as it is evenly sprayed over the entire surface.
Candlestick
Another option for using spoons would be a decorative candlestick. We will tell you how to make such a craft from spoons below. So, all we need are a few basic spoon parts, a scented candle and glue.
We assemble the structure in the shape of a lotus flower, gradually gluing the spoons. To complete this, you just need to glue the candle itself. This craft is done very simply and quickly, and you can transform your life quite creatively.
Rose
The materials for this craft will need the following: 12 spoons, tongs or pliers, glue, a lighter and scissors. The creation of such a craft should begin with the deformation of spoons. Take a lighter and gradually heat the spoon until it begins to deform, but do not overheat the plastic, as it may simply leak.
https://youtube.com/watch?v=wl-Y9DY7lSc
To create the mold, we will need pre-prepared pliers. It is necessary to give the spoons the shape of petals, and each subsequent petal should be relatively wider than its predecessor. The first spoon should be rolled almost into a tube.
After deforming the spoons, you need to cut off the handles. Now take the glue and use it to gather all the “petals” together, let the glue dry and the job is done.
In addition to all the above crafts from spoons, you can do something similar not only for the home, but also for the garden. You can make a peacock from spoons or a lamp in the shape of a pineapple, all this will look quite unusual and very creative.
However, it is not recommended to make crafts from metal spoons, because working with metal requires certain skills, and this will be more like damaging cutlery than creating something special.
Doll made from disposable forks and cups
This craft will decorate a schoolchild’s desk, a window sill with flowers, or a shelf with books. It looks original and fun. However, besides forks, the main character here is an ordinary plastic glass.
@evroshik.ru
To work you will need:
- disposable forks (10–15 pieces) and a glass;
- glue (it’s better if it’s “Moment”);
- scissors;
- decorative eyes, mouth and nose bead.
By the way! It is important that the toy is stable. Therefore, it is better to use dishes made of thick plastic. A paper coffee cup will also work.
The work consists of several steps:
- The bottom of the glass is cut off (carefully, since it is to this part of it that the forks will be glued in the future).
- To make the structure stable, the base of the glass can be strengthened. To do this, you need to stick a thin strip of cardboard (no more than 1 cm wide) on the inside of it.
- The handles are cut off completely from two forks, and half from the rest.
- The narrow part of the glass is the conventional “head” of the doll. Forks, the handles of which are cut in half, are glued along the entire circumference of the glass. This is the doll's “hair”. It is better if they are of different “lengths”. They can also be decorated with sparkles and colored threads.
- You need to make small slits on the sides of the glass. Handles from forks are inserted into them as carefully as possible. The slots should be small so that the glass does not break and the doll’s “hands” do not fall off.
Then glue on the eyes, mouth and nose. If desired, the doll can be painted with acrylic paints.
Decorative panel for the kitchen “Broom”
A child can make such a craft as a gift for his grandmother. A beautiful, unusual and lovingly made panel will decorate any kitchen.
@maistrinya, stranamasterov.ru
To work you will need:
- nine disposable forks;
- thick cardboard;
- satin ribbon;
- artificial flower (lush);
- thick decorative thread;
- glue gun
The work is carried out as follows:
- A broom-shaped blank is cut out of cardboard.
- Forks are glued to the wide part of the workpiece at a distance of 1-1.5 cm from each other.
- Then a ribbon is threaded between the teeth. Its edges are also fixed with glue.
- The “handle” of the whisk must be wrapped with decorative thread. To prevent it from moving off the base, it is treated with glue.
Next, a flower is glued onto the wide part of the corolla, and a loop is made on the handle on the wrong side. This way you can not only put up the craft, but also hang it on the wall.