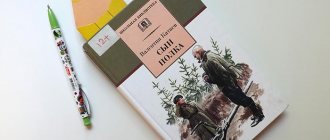
Greetings, dear readers. Despite the fact that the Internet and e-books have firmly entered our lives, textbooks and works in the classical version will always be side by side with us. And it would seem that such a simple thing as a bookmark is very necessary. I know from myself that when I didn’t have anything at hand to cover a page or a textbook with, I had to commit a crime - fold the page. And to prevent this from happening, you need to prepare a “book-bookmark” set in advance.
The best thing is when this wonderful and useful thing is made with your own hands or given by a child. A wide variety of materials can be used, including crocheted ones. From felt and textiles, from genuine leather and even from the spines of old books.
But today we will look at options for making bookmarks for books from paper. And even if they are not as durable as from other materials, any child or adult can make them.
Bookmarks for books made of paper (diagram): paper heart
You will need:
- colored cardboard or old cover, postcard, magazine page
- a sheet of white paper
- pencil
- scissors
- glue stick or PVA
- envelope.
1.
Take a sheet of plain white paper and fold it diagonally. Use a pencil to draw an arch (see image) - this will be half a heart. When you straighten the sheet, you will get a full-fledged heart.
* You can simply draw a heart on paper; it does not have to have ideal shapes.
3.
Cut out the heart. You have a template.
4.
Place the heart on the edges of the envelope, trace it and cut it out. You now have a corner for a book or notebook. It needs to be decorated.
5.
Draw a smaller heart on thick paper and cut it out.
6.
Glue the small heart to the big one.
Bookmark templates for books for 1st grade children at school
Primary school students have so many textbooks that every time they do their homework, they have to spend a lot of effort searching for the right page. Invite your children to make such a necessary thing as a bookmark at home or in technology lessons. I have collected a lot of options for you. Discuss with your child at home what he might like, or he will offer his own ideas. Also, schoolchildren, for example, in first grade do a lot of work with paper and it’s a great idea to make bookmarks with them.
A bookmark in the shape of a pencil is perfect for textbooks.
Scheme to execute
Girls will surely love the idea of making a bookmark in the shape of a beautiful unicorn.
You can cut out bookmark templates and decorate them as you wish.
Or, if you know how to draw well, take some ideas from such drawings or print ready-made ones
Funny minions are also loved by children and there is a place for such a positive bookmark in the textbook
Cardboard bookmarks are very beautiful in muted tones with drawings and appliqués.
Vintage products look appropriate in literature textbooks
If you still have book covers, the spines themselves are perfect for bookmarks. To prevent them from deteriorating and being erased further, you can laminate them. But since nothing lasts forever, the very texture and material from which the book covers are made are simply unique and tactile sensations will convey a special mood to reading.
Paper with slits in the shape of leaves or petals looks very interesting if glued to a contrasting and bright background. Or you can fix different areas on the base by color or even material, and then glue a blank with holes on top.
You can create a soulful bookmark even if you simply decorate it with bright markers.
I really liked the technique of painting with watercolors on thick watercolor paper. You can make bookmarks to suit your mood or even the cover of a book. True, the video is in English, but the principle of operation will be clear.
Here is one option for working with paints using a gradient.
If you are fond of drawing, then making bookmarks for yourself or friends is just a godsend for creativity and the realization of your ideas.
I really liked the bookmarks with drawn animals, but they also have tails that look like real ones. You can even touch them. If you measure a longer length, then a bookmark in the book will look out from above, and someone’s tail will stick out from below. It will turn out very interesting.
How to make a felt bookmark for a book: felt heart
You will need:
- sheet of felt
- scissors
- thread and needle.
1.
Fold a sheet of felt in half, draw a heart (or use a paper template) and cut it out.
*You can cut two triangles. Choose the shape of the bookmark yourself, the main thing is that both halves are the same.
2.
Using thread and a needle, sew both halves together, but leave the top of the heart (or the base of the triangle) intact so you can place the bookmark on the page.
Beautiful bookmarks for girls
Gentle, cute and bright bookmarks will delight girls. There are many interesting fairy tales about princesses and princes, romantic love stories. And in general there are so many wonderful works that I really want to read. And it will be even nicer to leave a beautiful bookmark made with your own hands on the desired page. Explore ideas for girls.
Everyone's favorite unicorn pony can be a faithful reading companion. Shall we make a bookmark like this together?
Please note that we glue only the body of the horse onto the base, the hooves remain free.
They will be the ones that secure the page of the book.
Continuing the theme of horses, you can cut out a template from any thick paper or cardboard, and make a tail from bright yarn. Also don't forget about the mane. Just don’t make it too large, otherwise the book will not close tightly or the page may become slightly deformed if you accidentally press it hard.
These are the same cute girly hearts that can be safely used both for notebooks and personal secret diaries.
This bookmark looks very cute. You can either glue or sew textiles onto the cardboard base and secure with a colored rubber band.
Painted cats and long ponytails braided with yarn.
Want anti-stress bookmarks? I am happy to share interesting templates with you. Save, print and color in bright colors. You will get a very beautiful bookmark, which can later be laminated.
Above I showed a similar bookmark with cutouts for the top layer. I found a bookmark template and the steps for creating it for you. I hope the girls like it.
Double-sided bookmarks that can be decorated as your heart desires, and then simply bent in half and glued together.
Or a ready-made option. Just print it on a color printer and cut it out.
How to make a bookmark from toys for a book
You will need:
- small plastic toy
- knife or scissors
- paperclip
- a lighter or matches (to heat the tip of the paperclip).
1.
Cut off part of the toy.
2.
Heat the tip of the paperclip. It is advisable to hold the paperclip with pliers to avoid getting burned.
3.
Insert a paperclip into one of the parts of the toy - since it is hot, it will go into the plastic toy easily (the plastic will melt).
4.
Wait until everything cools down, and you will have an original bookmark - as if the toy is inside a book.
Bookmarks for books using origami technique
Crafts using the origami technique amaze with their variety and imagination. Originally folded paper bookmarks using this Japanese technique will help to show children's interest in reading. It would seem like simple paper. And when you see how it can turn into something voluminous and interesting, it simply amazes the imagination. In shape, these can be corner bookmarks or strips with different elements. I have put together an interesting collection for you with step-by-step photographs, so that you and your kids can make bookmarks for a variety of exciting stories in books.
The paper can be very diverse, with or without drawings. Let's start with a simple corner bookmark. It is done simply and quickly.
What do you think of the pencil bookmark? A very interesting design made from paper.
You can make these bat-shaped bookmarks for your friends if you are going to a Halloween party.
Romantic bookmarks for girls can be used not only for books, but also for personal diaries.
You can also make a bookmark in the shape of a bear cub using the origami technique. Fold it as shown in the pictures and the funny little face will be happy to do its job.
By analogy with folding a corner, which was presented above, you can also add ears and teeth, and such a bunny will faithfully hold the pages of books.
Beautiful bookmark for books and notebooks: bookmark with bracelet
You will need:
- thin wire
- wire cutters
- different beads
- tape (braid)
- scissors.
1.
First you need to make a small bracelet. To do this, cut a small piece of thin wire, put several beads on it, twist the ends and insert them into one of the beads.
*If necessary, cut off excess wire.
* In this example, the diameter of the bracelet is about 4 cm.
2.
Cut a long piece of ribbon (2 times the height of the page). Tie the ribbon to the bracelet.
* Try to take a thicker tape so that it does not slip out of the book.
Braided option
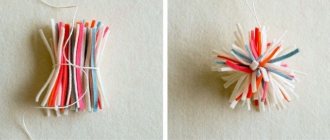
You can make this craft together with your child and give it to your grandparents. To make it, take three strips of the same size, but multi-colored.
Take a strip of the same color and fold it at a right angle. Glue the second strip to the left of the first. Next, glue the third strip on top of the first two.
After the workpiece is made, we begin to braid the pigtail. We make it the required length, cut the ends and glue them. At first glance it seems complicated, but in reality everything is simple. Shown in more detail in the photo below.
Another way to assemble a wicker bookmark step by step without glue.
Bookmarks for textbooks: bookmark with bead
You will need:
- beads and other decorations that can be threaded
- thick thread or rope
- paper, glue and matches or skewers to create your own bead (if desired).
*You can use purchased beads, you can make your own, or both.
1.
Cut a piece of thread or rope. Its length should exceed the height of the book. Tie a knot at the end of the thread.
2.
Place one or more beads on the thread and tie a knot again.
* To make your own bead you need to wrap a strip of paper (newspaper) around a match, adding glue periodically.
3.
Tie a knot at the other end of the thread, put the bead back on and tie another knot after it.
*If necessary, cut off the excess ends of the thread.
DIY bookmarks: ideas for original crafts
Reading time: 5 minutes Don't have time?
The link to the article has been successfully sent!
We will send the material to you by e-mail
Yes, paper media today is used much less frequently than before, but it still remains a favorite for many people. That is why such a craft as a DIY bookmark has not lost its relevance. HomeMyHome suggests keeping yourself busy with something useful and no longer flipping through pages in despair in search of what you need.
What beautiful bookmarks can be made from paper
Various master classes with recommendations on how to make bookmarks for books from paper materials
There is no point in praising the qualities of a material such as paper, because everyone has worked with it and knows its capabilities. So you shouldn't miss them. A paper bookmark is beautiful, quick, although not as durable as a textile one. But you can often change its design, giving yourself positive emotions.
A beautiful and simple card for girls in 5 minutes
What girl doesn't love beautiful dresses? Let's take advantage of this and make a very cute bookmark in the form of this piece of clothing. And it will take us no more than 10 minutes. We will cut out a dress from fabric and felt according to the template. Let's put one part on top of another.
Glue them together and then sew them with a thick thread along the contour.
Glue an elastic band to the back of the dress. The bookmark is ready. Now you can put it on books!
Girls will also like these bookmarks with images of princesses that they can color on their own.
A child can also make these gentle bookmarks with the help of an adult.
How do you like these knitted foxes? However, you will have to spend a little more than 10 minutes making them.
If you don’t want to sit for a long time at work, cut out cats from colored stickers. They will make absolutely everyone smile!
Or refer to this video:
Well, now you know how to easily and quickly make beautiful bookmarks for books for yourself and your children. I hope you liked my collection of ideas. Read for yourself and instill a love of reading in others! I wish everyone a good rest and creative success, and with that I say goodbye.
Master class - weaving baubles from ribbons
We will need: 1. 2 satin ribbons of different colors, 2 meters each. Scissors3. Matches
We take the ribbons, fold them and tie a knot at the bottom, stepping back from the edge about 4 cm (since I am making a bookmark, 4 cm will be enough, and if you want a bracelet, 8-10 cm) I used ribbons of blue and gold colors.
Take a blue ribbon and form a loop on the long side.
Sorry that under the photo it says “Photo 5”, it’s mixed up, it happens))) Well, shall we continue? Having formed a blue loop, take a gold ribbon (the one that is long, not the tip) and wrap it around the blue loop, 2 circles is enough)
Having made a blue loop and wrapped it, we proceed to the yellow one. Holding the blue loop so that it does not unwind, we make a yellow loop.
Insert the yellow loop into the blue one
Tighten the blue loop at the end. We only have one yellow loop left
Holding the ribbons, we form a blue loop again
We insert it into the yellow
We tighten the yellow one, as we did earlier.
To avoid such sloppy loops, do not forget to periodically pull the sides of the ribbons
Weave a bauble of the length you need as indicated above. Are you done? Well done! Now we will finish the bauble itself. Leave one loop.
We take the ribbon whose color is not the last loop, and without making a loop we insert it into the blue one.
Tighten the blue one
We make a knot from the resulting 2 ribbons. However, it often happens that one tape is longer than the other. No problem! Let's cut!
To prevent the ribbon from unraveling...
...We burn around the edges! Be careful not to get burned!
Voila!
If you make this bauble longer, you can stick it on a headband! Or tie it like a bracelet!
I have a bookmark
This is the variety of baubles I have woven together)) There were more - I gave them away!
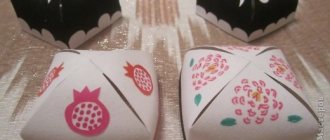
Bookmark with beautiful stones made of velvet ribbon
This is an unusual bookmark. It is expensive in stores, but making it yourself will cost you much less.
- Decor (any beads, pendants, etc.);
- Wide colored satin or velvet ribbons;
- Scissors and nippers;
- Glue, needles, threads. Think about what you want to attach to the ribbon. Start from this;
- To neatly trim the edges of the ribbon, you need ribbon clips.
- Place the tape on the page and measure. Then fold it twice as much, because the bookmark will be double-sided;
- To choose the right combination of colors, attach different pendants and rhinestones to the ribbon and choose the one you need;
- We glue each tape properly, folding it in half;
- Attach a clip to the end of the tape;
- Hang your chosen decor.
Bookmark with voluminous paper flowers
For such a simple but very bright bookmark, you need as much thick multi-colored paper as possible. Cut a thin rectangle out of it for the base, cover the edges with tape several shades darker and thread the narrow ribbon through. To make the flowers look more interesting and lively, lay out each of them in at least three layers, glued only in the center.
Simple weaving technique
To create a simple accessory, you need to prepare two multi-colored, but well-matching ribbons. It is desirable that their length be at least two meters.
To create a simple bracelet, you need to perform the following manipulations:
First, you need to lay one ribbon on top of the other, and do this so that both ribbons are face up.- These ribbons need to be tied at approximately a distance of 15 cm. This gap is left for ties.
- Now you need to secure this knot, but do it so that the weaving is located away from you.
- For more convenient work, it is recommended to secure the material with tailor's paper; you can also use tape.
- Now you need to make a loop on both strips, pull one into the other and tighten.
- Next, they make a new loop on the strip where it broke, and thread it into the existing one. After this, tighten the tape again.
- Continue these steps until the required length of the bracelet.
- At the very end, make a neat knot, trim off the excess length and hide the ends.
Products that are woven from two ribbons are the basis of any weaving. This technique is usually used to weave elementary products such as bookmarks, keychains and baubles. Once you get the hang of it, you can make such an accessory in a few minutes. Having understood how these actions are carried out, you can begin to weave more complex patterns and patterns, and also try to make some large item with your own hands and decorate it.
Paper bookmark "Tie"
To make such a wicker bookmark, you will need four strips of thick paper of different colors. Vary the width and length depending on the result you want to get. Glue the strips at the corner one on top of the other and weave the bookmark with a spikelet until you reach the end.
Photo: aminoapps.com
Photo: samodelino.ru
Bookmark-shortcut
To make a beautiful bookmark in the form of a label, cut out a book-shaped blank with a window from a thick sheet of paper. Glue a piece of wrapping paper or a bright sticker into it, fold the bookmark and thread the ribbon. Using the same principle, you can make cards or small pendants with wishes for gifts.
Photo: obustroystvodoma.ru
Schemes and master classes. My bookmarks.
Since it’s becoming more and more difficult to sort through my huge number of bookmarks, I will gradually post links here to interesting and useful diagrams and master classes. I will be glad if my systematization is useful to someone!
SCHEME
FLOWERS, LEAVES, TREES AND OTHER VEGETATION: 1. Pansies from panybasya 2. Scheme of half leaves for the “Miracle” necklace from nata_gnat 3. Super schemes. Elena Virko- Unique bouquet from Anita kiska 4. MAPLE LEAF from yar-bob 5. Decorative leaf. from Natalia 30 6. Flower with beads (rose or camellia) from delica_fly 7. Golden ears from olesia198 8. Calla lily pattern - brick weave from tricha8585 9. Rose from Zuravushka 10. Leaf from Ribachka
FIGURES MOSAIC AND BRICK WEAVING, WEAVING: 1. Parrot from Marvari 2. Many patterns 5. from Nastya19991 3. Cat from RomaSHka 4. Burberry Nova. Flying. from TigrOlya 5. Bunny from lened67 6. Cat face from StRaZoChKa 7. Scheme of a wolf. from Nastya19991 8. Butterflies - Zorka, Seritsin Montela, Brook's Birdwing, Glory of Butana, Sailboat Homer from Tsvetik-7tsvetik 9. Butterfly Sailbird Polymnestor + MK on weaving the body of a butterfly from Tsvetik-7tsvetik
JAPANESE DIAGRAMS OF FULLERENS, FIGURES AND TOYS: 1. Icicles from Delika 2. Cute, light patterns from ShmAiliK 3. Japanese umbrellas from Muraki 4. Turtle from zitova 5. Chain from AIJIN 6. Snail from serdolik 7. Duckling from Thumbelina 8. Chinese Dragon from Lilith Lilith 9. Kitten pattern Murrr from Lilith Lilith
PENDANTS: 1. Garnet from Buserinka (cross) 2. White Tiger pendant from Irushka 3. Round pendant pattern from yarina 4. Burberry Nova. Triangle pendant. from TigrOlya 5. Schemes of triangles from Gulnaz Ibatova 6. Scheme of a cross from Marfa 7. Scheme of the pendant “Matters of the Heart” from Lerunchik 8. Scheme of a bird from a Japanese magazine. from elyaa 9. Crosses from Muraki 10. Triangles from Anchutochka 11. On the Internet - 2 from marishka_n 12. Art Deco pendant from Polina F
CHAINS, BRAIDED HARNESSES: 1. “Pseudo-braid” chain from Elinka 2. “Chocolate Mood” harness from larets 3. “Shell” harness from Jan 4. “Square” harness from Jan 5. Chain pattern for the “Strict” pendant from Suavis 6 Scheme of “Flagella” from TatyanaBis
BRACELETS: 1. Burberry Nova. From a different angle. from TigrOlya 2. Scheherazade from ANGEL-OK 3. “Round-Square” bracelet from Lanya 4. Mosaic bracelets (several patterns) from anya3333 5. Matryoshka doll from giogio65
BOWTS: 1. Burberry Nova. Bow brooch. from TigerOlya 2. Small French bow from SONE4Ko
TOYS, FIGURES: 1. Swan from ANGI 2. Star diagram from Irushka 3. Snowflake from bunny 4. Monkey from alonka_homych 5. Guitar diagram from Kat2u 6. Piglet))) from Princess04ka
EARRINGS: 1. Earrings from kotyaoma 2. Mini butterflies from no_vember 3. Patterns for earrings “Yin and Yang” and “Stars of Katherine” from TYRA 4. Earrings with brick weave from LovePrinceSSka 5. rings from lened67
BRAIDED AND BRAIDED BEADS, FULLERENES: 1. Large ball from Pin_Evgeniy
NECKLACE: 1. Garden from AnnaB 2. “Black Night” necklace from Golda 3. Pattern for the Motley Ribbon necklace from Dinochka 4. Old-fashioned jewelry from Lagularia 5. “Golden” necklace from Nastenka - the best... 6. Pattern of the original necklace from MilaF
PATTERNS FOR KNITTING HARNESSES: 1. Patterns for knitting cords. by kotyaoma
OTHER: 1. Burberry style headband from _Nice_Olesya_
M A S T E R - CLASSES
FLOWERS, LEAVES, TREES AND OTHER VEGETATION: 1. Floral passions - “Carnation” from stasia007 2. Master class on weaving a flower from beads for hairpins from Ya-na 3. Strawberries from Zel_O 4. Necklace Lydia part 1 from Pussi (bells) 5. Leaf from cutting for lariat and for other needs (My MK) from tatiana_prokope 6. Leaves in a square strand from StarayaKoshka 7. Platycodon grandiflorus brooch, or wide bell from Zhenyusyapa 8. Flower from the “Miracle Lotus” or “Test Work” necklace " from JULIA3 9. Pendant "Flower" from eleonora 10. Tree of Wishes from Lidka 11. Flower with beads (rose or camellia) from delica_fly
BROOCHES: 1. “Flower” from ROSALEN
TOYS, FIGURES: 1. Master class Leonard the Bear from Simba_Red 2. MK on “I invite everyone to tea” from Tsvetik-7tsvetik 3. Grape snail from Zhanna_vasilieva 4. KotoSharik from tanik 5. Orange mood from unlock-2
PENDANTS: 1. MK on the “Drop of the Soul” pendant from SaKhalino4ka 2. Weaving a volumetric triangle from beads from Zachary 3. Weaving a heart from beads from Zachary 4. “Young Apple Tree” pendant from Barbara 5. Weaving a star from beads from Rivoli from Zachary 6 .Star from rx330 7.Celt from rx330
CHAINS, BRAIDED HARNESS: 1. “Golden chain” from anna-36 2. Twisted cord from Inul59 3. MK Petersburg chain (My MK) from tatiana_prokope
BRAIDED AND BRAIDED BEADS, FULLERENES AND OTHER: 1. Promised balls from Katyuk 2. Beaded cups for beads from Odnoznachno 3. MK Braided beads. Vintage earrings with pendant from TerraHome 4. “Half-cube” from Tia 5. Croissant bead from Verusya
EARRINGS: 1. Earrings with a bead “West is not West, East is not East” from Marja
BRACELETS: 1. Sach mat from Rozmarika 2. Macrame bracelet from Vesta 3. “Snake” bracelet from Mariha65
BOWTS: 1. French bow from Tanya Mazur 2. Bow from Stalker 3. Bow from Sfera
NECKLACES, TIES, NECKLACES, ETC. : 1. Tie (Austrian) made of faux pearls from Yulya-ya 2. Questions about the tie (mini-MK) from TigrOlya
BRAIDING OF RIVOLI AND CABOCHONS: 1. Set “Galina” from lenaberg 2. Braiding a cabochon with a chain in a cross from Jan 3. Planet of butterflies from TigrOlya
KEY RINGS: 1. Keychain “Beer mug” from Blackberry05 2. MK Keychain doll from Yahoo
RINGS: 1. MK Ring “Bohemia” from valeum
OTHER: 1. Braiding a small “Forget-me-not” box from mamadiggera 2. Beaded napkin from mancurova 3. Making a tassel from Coco_Chanel 4. Master class No. 1 for those who want to play with beads from Aunt Anyuta 5. Acute corner on a square rope from beadlady 6. Tutorial on sewing chains from Marinkins
And I also want to add links to different topics, forums, blogs with diagrams and master classes: 1. dog diagrams 2. Animals, insects, etc. 3. Bookmarks and more (for myself) 4. I’m looking for an earring diagram. 5. MK schemes are all here 6. Bookmarks for yourself 7. Links for yourself (bracelets) 8. Ndbele (bookmarks schemes) 9. How to make a beaded tail? 10. Album “Ndebele” 11. Album “Volume flowers for decorations (patterns of petals for flowers)” 12. Album “Necklace” 13. bows made of beads 14. Everything edible, but only from beads!))) 15. Help restore the diagram mosaics based on the picture! Very necessary!
What you need when making bookmarks
As a rule, you can almost always get by with the items you have at home. There is no need to purchase anything additional. To create a bookmark you may need the following materials:
- Colored paper, colored or regular cardboard.
- Ruler.
- Pencil.
- Scissors.
- PVA glue and a brush for careful application.
- Ribbons, felt or other material.
- Paints, stickers, glitter and other elements for decoration.
One type of material is selected for the base of the product. For example, for a paper bookmark you only need colored paper, etc.
Paper and cardboard bookmark templates
To make beautiful and original bookmarks with your own hands, we recommend using ready-made templates. They will make the process of making fakes easier, making it fun and fast. We offer a selection of the best templates.
I also really liked the bookmarks made from popsicle sticks, look how simple and beautiful they are.
Sources
- https://daynotes.ru/zakladki-dlya-knig-svoimi-rukami-iz-bumagi-dlya-detej/
- https://svoimirykami.guru/zakladki-dlya-knig-svoimi-rukami/
- https://rci76.ru/iz-bumagi/zakladka-iz-1-klass.html
- https://NadTex.ru/iz-bumagi/kak-sdelat-zakladku.html
- https://minyt-ka.ru/zakladka-dlya-knig.html
- https://sovet-podarok.ru/kak-sdelat-zakladku-iz-bumagi.html
[collapse]
Woven Paper Tie
You may be interested in a product based on paper weaving. To make it, prepare:
- 4 strips of paper in several shades;
- scissors;
- tape (it must be double-sided).
Let's start the workflow:
- Take 3 strips of paper to start. Glue them together with double-sided tape. Glue one of the colors parallel to the other strip.
- Take up weaving. Turn the workpiece over so that there are two stripes on the left and right sides.
- We bend one strip inward. We also repeat with the stripe on the other side. We continue weaving according to the same principle.
- When finished, glue the strips to each other and trim off the excess paper. Use a hole punch to make a hole at the top of the product and tie a ribbon.
The advantage of such a product is that there is no need for a template. With a minimum of effort and time, you get an excellent bookmark-tie.