Thrifty housewives, when getting rid of old things, carefully rip off the buttons and save them, in case they come in handy! Some people accumulate such accessories for years or throughout their lives. But not everyone knows that it can be used not only for its intended purpose, but also for making various crafts, decorating and creating entire masterpieces! In this article you will learn how to make original crafts from buttons with your own hands, from the simplest, but no less creative, to very complex compositions.
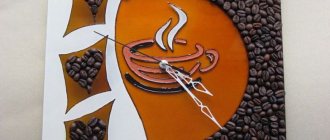
Paintings from buttons: master classes, photos
This is the first thing that comes to mind when talking about button crafts. This homemade panel will serve as an excellent interior decoration. In addition, creating one will be a great way to spend time with your child: the baby will learn to use various things like glue and develop his imagination.
For the simplest picture you will need:
- Multi-colored buttons
- Glue
- Regular pencil
- Paints, a brush and a jar of water for washing the brush
- Cardboard or plywood
IMPORTANT: You should choose thin plywood, while cardboard, on the contrary, should be thick.
The cardboard for making panels from buttons should be dense - it is great, for example, cardboard for scrapbooking.
How to create panels?
- First of all, you should prepare the canvas - paint it in the desired shade. It is unlikely that the natural color of plywood or cardboard will look aesthetically pleasing in the context of the picture.
- The canvas must dry.
- Next, the outlines of the planned plot are carefully drawn with a pencil.
- Now comes the most interesting part - decorating with buttons ! They are attached with glue. If you successfully combine buttons not only by color, but also by size, you can get an interesting relief. Lots of buttons in white or any other neutral shade can help decorate the background.
A panel of buttons in the form of a vase with flowers.
You can also create an unusual key holder or hanger for clothes and accessories, which, in addition to its functionality, will serve as a beautiful panel . To make the front garden panel you will need:
- The base - it can be, as in the previous case, cardboard or plywood. You can also look for a special metal base that can withstand a certain weight
- Glue
IMPORTANT: It is recommended to choose Moment-Crystal glue, since no traces remain after its use.
- Buttons
- Cardboard from which you can make a fence for the front garden. Popsicle sticks look good as an alternative.
- Gold and brown acrylic paints. However, if desired, you can include other shades in the palette.
- Brush, sponge for washing dishes
- Simple pencil
- Hooks
- Decoupage napkin - optional
Decoupage napkin and blanks for a fence for a picture hanger with buttons
Having collected everything you need, you can start making:
- A sketch never hurts. Therefore, it is worthwhile to schematically draw the future panel on a separate piece of paper in advance.
- Next comes the background design . It all depends on personal preferences - you can paint it, stick on some beautiful paper like wrapping paper, or attach a decoupage picture. In the latter case, the napkin is divided into layers, of which the top one with the image is glued.
IMPORTANT: If you want to use a decoupage napkin, the surface of the base under the hanger should be pre-treated with a primer.
- Now it’s time to cut out and glue together the parts for the fence.
- The fence is glued at the bottom center.
- Now you can start gluing buttons - they will act as flowers in the front garden. It is preferable to degrease them before gluing.
This is what a blank for a picture hanger with buttons might look like
- You can, of course, leave the panel in this condition. Or you can continue with the design. To do this, both the buttons and the fence are covered with brown acrylic paint. Both a brush and a sponge are used - the latter is easier to cover large areas.
IMPORTANT: It is recommended to place the brush in a jar of water during breaks between dyeing. The fact is that frozen acrylic paint is very difficult to remove from a brush.
This is how you get a blank for a picture-hanger made of buttons
- As soon as the brown acrylic has hardened on the panel, you need to squeeze golden acrylic paint . Use a sponge to cover the buttons and the fence. And in such a way that the brown paint shows through.
This is what the brown and gold buttons for the panel look like
- All that remains is to attach the hooks - and the panel hanger is ready!
This is what a panel hanger with buttons looks like
Masterpieces of button art from famous masters
There are artists in various countries who are famous throughout the world and they gained this fame thanks to their works made from buttons. The whole world admires them!
Augusto Esquivel
Augusto Esquivel is an Argentinean artist who works with buttons of various colors and creates delightful installations from them. These are, without exaggeration, real works of art!
Button art for Augusto began with a box of buttons found in the attic. They were quite ordinary, but there was a whole box. Augusto began to create three-dimensional images from buttons and fishing line, coupled with his spatial imagination. He stretches fishing line or threads between two surfaces and places buttons on them according to design. As a rule, string-button garlands are attached to the ceiling.
His most famous work is the black piano (“Upright Piano”), which he created from 30 thousand buttons. This sculpture weighs 20 kilograms. Augusto created his masterpiece over the course of two months.
Besides the piano, other musical instruments were created from simple clasps.
Augusto is also capable of creating portraits of famous people.
World map.
Prancing horse.
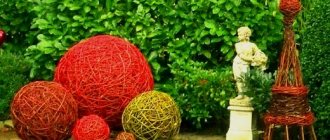
A bunch of balloons.
Sarah Jane Connors
Sarah Jane Connors is an artist who creates paintings from buttons and beads. Her childhood hobby grew into art; Sarah began to create magnificent paintings, which were exhibited at various exhibitions.
It takes the artist 1-2 months to produce one painting. Each bead and button is attached to the fabric with glue.
Sarah finds materials for her works at flea markets, flea markets, and charity shops. The artist pays a lot of attention to detail, so she carefully selects materials according to shape, color and size.
In her works, the artist conveys the inner beauty of nature and every creature.
The background of the paintings is created with no less diligence and care.
The paintings of Sarah Jane Connors are undoubtedly a striking example of recreating beauty!
Jane Perkins
Jane Perkins is a famous British artist of our time. She paints her pictures using buttons, beads, hairpins, toys, lids, boxes and other small things that many will consider old, unnecessary trash. She collects materials for creativity wherever possible - on the street, from friends and acquaintances...
Each such painting is unique, even if the artist made the same painting twice. First, Jane attaches the buttons with hot glue so that they can be re-glued and, if necessary, the shade of the image can be adjusted. When the painting is finished, the artist looks at it for a while and makes certain changes. Next, the buttons are firmly attached.
Most of Jane's paintings were purchased for private collections. The most famous works are the Queen of Great Britain, the President of the United States, Mona Lisa, Marilyn Monroe, etc.
The peculiarity of Jane's paintings is that they must be viewed from a great distance. They are quite large in size and made with large “strokes”, which were made from designer microcircuits and other elements.
You can see even more paintings by Jane Perkins in this video by Ruby Cohn :
Don't be afraid to try something new, create something original and creative from something painfully familiar! We wish you all inspiration and creative success in all your endeavors.
Author of the article – Tatyana Babikova
SHARE! "Cross" will not give bad advice! 
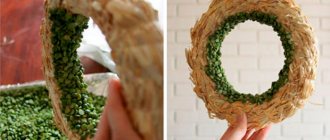
Bowl made of buttons: master class and photo
Continuing the theme of functional crafts, it’s worth remembering a bowl made entirely of buttons. What will be needed to create such a miracle?
- Actually, the buttons themselves
- Balloon
- PVA, which can be diluted with a small amount of water if necessary
- Brush
- Scissors
- Jar
Procedure:
- First you need to inflate the balloon. The size depends on what diameter you want the bowl to be.
- Now you need to fix it. This is where the jar comes in handy.
IMPORTANT: The ball must be installed with the tail down.
- Now the top of the ball should be coated with glue. It is preferable to wait until the glue dries. This dried glue will serve as a kind of barrier between the ball and the buttons.
- After the first layer has dried, the second is applied. This time you shouldn’t wait for it to harden – you need to glue the buttons carefully and quickly. The buttons should fit snugly against each other.
- leave the workpiece alone for several hours - it should dry.
- You can apply a little more glue, and then you should untie the ball and let the air out of it.
- The resulting craft is cleaned of excess glue - in this case, scissors can help. The bowl is ready!
This is how it is done and this is how a bowl of buttons turns out
Dish
Such a product attracts attention and brings a touch of originality to the interior.
A bunch of plastic buttons, PVA glue or other glue that becomes transparent after it dries is all that is needed to create. In addition, you need to use balloons as a base, brushes, cutting tools, paper, and a container to secure the ball.
Manufacturing
- Inflate a balloon. Place in a container with the tail down. It must be secured with a weight or glue.
- A thick layer of glue is applied to the base. Wait for it to dry and form a film on the surface.
- Then follows a second layer of glue, buttons, and the desired pattern is laid out. It is better to apply the glue to small areas, otherwise it will dry before all the fragments are attached.
- The elements are laid out from the top, reaching the sides, the base is turned over, tail up, continuing work. The parts must be in close contact with each other.
- After fixing all the elements, the work is sent for drying. This will take approximately three to five hours.
- After time has passed, they are coated with glue again for final fixation. Leave it overnight.
- After drying, the ball is carefully removed, first letting out the air, and putting it away. Using scissors, if necessary, trim the edge of the container.
This dish is not for food, but suitable for decoration.
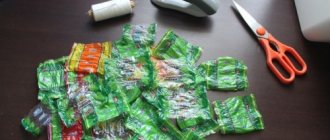
Bouquet of buttons: photo, master class
You can use buttons to create an original and cute bouquet as a gift for someone or just for room decor. To do this you will need to stock up on:
- With the buttons themselves
- Felt
- Pliers
- Wire
IMPORTANT: Wire that is too thick will not work - you need to take into account that it must fit into the holes of the buttons.
- After these simple preparations, you can start tinkering:
- First you need to string the button onto the wire.
- To secure, the second end of the wire must be threaded through another hole.
- This way you need to work on all the buttons.
- cut out petals, stems, leaves from felt in general, anything your heart desires to decorate a bouquet with. This beauty is strung on a wire.
- All components come together in the form of a bouquet. A few decorative elements depending on your mood - and the craft is ready!
A bouquet of buttons is cute and unusual
How to make your own buttons from polymer clay
Buttons are not only an important functional part of clothing, but also a way to add attractiveness to it. They can be simple and unobtrusive or bright and eye-catching. Moreover, you can make original accessories yourself from polymer clay.
Sometimes the ability to make accessories helps a lot - we have all encountered a situation where we cannot find products suitable for clothes in specialized stores. This happens after losing several factory buttons or if you sew for yourself.
The process of creating such decoration is extremely simple, and the flight of imagination is practically unlimited.
Tools
Before you start creating, you need to take care not only of the material, but also of a number of tools, without which the work will be inconvenient, if not completely impossible.
For the activity you will need:
- self-hardening clay of different colors;
- a knife, preferably a stationery knife or any other sharp one;
- special rolling pin;
- cutter of the required diameter;
- cling film;
- knitting needle, toothpick or other stick.
Select all the equipment and decide directly on the idea that you want to implement. Then start recreating it.
Key milestones
This creative process can be divided into standard steps, which are complemented by certain actions depending on the chosen design.
- Take a lump of clay and roll it out into a canvas.
- Cover it and use a cutter or other template to cut the buttons.
- Make grooves for threads in the resulting products.
- Leave the fittings until completely dry.
As you can see, manufacturing is very simple and does not require special knowledge. The main thing is to have all the necessary equipment and a place to dry the craft.
Ordinary monochromatic elements do not look particularly interesting and are used quite rarely. Therefore, craftswomen come up with all sorts of methods to add color to their crafts.
Recreating patterns
Select in advance the raw materials of the desired colors for the base and decorations. Make blanks - cut them into several equal parts of the required size.
Then take the clay of the main color and knead it thoroughly with your fingers. Use a rolling pin to form an even layer. Do not make it too thin, as this will cause the product to crack after it hardens.
Prepare small sausages from pieces for decoration and place on the base. Choose the quantity and location at your discretion.
Carefully roll out the sausages so that the surface is even.
Cover the product with a piece of cling film and use a cutter to cut out circles from the cloth.
Using the sharp end of a knitting needle, poke two or four holes. It is important that they are symmetrical. At this point the work is completed, all that remains is to let it harden.
In this role, not only strands are used, from which multi-colored stripes are obtained, but also circles or other ornaments.
How to make colorful buttons
Another creative way to get a combination of different colors is to use leftover clay scraps.
- Gather the leftovers into small bundles and combine them into a single mass.
- Place the resulting piece in your palms and roll it between them. The result should be a long cane.
- Stretch the figure and twist. The result should be a spiral pattern.
- Methodically roll the cane like a snail.
- Roll over the shape with a rolling pin until you obtain a uniform layer of the desired thickness.
- Cover it with film.
- Cut out blanks of the desired type from the canvas.
- Make holes and wait until completely dry.
Embossed variations
Such a thing will look original and very unusual. Moreover, the probability of finding the same thing somewhere else is extremely small, so you can be sure of the uniqueness of your decor.
To make this variety, in addition to the basic set of tools, you will also need a casting mold.
- Take a suitable amount of raw material and roll it into a ball.
- Wet the mold with water and place the lump into it. Apply gentle pressure until it completely fills the space.
- Remove the resulting mass.
- Use a cutter of a certain size to form a button.
- Take two small pieces of clay and pull out two ropes.
- Sew them together and carefully screw them along the contour of your object. Make sure the edges are aligned and there are no gaps or tails.
- Poke holes and allow to harden.
- If desired, decorate with copper powder or glitter. Be sure to fix them by covering the craft with varnish.
Cars made from buttons: photographs, master class
Kids will definitely like these miniature cars. And here's what they can be made from:
- Large diameter buttons
IMPORTANT: And the same size - this is very important, otherwise the cars will turn out crooked.
- Regular wooden clothespins
- Wire
- Glue
Here's what you need to create cars from buttons.
The procedure is as follows:
- The wire is threaded through one button, and then through the second
- Must be recorded
- The second pair of wheels is created in the same way
- Now all that remains is to glue them to the clothespin
- The car is already ready for racing. decorate it in some interesting way.
These are the kind of button cars you can end up with:
From cardboard you can build racing slides like these for button cars - kids will certainly be delighted
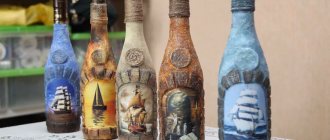
Second life of things
Beautiful interior items in a vintage style can be obtained from an old, cracked sugar bowl, teapot, chipped cup, which can no longer be used for their intended purpose, but it is a pity to part with dear memories.
Give them a second life by decorating them with button appliqué. You will receive designer kitchen decor or unusual fireplace decorations.
Globe for school made of buttons: photo, master class
If you need to make a craft for school, you can make a globe from buttons. The following will be useful for him:
- Cube and ball made of foam plastic
IMPORTANT: The cube will be a stand, and the ball will, accordingly, be the globe itself. It is necessary to correctly calculate the dimensions of the workpieces so that the cube, for example, is not too small.
- Aluminum plate
- Medium size and round buttons
- Acrylic paints in blue and green colors
- Simple pencil
- Tassels
- Toothpicks
You can start making the globe:
- To begin with, the ball is attached to the cube . This is easy to do - toothpicks will help. It's better to take several pieces.
- Now the boundaries of the continents are outlined with a simple pencil.
- Next, the continents are drawn with green acrylic paint . The remaining part should be painted blue.
The button globe is first coated with acrylic paint.
- buttons of the corresponding colors are attached to the continents and oceans with glue .
The globe is covered with buttons
- Now the globe is installed on the plate.
IMPORTANT: Of course, the skewers that attach the ball to the cube are removed in advance.
- All that remains is to paint the cube with brown paint to create an imitation of wood. The craft for school is ready!
This is how a globe is made from buttons
Elegant paper photo frame
Look how easy it is to make a cute photo frame even from plain paper! For the frame you will need a thick sheet of paper. Draw a template as shown in the photo - you can print the image or redraw it by enlarging it on the monitor.
Now, following the step-by-step instructions, fold the frame and decorate the inside with colored paper or fabric. Start decorating, but don’t forget that the frame is paper, so you can’t glue a lot of decorations onto it, otherwise the product may lose its shape.
Two or three flowers or butterflies will be enough. You can complete the composition with a contrasting thread winding with a cute trinket.
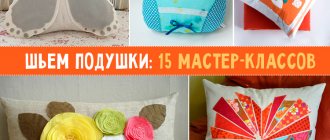
Decorative pillow with buttons: master class and photos
To create a cute pillow with buttons you will need:
- Fabric – it is recommended to choose cotton, linen
- A piece of black color for a future figurine-patch
- Buttons
- Scissors, thread
- Overlock
- A pillow that will need to be upholstered. The approximate size is 40x40 cm. But, of course, if you wish, you can choose a larger or smaller pillow
IMPORTANT: The main thing is to coordinate the fabric parameters for the pillowcase with this size.
Here's what you'll need to create a pillow with buttons
. Procedure:
- So, the first step is to prepare patterns for the future pillowcase. Whatever its size, you need to leave space on each side for allowances.
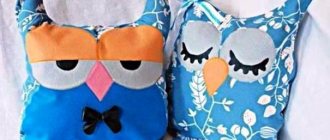
- Now you can start sketching the applique. In this case, there will be a funny little sheep on the pillow.
- The drawing with it is cut out and transferred to a black piece of paper.
- Now are cut out from the flap . A little trick: if the flap itself is not dense, you should glue it to a thin non-woven fabric.
This cute little lamb will be displayed on a pillow with buttons
- The sheep is basted to the fabric and stitched with a zigzag.
- The basting can be removed.
IMPORTANT: The sheep must be ironed.
- Now the buttons are sewn on . They need to be attached according to the silhouette of the sheep. Of course, you can go beyond the edges, because the sheep has wavy, beautiful fur. The main thing is to fasten the thread on the wrong side after each button.
This cute little lamb will be displayed on a pillow with buttons
- Next, the sides of the future pillowcase are placed right sides together and swept away.
- And then they are stitched on a typewriter. Of course, one side should remain untouched - a pillow will fit through it into the pillowcase. You can also overlock frayed edges.
Attaching the sides of a pillowcase with buttons
- Now the pillowcase is turned right sides out. to iron it around the seams.
This is what an ironed pillowcase with buttons for a pillow looks like
- All that remains is to put the pillowcase on the pillow and sew the remaining untouched side of the pillowcase.
IMPORTANT: But if you plan to wash the pillow in the future, it is better to sew in a beautiful zipper instead of the usual thread fastening.
It turns out this beautiful decorative pillow with buttons
How to choose frames for a picture?
As mentioned above, beautiful picture frames have many nuances to choose from. An option that will decorate and succinctly complete a classic oil painting will be absolutely unacceptable for the avant-garde. Specialists from framing workshops are guided by the following parameters when selecting:
- material of manufacture;
- frame shape and dimensions;
- shade;
- design of plastic relief;
- color scheme;
- availability of passe-partout.
https://youtube.com/watch?v=-zQeCSfhanU%250D
Picture frame shape
The choice of frame shape for a picture largely depends on what is depicted on the canvas:
- The rectangular format
is considered the most popular and popular. It is suitable for portraits and still lifes, as well as landscapes, especially seascapes. - Square framing
is used much less frequently. Often, for its harmonious combination, it is necessary to make a passe-partout. - Round
picture frames are called rondos and are used for portraits. - The elliptical format
is suitable for works with religious themes and portraits. It is sometimes used for inexpensive color printing.
Picture Frame Size
An important nuance of selection is the size of the frame. Frequently encountered formats are always available in workshops in a variety of colors and designs, while for a non-standard size you will need to pay extra. The main nuances of choosing the width of a baguette:
Large picture frames can cast shadows on your work, which is important to consider when choosing lighting. The size of the frame also depends on the size of the canvas itself. Experts recommend choosing wide baguettes for small canvases, the area of which exceeds the size of the canvas itself. Thin picture frames can be chosen for contemporary works or works done in watercolor, pastel or pencil.
Picture frame color
A painting should always be in harmony with the chosen baguette and not conflict with it. Choosing the right shade can take the longest amount of time before purchasing. The recommendations here are as follows:
- The frame for a three-dimensional painting or any other work can be in the same color scheme as the work itself. Be sure to follow the choice of shades according to the temperature of the colors of the work.
- A gold picture frame is suitable for warm canvases. Silver can be used for cold ones. However, such noble shades may not be acceptable for certain stylistic movements, for example, avant-garde or impressionism.
- If the canvas is to be used in an interior of a certain style, then the frame should be combined not only with the image, but also with the overall style of the room.
Passepartout picture frames
A separate design method is a picture frame with a passe-partout. This is a special contrasting insert made of cardboard or thick paper. It is necessary for:
- creating an accent on a small canvas;
- selecting a frame for a piece of non-standard format.
When manufacturing it, take into account:
- The color scheme of the work
. The mat should contrast with the canvas, but the most common color when using it is white. - Aspect ratio
. This parameter is always selected individually and is equal to the width of the frame or significantly exceeds it.
Frame with buttons for photos: step-by-step master class, photographs
The most ordinary photo frame, decorated with buttons, will definitely be transformed. What should you stock up on for such a purpose?
- The most ordinary photo frame without decoration
- Buttons in any quantity, as well as any size and color
- Lace, the length of which depends on the perimeter of the frame
- Fabric or paper flowers
- Acrylic paint metal-silver
- Bitumen varnish
- Cotton pads
- Liquid intended for nail polish remover
- Foam sponge and clamp for it
- Tassels
- Glue gun
- PVA glue
IMPORTANT: It is preferable to choose adhesive for carpentry work.
This frame is suitable for decorating with buttons.
You can start handicrafts:
- Each side of the frame is treated with glue.
- then attached to each side with wood glue.
Gluing a future frame with buttons with lace
- Next you need to let the workpiece dry.
The future frame with buttons is drying
- Now you can attach the buttons with glue . It is preferable to place large ones in the corners, and small ones on the sides.
- Flowers and other decorative elements are also It is recommended to glue both them and buttons with a gun.
- It is preferable to glue the frame onto a stand if it does not exist initially.
This is what a photo frame with buttons looks like at this stage
- At this stage, you can leave the frame as it is - maybe the needlewoman will like the multi-colored decor. But you can paint the entire frame along with the decor with acrylic paint.
This is what a painted frame with buttons looks like
IMPORTANT: If you want to create an antique effect, it is recommended to apply bitumen varnish with a sponge.
This is such a beautiful frame with buttons in the end
Applications
Cut out animal figures or other shapes. After this, buttons are selected according to size, texture, and color. They are carefully moved onto the paper, and the rest of the fittings are removed. After this, they begin to secure the fittings: they are glued or sewn onto a fabric base. The finished drawing is attached to thick cardboard. Then holes are made for fastening - chains, ribbons or twine.
The fabric is replaced with felt, and if desired, the edges are complemented with rhinestones and sequins. An interesting texture is obtained by using buttons on the leg: they are sewn on the inside with threads to match the fabric. This technique is used to decorate photo frames: the finished applique is complemented with lace and braid. Patchwork panels with buttons of the same color but different textures look original.
Crafts from buttons: ideas, photos
We present to our readers a selection of photographs of crafts made from buttons. Maybe some of them will inspire your own creativity:
Candlestick and stand for pencils, button tassels
Bright pencil holder made from buttons
Cute picture with a button elephant
Dinner Mood Uplifting Button Napkin Rack
From buttons you can create such painting masterpieces. A cute fox made from buttons will decorate any panel. A cute fox made from buttons will decorate any panel.
Crafts from buttons can also be made on a wooden base - for example, this owl. A postcard with buttons is a very cute gift
A tree made of buttons is an unusual decoration for your desktop. New Year's decorations made of buttons will definitely please your household.
An ordinary frame, burlap and buttons - and now another masterpiece for the interior is ready
You can make unusual and bright decorations from buttons
Owning a unique item is something everyone wants. And accessories such as regular buttons can help with this. In addition, they create a feeling of comfort, something homely.
Jewelry, accessories
Every little thing blossoms in creative hands. You will find various ideas and just pictures for inspiration on our website https://dnevnikmastera.ru. The use of epoxy resin and polymer plastic increases the variability of crafts significantly. This way you can start creating masterpieces, improving your skills time after time.
Keychains
Just a few large unusual buttons and metal rings are needed to create personalized keychains for all family members. Now the keys will not get confused and lost.
By the way, this is a good idea for gifts for a theme party, as holiday souvenirs for colleagues and friends.
Hairpins
The little fashionista will always be in trend with new clothes made from buttons. You can glue or sew beautiful buttons to match the main outfit, which will successfully complement the look, on any hairpin, comb, headband, or hair tie.
Clothes, shoes
Buttons in clothes are used not only for their traditional purposes. Although if you look back into the depths of centuries, they always carried a decorative and even semantic meaning - they showed the wealth and status of the owner.
Now buttons are used to embroider collars, cuffs, pockets, trims, and other elements of a suit. But there are also belts and bags. Even shoes, especially summer ballet flats, slates, and flip-flops are not prohibited, but are even encouraged to be decorated with buttons. With these accessories and a beachy, cheerful button-down bag, you will shine in the fashion crowd of the holiday season.
Marking
Consider the set: each button consists of a cover and a base with a stem. Take the top piece (it really looks like a beer bottle cap, but with a smooth edge), place it on the fabric, wrong side down, and trace with a disappearing marker.
Measure the thickness of the lid with a ruler or measuring tape. Draw another circle with a dotted line around the first one, increasing its radius by the resulting amount.
Example: your button has a diameter of 2 cm and a thickness of 3 mm. This means you draw another line at a distance of 3 mm from the first.
One of the largest asteroids of the year flies between the Earth and the Moon
Apple Pencil support and other 8 options that may appear in iOS 15
MAI student designs a capsule for two for space research
Measure the top from the center to the edge, draw a third circle.
Cut out the fabric blank along the last line drawn. Remove triangular fragments (five to seven pieces). Try to cut so that the vertices of these triangles do not go beyond the dotted line.
Tightness
Carefully coat the part to be covered with glue from the wrong side. Place the top of the future button on the fabric with the inside of the cap facing you.
Start folding the seam allowance tabs onto the inside of the lid. Press down and pull lightly to smooth out any wrinkles.
Style standard for women over 50: what Irina Ponarovskaya wears at 68 years old
Faster than a fired bullet: what speed do the winds reach on Jupiter?
The trend in men's fashion is jumpers with a round neck (photo)
When all the fabric is glued to the back, insert the bottom of the button inside. To be sure to secure it, add a couple of drops of hot glue to the cap before this operation.
Wooden jewelry
The man thought about jewelry even when there were no clothes. Then you could decorate yourself with flowers and twigs, and of course, wooden things. At the beginning of its existence, wooden decorations were completely primitive. Gradually the design became more and more complex. And it doesn’t matter why people started decorating themselves then. The main thing is that this tradition has remained and has survived to this day.
Despite the fact that now there is a lot of jewelry made of plastic, gold, silver, wooden beads, earrings and other trinkets are popular not only among women, but also among men. This is caused not only by the fact that many do not have the finances for diamonds, but by the desire to be fashionable and to be like their ancestors.
Required materials and tools
To make a button, the craftsman should stock up on yarn, hooks, and decorative elements, the first of which will be beads. You can additionally use beads and various rhinestones. Some models are created on the basis of an ordinary button , which is simply tied and beautifully decorated.
But a denser crochet of iris can be done without the reinforcing part, and it will look no worse. The work also requires needles and regular threads. The work is very small and the craftsman needs to be especially careful, since any incorrectly executed loop will immediately become noticeable and striking. Below are three models of knitted items that are not just beautiful, but unique.
Set of first crochet stitches
Materials used for work
To bring the button composition to life, you will need the following auxiliary materials and tools:
- The base is made of cardboard, ceramics, glass, thick paper, metal, wood.
- Glue gun for fixing.
- Threads of different thicknesses and textures. These are synthetic thin, lavsan, thick wool, fluffy mohair, silk, shiny, colored, melange, transparent, with the effect of shine and shimmer.
- Colored polymer and metal wire.
- Additional materials - fabrics, feathers, plasticine, wood, plastic, etc.
Influence on the interior
Even the smallest detail can affect the perception of the visual appearance of a room. Let's say even more: she should do it. Modern interiors, as a rule, have the utmost optimization of space, and therefore the decorative load is often placed on elements that seem at first glance to be quite insignificant (check out the best wall decor ideas in a modern style).
Also, do not forget about revitalizing the space. You can often find interiors in which everything is thought out to the smallest detail, but it’s difficult to describe a lively, tangible atmosphere in them. It is precisely such unconventional things, made with your own hands, and not purchased in the first store you come across, that help overcome some of the synthetic nature of the space.
If you approach making photo frames with your own hands with all your heart, then it doesn’t even matter what available material will be used for this - once placed on the wall, they will become an integral part of the interior and will directly influence how you and your family perceive it guests.
How to choose the most suitable material? Creative intuition has not been canceled, and the attractiveness of handmade works does its job: sometimes you catch yourself thinking that absolutely everything that is made with your own hands has some kind of hypnotic flair, some semblance of an aura. Is this really so or is it simply a purely human factor interfering with perception? You can argue about this until you’re blue in the face, but we choose a much more constructive path - creating photo frames from whatever scrap materials we have at hand.
Stones and shells as decoration
Almost every one of us has been to the sea. And, of course, he brought from there countless beautiful shells and expressive sea pebbles - as a memory of those happy moments that were experienced on the sea coast. And of course, you didn’t fail to take advantage of the opportunity to take pictures there to your heart’s content. Choose one of the most successful photographs and place it in such an improvised frame made by yourself - the wonderful organic nature of the decorative material and the moment captured in the photo will be immediately noticeable.
Remember that when gluing a frame with your own hands, it is best to take flat and not too heavy pebbles: so that later there will be no surprises in the form of periodic peeling off from the base. In general, such inlay has every chance to fit into absolutely any interior and will delight the owners every day about a wonderful vacation.
Using the dough as a base
The need for invention is tricky - and sometimes a cool photo frame can be made from such improvised material as salt dough. All you need:
- flour;
- fine salt without iodine;
- water;
- vegetable oil;
- food coloring of your choice or gouache.
Water with the coloring you need and oil are added to the dry ingredients. You can do without dye, but then you will have to paint the dough with gouache yourself, which will take a lot of time. The dough is thoroughly kneaded, and then you need to give it a little time - a couple of hours - so that it is convenient to work with. The next stage is decorating. You can add any element you like: buttons, shells, beads or rhinestones
.
The final touch is drying. Avoid too high a temperature when placing the photo frame in the oven to avoid cracking the dough. Afterwards, you can thoroughly varnish the resulting frame - this way it will look even more interesting, especially if you hang it on a favorably illuminated wall.
Holiday decor
For the New Year holidays, you can make a cute advent calendar with your own hands:
- Choose a suitable sheet of plywood, thin plastic, cardboard (for 31 pockets).
- Cover it with a beautiful fabric, draw contours for the pockets on it with a pencil and sew them on, it is advisable to use a fabric of a different color and use traditional Christmas colors - red, white, green, blue, gold.
- Mark each pocket with a serial number - embroider the numbers with thread or buttons.
- Include a small surprise and an interesting fun task in each compartment: make a garland, build a snow fort, decorate a Christmas tree, write a letter to Santa Claus, take a walk in the park or help mom prepare a festive dinner - there are a lot of options.
Using beautiful ribbons and bright buttons, you can make a stylish designer Christmas wreath.
Postcards decorated with button patterns will be useful for any occasion - a flower will be suitable for grandmother’s birthday, for Defender of the Fatherland Day dad will be pleased with a tank made by a loving child, and a veteran will be pleased to receive a touching postcard on Victory Day with a carnation made from glued red buttons. For Easter, an interesting craft would be wooden egg-shaped blanks covered with buttons.
Decoupage - stylish decoration
This decoration technique is being talked about more and more often - it is very popular among those who do handmade things. The advantages of such hand-made frames are obvious: elegant expressiveness, simplicity of design, absolute undemandingness in materials. Here's what you'll need if you decide to decoupage:
- any photo frame;
- sandpaper;
- PVA glue diluted with water;
- a pair of brushes;
- decoupage materials for finishing.
Technology
- go over the frame thoroughly with sandpaper;
- apply the adhesive solution to the front of the frame;
- cut out the desired fragment from the decoupage material and stick it to the place marked with glue;
- smooth it very well so that there are no bubbles left that could spoil the impression of the work;
- leave the frame under the press for a few minutes;
- remove all excess, clean off any debris and thoroughly dry the resulting frame.
In the interior, such DIY photo frames look amazing, and a large selection of materials allows you to bring your wildest idea to life. Take action!