A paper heart for children can become a craft that is relevant for any holiday: this symbol reflects all the warm feelings that every child experiences for their closest people.
By making even a simple heart out of paper with your own hands, your baby will be reminded that there is always a place in his little heart for a loved one.
DIY paper heart
Of course, there are a huge variety of ways to make a heart out of paper. We propose to consider the most interesting and unusual of them, and then choose the one that your child will like best and will be able to do.
Heart made from pieces of paper
In order to make a heart we will need to cut out a base from white paper. To do this, fold a sheet of paper in half and cut out half a heart on the fold. Open both halves and the base of the craft is ready.
Paper base
Cut out strips from pink paper. You can use paper of different shades.
Strips of pink paper
Cut up pink paper. It is not necessary to cut it into even squares - random cuts look interesting in their own way.
Cutting paper
Apply glue to the base and glue our paper cuts.
Glue paper cuts
Heart applique made from pieces of paper - ready!
Heart applique made from pieces of paper
Openwork valentines
Openwork paper hearts look gentle, like a weightless cloud or a pattern from a skilled artist. They are very easy to make, and the result exceeds all expectations. Here are several options for openwork hearts.
Option 1
First, we cut strips of pink paper about 1 cm wide. Their number must be even.
Now we stack all the blanks one on top of the other, in a stack. On one side we fix the strips with a stapler or PVA glue. And on the reverse side we shorten them trampled on. 2 long ones remain in the center, each subsequent one (symmetrically on both sides) becomes shorter by 1.5 cm.
We divide the strips in half and bend them downwards so that the fixed ends remain in the center of the work. We trim all the edges and again fix them with a stapler or glue. An openwork heart comes out of stripes.
If the top edge of the strips is connected to the bottom, you will get an equally beautiful heart.
Option 2
Using a stencil, cut out a heart from colored paper. Fold it in half and draw a beautiful pattern. You can depict a tree with fruits in the form of miniature hearts. Using sharp scissors, cut out according to the graphic design.
We open the resulting blank and see that the pattern on the left and right is the same. But in general it is a branched tree. This technique is called vytynanka.
All that remains is to glue the openwork heart onto a sheet of colored cardboard in a contrasting shade. The valentine card is ready.
Option 3
Using a stencil, we cut out a blank from white paper and a heart of the same size from red paper. On white paper we draw openwork patterns that are closely intertwined with each other.
Now we fold the red and white hearts and begin to cut out the extra fragments of the pattern with sharp scissors.
This is how beautiful a heart with a beautiful pattern looks.
Glue it onto a yellow rectangle so that the design can be seen even better.
Option 4
Using a stencil, draw a small heart on a sheet of pink paper. The paper must be double-sided.
In this heart we draw a spiral line that follows the contours of the image.
Fold the sheet in half and cut out two hearts according to the graphic design. They come out like a long spiral.
We fold a white sheet of paper in half and trace the palm so that the little finger is on the fold line of the paper. Cut it out and get something like this.
In the center we glue two openwork hearts, glued together by the centers. A valentine card entitled “Our hearts are in your hands” is released.
Option 5
Again, cut out the heart using a stencil on a sheet of double-sided colored paper.
Fold it in half.
And starting from the bottom corner we make cuts, trying not to reach the top edge by 0.5 cm. The distance between the cuts should not be too large (up to 1 cm depending on the size of the base). When we approach the semicircle of hearts, we need to make an additional fold and make cuts.
Then we unfold the workpiece to its original position. The result is a heart with horizontal stripes.
Now all the stripes need to be bent alternately to the right and left sides so that the heart acquires volume.
The result is weightless clouds in the form of openwork hearts. Smaller hearts look no less original.
If you attach a pink thread or fishing line to them, then the crafts can be hung on a chandelier. These openwork hearts are quite easily made from ordinary colored paper.
Paper heart (openwork postcard)
For an openwork heart, we need to cut out three hearts of different sizes and shapes from red paper, one heart from pink paper, as well as a frame and a declaration of love.
Materials for an openwork heart
Glue the large hearts together so that the red plain one is in the back, the red openwork one in the center, and the pink one in the front.
Gluing hearts together
Glue a declaration of love.
Glue a declaration of love
Glue a small red heart on top. The paper heart is ready - all that remains is to hand it to your loved one.
Paper heart with a declaration of love
You can make a heart from small colored pieces of thin paper using the cutting technique.
Heart made from pieces of paper
New ideas
We offer you other diagrams for assembling beautiful hearts using the modular origami technique:
№ 1
№ 2
№ 3
№ 4
№ 5
A lot of beautiful figures, figurines and souvenirs can be made using the modular origami technique, but you should remember that this is not a simple task, but an activity that requires attentiveness and perseverance from a person. Therefore, if you decide to do this business, do not give it up halfway, and then you will achieve good results and great success.
Related article: DIY knight helmet for a boy made of cardboard and paper
Heart with paper roses
A heart with roses, decorated with a ribbon around the edge, looks very beautiful.
Finish the edge with ribbon
Fold using a stapler or glue the flower buds together.
Forming buds
Glue stems with leaves and buds to the heart. At the bottom we decorate the craft with a beautiful ribbon. Paper heart with flowers - ready!
Paper heart with roses
A simple heart based on the origami principle
To construct a heart using the origami method, you will need rectangular paper of any color.
Manufacturing work:
(Step 1)
- mark the middle on the sheet;
(Step 2) - we fold the material as in the manufacture of an airplane;
- bend the workpiece and repeat the second step on each side;
(Step 3) - after bending, a pressed diamond forms in the center of the material;
- fold the corners a few centimeters; (Step 4)
- fold the material along the marked lines.
The heart is ready. It can be used as a greeting card or as an addition to a bouquet of flowers. A heart like this with paper flowers would look perfect. We talked about how to make them in one of the previous articles.
Hearts made from paper cupcake tins
Hearts cut out of paper cupcake tins are interesting. Cut out the heart from the mold.
Cut out the heart
Let's straighten it out.
heart
You can color them using prints made with cotton swabs.
Apply paint to the hearts
Moisten such prints a little with water and you will get an original color.
Pour water from a pipette
You can glue a ribbon to the heart.
Heart made from paper molds
Option 1
In order to sew such a toy you will need red and white felt, threads, padding polyester, and scissors.
Draw two hearts of the same size on felt. We cut out wings from white fern.
We compress two hearts, but leave a small hole. You need to insert a padding polyester into this hole and place a stick. Sew up the hole.
Yes, and don’t forget to place the wings in the right place during stitching and stitch them.
Simple hearts made from paper strips
Hearts are easy to make from paper strips using a stapler.
Paper hearts
Dip one edge of the heart in glue.
Dip in glue
We use them to decorate a whole tree, into the silhouette of which it is very easy to turn the contours of a child’s hand cut out of brown paper.
Tree made from a pen print
One by one, glue the hearts to the palm.
Glue the hearts
This way you can design a greeting card or a painting.
Heart applique
Slightly more complex hearts are made from strips of colored paper, the ends of which are twisted into curls. You can make a very beautiful, elegant pendant from such hearts.
Hearts made of colored paper
You can cut a heart out of paper, cut it into strips and glue it onto a plastic tube. We will make a very simple and cute Valentine card.
Heart - valentine
Multilayer hearts
Multi-layered hearts literally attract the eye. Subtle lines that transform into a different shade are truly mesmerizing. Try doing something like this and capture the imagination of your loved one. Here are several options for making multilayer hearts from colored paper and cardboard.
Option 1. Simple heart
Cut out several hearts of different sizes. We take into account the alternation of dark and light shades relative to the size of the workpiece.
Glue the hearts one on top of the other, moving from the largest to the smallest. The result is a multi-layered multi-colored heart.
Option 2. Heart with an accordion
Cut out a large pink heart. Glue a smaller heart onto it, cut out of crimson paper with curly scissors.
Now take red double-sided colored paper, cut off a strip and fold it like an accordion. On the very top part we draw half a heart. This must be done so that the fold lines capture the drawing.
Cut off the excess paper. We unfold the workpiece and see 4 hearts fastened together.
Glue them by the edges onto the raspberry heart.
Add a few more small hearts and fold the work in half.
It turns out to be a multi-layered valentine with a surprise inside.
Option 3. “Three-story” postcard
We bend a sheet of white cardboard so that we get 3 parts. We cut off the upper part at an angle, moving from the left corner to the right. As a result, some kind of steps should form. We also cut out small hearts from pink and raspberry crepe paper.
Glue hearts along the top edge, alternating shades.
Using a marker we write the word “Love” all over the white background. The multilayer valentine card is ready.
Option 4. Original Valentine's card
Cut out several hearts from colored cardboard: 1 large raspberry, 2 large red and 1 small raspberry.
We fold the red blanks in half, and apply a little PVA glue along the edge of the crimson one.
Glue the red hearts so that they can open on the sides.
We place stickers in them in the shape of miniature hearts.
On the central part we glue a small wicker heart and miniature blue stickers. There are so many layers to this valentine that it looks like a puzzle.
Option 5. Heart “iso-thread”
Draw the heart so that one edge is on the fold line. After we cut it out, you will get a blank in the form of two connected hearts.
On one of the parts we draw dots and make small holes with an awl.
Using a needle and thread, we embroider the design using the isothread technique.
The options can be very diverse. You can use red flowers and voluminous hearts as decorations. These valentines look very tender.
Option 6. Multilayer card with hearts
Cut a sheet of white cardboard in half lengthwise and fold it like an accordion 4 times. From colored paper we cut out rectangles (4 pieces) that are sized to fit the side of the accordion.
Glue them 2 pieces on each side of the paper strip. We prepare stencils of three hearts of different sizes.
On the first sheet we cut out the largest heart, on the second - a smaller one, on the third - the smallest, and the fourth side remains intact.
This is what the work looks like from the reverse side.
Fold the accordion and you get a multi-layered valentine.
If you unfold it, then all the hearts are clearly visible through the holes.
Option 7, in the spirit of “yin-yang”
We prepare a stencil in the form of two hearts connected by a curly part in the center.
We cut out a blank from double-sided colored cardboard using a stencil.
We bend along the line of joining the side hearts. And glue a beautiful openwork heart in the center.
Connect the side hearts together. Decorate with small hearts. The result is a multi-layer valentine in the shape of a book.
You can use 2 adjacent shades. To do this, cut out the middle part with one heart from pink double-sided cardboard, and let the second heart be red.
Glue the red heart to the side. We place a beautiful multi-layered heart in the center. Bend the sides into the middle.
We connect the halves and decorate with flowers. This valentine looks more original.
These multi-layer valentines can be made using stencils from colored cardboard and paper. Some of them even resemble a puzzle, so they will be interesting not only for an adult, but also for a child.
Heart with roses applique made from rolled paper
An interesting paper heart is made using the appliqué technique from rolled paper. We will need to roll the colored paper into a tube, then cut the tube into small curl pieces.
Cut the tube into curl pieces
We fix the ends of the curls with glue so that the curl is sufficiently free. Glue the curls onto the paper base.
Glue the curls onto the paper backing
Glue small green curls onto the base. Here is a “heart” applique decorated with a bouquet of roses!
Applique “heart with roses”
Heart made of triangular modules step by step instructions. Modular origami heart
Modular origami offers many assembly patterns and completely different and interesting figures. Such paper figures can be an excellent gift for both women and men.
For example, for Valentine's Day you can make a three-dimensional heart that will delight the eye and become a luxurious gift for a loved one.
You just need to be patient right away, as you will have to spend quite a lot of time.
It is worth saying that novice origami artists can try to make ordinary origami hearts, which will not take much time, and then start assembling the masterpiece, which is described below.
What does our product consist of?
It consists of triangular modules that are interconnected. In total you will need 370 pieces of red color, of course you can use other colors, but then it will already be some kind of fantasy heart.
To make the heart more voluminous, more modules should be added in the initial rows.
The process of making a volumetric origami heart can be seen in the step-by-step instructions on how to make a modular origami heart below.
Volumetric heart using modular origami technique
The first two rows are made of only 5 modules, and in the 2nd row 5 parts should be added, so that the 2nd row contains 10 parts in total. An increase in the number of parts occurs so that the figure receives its required volume.
The 3rd row also consists of 10 modules, and again you should add 1 module each, just like in the 2nd row.
The 4th row should consist of 20 modules, it is worth dividing them in half and adding 1 module on each side, opposite each other. As you can see, here, too, adding modules serves to give shape to the craft.
In the fifth row there is no need to add, but in the 6th row 2 modules are added at once.
You need to add 1 module to the additional modules of the 6th row, so you get the 7th row. It is due to the addition that an oval shape is formed, which subsequently forms the base of the heart.
The 8th row is assembled exactly the same as the 7th. The 9th and 10th rows are formed without additions, it is basic.
After this, you should find the added modules in the 8th row and insert 4 modules on each side between them. For 4 module 3 and so on in a circle. Thus, a handle is formed, like a basket.
To prevent a hole between the “handle” and the sides, a module is added. It is worth noting that in this case, adding a module gives the product an aesthetic appearance.
The last 3 rows end and close.
Of course, the assembly diagram of a modular origami Heart is not complicated, but still, in order to understand it, primary skills in the art of origami are required. Moreover, making this particular figurine requires patience and time, and beginning origamists just don’t have enough of them.
You can watch the video and then the assembly process will be easier.
Origami shirt with tie in 5 minutes by February 23rd. Hello dear masters and craftswomen. I offer you an origami diagram for making a shirt and tie. Make a gift on February 23 in just 5 minutes. To make a shirt with a tie, I bought special A4 size paper - this is decorative paper with a density of approximately 80-100 g/m2. Density like […]
Tank for February 23rd for real men. Hello dear masters and craftswomen! There is very little time left until the holiday of real men - February 23! Many people are now racking their brains about what to give their men, both big and small. And I argue that the best gift is a gift made with your own hands. I bring to your attention [...]
How to give a gift on February 23 Many people, especially children, are faced with the problem of what they can give to their dads, brothers, and grandfathers on the great holiday of our state - Defender of the Fatherland Day. I would like to offer you a simple and reliable way to solve this problem. I suggest you make a personalized medal with the symbols of our state. At work I was offered [...]
Magnificent swans
Swan in blue. Video tutorials and diagram. Part 3.
Source: https://pippins.ru/serdce-iz-treugolnyh-modulei-poshagovaya-instrukciya-modulnoe-origami.html
Card with a heart made of curled paper
We take special paper for quilling or cut it into thin strips. We twist the strips into curls. The ends can be fixed with glue or left free.
Twisting the strips
Glue a heart from a strip of paper onto the folded base of the card.
Glue the heart
We place our curls of rolled paper (rolls) inside the heart. We fix them with glue. Postcard with quilling heart - ready!
Card with quilling heart
Watch the video on how to make a beautiful heart pendant using the quilling technique:
Heart bookmark
This method is also easy to implement. Even a child can handle it. And step-by-step instructions for bookmarking origami in the shape of a heart will help with this.
First, decide on the size of the product. The standard size is 10*10 cm. The dimensions can be increased and you will get a larger bookmark. It is not advisable to reduce it, otherwise it will be difficult to carry out small details.
Heart made using quilling technique
In order to make a heart using the quilling technique, we need quilling paper. We roll paper into rolls (the basic elements of quilling). If you glue paper strips of different colors together, you get very interesting two-color rolls.
Paper rolls
We make a heart out of paper rolls. We fix each roll with glue.
Lay out the heart from the rolls
Heart made using quilling technique - ready! With this heart you can decorate a greeting card or make an original Valentine’s card for your loved one.
Heart quilling
And here is a wonderful heart using the contour quilling technique:
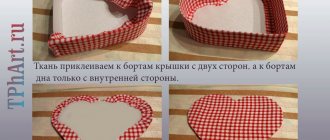
Heart-box
Almost any gift can be placed in a heart-shaped box. For example, candy, jewelry, a toy or a watch. You can make a box using several options:
Option one
Prepare for work:
- fairly thick paper;
- glue;
- pencil;
- ruler;
- stationery knife or scissors;
- sample.
We have already prepared a template for this box for you.
You can do your main job:
- transfer the drawing to thick paper and cut it out;
- Coat all joints with glue and glue them together;
- wait until it dries completely (this depends on the type of substance used, if it is PVA, just wait half an hour).
The box is ready. The beauty of this design is that it can be made to any size.
Paper heart scrapbooking
You can make a paper heart using the popular scrapbooking technique. The main thing for scrapbooking is multi-layering and the effect of antiquity. Based on this, we select materials for crafts.
Paper heart and craft materials
On the paper heart we glue an openwork paper napkin, an inscription, and an angel figurine.
Glue a paper napkin, an inscription, an angel figurine
We complement the craft with paper flowers and ribbons. Scrapbooking heart - done!
Heart scrapbooking
Paper ring with heart decoration
Ring with a heart
Of course, a finished paper ring will not last long if you wear it on your finger. But if you put it on a pen or pencil as a decoration, its service life can be long. Yes, and you can always replace the product, especially since it is done very quickly.
Let's get started:
- Take a colored paper square and draw four lines on it with a pencil. The first two lines should be 1/8 wide of the total size of the square. The third line should be 2/8 wide, and the distance from the third to fourth line should be 1/8 of the total size of the square.
- Fold the sheet vertically. We unfold the material. Now you need to bend the first strip that was drawn earlier. Turn the paper over with the different colored side facing you.
- Fold the triangle at the top. Now the blank resembles a future airplane. We turn the corner in the opposite direction from us.
- Carefully bend the border from the center of the product in opposite directions. We lower the corners that stick out down. The “ear” elements should remain at the top; we remove their tips.
- We roll up the part of the material that remains into a tube or accordion. Turn the product over. We connect the resulting belt and fix it.
It turned out to be a charming ring. Even if it is not diamond, be sure to give it to your soulmate.
Volumetric paper heart pendant
You can make a very impressive heart pendant from thin tissue paper. We cut out nine identical hearts according to the template.
Cut out nine hearts
Sew the heart in the center using a sewing machine. We do not cut the thread - we will use it to hang the craft.
Sew a heart
We straighten the paper - the voluminous heart is ready!
Volumetric paper heart
Craft cold heart
Olof the snowman can be made from fluffy pompoms. To do this you will need cardboard, white wool, black thread, glue, scissors, ready-made eyes and colored paper to create a nose and mouth.
First of all, we prepare blanks for our pom-poms. These should be 8 ovals of different sizes. We take two at a time and start wrapping them with wool. There must be a lot of it so that our snowman turns out voluminous. We cut the wool along the perimeter and tie it in the middle with thread. Let's fluff up the pompom.
As a result, you should have three pompoms of different sizes. We begin to attach the balls to each other.
Now you can glue eyes, hairs, make a carrot nose out of colored paper and glue buttons.
Weave a scarf from three thick brown threads and tie it on our snowman.
And for those who took the meaning of the craft literally and are not a fan of the famous cartoon “Frozen,” you can make a craft from water. To do this, find a heart-shaped mold, pour water into it and put it in the refrigerator for several hours. The heart is ready. It's a pity that it will melt very quickly.
Valentine's heart with surprise
You can complement your Valentine's heart with a funny paper ball. A paper ball is made from halves of a circle glued together in a checkerboard pattern.
Ball of half paper
Glue the ball onto the base of the card - hearts.
Valentine's heart with surprise
Watch how to make a voluminous paper heart with a ball in the video:
Intertwined hearts
Wicker hearts also have their own zest and a certain charm. They are easy to make, and the result is a beautiful interweaving of straight or curved lines. Here are a couple of options for making intertwined hearts from colored paper.
Option 1
First, let's prepare a stencil. Take a rectangle measuring 8 by 14 cm. Cut off the corners on one edge and draw wavy lines on the other, as shown in the photo.
Cut out 2 blanks from red and pink paper using a stencil.
Let's connect the resulting stripes in a checkerboard pattern; the result should be a two-color heart with a beautiful weave.
Now let's take another stencil of the same size and draw other lines on it, straight and with curves.
A heart will come out with a different ornament.
The more creative the design on the stencil, the more original the weaves will be at the stage of connecting two halves of different shades.
If you use double-sided colored paper, then the valentine will be beautiful on both sides.
Paper heart pendants
You can make beautiful and delicate pendants from paper hearts that can be hung on a window or decorated with a chandelier.
Pendant made of hearts and circles
You can even make a garland from many glued hearts.
Pendant made of multi-layered hearts
The simplest model
When you need to quickly make decorations for a card or gift box, there is no better option. You can make an accessory in 5 minutes.
Assembly algorithm:
You will need a square of red or pink paper with a side of 15 cm. Place the figure with the top facing you and fold it in half from top to bottom. Open it, turn it 90° and repeat the same procedure. We get a square with two diagonal folds.
Again we place the workpiece on the table with the top facing us. Bend the opposite corner towards the center line. We “close” the lower part like an envelope. The vertex closest to us should now be on the top fold line.
Fold the right side to the center line. We do the same with the left. We get a heart shape, but the figure is too angular and I want to round it a little. To do this, turn the workpiece over to the reverse side and carefully bend the protruding parts.
Here's what the finished product looks like:
You can put a note with congratulations and wishes inside. There are several similar sheet folding techniques that allow you to create the same model. Here's another simple diagram:
Heart made of foam and corrugated paper
Cut out a heart from polystyrene foam. Cut out a heart from corrugated paper.
Foam heart
We wrap it in corrugated paper, securing it with glue or double-sided adhesive tape.
Wrap in corrugated paper
The edges of such a heart can be wrapped with beautiful ribbons.
Beautiful heart
Each craft can be supplemented with unusual elements, decorations, drawings - then it will acquire a special charm. See how to make your own Valentine card.
Origami heart for beginners
Take a square sheet of thick double-sided paper and visually divide it into three parts with verticals. Fold the bottom right corner two-thirds, and then clearly fold both sides one-third along it. Unfold the piece with the pocket corner facing down and fold down the top half of the bottom layer. You can straighten the top halves to make them more rounded.
Photo: vivababy-opt.ru
Lovely affairs
An origami heart with wings is immediately associated with the mischievous Greek god of love, Cupid. It seems designed to convey playful or tender messages. You can write a note to your other half, hide it in such a winged heart and leave it on the table when leaving for work. The recipient is guaranteed a good mood.
You will need a sheet of paper with one side red and the other white.
Fold a 15x15 cm square in half lengthwise. Then peppered. We open the workpiece and place it in front of us with the white side up.
Fold each half of the square in half again to create a basic “cabinet” (or “door”) shape. Turn the workpiece over to the reverse side.
Fold the bottom corners to the center line. At the same time, the back half of our figure remains open. We turn the workpiece over again. Bend the top narrow rectangle to 1/3 of the height.
We open the newly folded sections like a “pocket” and smooth them out. In the center you get a figure resembling a bow. Fold the right corner of the remaining rectangle down at an angle of 90°. We do the same with the left one.
Bend the upper outer corners of the heart back to make it more round. The model is ready. In the “pocket” in the center you can insert a note, a congratulation, or put a small gift like an elegant ring.