| Authors) | Ambartsumova Ekaterina, 4th grade. |
| Age | 8-9 years |
| Educational institution | Secondary school No. 1, Pushkino city, Moscow region, Russian Federation. |
| Materials | Colored paper, velvet paper, glue, gel pens. |
| Teacher | Grechushcheva Marina Vladimirovna (mother) |
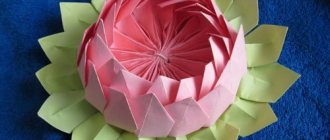
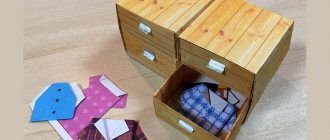
I made two women's and two men's skullcaps. From different regions of Uzbekistan: tall men's from the city of Chust, short men's - Margilan, all embroidered with ripe pomegranates - from Shakhrisabz - gilam duppy and the most popular among girls - Andijan - all embroidered with roses.
They were cut out of paper, the patterns were glued on, very small ones were drawn with gel pens.
Since ancient times, one of the main types of headdress in Central Asia is the skullcap - an embroidered men's or women's cap, which received its name from the Turkic word “tyube” (“tobe”), meaning the top, the top of something.
Mentions of headdresses resembling skullcaps are found in historical documents of the 15th-16th centuries. Museum collections contain examples of embroidered skull caps dating back to the mid-19th century. By the middle of the 19th century, the choice of skullcap styles was quite diverse. There were cone-shaped and hemispherical, square and flat ones.
In Uzbekistan there is a huge number of a wide variety of skullcaps, which are divided into several groups: Tashkent, Bukhara, Samarkand, Fergana, Khorezm-Karakalpak, Kashkadarya-Surkhandarya. They are also divided into: male and female, intended for children and infants, as well as for the elderly.
The technology for making skullcaps itself consists of several stages. The small pattern along with the skullcap ornament is embroidered separately: first the upper part, then the edge. The reverse cotton fabric is sewn onto the embroidered parts of the future skullcap. In order to give the skullcap a solid shape, its bottom is stitched, and paper strips soaked in glue are inserted between the lines. The same paper soaked in glue is inserted between the front and back fabric. Thus, the skullcap retains its shape and serves its owner for a long time. The production of a skullcap from cutting to pressing goes through 16 stages, almost all of them are performed by women, and only at the last stages of giving the skullcap a traditional shape do men get involved, since pressing is a very labor-intensive process.
Among skullcaps from all regions of Uzbekistan, the most popular are those made in the city of Chust, Andijan region in the Fergana Valley. They are called “chust-duppy”, high skullcaps. They have a square shape and are distinguished by the simplicity and subtlety of white silk embroidery on a black background. Its main convenience is the use of a combination of classic colors: black and white. This allows you to wear it both everyday and on holidays. The “Chusti” embroidery pattern in the East is traditional: in the upper part there are four capsicums (Kalampir), which are considered a symbol of life and a talisman against the evil eye. It is believed that hot pepper will scare away evil spirits, and its four pods will protect a man’s head from the four cardinal directions. The four parts of the skullcap represent the four periods of human life: childhood, adolescence, youth and old age. The bottom of the skullcap is decorated with embroidered arches, four on each side. Each fragment of the ornament has its own meaning, the small arch is the cradle of a child, and the points above it are the shining light of a new life, the large arch that closes the pattern is the deathbed, illuminated by the last rays of the setting sun, and the elements between them are the difficult path of life. A series of domes along the rim, as a symbol of endless birth and death. A small dome is a beshik, a cradle, a large dome is a tovut, a structure in which people are sent on their last journey. Birth, death. birth, death. and so on eight times.
In the Fergana Valley they also produce Margilan skullcaps - Margilan duppi, they fit tightly around the head and are of small height. Margilan skullcaps are distinguished by their elongated and thin “pod” shape.
Features of paper hats
How to make a cap from newspaper? In fact, everything is much simpler than it seems. Making crafts does not take much time. The technique allows you to make hats for a large number of people. Features of the craft:
- ease of implementation;
- covering your head from construction debris;
- sun protection in hot weather;
- cheap material for manufacturing;
- one-time use.
Paper crafts are suitable for children's games. You can create several hats for your child and his favorite toys. This way, your little one can imagine going camping with his best friends.
Necessary materials
Hats using the origami technique are made from any available paper. They can be folded from newspaper or use unnecessary scraps of wallpaper - the origami hat is so unpretentious in its material. Take yesterday's Izvestia or simple office paper - it doesn't matter. Much more significant is the decor, thanks to which the paper hat will acquire a thematic affiliation (pirate, gentleman, cowboy). To decorate the headdress, use feathers, any appliqués, drawings and inscriptions, buttons and any other available details. So a simple paper cap can easily become a pioneer cap, an army cap, and even a navy cap.
What you need to make a paper hat
To make a paper hat, first of all, you need to prepare a place to work, materials and tools.
It will be most convenient to sit at a table with good lighting. There should be enough space so that you can lay out a sheet of paper and a little more.
For some models of hats, all you need to work with is the material itself - paper. For others, you will need to additionally prepare the following:
- scissors;
- glue;
- paints and decorations;
- ruler, pencil;
- a compass or anything round that can be traced, the right size.
You should immediately clarify what you will need for the work so as not to interrupt the creative process.
Paper cap
A cap made from cardboard is much better than one made from newspaper. It is created on the basis of a sketch, which consists of 6-8 sections. First, they design the drawing in pencil on paper, then cut out the pattern along the marked lines, connect the parts in the center, aligning the holes made with a hole punch. The visor is glued to the main part. If the product is decorated with various decorative elements, you will get a bright and beautiful baseball cap.
Decorative and unusual newspaper decorations
Almost all paper hats are functional to one degree or another. They usually perform a protective function. A separate chapter presents purely decorative, unusual hats. They are distinguished by their original shape or unusual size. Of course, you will have to spend more time making them. But in such a hat you can safely participate even in a theatrical production.
Pirate hat
This wide-brimmed hat is perfect for theatrical productions, for example, at a summer camp. And it will also become an indispensable attribute for role-playing robber games.
Cowboy from a newspaper
This cowboy hat is truly a work of art. It looks authentic, and you won’t be embarrassed to wear it even to a party to surprise your friends with an original headdress. This hat can be decorated with a large buckle or even a paper sheriff's star. To increase strength and service life, newspaper hats can be coated with paste (a mixture of flour, water and glue). It is also recommended to paint them with paints.
The scheme for creating a cowgirl is quite complex, but there is something to work for.
Most origami patterns for making paper hats are simple and straightforward. You can make them together with your children, because the material for these crafts is always in the house!
Original paper sombrero
To make an original long-brimmed hat you need to prepare:
- Whatman.
- Old plastic flower pot.
- Glue.
- Paints, brushes.
Using a compass and ruler, mark a circle for the hat on whatman paper.
In the center of the circle you need to prepare a small hole that corresponds to the diameter of the flower pot. Corresponding to the contours of the pot, an additional cone is cut out of paper.
Color the brim of the hat in any pattern (you can use photos of real Mexican hats as an example). Place the pot in a paper cone, attaching it with tape or strong glue. Attach the finished hat cone to the wide brim.
Carnival hat cylinder made of cardboard
Is carnival coming soon? Will your child be dressed as a magician or a gentleman from London? Or maybe she will be a real lady who cannot go out without an elegant miniature hat? Then you definitely need to learn how to make a cylinder hat out of paper. Of course, plain paper will not work for this job. The material should be denser, it is better to use cardboard.
What else is needed for this job:
- the main material (cardboard) is selected according to the theme of the future costume;
- pencil for making marks;
- PVA glue;
- adhesive tape;
- fleece;
- To create a beautiful shimmer, use varnish and a wide brush.
Before you make a paper hat with your own hands according to the instructions, you need to prepare for the upcoming work. It is impossible to make a top hat without measurements, of course, unless it is a miniature hat to decorate your hairstyle.
You are required to:
- measure the circumference of the child’s head with a sewing meter;
- think about what height of the finished product you need; making a very high cylinder is not recommended, it can cause discomfort when worn.
Now we’ll explain step by step how to make a paper hat with your own hands:
- We transfer the obtained measurements onto paper. The first thing to do is to cut out a cylinder (the top part of the hat) according to the circumference of the head.
- Based on the resulting cylinder, we cut out the bottom and crown. Glue the parts together (Step 2)
- Let's start making the cylinder fields. We attach the blank to the cardboard and trace it. We cut out several identical parts. The second part will be attached to the crown of the finished cylinder. Don't rush to cut the first one. Draw another circle inside this circle with a diameter smaller than that at the base of the workpiece. We cut out the parts and cut the inner circle with a large fringe. Glue the elements together.
- Almost done. You need to attach the previously obtained “teeth” to the base with glue. To ensure that the finished hat fits tightly to your head, glue a layer of fleece inside.
For a spectacular result, coat the cylinder with varnish and leave until completely dry. Now you know how to make a cylinder hat out of paper with your own hands. But this option is suitable for little gentlemen, but what about ladies?
Types of hats
At the peak of popularity today is the fedora hat. This is a soft felt hat with a wide brim that goes well with a coat and dress, sunglasses, and adds elegance even to girls in jeans! Sewing such a model yourself is as easy as shelling pears.
Carnival hats
Carnival, party, happening, flash mob, corporate evening or Halloween are days when you can have a lot of fun and surprise everyone with your unusual look.
A carnival classic is the witch's hat with a huge brim and a high, pointed crown. Take cardboard or a frame onto which you stretch black fabric with a veil - the image of the witch is ready! You can also dress up as a fairy or dryad by decorating your regular hat with artificial leaves, flowers, fruits or other natural symbols.
What about the male gender? The image of the dashing Jack Sparrow, the famous pirate captain from Hollywood films, is now popular. In this case everything is simple. Jack's typical headdress is a bandana with beads, to which various intricate "amulets" made of pebbles and "gems" can be sewn or fastened.
Another option is the cocked hat of a 17th century pirate. Fold the plastic cardboard accordingly, fasten the margins with a stapler or needle and thread, glue on a feather or brooch - in front of you is a detail of the toilet of not only a pirate, but also Baron Munchausen
Don't forget also about papier-mâché animal masks and Venetian images!
Children's hats
If you have a child (especially if there is more than one), then every parent may face the following situation: an original carnival costume for a matinee is urgently needed! And the parents are in a panic, because often they don’t have extra money set aside for such one-time new clothes, but they still need a suit. And your baby will be sad if his friends in the kindergarten group or classmates come in bright and cheerful costumes, and he alone will be deprived of this pleasure. Don't be discouraged if your child's wishes go beyond the range of stores and your budget.
In any case, the most original costume will only be homemade. And the highlight will be, of course, the hat!
Does your son want to be a hussar or a musketeer? The main “trick” of the image of a fencer-musketeer, of course, is an elegant hat with a feather and curved brim. It can be made from a piece of felt, cardboard or papier-mâché.
Feather - artificial or natural, which is found in the house. It can be painted in an unusual color to match the costume - a musketeer's cape. And for a hussar, you can build a simple and comfortable shako with a visor made of cardboard, covered with fabric. Don’t forget to attach “regalia” to the hussar’s hat – a twisted braid with a tassel, a plait with fur imitating a sultan. The little hussar will hit the girls at the ball in the heart!
For a girl, there are many more options - from the crown of a little princess or a fairy-tale princess to a witch in a huge wide-brimmed hat.
Wedding or evening headwear
Wedding celebrations are the day when the bride receives maximum attention. Only the sparkle of loving eyes and good taste can make a newlywed the most beautiful and elegant in the world, but an additional factor can be an unusual hat!
The modern bride prefers small, compact, symbolic hats that give the impression of a hairpin or brooch. This format is convenient in its miniature size and perfectly highlights the makeup, dress, and beauty of the bride herself. Making such a miniature hairpin hat is very easy. Make a small analogue of a small hat from cardboard, cover it with white fabric, add beads, pearls, rhinestones or artificial (or even natural!) flowers. This will be a unique piece!
For an evening celebration, to the theatre, or opera, you can wear a pillbox hat. This is a simple and very beautiful option that goes well with an evening dress or suit.
Men's hats
A classic Stetson on your head, an umbrella-cane and a tweed suit - and a real movie hero leads you by the arm. To make your own Stetson, you will have to master working with felt, but there are always analogues that will be useful to your friend, husband or boyfriend.
A sophisticated and sophisticated top hat, handcrafted from quality materials, makes a very inspiring gift for a spouse, lover, friend or colleague. Indeed, is it possible to find a similar gift so simply and easily somewhere else? This is a real return to the 19th century, which would be appropriate at a classical ball, in the theater, at a masquerade, and some wear such hats every day - for example, supporters of the steampunk style.
Panama hats
Summer season, vacation or heat is covering the city - in all these cases a nice Panama hat is definitely required. It will protect against harmful ultraviolet rays and help prevent dry hair (which, among other things, fades in the sun). A Panama hat can be made from straw or knitted or crocheted. Sewing from fabric is possible from leftovers from other products. Let's say you have cut out a new sundress for yourself for the summer, but the fabric remains. Make a scarf, Panama hat or bandana out of it - and the whole set is ready.
Small elegant top hat for girls
The following instructions from megamaster.info will tell you how to make a paper hat that will decorate any holiday outfit. It is attached to the hairstyle using hairpins or a hoop. This accessory can be used not only by children, but also by adult girls. Such mini cylinders can be a good solution for photo shoots.
Prepare before work:
- thick cardboard;
- PVA;
- glue stick and gun;
- ruler;
- corrugated paper;
- paper for working using the quilling method;
- braid;
- scissors.
Before manufacturing, as in the previous version of the cylinder, we need to decide on the dimensions. There is no need to measure the circumference of the child’s head; the work can be done “by eye”. For those who are engaged in such creativity for the first time, we recommend using standard sizes; we will indicate them during the work.
And now the instructions on how to make a miniature paper hat:
Small elegant cylinder (Step 1)
- Take a ruler and pencil. Draw a strip on the cardboard with a width of nine centimeters and a length of forty-two centimeters.
- On the resulting strip we draw small stripes on the bottom and top. From the edge, each line drawn should be from one to two centimeters. Using the resulting strips, we cut out the cloves. They will help us glue all the resulting components together.
- We fold the strip and secure it. Use glue. We recommend using a stapler, this way the work will be stronger. We cut off the resulting excess part during the folding process. (Step 2)
- Make two circles. It is very important that they are level and match the required size. The first diameter should be twenty centimeters. It will be used as the brim of the hat. The size of the second circle should be twelve centimeters - this is the top of the product.
- We take a cylinder that has already had its teeth and the largest circle cut out. We glue the blanks. Start from either side. After this you can glue the bottom of the hat.
Externally, the cylinder may seem ready. It needs to be decorated. We use corrugated paper and quilling techniques. After practice, you can indulge in fantasy.
So:
(Step 3)
- We cut out a circle from paper, it should be smaller than the base, and apply it to the cap. We wrap the excess part inside and secure it with core glue. We decorate the top of the mini cylinder with braid;
- We make flowers. Use paper that matches the color of the hat. Use a special stick to twist the strips. Form flowers. Use the same principle to make the leaves. Glue the resulting products to the cylinder.
- To prevent the finished accessory from falling off your head, attach it to a hoop, you can use an elastic band or braid.
This is just an example of work, you can make the product any way you want, with larger or smaller margins and decorated as you wish
Cap
Suitable for the costume of an astrologer, Pinocchio, fairy.
Note!
DIY necklace: how to make it quickly and easily from scrap materials (160 photos)
How to make beads with your own hands step by step - an easy master class with photos and descriptions
DIY pencil case: a detailed description of how to make a unique pencil case for school
The simplest of all options, this is the basic version for creating multiple models.
- Using a measuring tape over the ears and above the eyebrows, measure the circumference of the head.
- It is necessary to make a cone, this can be done either using mathematical calculations or the fastest method - folding a sheet of whatman paper into a cone, where the outer part of the cone is bent, glue is applied and the seam is pressed tightly for better adhesion. A measuring tape with the circumference of the head marked is placed on top of the rolled cone. Markings are applied and excess is removed with scissors.
- The cone is decorated and decorative elements are added.
If desired, the cap can be turned into a Dunno hat or a wizard’s hat - for this:
- A circle is marked and cut out - future fields.
- You need to make cuts at the bottom of the cone, then bend the cut parts inward, place the cone in the center of the circle and draw around it with a simple pencil. Cut out the resulting smaller circle.
- Bend the parts that were previously bent inward outward and apply glue.
- Place the prepared disk with the hole on top of the cone and press tightly to the cut parts with glue applied.
- Decorated as desired.
How to crochet a men's skullcap?
Beautiful and fashionable men's skullcaps. The masters will cope with them in no time and therefore you can start executing 5 models at once.
Each has its own unique diagram and detailed description from the master.
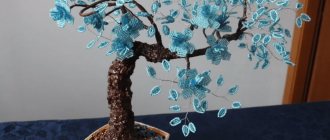
Tajik
The knitted men's skullcap has a familiar shape. But its bottom is decorated with the brightest flowers. It simply fascinates with its bright colors. For work use:
- yarn of different colors of medium thickness;
- hook according to the thickness of the yarn.
Measurements
Take measurements for head circumference. For the height of the skullcap, use the indicator not from the lobe, but from the upper edge of the ear to the next ear in the same place.
Sample
Knit several rows according to the single crochet pattern to complete a square. Next, calculate how many loops are in 10 cm, and how many rows are in 10 cm. Based on the density found, calculate the number of loops to start with, and how many for the circumference of the thing.
Bottom
Work begins with a charming bottom, and immediately several threads are connected, according to the chosen motif.
Sides
Knit the flower completely, and then switch knitting to the sides. For them, the craftsman will need to knit the required number of rows without adding or subtracting stitches. Look carefully at the patterns on the side parts. Here they are presented in simple squares; even a beginner can handle this.
Perform the last row with a slight reduction in loops. Make only 4 decreases so that the product does not stretch for a long time.
Here you have a beautiful do-it-yourself thing ready.
Uzbek of 4 wedges
The type of headdress is a skullcap with four wedges. Very easy to do. Work begins with a square canvas. Then we move on to smoothing the corners and knitting the pattern in a circular pattern. For work use:
- light-colored yarn (medium-thick cotton is good);
- hook for cotton thread.
Measurements
Take measurements of circumference and depth.
Sample
Knit a small square according to the single crochet stitch pattern, which is significant in this product, and calculate the density of the knitting. Then count how many columns there should be in a circle around the circumference.
Square
Make a small square for the top. But knit it not flat, but with a slight cone.
Sides
Next, knit in circular rows, and carefully smooth out all the corners of the finished square. Knit to the desired length and bind off the loops.
Turkmen
A charming and very contrasting novelty. These beautiful diagrams can be deciphered with a little magnification. In fact, there is nothing complicated about it. Simple triangular protrusions. But what combination black and white gives is just a sight for sore eyes.
For work use:
- pekhorka white and black;
- pekhorka hook.
Measurements
Measure the depth and circumference for the future product.
Sample
Using single crochets, make a small fabric and calculate its density. Next, carefully transfer everything into loops, and you can start working.
Bottom
A beautiful thing begins from the bottom and from the very center. You need to make a very flat bottom, and it’s better not to start with the usual short chain and ring. Initially, it is worth making an amigurumi ring so that there is not even a hole left in the central fabric. Then add loops randomly so as not to get wedges or a simple pattern due to adding loops.
Sides
Achieve the desired diameter, and start a simple side. When the increases are completed, make simple circular rows without changing stitches. Include a black yarn pattern.
The work is ready after the required length.
Tatar
Positive and sweetest model
The craftsman should pay attention to the pattern. This is a familiar and ordinary grid
This mesh was previously used by craftsmen to make strong handbags for going to the store.
For work use:
- yarn of different colors;
- hook according to the thickness of multi-colored yarn.
Measurements
Carefully measure the circumference and depth.
Sample
Knit a small square fabric and calculate the knitting density for the mesh. Then calculate how many loops are needed for the circle.
Net
The mesh starts from the top of the head and continues with some additions in circular rows until the required size of the headdress. The last rows are best done with simple single crochets.
Dunno Hat
The photo of a hat made of paper, repeating the headdress of the fairy tale Dunno, beloved by many children, attracts with its amazing similarity to the drawn original.
If desired, you can make this accessory yourself:
Measure the child's circumference and draw a circle according to the dimensions.
- Step back 2 cm from the circle and cut out.
- On a two-centimeter strip, make cuts every 3-4 cm.
- Step back at least 25 cm from the inner edge and cut out the brim of the future hat.
- Visually divide the previously cut circle into three triangles and cut out one of them.
- We make notches on one of the sides.
- We roll the cone and attach it to the hat using fastening cuts.
- We paint the entire surface with blue paint or cover it with fabric.
- We cut out a tassel from corrugated paper and “hair” characteristic of Dunno from yellow paper.
It is advisable to complement the fairy-tale image with a blue tie, which is also easy to cut out of paper according to the template provided.
As you can see, most hats are made according to an identical pattern, so often you just need to stock up on an appropriate photo example, patience, try to break the hat down into its component parts and make a beautiful accessory for any occasion.
How to make a stylish hat with your own hands
If a creative impulse has struck you and you are ready to make a hat, do not be afraid of experiments and first trial options with errors and miscalculations. The main thing is to start, and then your hand and eye will tell you how to cut and sew correctly. Understand your preferences, check the size of the person who will wear the hat - and go ahead!
Explore your stash of fabric, scraps, different decorative beads or unexpected details that can be placed as decoration on a hat. The combinations can be the most surprising. A huge selection of decorative fittings is now on sale. Use ribbons to decorate the crown, use contrast stitching on a machine - it’s very beautiful! Hats with brooches and lace look very advantageous if used sparingly.
You must be able to wear a headdress - boldly, confidently, in the appropriate environment, and then it will delight you and those around you with its individuality and beauty.
We hope that our ideas and suggestions will help you diversify your wardrobe and add some zest to it with the help of an elegant and unique hat.
If you want to further improve your hat-making skills, then there are numerous shops with handicraft supplies at your service. There you can purchase a variety of materials in texture and composition, patterns and get a lot of interesting design ideas. Also, don’t deny yourself the pleasure of leafing through an extra issue of a fashion magazine – fashion designers often pleasantly surprise you by offering very fresh and original styles.
Corrugated paper sports cap
Necessary materials:
- Corrugated paper with vertical folds for the base
- 2 corrugated paper strips in contrasting color
- 1 ribbon of thick paper or thin cardboard
- Lace or braid
- Decorations (eg paper applique)
Operating procedure:
1. Fold a sheet of corrugated paper in half, iron the fold and unfold it.
2. Apply a thin bead of glue directly below the fold line. It is better to use thick, non-spreading glue.
3. Place cardboard tape over the adhesive. Its top edge should coincide with the fold line of the base, and a little corrugated paper should protrude on both sides. Fold these edges over the sides of the tape and glue to it.
4. Apply a thin bead of glue along one edge of the contrasting colored paper tape.
5. Glue the tape along the top edge of the base so that its clean edge (without glue) matches the edge of the base.
6. Fold the bottom edge of the base up and glue the second corrugated paper tape over it.
7. Make a fringe along the entire top edge, capturing both the base and the ribbons.
8. To make a flap along the bottom edge of the hat, simply fold it up 1 or 2 times the width of the cardboard tape inside.
9. Now wrap the piece around your head from the lapel side, measure and cut off the excess warp on one side. Don't forget to leave a small seam allowance for gluing.
10. Glue the hat in the lapel area or fasten it with a stapler. Cardboard tape placed between the layers of paper will prevent it from tearing.
11. Place the hat on your head and carefully gather the top part into a bun. Tighten it with braid or lace and fluff out the fringe.
12. Decorate the lapel with paper applique or other decorative elements as desired.
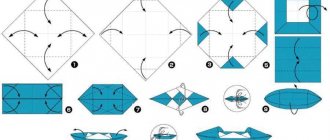
Origami skullcap
This Turkmen headdress, folded by a Russian
by an origamist, you can put it on your head. If you make it from a sufficiently large sheet of paper, for example, from a square with a side of 30 cm.
(1) Start with a "pre-fold". Bend and straighten one layer.
(2) Fold the two front side corners towards the center.
(3) Unfold what happened in step 2.
(4) Repeat steps 1 - 3 from the back.
(5) Fold the left and right corners inward. Use the folds you created in step 2!
(6) Repeat step 5 with the remaining outside corners.
(7) Fold one layer towards the midline on the left and right.
(8) Bend and straighten the white point.
(9) Unbend stage 7.
(10) Here! Now, using the existing folds (made in step 8), fold one layer up.
(11) Narrow the white flap by pulling the outer corners towards the center. Watch out for the black triangles.
(12) Bend the tip down.
(13) Push the tip of the flap into the pocket at the back. This way the tip won't come out.
(14) Repeat steps 7 - 13 at the back.
(15) Fold one section to the right at the front and one section to the left at the back.
(16) Repeat steps 7 - 13 front and back.
(17) Bend and straighten.
(18) Finally, insert your fingers inside the model and open the skullcap wide.
(19) The skullcap is ready!
origaminew.ru
Master classes on creating a hat
Today, the following types of hats are most relevant for children's parties:
- Dunno paper hat.
- Pirate headdress.
- Hat for a hussar.
- Women's hat for a beauty contest.
- Original sombrero.
All submitted works are accompanied by detailed instructions with step-by-step descriptions of actions.
What paper can you use to make a hat?
Paper hats are good to make because you can use almost any large enough piece of paper you have on hand as the base material, for example:
- full spread of the newspaper;
- A4 sheet of cardboard;
- a piece of paper wallpaper;
- office or landscape paper;
- colored paper or cardboard.
Important! Do not use paper that is too thin or soft - it will not hold its shape.
Repair hat made from newspaper
During repairs, construction dust and plaster tend to settle on the hairstyle. To prevent this, you can make a simple boat hat from newspaper.
And it is simple precisely because it is really very simple to put it together:
- Fold a sheet of newspaper in half. Mark the middle longitudinal line of the sheet by bending it in half lengthwise.
- Considering the fold of the sheet as the top, bend the upper corners to the middle line.
- Bend the bottom strip outward butt to the bottom line.
- Fold the bottom corners of the lapels.
- Fold the flaps up from the outside.
- Pull the center points of the bottom. You will get a square.
- Fold the bottom corners outward, bending along a line slightly below the center of the square.
- Pull the center points of the bottom again.
- Fold the flaps outward again.
- Grasping the corners, pull them apart.
- Add volume to the hat.
Having learned how to make such a headdress, you will not have to worry about your hairstyle during any dirty work.
How to make a hat with a visor from a newspaper with your own hands
Another interesting version of a newspaper headdress is a cap.
It is also done by folding paper without using scissors and glue as follows:
- Fold a sheet of newspaper in half. Fold the top corners, closing them in the middle.
- Fold one of the bottom strips in half.
- Bend it from the outside, forming a side.
- Turn the workpiece over and bend the protruding corners of the side. Fold the sides, forming the size of the future cap.
- Fold the bottom strip up to the hem line.
- Fold in the bottom corners.
- Tuck the free corners of the curved triangles inside the side.
- Turn the workpiece over and bend the top corner.
- Tuck it under the side.
- Straighten the cap and give it volume.
This cap can be worn on a sunny day somewhere in the country.
Paper cylinder
The young gentleman will definitely love the paper cylinder.
To make it you will need a sheet of colored paper. You can take the packaging. And also a thick paper or cardboard sheet of A4 format, scissors, glue, paints, a pencil, two circles of different diameters.
After preparing everything you need, you can start working:
- Cut a strip from a colored sheet. The width of the strip is the height of the future hat, the length is equal to the circumference of the cylinder.
- Roll the strip into a pipe and glue it together.
- On a sheet of cardboard, draw two circles of different diameters with a common center. The inner circle should be equal in diameter to the glued pipe. The difference between them is the width of the cylinder fields.
- Color the resulting fields and cut them out.
- Cut the bottom edge of the pipe into a fringe 1 cm deep and wide.
At this stage, all the parts are ready, all that remains is to connect them. To do this, you need to bend the fringe of the pipe outward, put the cut ring on the pipe and glue the fringe along its lower side.
On a note! For a neater look, you can cut out a second ring and glue it underneath, covering the fringe.
You can diversify the hat with additional fun decor.
skullcap CODE HS CODE
The material was prepared and current as of 12/01/2021 Irina Dmitrieva, customs clearance specialist.
Which HS code is suitable for your product (skullcap):
How to save money when importing goods (skullcap)
- When importing, a correctly selected HS code allows you to save 1 to 18% (without paying duties).