A bookmark is a small but useful accessory. It should always be at hand for those who love to read. Especially before going to bed, many people like to flip through the rustling pages of an interesting novel, and then they need to quickly mark the one they need and cover themselves with a blanket. And the bookmark will help you do this. And schoolchildren also need such things, because they have a lot of textbooks, and in class they don’t have time to look for a page with the material that was just covered.
Bookmarks produced now can be considered works of art in the field of design and graphics - they come in leather, metal, wood, fabric, beads, etc. But isn’t it better to make them with your own hands, putting your soul and warmth into them? your own hands, and showing all your resourcefulness and imagination? So let's get started!
In this lesson I will show many unique master classes - how to make bookmarks for books with your own hands with step-by-step photographs. We can only hope that among the options and techniques for making bookmarks shown, there will be one that will help you realize your own ideas and plans. And with them, reading will be more interesting and notes will be more pleasant to pick up.
How to make bookmarks for books and notebooks
What types of bookmarks are there? Paper and plastic, in the form of ribbons, on magnets and so on. Stationery manufacturers have not ignored this accessory, because it is always needed. For adults, their appearance and brightness are not important, the main thing is that they are convenient to use. But children are primarily interested in this. Children's bookmarks should be bright and convenient, and also inexpensive, because they are often lost. It’s even better to make a wonderful bookmark with your own hands.
Bookmark an owl from a paper clip and foamiran
This tutorial shows you exactly how. We will get a convenient school accessory from a paper clip, ribbon and foamiran. A paper clip is a convenient piece of fastening to the pages, a ribbon is a long soft base, foamiran is a material for design, from which we will make an owl figurine. The cost of the bookmark will be very low, so you can make a unique copy for each book, school textbook, large notebook or diary. This is a bright craft, and we will now look at how to make it.
For a bright bookmark, prepare:
- Paperclip;
- A piece of thin satin or grosgrain ribbon;
- Foamiran sheets – soft, multi-colored;
- Scissors;
- Glue;
- Bright markers and a black marker.
How to make a bookmark with your own hands
Prepare foamiran sheets for work - bright and soft. From these we will make parts for the owl. This is a stronger and more reliable material than paper or cardboard, but it is just as easy to work with, cut and glue parts. The above list, of course, is only a recommendation; you can add something of your own. The sky's the limit when it comes to creative lessons for kids.
Make details for the bird figurine - the body and head (this will be a single oval part with two ears), two wings, a bright abdomen.
Our owl will be unusual, multi-colored; we will successfully combine red, blue and yellow foamiran in one product. It is not necessary to make the craft gray or brown, use the shades that you like.
Glue the yellow belly in the center, two blue wings on the side. The night bird figurine is ready. No need to make it too big. After all, this is just part of the bookmark, a tail, so to speak, that peeks out from under the pages.
Use bright markers to color the tips of the ears, belly and wings. Glue a triangular yellow beak and eyes on top. With this we will complement the image of the owl, it will be recognizable. You might want to make a different bird.
Now we can move on to assembling the accessory itself, for which we made the bird. Glue a ribbon to the back of the figure, and attach a paper clip to the opposite side. Thanks to the paperclip, the bookmark will be securely attached to the pages, and thanks to the small figured keychain, the bookmark will not get lost among the pages, and the book will be convenient to open.
The bookmark is ready. It is unique and functional. The child will definitely use it, and will not put away a handmade product. This is especially true for younger schoolchildren. And if you attach a ring to the figure, you get a full-fledged keychain for a pencil case or backpack.
DIY owl bookmark made from paper clips and foamiran
Knitted bookmark “Rabbit”
On the eve of the new school year, parents of first-graders are entering a busy time - preparing for school. And it’s no secret that the lion’s share of the family budget goes to purchasing office supplies. But you can still save money on some items if you make them yourself. For example, bookmarks. Let's knit this cute bunny.
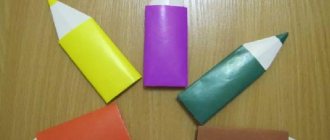
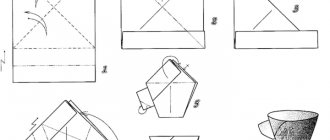
Master class on creating an origami corner bookmark
Now there is another popular bookmark model, it is also made using the origami technique, but only in a corner.
We cut out a template from white thick paper: a square measuring 7x7 cm.
We trace it three times on a piece of colored paper as shown below. Using a ruler, draw diagonals at the top and bottom left squares.
We cut off the outer corners of these same squares and as a result we get the following detail.
With the blunt side of the scissors we draw along the lines to make the workpiece easier to bend.
Fold one corner and coat it with glue.
We also fold the second one. You get neat corners.
Using felt-tip pens and white gouache, we draw cute faces on each bookmark.
To start using a bookmark, simply place it on the corner of the page you want to mark. Ready!
This bookmark can be designed in completely different ways.
Look at how unusually the authors of various master classes approached this.
Even I was already thinking about using the idea.
Bookmarks with images of favorite characters for young children will make reading more fun and help instill a love of books.
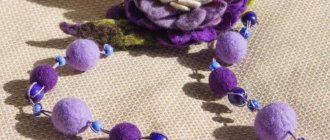
"Peacock feather"
In this master class we will knit an unusual bookmark in the shape of a peacock feather.
For knitting you will need:
- Yarn "Areola" purple, blue and dark green;
- Hook 1.75 mm;
- Scissors.
It is very important to choose the right thread colors. It is not necessary to use exactly those that were chosen for this master class. You can take blue, orange or yellow and turquoise. Or purple, blue and beige. With this palette the feather will look more realistic and natural.
We knit 3 lifting loops into a sliding loop and perform 15 double crochets. Then we knit 3 double crochets. And we perform 1 connecting column in the 3rd lifting loop to close the row.
Photo 1
In the new row we knit with a thread of a different color. We make 1 lifting loop and perform 8 single crochets. Then another 1 stitch and a picot of 4 loops. We finish the row with single crochets. Please note that the picot should be opposite the central column with 2 double crochets on the bottom row.
Photo 2
We also knit the next row with a thread of a different color. We retreat 3 loops from the picot and knit 1 single crochet. Then we form 3 air loops and knit 1 single crochet into the next loop. And again we make 3 air loops. So we knit up to the central column with 2 yarn overs of the first row. That is, to the loop opposite the pico. We make a picot of 4 loops in this place. Next we knit in the same way as we knitted to the picot. We do not knit 3 loops to the picot of the second row.
Photo 3
Now let's tie the lace. We make 25-30 air loops. We unfold the chain and knit the connecting posts not into a loop, but into a vertical thread.
Photo 4, 5
Now we will make a tassel from blue thread. To do this, we wind the thread in several layers around the hand. Then cut on one side. Now we tie the bundle of thread in the center with thread. Tighten it well.
And tie the bun on top. We also tighten it properly. We trim the brush itself with scissors.
Photo 6
Attach the tassel to the lace using the thread that remains from forming the tassel.
Photo 7
Now you need to make several stitches with blue thread from the center of the feather to the picot. It will be enough to make 6-7 stitches. And we attach a lace to the picot.
Photo 8
This is such a beautiful and unusual bookmark.
These bookmarks can be given as gifts to book lovers.
Paper bookmark “Cute cats”
These cats are best made from multi-colored sticker paper because it is thick and double-sided. Using a sharp stationery knife, cut the tabs, which will hold onto the page. Cut out the ears, draw the muzzle, fingers, claws and other details with felt-tip pens.
Photo: lermontovka-spb.ru
Bookmark with weaving "tie"
Braided bookmarks are very easy to make.
- We take three strips. Using double-sided tape, glue them together as shown in the photo.
- Let's start weaving. We turn the workpiece over: on the right and left we have two strips.
- We braid an ordinary braid.
When making bookmarks with weaving, you can use not only paper, but also ropes and threads. And also many people practice various methods of weaving.
- When the braid reaches the desired size, glue the strips together and cut them.
- You can leave it like this, but you can also use a hole punch to make a hole and thread the ribbon through.
heart
It takes a little imagination and even less time to make a heart-shaped bookmark.
- Print and cut out the template, apply marking lines as in the diagram.
- Fold the paper to make an angle.
- Glue the hearts in halves.
- A large heart can be decorated with smaller ones, or simply applied with a design.
The bookmark is ready.