- April 11, 2019
- Needlework
- Svetlana Funtova
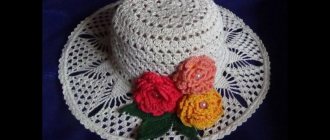
A felt hat is a great addition to any look and style, from strict classic to daring street. Despite the wide range presented in stores, you can make this fashion accessory yourself at home. In addition, this skill will be useful when sewing a felt hat with your own hands, for example, for a child’s holiday.
Material selection
Felt is loved by needlewomen for its properties. It is pliable, like paper, sticks well, bends well, and is pleasant to the touch. But not every variety is suitable for making hats.
There are the following types of felt:
- With acrylic. Hard material should not be used to make products that will be subject to mechanical stress, they may simply burst. It is also worth noting that acrylic material cannot be used to make a felt hat with your own hands; it is better to leave it for children's creativity.
- With polyester. Durable, soft material, holds its shape well, used for making soft toys.
- Made from wool. Eco-friendly, safe, dense soft material. Craftswomen don’t really like it because of the limited color range and high cost. May be deformed after washing, not wear-resistant.
- Made from half-wool. A compromise option. Composed of synthetics and natural fibers in a ratio of 50 to 50. Plastic and soft material. Suitable for sewing garments.
- Made from viscose. This type of felt holds its shape perfectly, is soft, flexible, and durable. Able to pass air and absorb moisture. Serves for decoration. The disadvantage is that it wrinkles.
What to wear with
Felt hats best complement the classic style: patent leather shoes, trousers, coats. The most important thing is the color combination of clothes and accessories. It looks good when the coat and hat or scarf and hat are the same color. In some situations, you can focus attention on shoes by combining colors, but this does not always work out well.
Leather tape
In autumn and winter, it is best to give preference to dark tones, and in the warm season or early spring, lighter ones. The headdress can also be complemented with decorations in the form of ribbons. You just have to be harmonious so that they don’t stand out too much. For this purpose, ribbons made of natural material are best suited, as they will give the hat a solid feel.
What will you need for work?
For beginners, making this item of clothing may seem quite difficult, but with experience everything will become much easier and faster. Moreover, if you use blanks to sew a felt hat with your own hands, rather than felting the material by hand.
To work you will need patience and some components:
- wooden mold for making hats (sold in craft stores);
- a piece of polyethylene;
- felt blank;
- iron or steamer;
- buttons;
- felt hardener and brush;
- wire;
- twine;
- scissors, needle, thread;
- rep and satin ribbon.
We’ll look at how to make a felt hat and how to care for the product later in the article.
Uncover
To make a simple headdress we need material and a pattern. Details can first be drawn on paper and then transferred to felt.
To create a pattern, measurements are taken from the head. The diameter will be equal to the circumference divided by 3.14. Draw out the details on paper:
- Round bottom - 1 pc.
- Crown elements 10 - 15 cm high - 2 pcs.
- Parts of the fields (the size is chosen at the discretion of the master). Most often, the radius is a maximum of 30 cm on the outer side and 20 cm on the inner circle - 2 pcs.
The parts are laid out on a sheet of felt, outlined, and cut out using scissors or a roller/stationery knife. When cutting, you need to pull back the edges to make them easier to cut.
Pumpkin in a hat
This witch's hat is not large in size, but if desired, it can be simply secured to the head with invisible pins or hairpins and used as an accessory to a carnival costume.
To work you will need:
- Felt in three colors (black base and small pieces of yellow and lilac);
- Two sheets of A4 format;
- Scissors;
- Compass;
- Needle, thread of two colors (black, gray or lilac);
- Pen or pencil.
Two circles with one center are drawn on paper. Diameter of circles: 5 cm and 12 cm. A semicircle is marked from the corner of the second sheet, while the length of the compass step is 13.5 cm. The marked figures are cut out. Using the resulting patterns, felt parts are formed.
Next, a tassel for the hat is made. A rectangle of 5 by 7 cm is cut out of lilac felt. On the short side along the long side, cuts are made with a depth of 5 cm. It is advisable to make the strips thinner.
On the other short side of the rectangle, the corners are cut off to create a triangle shape. The resulting workpiece is twisted into a brush. The brush is applied to the part in the shape of a triangle, at the top of the corner, and sewn with threads to match the main product.
Now you can roll the triangle into a cone. In this case, the base of the cap must coincide in diameter with the inner circumference of the second part.
The cone is stitched along the vertical cut using a hidden stitch.
The completed cap is inserted into the remaining part and sewn on the inside of the hat using a blanket stitch.
The base is ready. Now take a paper pattern in the form of a triangle and apply the semicircular side to the lilac felt.
A strip of small width is outlined (to decorate the hat) and cut out. The length of the strip should correspond to the diameter of the bottom of the cap.
A buckle for a witch's hat is made from yellow felt. You should mark a small oval on the fabric, the width of which corresponds to the width of the prepared lilac strip.
A smaller oval is cut inside the oval so that the final shape resembles an iron buckle in shape.
The colored parts are sewn on at the base of the hat: the stripe comes first, then the buckle is placed on top. It is recommended to use blind stitches and threads of gray or lilac color.
A funny and original witch hat is ready to fulfill its assigned role.
Tips for preparing the mold and workpiece
The blank for making a hat is placed on a flat horizontal surface. It is better to cover it with plastic wrap and secure it with adhesive tape or an elastic band so that it does not move. Of course, you don’t have to use polyethylene, but this will make it easier to remove the product.
The final result will depend on the appearance of the form; this is important to consider when purchasing it.
Another recommendation relates to the workplace. Since felt hardener has a pungent odor, the room should be well ventilated to eliminate possible headaches and dizziness from intoxication.
It is better to purchase a felt blank for sewing a felt hat with your own hands at a craft store. As a rule, it is a cap. It must be turned inside out and coated with hardener using a brush. The product should saturate the material well, but not seep out from the front side. In the absence of blanks, wool felt can be purchased at any specialized store.
How to Make a Witch Hat for Halloween
How and from what to make a headdress depends on the available materials and your own wishes. There are many options, among which it is easy to find the most suitable one.
How to make a witch hat with your own hands from paper
The easiest way to make a DIY Halloween hat for girls is from paper. This is suitable for those who need to make a costume in the shortest possible time.
For this you will need:
- thick sheets of paper;
- scissors;
- pencil;
- glue;
- ruler;
- paints and brush;
- beads, ribbons for decoration.
- You need to roll a cone from a sheet of paper and glue it to make a cap. You can use a special pattern.
- The brim of the future hat also needs to be made from paper, drawing three circles, two of which will be borders, and the third must be cut. These cuts are needed to connect the top and bottom parts of the headdress.
- The parts are glued together, allowed time to dry and the product is painted black.
Advice! In order not to waste time on coloring, you can immediately take paper or cardboard of the desired color.
If the color is not saturated enough, apply another layer of paint. You can spray hairspray on top to secure and shine. The finished hat is decorated with various decorations - ribbons, lace, feathers, beads, etc.
Paper products are not very durable and most likely the hat will have to be made again next Halloween.
How to make a witch hat with your own hands from fabric
The most common option is to make it from fabric. Almost any textile is suitable for this, just keep in mind that you definitely need a frame that will help keep its shape.
- textile;
- scissors;
- thread and needle;
- wire for frame;
- cardboard for patterns;
- decorative elements.
- The first step is to measure the circumference of the head for which the hat will be sewn. Based on the results of these measurements, a witch hat pattern is made from cardboard with reserves of about 1.5 cm.
- Two circles are bent from wire - one along the length of the head circumference, and the other along the outer margins.
- Parts are cut out from the fabric and first the cap is sewn together, and then the brim from two identical parts, attaching wire rings inside.
Advice! If you don’t have wires at hand, you can insert a circle of cardboard into the fields.
The parts are connected to each other. The fastening area can be covered with a satin ribbon. The finished accessory is decorated with buttons, organza, flowers and other decorations.
A textile hat can be used repeatedly.
How to make a witch hat from felt
An excellent option is a felt craft that can hold the desired shape without additional equipment.
To work you will need:
- black felt;
- scissors;
- thread and needle;
- glue;
- cardboard for patterns;
- compass;
- pencil;
- decorative elements.
A hat is made from felt using the same pattern as a fabric one.
- Based on head circumference measurements, a pattern is cut out of cardboard.
- The cut out pattern is secured to felt with pins, redrawn and the details are cut out.
- First, the crown is sewn together, and then the brim is attached to it.
- The hat is decorated with ribbons, buckles, small spiders or skulls.
Sometimes felt hats are made in small sizes. By attaching it to the headband, you can make a very stylish accessory.
How to make a crocheted witch hat
Crafters who love to knit can try a witch hat using a crochet hook. For this you will need:
- yarn of a suitable color;
- scissors;
- Crochet hook;
- needle.
You can embroider a plaque on a hat with green yarn
- first make a slip knot and cast on 2 VP (chain loops);
- then 4 sc (single crochet) in the second row from the VP hook (4 loops in a row);
- then knit according to the following pattern:
- at the end of the row you can change the color of the yarn to make a ribbon;
- the end is cut off, secured and tucked inside.
Now all that remains is to attach decorative elements or embroider a buckle and the accessory is ready.
Fixing, processing and steaming the workpiece
In the next step, the cap is turned out and put on the mold with the treated side. The blank is turned over, and the edges of the felt are attached to its bottom using buttons. It’s better to start from the top and bottom, then fix it on the right and left, gradually reducing the remaining gaps. The product is left for 30 minutes, during which time it should dry.
Then a towel or a double layer of gauze is placed over the workpiece and ironing begins. To do this, the device sets the wool processing mode and activates the steaming function. It is important that the fabric over the hat does not bunch up. The entire surface from top to bottom is evenly steamed with an iron. As you iron, the felt should harden and take the desired shape. As a rule, 5 - 10 seconds of steam exposure is enough for one area.
Stylish cap
This method is suitable for those who do not have enough time and need to make a hat in one evening. The presented master class on making a witch's hat from paper and plastic will help save valuable time.
Popular articles Decorative apple tree
You need to prepare for work:
- Large plastic plate;
- Landscape sheet;
- Glue;
- Scissors;
- A large flat brush (you can use a foam sponge);
- Black paint;
- Water-based acrylic varnish;
- Various decorations (for decorating a hat).
The album sheet is rolled in a cone-shaped manner and glued. This should be the shape of a cap.
The plastic plate is positioned bottom up. A point is outlined in its center, from which rays are drawn in different directions. Lines are drawn only along the bottom of the plate.
The marked rays are cut. The resulting triangles are bent upward, as in the photo.
The prepared paper cone is glued to the plate.
The work is left to dry for a short time.
Next, the hat is painted black. If one layer is not enough, then after drying it is advisable to apply a second layer. It will take 30-40 minutes for the paint to dry. The next step is to apply acrylic varnish.
When the base is ready, you can decorate it as you wish.
When decorating such a hat with stars, the accessory is quite suitable for an astrologer’s costume.
The holiday of evil spirits implies not only a carnival, but also stylization of your home with appropriate decorative elements.
Usually for Halloween, a pumpkin with slits resembling eyes and a mouth is used in the interior. It will look unexpected and original if you add a witch’s hat to the pumpkin.
It is best to sew such a hat. This way it can last for more than one year.
The material should be chosen dense so that the headdress holds its shape well. The work can be done from fabric. But felt is most convenient in this case.
Using twine
The twine is wound around the crown in the place where the brim of the future hat should begin. For this purpose, you can use a special elastic band, which can also be purchased in the store. This manipulation allows you to create a fold on the cap between the crown and the brim. In the future, the twine can be removed, since it will not be useful after the product is formed.
It's worth noting that not all types of hats have brims. For example, a “tablet” looks like just a crown. If you plan to make just such a felt hat with your own hands, then you need to skip this stage with twine. Alternatively, you can attach a series of buttons end-to-end around the circumference of the crown, but they often leave puncture marks and dents in the fabric.
Hats for strong and fashionable men
A man who wears a hat immediately becomes more attractive in the eyes of beholders, as this adds a special brutality to him.
You might be interested in: Choosing fabric for a T-shirt and calculating the amount of material for sewing
Decoration
Representatives of the stronger half of humanity wear the following styles of felt hats:
- Tribley. This variety is distinguished by the presence of a longitudinal dent in the center and small fields that are slightly turned up.
- Pork pie is a classic version, the features of which are the presence of a cylindrical crown, decorated with a ribbon, and a horizontal top.
- Fedora. This type of hat is the most common among men. It is distinguished by the presence of dents on the front and sides. It is made of soft and pliable felt and is best suited for casual style.
- The Homburg is a hat that goes perfectly with a classic suit. It has a dent in the center, rolled edges and a fixed shape due to the rigidity of the material.
With a bow
Due to such a variety of accessories, men have scope to realize their fantasies. A felt hat can be ideally combined with both trousers and jeans, both T-shirts and shirts, thereby adding uniqueness and aristocracy to each look.
Inserting wire, sewing tape
To shape the brim, you can use special hat wire. She shouldn't be fat. The required length of wire is measured along the perimeter of the fields and cut with wire cutters. The wire is carefully sewn along the edge using a loop stitch. The threads should match the color of the felt as closely as possible. The fields will become stiffer and stronger. If they are planned to be soft, this step can be skipped.
Sewing on the ribbon is mandatory if the fields are reinforced with wire; in other cases this is purely a decorative finish. A piece of grosgrain or satin ribbon is cut and sewn as close to the edge of the brim as possible. Its front side should lie on the surface of the hat, and it can be processed manually with small stitches or on a sewing machine. Then the tape is turned back to the bottom and sewn again.
How to decorate a felt hat with your own hands
Surely everyone has at least once seen a grosgrain ribbon inside a hat, sewn along the edge of the crown. To add such a frame to your product, you need to cut a piece of the required length and sew the ends together. The finished ring is inserted into the hat and sewn to the edge of the crown from the inside. It is important to note that the tape must pass strictly where the fields diverge. This trick will allow the hat to keep its shape. To prevent the stitches from being visible, the tape must be turned away.
Decorating a felt hat with your own hands is the most interesting and creative stage in the process of making a headdress. The product will look more neat if all the details are sewn on by hand with hidden stitches. Alternatively, you can use hot glue or a special adhesive base for fabric.
You can do the following:
- The simplest and most classic design is considered to be a ribbon wrapped around the crown. The ends can be disguised with a flower or a bow.
- Felt decorations look good. Here you can use material in the same color scheme or the opposite, contrasting one.
- Another option is a product decorated in a vintage style. A ribbon is sewn around the crown and a thin feather is tucked behind it. You can add leather elements for decoration.
Review of felt hat models
There are several types of felt hat models, each of them has individual characteristics and some elements. To begin, choose the model that you like the most. To do this, look at the list of hats with a brief description:
Wide-brimmed felt hat with a soft, curved brim. A very beautiful version of a classic hat, perfect for everyone.
Felt cowboy-type hat . Everything is clear here; the Wild West immediately appears. Now it is also in demand.
Fedora is a variation of the men's model with a satin ribbon along the contour. Suitable for a representative suit, trousers with a jacket. Reminds me of the mafia.
The cloche is a famous retro hat style that has not gone unnoticed even today. Resembling a neat bell, such a hat covers the head completely, and its small brim beautifully complements the image.
Slouch - translated means hanging. This word contains the essence of this model. The fields seem to hang evenly on the sides. It’s very beautiful, the main thing is not to choose models with very wide brims, otherwise beauty will turn into discomfort and the brims will hang unattractively and fall straight onto your face.
IMPORTANT! Among the variety of choices, you need to focus on facial contours, complexion and the color of the season. Taking into account all these factors, you can choose a felt hat to suit your look, emphasizing your strengths and hiding your flaws.
Useful tips
In order to correctly and without any problems make a felt hat with your own hands for a child’s party or an interesting headdress for the street, you should follow these recommendations:
- When preparing the mold, polyethylene film is applied in such a way that no gaps are formed.
- When using the blank, the product will be thin and smooth. A hat made from felted wool is usually denser and rougher.
- Often, a wooden form is expensive; it can easily be replaced with a more affordable plastic or polystyrene base.
- As a last resort, the mold can be made from scrap materials, for example, from an inverted round bowl. However, it must be the same size as the head.
Advantages of the material, how to care for the product
Compared to hats made from synthetic or cotton fabric, felt has many advantages:
- retains its shape for a long time;
- has a pleasant texture;
- affordable price of the product;
- weather protection.
In order for a hand-made hat made of leather and felt to retain its original appearance longer, you must adhere to the following recommendations:
- The product cannot be washed, it is better to take it to dry cleaning;
- To prevent the headdress from becoming deformed, do not hang it on a hook;
- clean the hat with a soft brush, wipe the leather inserts with a damp cloth;
- store the product in a box with the brim down; you can put a crumpled piece of newspaper into the crown;
- if the hat gets wet, place it on a flat horizontal surface and dry it at room temperature.
It's not always easy to find a hat of the right shape and color. Of course, with the design everything is much simpler; you can also decorate the finished product. However, some people find it difficult to choose a hat due to personality, style, and other reasons. In such cases, it is recommended to try to make it yourself. Perhaps this will not be the last headdress made with your own hands.
LiveInternetLiveInternet
—Categories
- Do-it-yourself (knitting, embroidery, crafts (2170)
- Knitting magazines (163)
- Dresses, skirts, sundresses (149)
- Jewelry, decorations. (148)
- Blouses, tops, T-shirts (105)
- Home decor (95)
- Mabel (89)
- Jackets, cardigans, blazers, ponchos (87)
- For your favorite feet (84)
- Pullovers, jumpers, sweaters (78)
- Knitted sets (74)
- Scarves, shrugs, stoles (73)
- Patterns, schemes (70)
- Knitting lessons (57)
- Children's (46)
- Knitted toys (40)
- Leg warmers, socks, stockings (38)
- Capes, stoles, shawls, boleros (34)
- Hats (32)
- Tunics (31)
- Works by Liru needlewomen (when your hands are OWN!) (29)
- Embroidery (26)
- Men's (26)
- Swimwear (25)
- Rare techniques (19)
- Vests (15)
- Creative (11)
- Coats, jackets (8)
- Felted pears (7)
- Knitting terminology, dictionaries, explanations of patterns (7)
- Mittens, gloves, mitts (4)
- For animals) (4)
- Machine knitting (4)
- Pants, shorts, capris, breeches (2)
- Goodies (1257)
- Desserts (136)
- Snacks (111)
- Salads (90)
- Baking (87)
- Meat (70)
- Blanks (67)
- Cakes, pastries, cookies (61)
- Vegetable dishes (47)
- About products (42)
- Drinks (42)
- Sauces, dressings (27)
- Seafood and fish (24)
- Casseroles (23)
- Table setting (19)
- Bread (18)
- Pasta (pasta) (15)
- National cuisine (14)
- Soups (14)
- Homemade (anti-shop) (14)
- Grilled (11)
- Main courses made from dough (10)
- Cookery books (magazines) (7)
- Bread machine recipes (7)
- From the chef (6)
- Videos - recipes (4)
- Lenten dishes (2)
- Flea market (942)
- Animation (211)
- Comments with codes (147)
- Flash (98)
- Watch (33)
- Frames (20)
- Smilies - comments (19)
- Dividers (16)
- Backgrounds (11)
- Author's animation (Nikash) (7)
- Sewing (581)
- Alterations (127)
- Dresses, skirts, sundresses (90)
- Decor (84)
- Toys (33)
- Curtains (27)
- Children's (23)
- Tops, T-shirts, blouses (12)
- Magazines (10)
- Underwear (7)
- Pants, shorts, capris, breeches (6)
- Hats (4)
- Men's (4)
- Hand made. (481)
- hand made for the holidays (97)
- Decor (82)
- Panels, souvenirs, crafts (78)
- Flowers (paper, leather, fabric) (29)
- Packaging (27)
- Decoupage (22)
- Newspaper weaving (21)
- Postcards (16)
- Magazines on crafts (weaving, souvenirs) (11)
- Shabby - chic (9)
- Soap making (9)
- Polymer clay, salt dough and all that) (6)
- Modular origami (6)
- Monigami (4)
- Candy bouquets (1)
- Intarsia (cutting from wood of different species) (1)
- Bags, handbags, bags) (271)
- AZBUKA Li.ru (228)
- Diets (215)
- Photoshop and everything connected with it (204)
- Lessons. (54)
- Brushes (34)
- Animation (lessons) (17)
- Photoshop video tutorials (10)
- My lessons (3)
- My author's translation of lessons (2)
- Beauty! (174)
- Queen's body! (75)
- Hair (32)
- Handles (5)
- Legs (1)
- Interior (165)
- Blogging (147)
- Earning money online, monetization, SEO (41)
- Affiliates (35)
- Video tutorials (1)
- Photos (141)
- Food style and food stylists (8)
- Interesting things (124)
- Tests (41)
- Computer programs, widgets, etc. (117)
- Artists (104)
- Training (101)
- Illustrations and illustrators (98)
- Postcards (20)
- Blah blah blah. (96)
- Fashion (96)
- Required sites (90)
- Clipart (80)
- Tips, tricks, techniques (69)
- Homo Sapiens (64)
- Psycho. (12)
- Fathers and sons (10)
- Design (63)
- Stardust (horoscope) (61)
- Galloping across Europe and beyond (61)
- Garden, vegetable garden, landscape design (53)
- Carving and decoration of dishes (53)
- That's funny! (52)
- Decorations (flowers) (48)
- Photographers (42)
- Great and mighty! (internet) (41)
- Entertainment (32)
- Her Majesty advertisement (31)
- html (30)
- Autopasses and more (30)
- Knitting techniques (22)
- Innovation, technology (22)
- Art (18)
- Be healthy! (17)
- Traditional medicine (1)
- Sothink SWF Easy (14)
- Videos (14)
- Menagerie (13)
- Download. (12)
- Books (5)
- Music (10)
- Gold Rush (9)
- Lingvo (8)
- Fonts (2)
- For friends! (7)
- CorelDRAW and everything connected with it (7)
- CSS (7)
- Infographics (6)
- Kunstkamera (6)
- Drawing (MK, lessons) (5)
- Painting (1)
- Flash - lessons, theory and practice (4)
- Master's corner (2)
- Online games (2)
- WEB (2)
- Adobe illustrator (lessons, articles, tutorials) (1)
Popular articles How to weave a Christmas tree from beads with your own hands