DIY pearl bracelet: ideas with photos, master class
Once upon a time, bracelets were a sacred element of clothing that protected their owners from the influence of evil spirits and evil spirits. Later, but still long before Christian times, bracelets began to show the status of their owners. The nobility preferred to wear jewelry made of gold and silver, while simpler people wore bracelets made of leather, wood, animal teeth, mineral stones and other materials that were at hand. In ancient times, wearing pearl bracelets was also considered a sign of nobility. Pearls were expensive, they were obtained the hard way, and only the most high-born persons could afford them. Now any woman can wear pearl jewelry. And, moreover, it can be made exclusive. Let's consider several options for how and what type of pearl bracelet you can create with your own hands for yourself or as a gift for someone you love.
DIY bracelet materials
To create a bracelet with your own hands, there are many options and materials for its base. Most often the base is used: leather, beads, seed beads, suede, ribbons, shells, natural stones...
Some bracelets can be crocheted, woven from small multi-colored rubber bands, or assembled from multi-colored strips of paper. Original ideas include creating a bracelet from unusual materials: a zipper, a cardboard egg tray, ice cream sticks or wooden stirrers, a plastic bottle.
On the Internet and specialized magazines you can find instructions on how to make a bracelet with your own hands from various materials.
Bracelet with jewelry insert
One of the simplest bracelets to make yourself will be a bracelet made from a single strand of pearls with a jewelry insert in the middle. It is advisable to make such a bracelet close to the wrist so that it does not turn over on the back of the hand, and the jewelry insert is always visible as the crown of the product.
The thread, wire, fishing line or lace on which the beads will be strung must be chosen so long that 1 finger fits between the wrist and the bracelet. If the bracelet is solid, without a clasp, then the insert can be selected with loops along the edges, into which we will thread the ends of the wire or thread. In order for the entire structure to hold tightly, the thread must be tied tightly and the ends of the wire bent with pliers. It's even easier to use a jewelry insert with a through hole. It just needs to be strung along with the rest of the beads. Then it is better to make a pearl bracelet with your own hands with a clasp, which can be purchased at a sewing accessories store or detached from some old product.
Weaving beaded bracelets
The beading technique is mistakenly considered too difficult for beginners. In fact, you don’t need to be a master - you can find simplified patterns for weaving bead bracelets for beginners, or go to a detailed master class once and feel free to try yourself in a new art.
Weaving a simple bracelet from large beads, beads and stones is not only an opportunity to escape from unpleasant thoughts and focus on calm, monotonous, almost meditative work, but also an excellent way to create unique gifts for loved ones. Agree, there is nothing more pleasant than a gift with a soul, created with your own hands.
So, let's talk about making bead bracelets with your own hands. What will you need for work?
- The base is a fishing line, wire or strong thread on which you will string the beads;
- Beads - for starters, you can take all the beads of the same color, just to master the technique;
- Needle - to pass thread or fishing line through the bead;
- Hook-and-loop clasps to secure the ends of the bracelet;
- Scissors and glue.
Advice on material selection
: When purchasing, pay attention to the quality of the beads. The cheapest Chinese beads can be sold in hundreds of different colors and sizes, but, most likely, the paint on the beads will wear off very quickly, and the beads themselves will already be cracked or chipped. It is best to purchase more expensive, but guaranteed high-quality and textured Czech beads.
Weaving technique for beginners
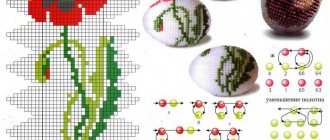
In order to create an original bracelet-bracelet made of beads on a fishing line, you need to master the simplest weaving technique, which is called the “monastic cross”. Once you master this weave, you can play with colors and patterns and create unique things.
You start by putting four beads on a fishing line, closing them in a ring and once again passing the fishing line through the second, third and fourth beads. Then three beads are again strung on the fishing line and another ring is created. You can continue weaving in this way and make a thin, elegant bracelet, or you can expand the decoration a little by adding rows on both sides. More detailed instructions can be seen in the video.
Bracelets on the machine
In addition to the hand weaving technique, you can also weave a wide bracelet from beads on a machine. You can purchase the machine online or make it yourself from an unnecessary box - for example, a shoe box. After the threads for the base of the bracelet are tensioned, you can begin weaving. A working thread (the one on which the beads are strung) with beads strung on it is tied to the outer warp thread. The working thread is passed under the warp threads and then pressed against them so that the warp threads pass between the beads. The working thread is again threaded through the beads, but already above the main threads and tightened.
This way you can easily weave a bracelet of any width and with any pattern, even without knowing the cross weaving technique. The ends of the bracelet are braided into braids, which will serve as ties for decoration. If desired, you can attach a special hook-clasp to the ends to make the product look more elegant.
Volumetric pearl bracelet
A voluminous bracelet with pearls is more complex in design. In addition to imagination, you also need to use special schemes here. One of the easiest ways to make a three-dimensional bracelet is as follows:
- We take pearls of two different sizes (large and medium).
- We string each pearl onto a pin. It is advisable to take the same pins so that the bracelet does not look ridiculous.
- Next, the pins with pearl balls strung on them must be attached quite tightly to a thin chain, using round pliers to bend the tip of the pin.
- The beads are attached to the chain in a checkerboard pattern.
Such a bracelet can easily sit on the wrist freely. And it looks gorgeous on the wrists of petite women and ladies in the body.
But there are also more complex patterns for weaving volumetric bracelets. Fortunately, there are quite a lot of master classes on weaving pearl bracelets with your own hands, several of them are presented in the article.
Cute bracelet made of metal and beads
You will need: beads on a cord, a metal base for a bracelet, a glue gun, thick thread, scissors.
Master Class
- Take the bracelet base.
- Apply glue to one quarter of the bracelet.
- Glue the beads onto the cord.
- Cover the entire bracelet with beads.
- Wait until completely dry.
- Tie a thread around the space between the beads.
Memory wire bracelet
A memory wire bracelet with a few pearls looks elegant. To make such a bracelet you will need:
- A piece of memory wire with the required number of turns.
- Rubber cord, cut with side cutters into tubes of the desired length or metal/plastic tubes of the required length.
- A few pearls.
- Caps for beads.
- Round nose pliers.
At one end of the wire we make a loop using pliers, and then alternately string a cap for a bead, a pearl, a cap for a bead, a tube until the pancake of wire runs out. If you wish, you can string some kind of pendant somewhere in the middle that does not contradict the style of the rest of the bracelet. At the end, we bend the memory wire with round nose pliers so that the component parts do not fly off. A DIY pearl bracelet based on memory wire is ready.
Made from denim
We are almost sure that you will find a piece of denim, or at least an old pair of jeans, in your craft supplies. We'll need them to create a boho bracelet - and this is just one of many ways to use textured fabric!
What will be needed in the process:
- jeans, or a scrap of denim;
- strong thread and needle;
- large beads for decoration;
- scissors.
Detailed MK:
Step 1: Measure your wrist circumference and multiply it by two. Add another 3-4 cm of margin: this will be the length of the denim strip that needs to be cut. Width - 3-4 cm.
Now, using a needle, you need to make a fringe along the long sides of the piece, leaving 2-2.5 cm on the fabric.
Trying to maintain the same length of stitches, we sew the fabric in the center, forming several folds.
We string the bead and make the same number of stitches as at the beginning.
Repeat the previous step until we get the desired length of the bracelet.
If you don’t have a fabric strip of the required length, or it runs out at the most inopportune moment, then make another strip of the same dimensions and fray the edges. Carefully sew to the previous one, hiding the seam in the folds, and continue to increase the length to the desired size.
You can finish it in two ways: if your wrist circumference allows, then simply sew the ends together on the front and back sides, or sew a button to the folds.
Using this technique, you can create original jewelry in an almost endless number of designs. Arm yourself with fabric, decorative materials and use your own imagination to help!
Pearl embroidered bracelet
It is also easy to make a fabric bracelet using pearl embroidery. For such a bracelet you will need a piece of dense fabric that does not fray at the edges. For example, felt. We measure the width and length based on the parameters of the hand on which the bracelet will appear. Next, we sew special fasteners-buttons along the narrow edges (2-3 pieces, depending on the width of the bracelet), onto which we will fasten the finished product.
For variety, you can glue or sew one or more rhinestones to the surface, or you can get by with pearls of one or more colors that combine with each other. You can fold them into a pattern or sew them in a random order, alternating beads of different sizes. In any case, the bracelet will look rich. The master class for a DIY pearl bracelet based on fabric is quite simple.
Bracelet from the jewelry section
Few people will be surprised by a silver or gold bracelet on their wrist, but among the costume jewelry you can find original and exclusive jewelry. High-quality jewelry is in no way inferior in appearance to a product made from precious material. Also, costume jewelry is much cheaper, so it is more accessible.
On the Internet you can find various pictures of bracelets from this category, but they are surprisingly beautiful and stylish in appearance. You can easily purchase a bracelet you like, or you can try to create it yourself with your own hands.
Leather cord bracelet
A leather cord bracelet decorated with pearls can be made for both women and men. Such a bracelet can be very delicate, brutal, or in folk style. A bracelet made of 3-4 leather cords of slightly different lengths looks beautiful. To make such a pearl bracelet with your own hands you will need:
- Leather cords of the same or different, harmonizing colors, cords of slightly different lengths.
- Thread.
- Clasp.
- Pins.
- Beads.
- Spacer rings.
- Glue.
- Round nose pliers.
One end of the leather cords must be tightly tied into one with thread, lubricated with glue and inserted into the lock socket. Remaining glue should be carefully removed. We don't touch the other ends yet. We string beads (or bails) onto pins, bend the end of the pin with pliers and attach it to the spacer rings. Thus, we get pendants. We thread rings into the free ends of the cords (it is enough to string one pendant per cord). We fasten the remaining ends of the leather cords in the same way as the first time. To glue it to the lock, you can use superglue or special glue, which will be recommended in a craft store.
The options for such bracelets can be varied. Cords can be taken in pastel or dark colors; glass and pearls, delicate jewelry elements, or skulls and pearls in dark shades can be used as pendants. It all depends on the tastes of the person for whom the bracelet is intended and on the imagination of the craftswoman.
Braided bracelet from a watch belt
This version of the bracelet is quite easy to make. Both men and women can wear it. To make it you need:
- leather watch strap;
- stationery knife;
- ruler;
- thin rope.
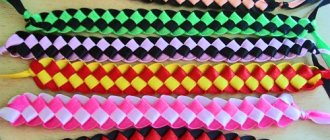
Cut a rectangle from the strap measuring approximately 23 cm by 2 cm. Cut the rectangle lengthwise into 3 identical strips, but without cutting to the end of approximately 2 cm. Braid the resulting piece into a tight braid. Tie the end of the braid tightly with a thin rope.
At the other end of the bracelet, carefully cut out a small triangle using a utility knife. Thread the rope with a knot into the triangle. This way the bracelet is ready to wear.
DIY pearl and bead bracelets
Pearls can also be combined with beads. You can use beads and pearls to embroider various patterns on a fabric bracelet, replace tubes on a wire bracelet with many beads, add beads to pendants, and much more. In addition, beads can be used as a substitute for small beads in voluminous bracelets and used to decorate pendants on leather cord bracelets.
In any case, when making a pearl bracelet with your own hands, the main thing is to give free rein to your imagination and do the work from the heart.
Source
Fashionable jewelry made from natural stones
This summer, massive bracelets made of natural stones are still popular. Such accessories are versatile, as they can be worn with a business suit, a cocktail dress or jeans and a T-shirt.
In addition to large sizes, fashionable jewelry should be summer, warm colors: golden, yellow, orange, sand. As for the shape of bracelets, there are no restrictions: the most unimaginable, original shapes, animalistic images, “sharp” accessories with spikes or Shambhala bracelets.
DIY pearl bracelet: ideas with photos, master class
Pearls are the only precious stone that is formed in the shells of certain species of mollusks that live in both salt and fresh water bodies. Depending on this, it is classified as sea and river.
The process of pearl formation is interesting. The mollusk does not have the ability to expel foreign bodies trapped in the shell. To protect yourself from harm from an uninvited guest, the “host” must isolate him. To do this, the mollusk envelops it layer by layer with mother-of-pearl, ultimately obtaining a precious pearl - a pearl.
The shape of the pearl depends on the place of origin of the shell, the weight on its size, and the color on the impurities included in the water in a particular place and the type of mollusk. White pearls with slight variations in shades (cream, pink, bluish) are considered exemplary. However, black, gray or golden pearls are also highly valued among connoisseurs.
Pearl beads are a decoration for any lady
Pearls are the oldest jewels that were used as decorations. Mentions of them are found in sources dating back thousands of years. They were of high value because they did not require processing.
At the beginning and middle of the 20th century, almost all the world's jewelry houses used pearl motifs in their collections. Pearl products crowned the image of such a fashion industry star as Mademoiselle Chanel, who introduced them into the mandatory wardrobe of every society lady along with the little black dress.
Today, pearl necklaces are as popular among fashionistas as they were a hundred years ago, and, just like a hundred years ago, they can adorn any woman, adding sophistication and style to her look.
Pearls can suit a woman of any age, with the exception of very young people - schoolgirls or teenagers. Considering the versatility of pearl beads, starting from the age of 20, you can safely wear jewelry made from it, choosing them to suit your own style.
Despite the constantly updating fashion trends in the jewelry market regarding pearls, the requirements for today's jewelry are absolutely not conservative. Therefore, even an old grandmother’s necklace will fit perfectly into an outfit if you modify it a little and “modernize” it by attaching a stylish pendant to it.
Do not mix expensive pearl accessories with cheap jewelry. This will spoil the impression of the image.
Bracelet - amulet
Any precious or semi-precious stone can be worn in a bracelet. But if the impact of a bracelet on health is important, then you need to choose those stones that most widely reveal their properties when worn on the wrist. These include jasper, chrysoberyl, topaz, carnelian, amber, and aquamarine. If the bracelet is made up of all these stones, in this case it will bring the greatest benefit, since the stones will complement each other, and their effect will increase many times over.
Many are convinced that increased attention to useful bracelets is a marketing ploy by jewelry stores. Skeptics believe that the main therapeutic effect of them is achieved through self-hypnosis, the so-called “placebo” effect.
Shambhala bracelet made of amber
It’s up to you to believe or not in the healing power of such bracelets. But healing bracelets that follow fashion trends perfectly replace expensive jewelry or fashionable jewelry and are quite capable of decorating any girl. Therefore, in fact, why not wear a beautiful and useful bracelet for aesthetic and therapeutic purposes at the same time!
Volumetric pearl bracelet
A voluminous bracelet with pearls is more complex in design. In addition to imagination, you also need to use special schemes here. One of the easiest ways to make a three-dimensional bracelet is as follows:
- We take pearls of two different sizes (large and medium).
- We string each pearl onto a pin. It is advisable to take the same pins so that the bracelet does not look ridiculous.
- Next, the pins with pearl balls strung on them must be attached quite tightly to a thin chain, using round pliers to bend the tip of the pin.
- The beads are attached to the chain in a checkerboard pattern.
How to make pearl beads with your own hands?
So, fashion demands diversity, but the wallet asks for mercy? Nowadays, beautiful pearl jewelry is quite expensive, since their price includes not only the cost of the material, but also payment for the work of the jeweler, and most importantly, design ideas.
However, by making a necklace yourself, you can not only save a lot, but also get an exclusive piece of jewelry with 100% confidence that no one else has one like it. And don’t think that only experienced craftsmen can do this. Even a beginner in this matter can assemble beads from pearls!
To do this you will need:
- pearls - the more there are, the longer the beads will be;
- clasp kit;
- callots;
- transparent superglue;
- special round nose pliers;
- scissors;
- regular needle;
- base for assembly.
It is best to collect beads on a nylon or silk thread, which will not react with water and cleaning compounds when caring for the product.
Another versatility of pearls lies in the fact that almost all shades of accessories can be combined with them. Additional elements are also selected to match the same color. Assorted fittings reduce the cost of the product.
The clasp of the necklace should not only be reliable, but also harmoniously fit into the design idea of the jewelry. For this purpose, in special stores there is a large selection of locks, decorated in a variety of styles and colors.
Collecting beads
We fix in the callot the beginning of the thread on which we will string the pearls. To do this, thread its end into the callot loop and tie it with a knot. We fasten the knot with instant transparent glue and clamp the halves of the product, leaving the knot inside.
A callot is a part for fastening accessories in the manufacture of costume jewelry, which is a camouflage bead consisting of hemispheres inside of which fastening elements, for example, knots, can be hidden.
Next we put the pearls on a thread base
To avoid deformation, the stones should not be in close contact with each other, so an intermediate link is inserted between them. It can be an ordinary thread knot or any suitable decorative elements - it all depends on the author’s imagination.
Having collected all the necessary pearls on the base, fix its end in the second callot, according to the principle of the first.
To make threading easier, use a sewing needle.
We fasten the clasp by connecting the callot hooks with the lock parts.
The beads are ready! These were instructions for assembling a simple necklace, however, by combining various decorative elements in this way, you can create real pearl masterpieces of any complexity.
Memory wire bracelet
A memory wire bracelet with a few pearls looks elegant. To make such a bracelet you will need:
- A piece of memory wire with the required number of turns.
- Rubber cord, cut with side cutters into tubes of the desired length or metal/plastic tubes of the required length.
- A few pearls.
- Caps for beads.
- Round nose pliers.
At one end of the wire we make a loop using pliers, and then alternately string a cap for a bead, a pearl, a cap for a bead, a tube until the pancake of wire runs out. If you wish, you can string some kind of pendant somewhere in the middle that does not contradict the style of the rest of the bracelet. At the end, we bend the memory wire with round nose pliers so that the component parts do not fly off. A DIY pearl bracelet based on memory wire is ready.
Delicate bracelet made of ribbon and beads
You will need: satin ribbon, lighter or matches, beads, scissors.
Master Class
- Take a piece of tape.
- Cut the ends at an angle, creating sharp corners.
- Burn the ends with fire to prevent the ribbon from unraveling.
- Tie a knot at one end of the ribbon.
- Thread the bead and tie a knot.
- Weave the entire bracelet in this way.
- Tie a bow.
Bracelet with jewelry insert
One of the simplest bracelets to make yourself will be a bracelet made from a single strand of pearls with a jewelry insert in the middle. It is advisable to make such a bracelet close to the wrist so that it does not turn over on the back of the hand, and the jewelry insert is always visible as the crown of the product.
The thread, wire, fishing line or lace on which the beads will be strung must be chosen so long that 1 finger fits between the wrist and the bracelet. If the bracelet is solid, without a clasp, then the insert can be selected with loops along the edges, into which we will thread the ends of the wire or thread. In order for the entire structure to hold tightly, the thread must be tied tightly and the ends of the wire bent with pliers. It's even easier to use a jewelry insert with a through hole. It just needs to be strung along with the rest of the beads. Then it is better to make a pearl bracelet with your own hands with a clasp, which can be purchased at a sewing accessories store or detached from some old product.
Wooden bracelet made from ice cream sticks
It is not necessary to use ice cream sticks: wooden medical spatulas will work well for the same purpose.
Below we will tell you how to make a bracelet from such an unusual material:
Step 1. First of all, you need to give the sticks the desired shape: to do this, soak them for half an hour in boiling water. After this time, try to bend our base: if it is flexible enough, then good, but if not, pour boiling water over it again.
Step 2. Carefully remove the sticks and, without waiting for them to cool, place them in a bent state in any cylindrical container, the diameter of which is slightly smaller than your wrist.
Step 3. Your foundations will need about a day to cool and dry completely; if possible, place them in fresh air to speed up the process. When the pieces of wood are completely dry, you can start decorating.
As decorative elements, we use whatever we feel like: we paint, draw hearts, paste them with patterned fabric, wrap them with bright threads, satin ribbon, twine, jute, and whatever is at hand.
The result is very beautiful Indian-style jewelry that is easy to take off and put on thanks to the absence of clasps.
Step-by-step instructions
- First of all, you need to take 7 polyester cords (35 cm each) and wrap them in a bundle.
- Thread the clip through the tip and onto the cords.
- The wire must be cut with wire cutters, further than 1 cm from the clamp
- Bend both ends with round pliers to create an eyelet on both sides.
- We wind a wire (0.2 cm wide) to the cords, retreating 10–12 cm from the clamp.
- We string pearls onto the wire and wrap the cords with wire and beads. Do 32 turns.
- You can thread a gold and glass bead along the pin, and a stud on the last one. We cut off all the ends.
- We make ears on each bead. We grab the tip of the pins and nail with round pliers and wrap it until it stops.
- Having opened the eye of the pearl, we attach the eye of the pin to it with a glass pearl. Add the remaining beads to the second ear of the glass pearl. We attach this chain of pearls with a ring to the center of the decoration.
- We add five pearls to pins, and attach one to a nail. We make ears on them and attach them to each other. We fasten the chain to the base with a ring, stepping back a little from the attached chain.
- We make 7 chains of gold and 8 of glass pearls (as you like). We attach the structure to the base.
- We make the lock using a ring on one side and a ring with a carabiner on the other.
Does the diameter of a pearl matter?
The same diameter along the entire length of the bracelet seemed uninteresting to me, so I ordered 2 types of beads (I took white cultured pearls): small pearls (4 mm in diameter) and slightly larger ones (6 mm). Large beads 8, 9, 10 mm will not be convenient and practical for everyday use. So, I strung beads with a diameter of 4 mm along the edges, and the larger ones in the center. I tried to achieve a smooth transition by choosing what I thought were the largest of the four-millimeter pearls and placing them closer to the center, next to the six-millimeter ones. I would like to note that pearls are not stamped plastic beads. And even within the same size, they can imperceptibly, by half a millimeter, differ from each other in size - this is exactly what I took advantage of, carefully sorting the pearls, sorting them from those that seem larger to smaller ones.
To calculate how many pearls I need for a bracelet, I made up a simple equation. Our mathematician should have seen me! My calculations roughly looked like this.
I place 5 large pearls in the center. With a diameter of 6 mm, they will take exactly three centimeters 5 * 6 mm = 30 mm = 3 cm
The lock takes up 1.5 cm. For pearls with a diameter of 4 mm, the following remains:
16.5 cm - 3 cm - 1.5 cm = 12 cm
Let's find out how many pearls with a diameter of 4 mm are needed:
120 mm : 4 mm = 30
As a result of calculations, I found out that I would need 30 pearls with a diameter of 4 mm and five pearls with a diameter of 6 mm. I also bought a meter of string for stringing, a dozen balls to secure the ends, and a good lock. At that moment I realized that the gift would be not only sincere, but also inexpensive. It was pleasant, although such a moment was not defining for me from the very beginning.
Start of the process
Personally made items have always been distinguished by their unusualness and extravagant design from their purchased counterparts. Today, every needlewoman can afford to assemble a necklace from almost any material. The necklace can be leather, wood, plastic or any other.
On the vast world wide web you can find necklace patterns that allow you to create jewelry of any shape and size. Below we will consider several options for this jewelry made from different materials.
Stylish and fashionable gift for a man
In the public consciousness, jewelry is a woman's prerogative. But it is not always the case. A man's bracelet made by the hands of his beloved woman will delight any member of the stronger sex.
Jewelry made from leather, cord, floss or rope with metal or wooden inserts will be a good gift for a friend, co-worker or boyfriend. Such things can emphasize the masculinity and brutality of the owner.
DIY hats for newborns. Several types of knitted winter hats for every occasion in a baby’s life- How to prepare essays on physical education
How to crochet beautiful napkins: tips with video lessons and patterns
Pearl embroidered bracelet
It is also easy to make a fabric bracelet using pearl embroidery. For such a bracelet you will need a piece of dense fabric that does not fray at the edges. For example, felt. We measure the width and length based on the parameters of the hand on which the bracelet will appear. Next, we sew special fasteners-buttons along the narrow edges (2-3 pieces, depending on the width of the bracelet), onto which we will fasten the finished product.
For variety, you can glue or sew one or more rhinestones to the surface, or you can get by with pearls of one or more colors that combine with each other. You can fold them into a pattern or sew them in a random order, alternating beads of different sizes. In any case, the bracelet will look rich. The master class for a DIY pearl bracelet based on fabric is quite simple.
Source
Denim bracelet made from a plastic bottle
Required materials and tools:
- plastic bottle;
- denim;
- glue gun, rods for it;
- wide tape;
- stationery knife;
- scissors;
- multi-colored stones of different sizes, shapes.
Carefully paste tape around the center of the plastic bottle in a circle and cut it out using a utility knife. Try the resulting ring on your hand, if it is too big, then cut it and glue the ring to the size of your hand with a glue gun.
Wrap the workpiece with denim, press the ends, and glue with hot glue. Glue the stones in a fairly orderly manner using a glue gun. If desired, you can decorate with other decorative elements.