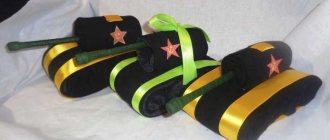
Weaving bracelets from rubber bands is a fascinating process that will captivate both children and adults. To work, you only need small Chinese rubber bands and simple tools that can be found in any home.
The easiest way is to use a ready-made weaving kit, which already includes a bag of multi-colored elastic bands, the necessary accessories and tools - a machine and a hook. Such kits, intended for children 8-14 years old, are sold in handicraft stores and on Aliexpress, but we do not recommend making such a purchase if you are just getting acquainted with weaving. In this case, we recommend purchasing special silicone rubber bands separately and buying accessories for exactly the number of bracelets you are going to make.
As for special machines, there is an easy way to replace them: you can weave a bracelet from rubber bands using pencils, a fork, a comb, and even your fingers . The details of the process will remain unchanged, so stock up on everything you need and let’s start weaving!
Weaving pattern for the simplest rubber band bracelet on fingers
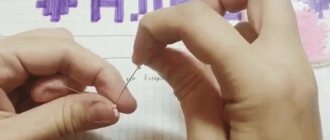
To start weaving rubber bands on your fingers, you will need three bracelet elements and your own hands. The index and middle fingers in the shape of the letter “V” will replace the machine, fork and other devices.
*photo MK: HonestlyWTF
For the first time, we advise you to limit yourself to single-color elements in order to understand the basic skills of how to weave bracelets from elastic bands, and not complicate the work of creating a pattern. To weave a fishtail, repeat the following free master class with pictures:
Step 1 . Place the first elastic band on your fingers, twisting it in a figure eight. Place two more over the first without twisting;
Step 2 . Pull each side of the figure eight up, placing it between your fingers so that the loop is in the center of the next two;
See it clearly in a short video:
Step 3 . Thread a clasp into the loop or secure it with a pin: this way you will secure the beginning of the work and it will not unravel during further weaving;
Step 4 . Place another elastic band on your fingers without twisting it (it’s yellow in the photo) - only the very first one has a figure eight shape.
We again pull the bottom elastic up alternately on each side, removing it from the fingers and placing it in a loop in the middle;
Step 5 . Thus we continue weaving to the desired length.
Step 6 . Remember to follow the pattern if you use different colors;
Step 7 . Upon completion of the work, remove the two loose elastic bands, and thread an S-shaped clip into the free edge of the bracelet - it will serve as a clasp.
Don’t worry if the Christmas tree seems uneven at first - it will take the desired shape as you wear it. Also, do not tighten a strong knot - everything will hold together just fine without it. The thin children's bracelet is ready!
Weaving from rubber bands - techniques: types
Today, weaving with elastic bands is possible using various techniques and they differ from each other in the tools used. Thus, weaving on the fork, loom, slingshot and fingers stands out.
Weaving on your fingers is the easiest way, but you just won’t be able to make different patterns, and you can come up with a lot of them, especially if you have a very rich imagination. To begin with, it is better to try simple things, for example, bracelets. If you weave a long bracelet and put on a pendant, you get a necklace. Or you can even make a whole set.
For more complex products, you can no longer do without a hook. It can be ordinary, plastic or even a machine. Machines may differ in size and number of rods for fixing rubber bands. By the way, there are many schemes for creating them on the Internet, but it’s easier to buy a ready-made one.
Weaving bracelets and other figurines involves the use of various techniques. It could be:
- Caterpillar
- Fish tail
- French braid
- Sidewalk
- Dragon scales
You can create other interesting products from rubber bands. These could be toys, keychains, and so on. If children engage in such creativity, they develop motor skills, attention and perseverance. It’s not at all difficult to learn it on your own. You just need to follow the instructions and follow the diagram step by step.
Rubber bands make very good:
- Jewelry - bracelets, rings, necklaces and brooches
- Figures - these can be cartoons, funny animals, fruits, and so on
- Clothes for dolls
- Phone covers
- Useful things in the house
Fishtail on a slingshot
Regardless of which tool you choose for weaving, the essence of the process remains the same. We suggest you see how to make a bracelet from rubber bands on a slingshot: after familiarizing yourself with the details of the work in step-by-step photographs, you can easily repeat each stage. Let's get started:
- twist the first elastic band into a figure eight and put it on the frame;
- put on two more without twisting;
- alternately grasping each side of the lower elastic band with a hook (or fingers), remove them from the frame and place them in the center;
- put on a new element;
- repeat the third step - remove the bottom elastic band and place its edges between the horns of the frame.
We continue weaving until the desired length, after which we attach the clasp.
- Remove the excess ring (cut with scissors and remove). Ready.
Practical use of crafts made from rubber bands
Gifts for family and friends
Self-made souvenirs made from rubber bands for relatives, friends and acquaintances will remind you of the person who gave them for many years. Any home craftsman with even a small income can buy the source material for such a craft.
Kids toys
Experienced craftsmen use rubber bands to make not only dolls, characters from fairy tales, birds and animals, but also fantastic compositions and characters from famous cartoons.
Interior Design
If such design elements are present, the room will acquire its own unforgettable original style and will be able to reflect the individuality of the owners.
The slingshot weaving technique will help you create various crafts, including toys and garlands, that can give the New Year tree an exquisite and unique look.
Materials, tools and accessories required for work
There are kits containing everything you need to weave elastic bands. You can also purchase a hook and multi-colored elastic bands separately.
After acquiring the necessary experience, to manufacture products that require skills and abilities, you will need additional tools:
Special machines for weaving.
Accessories and supplies for various weaving techniques.
"Circular knots" on pencils
To weave such a bracelet, you will need rubber bands of several colors, a lock (S-shaped clip), and a device on which the work will be carried out. You can do it with a pen or pencil, as in our example, or replace them with sushi chopsticks. Instead of a hook, a toothpick will do just fine.
To ensure that the improvised machine keeps its shape, place a regular eraser between the pencils and secure it with tape as shown in the photo.
pencil machine
To create a rubber bracelet with the same pattern, repeat the following steps step by step:
1. Place a figure eight rubber band over the pencils.
2. We put on another one without twisting it.
3. We hook the “eight” with a hook, drag each side to the center, forming a hanging loop from the first.
It should look like in our example.
4. Attach the clip. You can start weaving the pattern.
5. Fold the colored element into two turns and place it on the right pencil.
6. Pass the hook through the colored elastic, pick up the bottom one, pull it out and put it on the left pencil. The colored one stays in place.
It will be like this:
7. Place a new background color element on both pencils.
8. Remove the color from the right pencil and throw it into the center.
9. Remove the bottom elastic band from the left pencil and place it in the center.
10. Again we put the colored elastic band in two turns on the right pencil, pick up the lower background one through it and drag the latter onto the left pencil.
11. We attach the bottom element of the background color to the left pencil, remove it from the base and place it in the center.
Now repeat all the steps, starting from step No. 7 to step No. 11: put the background color eraser on both pencils, shoot in the center, first the colored one on the right, and then the background one on the left.
As the length increases, the pattern will be clearly visible: all you have to do is carefully throw the remaining loops onto one of the pencils, thread the clip through them, and you can put the cool bracelet on your hand!
If the explanation of the method from the photo did not seem detailed enough to you, then in this video you can see how to make bracelets from rubber bands on pencils using this method:
How to weave figures on a slingshot from rubber bands
A slingshot is one of the main tools that both beginning rubber band weavers and professionals work with. Making figures both on machines and without them is quick and easy. Weaving on a slingshot is considered one of the simplest and most accessible methods among a variety, since only two columns are involved in the work. Therefore, we can consider this as preparation for more complex knitting methods, for example, on Rainbow Loom or Monster Tail machines.
See also...
✅ How to weave bracelets from rubber bands: patterns with detailed descriptions
✅ Braiding for medium hair
✅ Braiding for long hair
✅ Braiding hair for girls step by step photo
Simple figures for beginners
To begin with, you should master simple figures made from rubber bands. Weaving for beginners includes methods of knitting on fingers, forks, two sticks and much more, and most importantly - on a slingshot. Beginners should not be afraid of difficulties, since most simple products made from rubber bands are made according to the standard scheme: first step, second step, repeating the second step until the required shape is obtained, completion of the work.
Bouncing ball without machine
Such a simple figurine as a ball is useful for playing with pets, for example. Let's take a closer look at how to make a beautiful ball from rubber bands with your own hands without machines.
Materials for work:
- cotton pad/piece of cotton wool;
- 200-250 elastic bands of one or more matching colors.
Progress:
We bend the disk in half, and then in half again, crushing the disk so that it looks like a ball.
We take the first rubber band and wrap it around the disk three times, each time folding the middle into a figure eight. The result should be three rows. You also wrap the second one in three rows, but this time across the first elastic band - to make a cross.
You should try to place all subsequent rubber bands on the empty spaces of the cotton pad. We continue to wrap the cotton wool with rubber bands.
In the process of weaving a jumper with your own hands from rubber bands, there is one trick: the greater the number of turns of one rubber band around the base, the more “bouncy” it will be as a result. This means that you should tighten each rubber band tighter to wrap it more tightly.
When the volume of the ball becomes large, the elastic bands can be put on without twisting. Thus, we continue to work until the supply of rubber bands is exhausted. It's important to remember that the process itself is quite lengthy and time-consuming, but it's a great way to get your feet wet before you start working on more serious figurine models.
Banana keychain on a slingshot
Another simple item that beginners, even children, can knit. By the way, gum figures in the shape of fruits are very popular. They are easy and fun to knit, and their biggest advantage is the ability to train your hand for weaving more complex figures.
Materials for work:
- slingshot;
- crochet hook or plastic hook from the rainbow set;
- black elastic bands - 4 pcs.;
- yellow elastic bands - 20 pcs.
Progress:
Hold the slingshot so that the notches are facing towards you. Place the first black rubber band on the right column as follows: carefully wrap it around the column three times.
Next, put two yellow elastic bands on the posts, without twisting them in any way.
Now you need to take the hook and throw all three turns of black elastic onto the middle of the yellow elastic already put on top of it, according to the photographs below.
On top you need to put four yellow elastic bands back on.
Carefully pick up the two lower loops, which already have black elastic bands, and move them to the very top, throw them over the posts of the slingshot and release them so that they lie on top of all the elastic bands put on the slingshot.
Again we put exactly four yellow elastic bands on the slingshot, as in step 4, so that they lie straight - one above the other.
We continue to throw off the elastic bands using a hook, moving them through the columns of the frame. Exactly the same actions need to be repeated exactly twice more to get the oblong body of our future toy.
For the last time, you need to limit yourself not to four, but to two yellow elastic bands, on which you need to put the previous four.
Next you need to put two black elastic bands on the slingshot.
We throw on the black or brown elastic bands the same two yellow ones that were put on at the end of weaving the body of the toy.
All that remains is to throw one more, very last, black rubber band onto the frame, and then throw the two lower ones over it to secure the work. But first we throw both black loops of the same elastic band onto one side of the slingshot. Next, all that remains is to pull the lower loop, using the same hook, through the upper one, and remove the toy from the mini-frame. The little rubber band banana is ready!
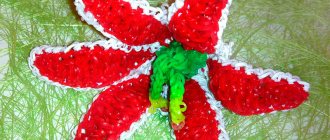
Strawberry keychain on a slingshot
Children and adults who are just beginning to master the art of weaving from rubber bands will really enjoy the process of making various keychains in the shape of bright fruits. That is why it is worth paying attention to such a funny figure as this strawberry.
Materials for work:
- slingshot;
- red elastic bands;
- green elastic bands;
- hook.
Progress:
We put a red rubber band on the right side of the slingshot in three turns. We put a double red elastic band on both pegs. We throw the previous loops onto it. We string two elastic bands again.
Fold the bottom right loop to the center. We transfer the left edge of the elastic band to the right peg. We string two red rubber bands. Remove the left loop.
We repeat the previous steps: string two red elastic bands and remove the left loop. Remove the top pair of loops from the right side of the slingshot and put it on the left. We string a couple of red rubber bands. We throw the top right double elastic band to the middle.
We put the top red loop on the left column. We put on the red elastic band and remove the loop on it from the right edge. Now we take a green double elastic band and put it on the slingshot. Remove the top red rubber band from the left edge to the green one. We put the left green loop on the right peg.
We put on the green pair. Remove all the loops on the left side of the slingshot. We put a single rubber band on both pegs. We remove all the green loops on it. Using a crochet hook, carefully remove two loops. Tighten the loop by slipping one elastic band onto another. The keychain made from rubber bands in the shape of a strawberry is ready.
Animal Weaving
Weaving animals from rubber bands can be considered a separate form of art, since they can play the role of not just a toy or keychain, but also a fun decoration for pens or pencils. Weaving animals on a slingshot is an entertaining process that captivates everyone without exception.
Cute owl
Let's try to weave such a cute symbol of knowledge from rubber bands using a slingshot. It will look great as a keychain or decoration on the handle of a cabinet.
Materials for work:
- slingshot;
- hook;
- scissors;
- golden elastic bands - main body color - 44 pcs.;
- white elastic bands - belly - 8 pcs.;
- orange rubber bands - paws and beak - 4 pcs.;
- black elastic bands - eyes - 2 pcs.
Progress:
We will perform the weaving of the owl in two stages. First, let's prepare rubber bands in the form of a pattern for the owl's body and weave it, and then move on to the head, as shown in the step-by-step photos below.
Let's start with the gold color. We put the first elastic band in three turns on the right column. Then we put two red ones on two pins.
The first of the three turns will be thrown to the center.
Then release the right column by moving the elastic bands to the left side.
Now let's make an owl's foot. We wrap one orange elastic band four times on the right side of the slingshot. We usually wear two red ones.
We lower the orange one of the four turns onto the elastic bands. From the left column we send the bottom two pairs to the center so that the orange one remains to the right of them.
We throw on two red ones again, and send the lower ones to the middle.
Then we will put the second pair of red ones on two columns, and send the lower ones to them.
And we’ll throw the third pair over both parts of the slingshot, dropping the lower ones into the center.
Let's move the rubber bands from the left side to the right.
We insert the hook into the initial elastic band of three turns and throw it over the left column.
Now we will weave an owl's belly from white rubber bands. Having thrown on the first two white elastic bands, we will send the triple elastic band to the middle.
We put on the second white pair in the same way as the previous one and lower the lower white ones from the columns.
We also weave the third and then the fourth pair of rubber bands.
Let's move the white elastic bands from the left side to the right.
Once again, insert the hook inside the initial triple elastic band and put it on the left pin.
We weave again with red rubber bands. Let's put two on both columns.
We will send three turns from the left to the center.
Let's move the left rubber bands to the right, and on the left pin we'll screw 4 turns of the orange rubber band.
We throw on a couple more red ones and lower the orange one from the pin.
From the right column we will throw off the top two pairs of red ones so that the orange one remains on the left.
We’ll also put on two red ones, and send the previous ones to the center.
We put on a pair of red ones again and lower the previous ones from both columns.
We also put on the next pair and drop the previous ones from the columns.
Using the next pair of red rubber bands we will connect everything together i.e. Having put a pair on both parts of the slingshot, we send all the lower elastic bands from the slingshot to the middle of the weaving.
Next we move on to weaving the owl's head. Let's prepare the rubber bands and arrange them in the form of a diagram, as in the photo.
Having put on a pair of red ones in the usual way from the right row of the diagram, we will throw the lower ones in the middle.
Then we’ll put on the next pair, and send the bottom ones to the center again. Let's move the left rubber bands to the right.
Now let's weave the owl's eye. Throw the black rubber band four turns onto the left pin.
Again we will put on the usually red pair and remove the black 4 turns on it.
We will also send both lower pairs from the right side, but so that the black one is on the left.
Let's throw on two more red rubber bands, and send the bottom ones to the middle.
Let's release the left column by moving the elastic bands from it to the right one.
We will insert the hook into the loop from which we started weaving the head and throw two orange ones on the hook. Let's pull it through the loop and put the second part on the hook too.
And already from the hook we lower the orange ones onto the left pin.
We put a pair of red ones on both posts and remove the orange rubber bands on them.
We transfer from the left side of the elastic band to the right.
We insert the hook again into the loop from which we started. We throw a couple of red ones on the hook, pull out one side, and put the other on the hook.
We lower the rubber bands from the hook to the left column.
Again we put two red rubber bands on both columns. We lower two pairs of red ones on the left into the center of the weaving.
On the right column we hook the top two elastic bands and transfer them to the left. We put a black single elastic band in four turns on the right side of the slingshot.
Let's put a pair of red ones on both columns and lower the black turns.
Next, we’ll remove all the rubber bands from the left side of the slingshot so that the black one is to the right of them.
Let's continue with red hair. Having put on a pair, we send the previous ones to the middle.
Now we connect all the rubber bands on the slingshot. Let's put one red one on two posts. We will send all the rubber bands from the slingshot to the center.
We transfer one of the rubber bands to the post next door. We lower the lower one to the center. Tighten the loop well.
Now we will make tassels for our owl. Insert the hook into the upper left loop of the head and pull one red one through it.
Let's make a loop using a method already known to you.
We'll do the same on the right side.
Now take scissors and pull out each of the prepared elastic bands and cut off about half. The rubber band owl is ready.
Bunny
Another cool pet that you can carry with your keychain. You can make a bunny keychain if you follow the following instructions for weaving from rubber bands.
Materials for work:
- slingshot;
- hook for weaving;
- yellow elastic bands - 58 pcs.;
- black elastic bands - 3 pcs.
Progress:
We hold the slingshot in our hand with the grooves in the pins facing us so that it is comfortable to grab the rubber bands with the hook.
On the right side we wind one yellow elastic band, wrapping it three times, and then we put two on both pins.
We put the first rubber band (3 turns) in the middle and put on the next pair.
Now we lower the previous rubber bands to the center on both sides and throw another third pair on the posts.
We weave, throwing off the bottom ones, and then put on the fourth pair of yellow ones.
Having thrown off the lower ones once again, we transfer the workpiece to the right column, and insert the hook into the triple initial elastic band.
We lower the triple one from the hook onto the left pin, and then put on another pair (this is the first pair of the next piece).
Let's lower the triple elastic band into the center on each side, and then add two more yellow elastic bands.
We send the previous ones to the center on each side, and then we throw on two more yellow elastic bands.
We lower the lower (previous) rubber bands again, and then transfer the second blank to the right side of the slingshot.
We find a triple elastic band and put it again on the left pin.
We make the next blank in the same way, weaving 4 pairs of elastic bands using the fishtail technique.
The bunny's body is almost ready, all that remains is to connect the woven chains. To do this, we’ll put on two more yellow ones and send all the rubber bands on the slingshot to them.
Now let's start weaving the bunny's head. We’ll usually put on two yellow ones, and throw off the previous ones.
Let's throw a couple more yellow ones on the slingshot. We throw off the previous ones, and transfer the elastic bands from the left side to the right.
Making an eye for the bunny. On the left side of the slingshot we wrap one black one three times. And then we’ll put two yellow ones on both columns.
We lower three turns of black on the left and both lower pairs of yellow on the right side, and then transfer the elastic to the left side.
Now we are making a bunny’s ear from yellow rubber bands. We start by winding the rubber band three times on the right column. And then we’ll put the first pair on both posts.
Three turns weave two more pairs of elastic bands.
We connect the elements by throwing on a couple more yellow ones. Let's take off all the lower elastic bands so that the eyelet is on the right.
We continue weaving the head. We insert the hook into the loop from which we started weaving the head and throw this loop over the left side of the slingshot.
And then we throw on a couple of yellow ones.
We lower the loop on the left.
Now we wind the black rubber band 4 turns on the right column.
Let's put a pair of yellow ones on the slingshot.
We lower the black elastic band and the previous yellow ones.
Let's throw on a couple more yellow rubber bands, and send the previous ones on the left to the center.
Let's move the elastic bands to the right side.
We put the hook back into the loop from which we started making the bunny’s head and put it on the left pin.
We weave a couple of yellow fishtails and make a second eye.
We wind the black one on the right column, and then we throw a couple of yellow ones on the slingshot.
We lower the black turns and two pairs of yellow ones on the left side.
We put the left elastic bands on the right side and weave the second eye.
On the left side of the slingshot we wind the yellow rubber band three times, and then weave it in the same way as the first eye. We weave three pairs of elastic bands, and then connect the elements using another pair of yellow ones.
We lower a pair of elastic bands on the left, and 3 pairs of upper yellow ones on the right.
We throw on the last single elastic band, onto which we send all the lower elastic bands from the slingshot. We move one of them to the adjacent column, and then lower the bottom one. We tighten the loop and remove the figure from the slingshot.
We straighten the eyes, ears and straighten out the nose. The bunny is ready.
Video lesson
Difficult, but interesting, maybe even when creating figures from rubber bands using a slingshot! For example, if you choose such an interesting way of weaving a figure from rubber bands, as shown in detail in this video tutorial. A master class on knitting another bunny figurine will help you create a toy that children will love and can also become a memorable gift for adults.
Video tutorial - weaving figures on a slingshot from rubber bands:
"Sixfold fishtail"
This type of weaving is more difficult than the previous ones, so it is better to concentrate on the work and not be distracted in the process.
To work, you will need rubber bands of at least two colors, an S-shaped clip, a regular fork, a hook or something that can replace it - for example, a pencil or a sushi stick.
To weave complex bracelets based on it, see the step-by-step tutorial:
1. Pay attention to the position of the fork: it should be as in the photo. Place the elastic on the first prong and twist it in a figure eight. Do the same with the rest: as a result, two “eights” will be formed on the fork.
3. Repeat the previous step. The more colors, the “thicker” the bracelet will be.
4. Hook the first element from the front side, pull it up and back so that the loop is between the first and second teeth. It should lie on the top elastic band.
5. Now it’s the turn of the last left loop: pull it up and throw it over the last tooth. There will be two central loops left in the first row: they also need to be thrown over the tines of the fork. After you throw the first row back, the work will look like this:
6. Make another layer of figure eights by repeating step two. Just as in steps 4-5, pull the elastic of the previous row over the tines of the fork from the front to the back.
7. The weaving technology is maintained throughout the entire work: repeat steps 2-5, extending the bracelet to the required length. When several rows are ready, stretch the finished fabric a little to give it the desired shape - it will almost look like a French braid - and position the elements correctly.
8. Pull the bracelet over the fork to highlight two loops at the beginning of the braid. Attach a clip to them, hooking it on both loops. Then carefully remove the hinges. Before pulling them together, squeeze the weave at the base to prevent the fabric from unraveling. Secure the loops by hooking them with the free end of the clip.
Pay special attention to the last stage: excessive haste can lead to the dissolution of the canvas. The three-row bracelet is ready!
History of creation
The idea of weaving colorful bracelets first came to the mind of the American Chong Chun in 2010. Watching his little daughters play, he came to the conclusion that they really enjoyed making jewelry. The process was quite labor-intensive for such babies, so Chong came up with the idea of making it as simple and convenient as possible. Together with his wife, they designed a miniature machine, came up with several auxiliary tools and selected suitable materials.
The Chun family liked the toy so much that they decided to create their own brand, Rainbow Loom. The startup cost only 10 thousand dollars. In the first three years, the newly formed company sold more than 1.2 million products, turning its creator into a millionaire.
The benefits of Rainbow Loom for children are difficult to overestimate. The toy helps develop:
- perseverance, concentration, fine motor skills
- logic, abstract thinking
- the ability to learn independently (search for projects on the Internet and implement them)
- creativity, creativity, designer taste
- communication with other people (at school, family and on the playground)
A separate important advantage of this simple needlework is its multiculturalism. Girls and boys of all ages, nationalities, and religious traditions enjoy being creative and sharing their crafts with friends. There are even special funds where you can buy or sell a woven rubber bracelet for charitable purposes.
Flat bracelet on a fork
To weave such a decoration you will need a regular fork and hook. If there is none, then a simple toothpick will do. The most important “ingredient” is rubber bands of two colors, in our example they are orange and purple. A cool bracelet will turn out to be quite wide and bright, but not round, as usual, but flat.
Let's get started! Instructions:
1. Starting with the purple ones: fold the first one in two turns, and put it in a figure eight on the central tines of the fork. Also fold two more elastic bands in half and put them on the outer teeth as shown in the photo.
2. Alternately, use a hook or a toothpick to hook the lower central loops and place them on the reverse side above the teeth.
3. Roll the new purple elastic band in two turns and, without twisting, put it on the two outer teeth. We do the same on the other side. We alternate the loops of the previous row to the top, forming the next row. You should get something like this:
4. When weaving, we follow a checkerboard pattern: in one row we always put one elastic band in the center, in the other - two at the edges.
6. Every two rows we change the color. We continue weaving until we get a bracelet of the required length.
7. To make the tip of the bracelet neat, use our method: transfer the loops from the outer teeth to the central ones, and from the previous row to the top one. Fold the new elastic in two turns and put it on the middle teeth - you need to throw the remaining loops onto it in the center.
8. Secure the loose loops at both ends with an S-shaped fastener.
That's all the magic, the decoration is ready!
Tools slingshot and hook
A slingshot for weaving is sold in stores with almost every set of elastic bands. This is the most common lumigurumi tool due to its compactness and ease of use.
A mini-machine slingshot is a plastic device with two “horns” and a handle for holding the tool. The horns on one side are convex, which gives shape to the elastic and protects it from twisting. On the other hand, they are equipped with concave grooves, from which it is easy to pick up the elastic band. When working, the slingshot is positioned with its horns facing up.
Also, the lumigurumi kit usually includes a small plastic hook. It is very convenient for them to remove the rubber bands from the slingshot, moving it into the groove. If this tool is not included in the kit, you can use a regular crochet hook.
Rainbow "Dragon Scale"
Making this bracelet made from large rubber bands does not require any special tools: a couple of forks, a piece of tape and standard plastic clips will suffice. You will also need different colored rubber bands: 13 purple, 16 blue, 12 light blue, 16 green, 12 yellow, 16 orange, 12 pink and 16 red - a complete rainbow.
Before starting work, secure the forks with tape in two places, as shown in our example. This design will replace a huge machine for us.
The scheme will be like this:
1. We start weaving with red ones. The first row consists of four elastic bands placed in a figure eight over the 1-2, 3-4, 5-6 and 7-8 tines of the forks.
2. In the second row, we put pink elastic bands on 2-3, 4-5 and 6-7 teeth, without twisting .
3. We hook the red elastic bands of the first row on all the prongs, except for the side ones (there is simply nothing to fix on them), and transfer them to the back side of the forks. You should get it like in the photo.
4. Without twisting, we put four orange elastic bands on 1-2, 3-4, 5-6 and 7-8 cloves. Now you will need a toothpick or a hook, but with proper skill you can continue with your hands.
5. We hook the elastic bands from each tooth and put them on the reverse side as shown in the photo.
6. Introduce a new color - yellow. In this row there will be three elastic bands on 2-3, 4-5 and 6-7 teeth.
7. Repeat step No. 3, throwing all the loops, except the side ones, over the tines of the forks.
The principle of operation is maintained throughout the entire weaving. The bottom line is that you need to repeat steps No. 4-5-6-7, alternating the selected colors : when you throw on 4 elastic bands, then throw the loops from all the teeth back, and when you throw on 3, then from the 2nd to the 7th clove, i.e. except for the extreme ones.
In this way we weave to the desired length, not forgetting to check the size: for the pattern to look good, the rainbow dragon scales should be slightly stretched.
When the weaving is finished, it’s time to fasten. To connect both parts of the bracelet you will need four S-shaped clips. Slide all the loops on the forks to the very bottom.
There are two loops for each clip: alternately fix the loops with 1-2, 3-4, 5-6 and 7-8 teeth on the fasteners, and carefully pull them off the forks. Don't worry: the weave will not unravel, as the clips hold it securely.
On the back of the bracelet you need to find the red elastic bands that we used to weave the first row. In the same way, we attach two loops to the second edge of the clip.
Dragon scales are ready! If the description did not seem detailed enough to you, we recommend watching the video from the author:
The simplest and easiest types of weaving for beginners
Among the dozens of proposed patterns on different sites, you should pay attention to the simplest and lightest bracelets made from elastic bands, because they are so popular among beginner knitters in this style. This includes weaving bracelets on fingers and working with a slingshot.
For example, on your fingers you can easily and surprisingly quickly master a model of a bracelet made of rubber bands, such as the Fishtail. Then knitting this pattern on a slingshot will be more interesting and faster. Another popular type of bracelets among beginners is the Dragon Scale. This is a fairly universal pattern that can be knitted using all tools for working with elastic bands. The choice is yours!
Fish tail
At first, when getting acquainted with the art of weaving from elastic bands, they usually work with the Fishtail pattern. It is quite easy to perform, and also does not require the use of additional tools. All you need is elastic bands, a connecting clip and the hardworking hands of a knitter. Let's take a closer look at how to weave a Fishtail bracelet from rubber bands in the simplest way.
Materials for work:
- single-color rubber bands - 50 pcs.;
- connecting clip;
- hands.
Progress:
The first rubber band is put on the index and middle fingers in a figure eight. Next, the two elastic bands are put on without twisting.
The bottom elastic band is removed from both fingers separately at each edge, after which it forms a kind of double loop, as shown in the photographs.
Then another - the fourth - elastic band is put on the fingers, also without twisting (this bracelet model involves twisting only the first elastic band in the entire work). Then the lowest elastic band is removed from the fingers in the same way as the previous lower one. This is the main work on the bracelet: adding one elastic band at a time, and forming a double loop with the very last elastic band in the row.
These steps are repeated until the required length. Finally, the ends of the product are secured with an S-shaped clip-fastener.
Dragon scales
The Dragon Scales bracelet made from elastic bands is also very popular among beginner knitters. It looks interesting, especially due to its openwork structure and impressive width. Depending on the choice of knitting method and the number of stitches on which the bracelet is knitted, Dragon Scales will have its characteristic width and delicacy. Let's consider a way to knit this bracelet from elastic bands using two ordinary forks.
Progress:
We take two ordinary forks in our hand with the tines facing us, and in the very middle of the legs we tie them with tape or the same rubber bands. It is important that they do not move to the sides and do not fall apart.
Each fork has four tines, which means we have four pairs of tines 1-2, 3-4, 5-6, 7-8. The first row must be twisted in figures of eight: on each pair of cloves you must put a ring, twisting it in a figure of eight, as shown in the photo.
For the next row you will only need three rings of the same color, this time you don’t need to twist them, just put them on the teeth, connecting them in pairs 2-3, 4-5, 6-7.
When putting on each new ring of the next row, you need to remove the loops of the previous row so that they overlap the new elastic bands. When removing the loops of the first row, you need to leave them on the first and last clove, since we did not put new rings on them.
Thus, to get bright bracelets made of elastic bands without a Dragon Scales machine, just follow a simple algorithm: alternate rows, connecting in pairs 1-2, 3-4, 5-6, 7-8 and for the next row 2-3, 4-5 , 6-7. When creating a new row, do not forget to throw off the loops of the previous one. In this case, the two forks should form a line, not overlap each other, so that the product turns out neat.
You can make 4-5 rows of each color so that the mesh looks bright and beautiful, you can alternate only two colors or make the bracelet rainbow.
You need to adjust the desired length of the bracelet as you work. It is necessary to take into account that the elastic bands in this weave stretch very well, and you need to control the process all the time so that the finished bauble does not fall off your wrist.
A very important point in the process of creating a bracelet from rubber bands is the final connection, because this will determine whether the loops will unravel. The last row of the mesh will be different from the rest: you need to put one rubber band on one fork over all its teeth, twisting it several times, as shown in the photo of the master class. We remove the lower loops and do the same with the second fork. Now there is only one line left on each, you need to drop it from 1 tooth to 2, from 4 to 3. Hook the fasteners onto the remaining loops.
Two-tone sidewalk
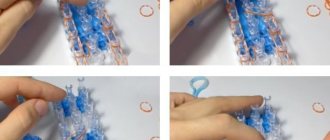
This cool friendship bracelet made from rubber bands is best made on a slingshot: it turns out fluffy and spectacular, and it’s quite quick to make, literally 5 minutes. At the same time, the essence of weaving is very simple, and the technique is no more complicated than the popular “fishtail”, and the outwardly thick sidewalk resembles a braid of spikelets.
To perform it you will need a slingshot (it can be replaced with two pencils with an eraser), rubber bands of two colors, one S-shaped clip and a hook.
The main difference from the “fishtail” is the number of elastic bands that need to be placed on the frame at a time - here there are not one, but two. You need to remove not from both sides, but only from one, and four elements at a time: you get a double braid. In short, look at the step-by-step photos of the process - and everything will be clear:
Step 1 . We put two yellow elastic bands on the frame, twisting them in a figure eight. Next we put on two green ones, without twisting them. We hook one of the lower yellow loops (double) and drag it to the center of the frame. We do this on one side only.
Step 2 . Throw on two yellow elastic bands without twisting. On the left side of the frame we have six loops: we hook four from below and drop them into the center of the frame.
Step 3 . We throw on two green elastic bands, hook four loops on the right, and throw them into the middle.
Alternating steps No. 2 and 3, we continue to increase the fabric to the desired length of the bracelet. In the end, all that remains is to manually secure the connector to complete the weaving. Here you can watch the video MK from the author of the master class:
How and what to weave with?
You can weave bracelets from rubber bands using:
- "rainbow" machine;
- slingshots;
- forks;
- hook;
- fingers.
For a beginner in this business, a special kit is suitable, which includes material, various devices and connecting hooks . You should start studying this type of creativity with simple machine diagrams and gradually complicate the task.
Before you begin, you should decide on the colors of the product . You can choose one or several colors. As they gain experience, they begin to make bracelets from hearts and with decorative elements. Using a thin hook, beads, pendants, ribbons, flowers, stars and bows are woven into them.
Important! Rubber bands can be used in different shades, but they must be the same thickness and density.
A child who is interested in such creativity not only receives pleasure from the process and the result, but also develops fine motor skills.
Video master classes
There are many techniques for weaving from rubber bands, on the basis of which you can create very beautiful jewelry. We show here popular ideas for bracelets on a regular and mini loom, and invite you to familiarize yourself with the lessons provided. Try to repeat at least a few of them. We are sure that the result will please you!
Fishtail in a spiral shell
Using the simplest technique, you get a very beautiful, voluminous spiral bracelet that even a child can create. If you make the core bright and multi-colored, and choose monochrome shades for the spiral, the effect will be very interesting!
Crochet spider
It's called a spider for a reason: using only a crochet hook and having two colors of elastic bands in stock, you can easily make an unusual bracelet for a Halloween themed party. Jewelry made with luminous elastic bands will look especially impressive: both girls and boys can wear them. We invite you to watch the video below - even a beginner can do it!
Wide crochet bracelet
To create a four-layer bracelet with your own hands, you will need crocheting skills, but if you don’t have them, don’t rush to close the video or learn to knit! In appearance, circular knots are very similar to single crochets knitted from ordinary threads, and to weave you only need a set of elastic bands, a hook and your own patience. The number of rows can be any - a three-tiered bracelet using this technique looks very cool. You will learn how to knit a wide bracelet from the video tutorial.
Wide bracelet on the machine
The fabric of this bracelet is similar to a triple or quadruple knitted pattern. A spectacular and bright Rainbow Loom decoration will not require much time to create - make sure of this by reading the master class:
Wide rainbow ladder on the machine
A dense, bright ladder bracelet, the core of which is made of black, looks very original, like a real path. We advise you to repeat it, following the recommendations from the video lesson. The ladder will look better if you use bright colors for the side parts, and the tail for fixation can be made to fit any wrist size.
We hope that the weaving options given here for beginner girls and boys will help you learn how to weave jewelry from rubber bands at home and master this exciting area of needlework!
© text prepared by the website MirPozitiva
Video tutorial on knitting a French braid from elastic bands
How to learn to weave a beautiful French braid bracelet from elastic bands? Watch a master class on making this beautiful accessory! You can weave this lush bracelet, so similar to a woman’s hairstyle, using all possible tools: fingers, a machine, a slingshot, two columns in the form of pencils, and even a fork. The pattern for knitting a French braid from elastic bands is not at all complicated; it can be repeated without much effort even by someone who has never woven products of this kind before. Let's consider the method of knitting on a rainbow loom.
From the very beginning
Weaving from rubber bands on a machine for beginners involves using simple patterns. They also determine which machine to use for beginners. Several simple, but at the same time original and stylish options are presented in master classes for beginners.
Simple "Sidewalk" scheme
It is recommended to start weaving from elastic bands on a small machine with the simplest patterns. Only two rows of the machine are taken, and only two columns are used in the weaving process. Determined by the color of the material. For this product you will need elastic bands in two shades: metallic gray and yellow. Then follow the following instructions:
- They work with pairs of rubber bands. The first gray pair is twisted in a figure eight and thrown over two columns.
- The next pair is pulled on top, but yellow. There is no need to twist this and subsequent pairs with a figure eight. Use a hook on the left column to hook a gray double loop, remove it from the column and place it in the middle of the product.
- Throw on the next pair in gray. Use a hook to hook and remove two pairs of lower loops.
- In the future, the process is continued, alternating pairs of rings of corresponding shades to the required length of the bauble.
- The weaving of the product must be completed in the following way. The last pair should be gray. On the side on which two loops have formed on the post, pry up the bottom one and remove it. Then the loops are transferred from the left pin to the right double loop. A clip fastener is attached to the resulting quadruple loop and the first loop at the other end of the product. Weaving the bracelet using the “sidewalk” technology is completed.
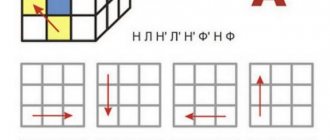
How to weave an “Star” bracelet on a loom
In the process of making a stylish and elegant “Star” elastic bracelet, we will use a machine with three rows of staggered posts and a hook.
1. We place the machine with the cuts of the posts facing away from us and put an elastic band on the outer pegs of the central and left rows.
2. Next, using rubber bands of the same color (we will consider it the main color), we sequentially connect all the pegs on the left, except for the last one.
3. We do the same with the right row, connecting the pegs in pairs with rubber bands, starting from the middle column. In fact, you get a mirror image of the left edge, “dressed” in elastic bands of the same color.
Please note: the farthest columns of the left and right rows remain unused.
4. After the machine is framed with rubber bands, we proceed directly to creating the rays of the stars. To make the task easier for yourself, number the pegs in the center in your mind. Each even number will be the center of the future snowflake. These columns need to be connected with rubber bands to the nearest adjacent pegs, starting from the second column of the right row.
It is important that the connection occurs clockwise, as shown in the figure.
5. In the same sequence, we connect the fourth central column with its closest “neighbors”, forming a second star.
6. Now, knowing the procedure, it is easy to follow the procedure for creating a star pattern to the end of the machine. To make the ornament colorful, use rubber bands of different colors.
7. Take the elastic band of the main color, fold it in half and put the resulting double collar on the last column of the middle row.
We repeat the same action with all the “centers” of the stars. The base of the bracelet is ready.
8. We turn the machine so that the star made last is closest to us. On the outermost column of the middle row (indicated in the photo as No. 1), using a hook, we pick up an elastic band, which is one of the rays of the star, and throw it over the core column.
9. From the central peg, which is the center of the star, we remove colored rubber bands one by one, throwing them on the columns-ends of the star rays. We start from the far right column and move counterclockwise.
10. We perform steps 8 and 9 with all the stars until the end of the machine.
11. We return to the perimeter. We hook the elastic band of the main color connecting the outer columns of the middle and left rows and throw it onto the left peg closest to you.
Then we perform the same actions with elastic bands connecting columns 1 and 2, 2 and 3, 3 and 4, and so on until the end of the machine.
12. We return to the beginning and do the same manipulations, only with the pegs located in the right row. We begin to drop the loops from the nearest central post and again reach the end of the machine.
You should end up with a drawing like this:
13. We proceed to the final stage - remove the bracelet from the machine.
For convenience, we unfold the machine again, placing the cuts of the pegs away from us. We pass the hook through the loops of the outermost column of the central row, take an elastic band of the main color and, hooking it, form a double loop.
Having hooked it with a hook, carefully remove the bracelet from the machine.
If the resulting length is not enough, you can weave an extension. The method of making it will become clear after watching the video tutorial “How to weave a bracelet from rubber bands “Star” on a machine”