It is better to start getting acquainted with the unique origami technique with simple paper models. This will allow you to understand all the intricacies of the craft and feel how deeply it is connected with the philosophy and worldview of the Japanese people. Origami attracts affordability combined with a wide range of applications. A simple sheet in skillful hands can turn into trendy jewelry, eye-catching packaging, an educational toy, or a budget but stylish decor for any occasion.
Paper origami for beginners - the easiest patterns
Crafts based on paper begin to be made in kindergartens. This material is popular because it is easy to work with and, most importantly, interesting. For those who are interested in paper art, we suggest you consider the easiest paper origami schemes for beginners.
Origami sparrow simple diagram for beginners
What beginners need to create origami
The first thing you need is, of course, paper and your hands. But if you are determined to delve deeper into the art of origami, we recommend purchasing additional, useful tools.
Before we start looking at the topic of paper origami for beginners, I would like to note that not only paper can be used to create masterpieces.
You may need:
- Glue. Use PVA or pencil glue. Adhesive components are practically not used in origami, but glue will add strength and decorative elements to the finished fake. Experienced origamists use special aerosol glue. It makes it possible to combine two materials and creates interesting combinations of textures and colors.
- Coloring materials. This means everything from pencils to paints. Thanks to such materials, you can use white paper in your work. Be careful with watercolor paints, their excessive use can lead to damage to the craft.
- Scissors. Before work, it is better to take care of having several loose scissors of different lengths. The tips of such scissors must be sharp. If you plan to work with small elements, prepare scissors for manicure. In our master classes, scissors are practically not needed; we will look at the easiest origami for beginners.
- Knife for office work. It must be well sharpened. In some situations, this knife can replace scissors.
- Sharpened pencil. It will help you mark the material.
Owl made of colored paper
You will need: colored paper in black and yellow, a simple pencil, scissors, ruler, glue, compass, glitter.
Master Class
- Print or redraw the box template.
- Fold the box.
- Make 3 plumage blanks for the owl.
- Make a beak out of a black triangle, then glue a small yellow triangle onto it.
- Form the owl's eye in this way: cut out a black circle, then a smaller yellow one and make another black circle the smallest one, fold the eye and fix it with glue.
- Fold the other eye in the same way.
- Apply glue to yellow paper and sprinkle with glitter.
- Glue the plumage onto the box, then the eyes and beak.
The colored paper owl is ready!
You can also make a cute bunny out of colored paper, and see how in this video!
How to make a paper bunny / How to make paper bunny / Easy Kids Craft / My Paper Quest
Origami box with lid
If you urgently need a small box with a lid, then all you need to make it is two sheets of paper. We suggest you make an origami box from paper material for beginners.
The finished box is ideal for storing small items. Using special origami paper that has a design, you can create beautiful packaging for a small gift. The finished design will be very simple, the bottom and lid will not fall apart, so the box will not need to be tied with tape. To make it you will need:
- two square sheets of paper (one should be shorter than the second sheet by a centimeter);
- basic knowledge of how to make paper origami for beginners.
The beauty of making this box is that you don't need scissors, glue or tape. Everything is done quickly and without auxiliary materials.
Let's get started:
- In our work we use sheets with dimensions of 19 by 19 centimeters and 20 by 20 centimeters. Take a large sheet and fold two opposite corners. Iron the fold. Unfold the paper and fold the other corners. Let's unfold it again.
- Now we fold each corner to the central point. We get a square, iron the folds.
- Take the closest side and bend it towards the center, carefully smoothing the seam. We turn the workpiece with the other side towards us and repeat the work. Repeat the action with the remaining sides.
- Unfold your future craft. You should have a square in the center. This is the size of the future box, or more precisely, one of its parts.
- Take the sides and stretch them. We wrap the remaining two folded sides towards the middle. We iron the seams. You should have noticed that the sides of the resulting figure are divided into four squares.
- Focusing on the outer square, wrap the end of the figure so that you get a diagonal. We carry out work with the remaining sides of the workpiece.
- If the work is done correctly, then there should be two squares left in the central part of the product, and one layer of paper on the sides.
- Turn the figure with one of the corners towards you. Lift it up. Using your fingers, carefully push the central part of the workpiece apart. Fold the corner inside the product. The other side must be dealt with in the same way as the first.
- Iron all folds. One part of the future box is ready. You can already use this part, but we are making a box that closes. Therefore, we take the second square, which is smaller, and carry out the same actions as we did with the first sheet of paper.
If you managed to make the second part of the box, then you have the bottom part. It can be covered with the lid that we made earlier.
As you can see, the work is simple. Such origami, made from paper according to patterns for a novice craft lover, can bring a lot of benefits. You will be able to improve your hand coordination and improve your skills in making paper crafts.
You can see other origami boxes in a separate article
Origami bunny for kids
Children will love making cute eared origami bunnies. Here are some simple patterns for kids.
The first diagram produces the head of a bunny.
And in this origami model the bunny is voluminous.
Choosing paper
Special paper for origami
The main rule by which you need to choose a material is strength. It doesn’t matter whether you make origami crafts from paper or it’s a box, durable paper will not tear. If the material is not dense, it will begin to tear and you will quickly get tired of this activity.
In addition to density, it is important that the working material holds the folds made.
Separately, you should consider paper for modular crafts. Here, of course, it is better to choose a thin version, which will allow you to bend several layers at once.
Otherwise, choosing paper is not difficult:
- Paper for office work. This material is durable, does not slip during operation and is able to hold its shape well. This paper is ideal if you are making an origami airplane out of paper.
- Multi-colored paper for children's work. Before using or purchasing, make sure that it is durable enough and that the colors in the set are enough to complete the craft.
- Crumpled paper. It is not used for making animals or cars, but for origami flowers, this option is ideal. This material has ductility and strength.
- Paper for gift wrapping. An excellent option for making bright crafts.
There is paper that is specifically used for origami. She is called kami. You can purchase it at creativity departments. The paper can be decorated with patterns or painted in any shade. Another option for origami paper is washee. This material is created by hand-making.
We do not recommend using special paper right away. Practice the simple crafts we'll talk about below using regular construction paper.
Paper stories or paper origami for beginners
Both young children and adults will enjoy folding origami figures. If you are a beginner craftsman, we recommend starting with simple but very interesting figures. We invite you to consider our paper origami and clear diagrams for beginners.
Bookmark “Nibbler” made of colored paper
Most moms love to read. This is a great excuse to give a fun, creative, and convenient homemade bookmark.
You will need: a cardboard template, scissors, glue, decorative elements, felt-tip pens, paints, buttons, beads, glitter...
Master Class
- Print or redraw the template.
- Cut it out.
- Fold the paper according to the printed diagram.
- Glue the connecting parts of the paper.
- Decorate the catfish to your taste.
I recommend watching the video master class!
DIY: Bookmarks for “Freaks” Books
I recommend viewing a photo gallery of ideas for crafts made from colored paper!
From colored paper you can make animals, fairy-tale characters, food, accessories and anything your imagination desires. Create small masterpieces and surprise others with your own hands.
Origami mouse
The simplest crafts are folded paper animals. For example, a gray or white mouse with a long tail and a curious nose.
Instructions:
- turn the square at one angle towards you;
- take the side corners and fold them towards the center so that triangles are formed and their sides touch in the center;
- the lower corners of the resulting figure must be carefully opened and wrapped inside the product;
- we turn the top corner back and carefully iron the paper, the back side must be folded in the same way;
Mouse (Step 2) - bend the resulting figure in half, iron it to get a line and open it;
- the upper corner of the craft should be folded into a pocket, this will create an ear;
- We turn the sharp corner on the paper back to get a tail.
The mouse is ready, all that remains is to finish drawing its antennae, nose and eyes. By the way, if you add to the craft a frog made of paper, which we talked about earlier, and a few more fairy-tale characters, you can make a good children’s fairy tale Teremok.
Toys
Making real toys from scrap materials is doubly useful and entertaining. The child will be happy to build a paper ship or a shooting pistol with his own hands, and then find a use for such products in the game, imagining himself as a captain of a ship or a brave soldier.
A boat made of colored paper
Lovers of nautical themes will definitely appreciate the lesson on folding colorful boats. All you need for this is sheets of thick colored paper. Instructions:
- Take an A4 sheet of paper and cut it on one side so that it becomes a square.
- We outline the central lines horizontally and vertically.
- Fold the bottom half of the square in half separately.
- Turn the workpiece over.
- We bend the sides outward towards the line in the center.
- We create the side of the ship by bending the lower squares to the sides and forming triangles from them.
- We move the top of the paper structure to the bottom wall, then bend it upward, leaving a fold along the border of the main part of the vessel.
- Again we narrow the upper parts towards the center, having previously folded the side corners, and open the figure along these lines.
- We unfold the boat from the outside and paint it with multi-colored pens and felt-tip pens.
Shooting gun
A shooting paper pistol is an unusual craft that every boy would be happy to make. In addition to colored sheets, you will need the following materials and tools: hot glue, thin tape, a ruler, a spring from a ballpoint pen and rubber bands for money. Manufacturing technique:
- We take a sheet and twist it into a tube diagonally, starting from the corner, and secure it with tape so that it does not unwind.
- Making the pipe thicker. To do this, we wind another sheet over the first tube and secure it with tape along the entire length. After this, the tubes should be disconnected.
- Repeat the same steps two more times to get three wide straws.
- We cut them so that the output is: 7 pieces of 5 cm each (for the handle), 2 pieces. 15 cm each (for the trunk) and 1 pc. 8 cm long (for the trigger).
- We make the handle of the gun by gluing short sections diagonally.
- We glue the “trigger” so that its right edge protrudes about 3 cm beyond the handle.
- Glue the remaining 2 tubes 15 cm long on top. The base for the gun is ready.
- Let's move on to assembling the trigger mechanism. To do this, twist two narrow tubes.
- Carefully bend one of them into a U shape and insert one end into the trigger and the other into the outermost tube of the handle. We cut off the excess.
- We use the second to create a safety bracket. We attach the tip to the second handle pipe from the top. And we glue the free edge to the bottom wall of the barrel, preserving space for the trigger.
- We twist the long tube and flatten it. With the resulting strip we paste the handle and trigger guard around the entire perimeter.
- Now we insert a spring into the upper tube of the handle, and then a hook for release.
- You will need another tightly twisted tube. We bend its edge, place several rubber bands on the fold and glue the structure well using a hot-melt gun and tape.
- We place the made part in the lower barrel tube.
- We stretch the elastic band and hook it between the front walls of the tubes.
- Paper weapons are ready! We load it with bullets or balls rolled out of paper and select it at the target!
Volumetric paper cat
We continue to make crafts and now we will try to design origami animals from the cat family. We have already reviewed detailed instructions for making a cat in earlier articles. This design option is no less interesting, but also simple.
If you follow the simple tutorial below, you will get a voluminous cat. For the first work, it is better to use regular office paper; in the future, it is appropriate to use thick double-sided material. Let's get started:
Volumetric paper cat (Step 1)
- Shape the paper into a square. Make a fold on the finished figure and press the sides of the rhombus towards the middle. Fold the resulting figure in half.
- Bend two small triangles located at the top towards the center. We open the workpiece and bend the side on the right. Form an additional fold at the border of the figure. Fold the figure along the resulting lines.
(Step 2) - A bend needs to be formed in the resulting triangles. To do this, connect the right and left protruding sides. We do the same with the other side. The last bend allows you to form the cat's head.
- Open the left side. Connect one and the other side. Do the same with the other side. Both sides need to be folded to the center, and the figure itself should be folded in half. (Step 3)
- Fold the right side in and make a bend. Point the right side down. There should be a tail. It needs to be reduced, bend it in half, and point the tip up.
- To finish the work in the muzzle area, tuck the sharp edge under. Unfold the folds under the head to create paws. The cat is ready.
See also other options for origami crafts for children in our other article
Creative flower made from colored paper
You will need: double-sided colored paper, a glue gun, a stick or skewer as a stem, a button.
Master Class
- Take a square of paper and connect opposite corners to form a triangle.
- Fold the sides up to form a diamond shape.
- Fold the top corners down and out from the center.
- Fold the piece in half and secure with a glue gun.
- Fold 6 petals in this way, then glue them to the stick.
- Glue the button to the center of the flower.
A creative flower made from colored paper is ready!
Paper dog face step by step
If you want the easiest folding craft designs, then nothing could be easier than making a cute dog face.
Let's do it step by step:
- make a triangle out of a square;
- iron the line and unfold the figure;
- Focusing on the line obtained in the center, bend the sides of the triangle down;
- We make triangles both at the top and at the bottom.
The dog's face is ready. Decorate the finished origami so that it resembles a real dog.
Origami fish
Making origami fish is very simple. In just a few minutes you can create an entire paper “aquarium.” Let’s look at several options for making fish.
Heart in hands made of colored paper
You will need: a sheet of colored paper, a felt-tip pen and scissors.
Master Class
- Fold a sheet of colored paper in half.
- Place your palm on the leaf so that your thumb and index finger touch the edge of the leaf, thereby forming half a heart.
- Circle your palm.
- Cut out the palm and unfold the craft.
A heart in hands made of colored paper is ready!
Triangular fish
(Step 1)
This fish is not only easy to make, but also very beautiful. This craft is interesting because you can put together several fish according to one pattern, which will not be similar to each other. To make it, take colored double-sided paper. How to make such a fish:
- make a triangle from a square sheet of paper;
- bend the lower corner of the triangle;
- return the material to its original position;
- fold the upper corner to the line obtained in the previous paragraph;
- fold the top side along the resulting line, turn the figure over;
(Step 2) - bend the top part towards the bottom;
- fold the resulting sides of the figure in the center;
- make two small cuts and fold back the triangles.
The fish is ready, add some eyes and you can play with it.
Start
As a rule, simple origami models are chosen for children in order to gradually discover with them the magical world of Japanese papermaking. And since this type of applied art contributes to overall development, it is important to develop in the child a positive attitude towards work and self-confidence. There are several rules that help you quickly master the initial stages of origami:
- You need to stock up on square sheets of paper in advance, at least 15x15 cm in size. Let there be a lot of them so that the child is not afraid to make mistakes and then start all over again.
- It is better to choose paper that is colored on only one side; it is easier to navigate when folding.
- The first schemes should consist of no more than 10 steps. Children usually repeat the same algorithm several times, trying to think through and remember it down to the smallest detail. If a child folds the same figure twice or three times, there is no need to try to “switch” him to another object. Painstaking work simultaneously develops fine motor skills, and with it creative and logical thinking.
- It is recommended to start with easily recognizable and familiar objects to young children: a flower, a boat, an airplane, pets. As they grow up, young origamists will become interested in applied models: jewelry, boxes, phone stands, and so on.
- If possible, the child is provided with a calm environment that allows him to relax and immerse himself in the process. Origami has been proven to act like meditation, relieving stress and restoring inner balance.
gold fish
Who hasn't dreamed of catching a goldfish? Catching it is not so easy, but making origami is easy. Who knows, maybe she will fulfill your wish.
(Step 1)
Prepare the paper you need and get to work:
- fold the square so that the triangles inside are connected;
- iron the folds to mark a line in the center, unfold the paper;
- bend one corner of the square from class=”aligncenter” width=”1024″ height=”680″[/img] (Step 2)
- fold the craft along the marked lines;
- fold the fins towards the middle and straighten the tail so that it takes on a rectangular shape.
That's all. The wish-granting fish is ready. Draw fins and eyes on it. You can add a crown. Well, if we continue the fairy-tale theme, then we cannot do without a ship with which you can catch a goldfish. We described how to make a paper boat in one of the articles earlier.
Fish from modules
Modular origami can also be simple and quite accessible for beginners. In this case, it is important that the number of elements is kept to a minimum and the dimensions of the product are compact. Then the assembly will not cause fatigue and the desire to quit work halfway.
One of the suitable options for children's creativity is modular angelfish fish, from which you can later make a picture or postcard. For them you will need only 80 triangular parts, 1/32 of a landscape sheet in size:
- 37 red;
- 30 salad;
- 12 white;
- 1 dark purple.
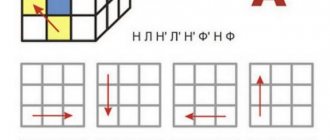
Simple origami airplane
Airplane diagram
There are many schemes by which you can make an origami airplane out of paper. Megamaster.info advises you to start viewing the manufacture of airplanes, preferably with a simple and well-known model. Even if you know how to make it, repeating the design will help show your child the manufacturing process, and “warm up” your hands before more serious crafts.
Let's start building a simple airplane:
- fold the sheet of paper vertically, then unfold it;
- We bend the corners located on top towards the center, focusing on the line obtained in the previous paragraph;
- fold the resulting corners again, making sure that the edges do not connect or intersect with each other on the center line;
- bend the sides from top to bottom from each top;
- spread your wings.
The toy is ready, we trust a little designer to decorate the airplane.
Origami dog for kids
To create a dog's face you will need an A4 sheet from which you need to cut a square.
Step-by-step diagram:
It is recommended to use colored paper, white on the back and orange or brown on the front.
You need to show your child how to make even folds so that the craft turns out neat.
An airplane that rotates
The next version of the airplane is not easy. After starting, it spins, rotates and picks up the air flow.
How to make this origami airplane out of paper:
- take a square, bend and unbend it to get a center line;
- fold the upper corners according to the marked line, the sides of the corners should be aligned after folding;
- place the corners in the middle of the craft, and bend the upper part towards the center;
- carefully bend the wings of the future aircraft inward;
- turn the workpiece sideways towards you and fold it in half;
- bend the wings on each side.
The plane is ready. This product has one rule of use. The plane must be launched in an open area.
Besides:
- If the plane is launched over the ground. After startup, the product will begin to draw loops.
- If the plane is launched upward. He will start doing circles.
It is better to launch such a product against the wind. If necessary, bend the wings.
Fighter aircraft
Now we will tell you how to make a real paper fighter.
Follow the steps:
- take a sheet and bend the upper corners towards the middle;
- by folding the sheet (as shown in the diagram), we outline the fold lines;
- fold the sheet along the marked lines, you should get a blank with a triangle lowered downwards;
- bend the corner up and pull the sides down;
- fold the figure in half;
- straighten the resulting wings and carefully iron the lines on each side;
- carefully turn out the “nose” of the fighter;
- in the back you need to make two cuts, for better air flow, bend the cut parts.
The paper fighter is ready. Such an airplane does not need to be thrown into the air. It is better to launch so that the model is placed parallel to the ground. You can launch the finished structure slightly tilted downwards.
We have collected even more options for making paper airplanes in a separate article.
Case for surprises made of colored paper
You will need: colored paper, stapler, cut out butterfly (from a magazine, notebook, picture), felt-tip pen.
Master Class
- Roll up a piece of paper to form a cone.
- Secure with a stapler.
- Fold over the top corner to form a “case clasp.”
- Separately, cut out the strip and write a wish.
- Attach a butterfly with a wish to the case.
The case for surprises made of colored paper is ready!
Origami tulip for beginners step by step.
Women's Day is coming soon, which means you can't go without flowers, the most original way to create an origami bouquet, how to make them below
For an origami tulip you will need:
• Two square sheets of paper
- So, fold the sheet diagonally to the left and right. Next, fold the sheet in half, we see a triangle, it is necessary for it to become voluminous, put the sides in class=”aligncenter” width=”1024″ height=”768″[/img]
- Now we bend the upper corners at the bottom of the triangle upwards, and similarly bend them on the reverse side. So that the resulting diamond does not diverge, we bend the left side to the right, and on the reverse side, the right side to the left.
- We lay the side a little further than the middle, turn it over and fold the opposite side along the line. On the reverse side we perform a similar operation.
- After this, holes appeared in the petals, insert opposite sides into them, and do the same on the other side.
- Then we take the flower by the ends and blow into the hole in the middle, this is done for volume, if the hole is too small, carefully move the paper apart so as not to tear it. We bend the petals on the resulting bud, do it carefully, giving them a rounded appearance.
- Let's start with the stem, apply the corners to the middle of the square sheet, and then bend the side corners towards the center. Then we bend it in half, it is important that one of the corners is higher than the other. We bend the bottom one down - this is a leaf, we connect the bud with the stem.
Flowers and decorations
While boys shoot with homemade weapons and drift across the sea on ships they built with their own hands, girls can create paper bouquets and decorations.
Origami rose
Process of creating a flower:
- Give the album sheet a square shape.
- Fold it along two diagonals, unfold it, and then bend it horizontally.
- Bend the side triangles inward so that the parts of the line touch. You will get a double triangle.
- The lower corners of its base, both on the front and back sides, must be tucked towards the top.
- Connect the left and right parts of the figure together on one side, and then on the other.
- Fold the sides towards the middle, slightly overlapping, and secure by inserting the left corner into the adjacent pocket. Repeat steps for the opposite side.
- At this stage, a bud with a small hole at the bottom has already appeared. It can be slightly expanded using a toothpick. Then blow into the hole so that the bud expands and gains volume.
- Bend the petals outward and twist slightly.
- Insert a straw-stem into the hole.
Chamomile made of colored paper
To create a daisy, just take glue, as well as yellow and white paper. Now you need to follow a few simple steps that even the youngest needleworkers can handle:
- For one daisy, cut out 2 circles from yellow paper and 9 stripes from white paper.
- Form petals by gluing the ends of each strip.
- Glue them to the core circle. Attach the middle on the reverse side too.
- If desired, you can make stems and leaves from green paper, and then arrange a beautiful bouquet on cardboard.
Paper ball
There are many options for making voluminous paper balls. Let's talk about one of them. To do this you will need:
- corrugated paper;
- white cardboard;
- glue stick;
- scissors;
- markers;
- compass or round object;
- needle and thread.
Step-by-step creation of a ball:
- Draw a circle on cardboard that will correspond to the size of the future ball, and cut it out.
- Divide the circle into two halves.
- Cut 40 rectangles from corrugated paper. The size of each piece should be such that one semicircle fits entirely on it.
- Take a sheet of cardboard and place it horizontally. Draw parallel vertical lines on it at equal distances from each other, alternating two colors (for example, red and green).
- Place a corrugated rectangle on the lined cardboard. Use glue to draw stripes along one of the marking colors.
- Place the next sheet of corrugated paper on top and press until it adheres firmly to the first layer.
- Apply glue on top again, only this time using a different marking color.
- Connect all existing rectangles using this principle, constantly alternating glue strips.
- Cut the entire glued stack into a semicircle using the cardboard stencil from step 2.
- One semicircle of cardboard needs to be cut at the base to form the letter C, and glued to one side of the multi-layer workpiece. The other semicircle must be glued to the second side unchanged.
- Next, you should loosely stitch the product from two corners. You can leave a thread in one for further hanging of the ball.
- The final stage is unfolding the craft and gluing the cardboard parts.
Paper origami crane for beginners
The most popular origami craft is the origami crane, it symbolizes life and optimism, and anyone can make it!
For a paper origami crane you will need:
• Square sheet
- We bend the sheet diagonally and in half on all sides. It is necessary to obtain a double square; to do this, we fold the figure along the bending lines.
- After this, we apply the corners of the square up along a vertical line, creating a long triangle. Bend down the top corner of the figure.
- We open the paper and turn the paper upward along the resulting horizontal line. We fold the paper inward along the fold lines we made, and do a similar operation on the reverse side.
- The result is an elongated rhombus with legs, we make it by bending the edges towards the center, and do the same on the other side. Short corners - wings, long head with a tail, attach a long triangle to a short one, wrap it and bend it, as shown in the picture.
- To make the head, we bend it at the end, and bend the tail back, all that remains is to straighten the wings. You can add a swan to the crane, how to make a swan from origami paper. Paper origami for children is the TOP of the best crafts.
Origami swan
Take a square white sheet, mark one diagonal and bend the upper and lower corners to it. Fold the ends of the corners in the opposite direction, fold the piece in half and place it on the table like an open book. From a long, elongated corner, form the neck and head of a swan. Make a beak by bending the tip of the head back and forth, and then draw the swan's eyes.
Photo: yboard.ru
DIY boat made from origami paper
Spring is coming, which means it’s time for streams and paper boats, and how to make it is below.
For an origami boat you will need:
- Rectangular sheet
jumping frog
When talking about models made from rectangles, one cannot fail to mention this dynamic toy, beloved by children. The jumping frog is incredibly simple to perform, but can bring a lot of joy with its high and intricate somersaults. And with it you can organize real “flight range” competitions. A certain amount of dexterity is required from the owner of the toy so that the frog covers a long distance and is guaranteed to land on its paws.
It was experimentally found that models made from ¼ landscape sheets jump best. That is, for this origami craft, the A4 format will have to be divided into four parts. It is recommended to take thick paper - office paper or for pastel painting, then it will spring back well when pressed.
Step-by-step instruction:
- Fold the sheet in half vertically. Let's expand.
- The upper right corner is aligned with the left edge. Return the workpiece to its original position.
- We repeat the same action on the left.
- Turn the model inside out.
- We lower the top edge of the rectangle to the base of the diagonal folds. We raise. Turn the product over again.
- We fold the upper part into a “Double Triangle” along the previously outlined fold lines.
- We raise the lateral corners of the triangle to the top.
- Align the right side along the central axis. We repeat the action on the left.
- We bend the triangles from step 7 in height so that they “look” to the sides.
- Raise the bottom edge and align it with the top.
- Bend the same part back.
Turn the model over to the front side. We paint it to give it a realistic look and start playing.
For older children and experienced origami artists, there are more complex frog models. They are used in hand-made jewelry, table decor, or as “artists” for home puppet shows.
DIY origami frog for children
Jumping competitions using paper frogs are interesting, exciting, and making a frog is very simple.
For the origami frog you will need:
- Double-sided, 20*10 cm green rectangle
- First, fold the sheet in half, then bend the top side to the bottom, do this on the other side. Unfold the resulting accordion and fold the corners diagonally.
- We turn it around and make similar movements on the other side. Along the resulting lines, we fold the corners and apply the rest to them, we get a rhombus.
- Now we bend each side to the center line, do this on all sides. Next, we turn these corners in the opposite direction - these will be the paws.
- Now turn it over to the smooth side and fold the paper as shown in the picture. After that, we bend the triangle on the other side, but so that the paws do not follow.
- Now we put the corners that were under this triangle into the pocket of the triangle. Next, we bend the “pocket” first on one side, then on the other.
Bookmark "Crane" by Joe Nakashima
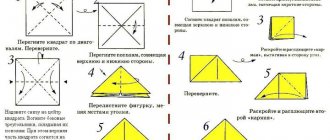
A new look at the traditional tsuru crane is offered by a famous Brazilian designer. Of course, his origami model requires experience and patience, but analyzing each step step by step makes the task much easier.
Video description of the model:
Paper origami for beginners butterfly
One of the most beautiful insects is the butterfly, and the paper butterfly is original and beautiful.
For origami butterfly you need:
- colored square sheet
- Scissors
- Fold the sheet in half, then diagonally. Next, fold it into a booklet, bending the corners inward. Fold the resulting triangle in half and cut off the left corner.
- Now we unfold and bend the future wings, on the back side we bend the upper corner down, we try to bend the corner to the front side, and iron it thoroughly.
Modules
Small squares of paper are used to make parts for modular origami. They are no less convenient than their classic rectangular counterparts, but are used only for tangram puzzles - flat figures assembled like puzzles. There are two types of modules: main and additional. The second option is needed for narrow long parts:
The main module folds as follows:
- We bend the square base diagonally.
- Raise the outer corners up to the center line.
- Turn the workpiece over.
- Bend the top.
- This is what should happen.
- We lower the forked part over the previously bent one.
- Fold the resulting triangle in half into a “valley”.
- The final module is presented in steps 8 – 10.