The slender, beautiful birch tree is a real symbol of Russia. They loved it at all times not only for its flexible body and branches, but also for its white smooth bark - birch bark.
Since ancient times in Rus', birch bark was the only material available to the common people. That’s why it was used so often on the farm:
- made dishes, household utensils (tueski, boxes, baskets, baskets);
- clothes and shoes (bast shoes);
- toys and musical instruments;
- furniture (chairs, cradles);
- amulets and jewelry;
- boats, tackle, ropes, harness for horses;
- they lit stoves and lit fires;
- covered the roofs of houses;
- recorded important life events (birch bark letters).
Now the love for natural materials is returning, and making handicrafts from birch bark is becoming popular again. Modern craftsmen make antique utensils, boxes, paintings, artistic panels, souvenirs and much more from birch bark.
Why is birch bark so attractive?
- Flexible and easy to process.
- Able to retain heat and allow air to pass through.
- Products in birch bark dishes remain fresh for a long time.
- Products made from it are safe for allergy sufferers.
- Beautiful, strong and durable material that is not afraid of moisture.
Preparation of birch bark
Before you begin the creative process, you need to prepare birch bark for crafts. It is best to do this in June-July, when the birch bark is most pliable.
You should choose sawn or fallen trees so as not to harm the forest. If the bark is removed from a young tree, then it is necessary to monitor the depth of the cuts so as not to damage it.
Harvesting can be done in layers or strips. For this:
- On the bark you need to make a vertical incision that is not too deep, up to 1 cm.
- Then - 2 circular cuts along the edges of the vertical one.
- To separate the birch bark from the trunk, its edge is picked up with a knife or spatula. This is how harvesting occurs in layers.
- If there are many layers, they are placed on top of each other, alternating the outer and inner sides.
- In order to prepare the bark in strips, it is cut in a spiral and then immediately rolled with the outer side up.
It is believed that birch bark ribbons are best suited for making birch bark crafts for beginners.
Russian birch beads
To make one, take:
- beads of green shades;
- glue;
- thin wire for beading with a diameter of 0.4 mm;
- alabaster or plaster;
- thick wire with a diameter of 1 mm;
- acrylic paint white and black;
- tassels;
- foil;
- construction tape;
- threads;
- container for the stand.
The master class will tell you how to make birch from beads.
To create it we will use the loop weaving technique. Cut a thin wire and string 9 beads onto it. Form them into a loop, twist both turns of wire together. String 9 more beads onto the first and second ends of the same wire. Twist each of these wire pieces. On each side, make 5 leaf loops in total, the eleventh one will be at the top in the middle. Twist the wire to make a twig. You will need to make 50 of these blanks. From 5-7 similar small branches we make one large one. To do this, cut off a fragment 15 cm long from a thicker wire with pliers. Using thread, screw the first branch to it, cover the junction with tape. Attach the rest of the small branches here in the same way. Next, we make a birch tree from beads as follows: since it does not have a top, we design the first group, consisting of four branches, so that it becomes the top of the tree. We place the remaining blanks at different levels. At the bottom of the barrel, secure 4 strong wires with tape, bending them at an angle of 90 degrees. Lay cellophane in the container, place the cross of the tree here, fill its lower part with alabaster or plaster. First, hold the tree yourself; when the solution has hardened a little, lean the birch against a vertical support. Leave it so that the plaster or alabaster is completely dry. To avoid staining the beads at the next stage, wrap the birch branches with foil. Dilute plaster with PVA in a 1:1 ratio. Mix well so that there are no lumps left. Cover the birch branches with this substance with a thin layer and the trunk with a thicker one. To make the tree bark more authentic, use a toothpick to make grooves. When the glue and plaster solution has hardened, paint the top with white acrylic. Make black stripes on the trunk and branches. When the solution is completely dry, remove the base of the tree from the mold and decorate it with pebbles or moss.
This is what a beautiful beaded birch turned out to be.
Based on this technique, you can make not only summer, but also autumn birch from beads. To do this, take this yellow material. Moss is perfect for decorating the tree trunk circle.
Processing birch bark for crafts
So, the birch bark has been collected. But before you start getting creative, you need to prepare the groundwork:
- To begin with, the birch bark is cleaned of dust, dirt, and growths using sandpaper.
- Use a soft cloth or sponge to slightly moisten the underside of the bark.
- Then a warm salt solution is prepared in a large bowl and birch bark material is placed there for 2-4 days, depending on the age of the tree.
- The soaked bark is divided into strips and layers.
- After which they are ironed for final drying and separated by shape, color, pattern.
- If you need to get small crumbs to decorate future products, then the birch bark is ground in a meat grinder.
Tools for making birch bark crafts
For fruitful and high-quality work with birch bark you will need:
- scissors;
- sharp knife;
- staples;
- office clips for fixation or clothespins;
- tweezers;
- pencil or pen;
- compass, ruler, square;
- templates;
- awl, pliers;
- hole punch, chisel;
- a board or any hard surface for working with sharp tools;
- vegetable oil and soft dry cloth.
Do-it-yourself voluminous applique made of colored paper Birch trees for primary school children
Master class with step-by-step photos. Volumetric applique “Birch trees”.
Author: Zyryanov Nikolay, 11 years old, student of the 5th special (correctional) class of MAOU Secondary School No. 20, Baranchinsky, Sverdlovsk region.
Head: Plyusnina Tatyana Aleksandrovna. Teacher of correctional class VIII type, MAOU Secondary School No. 20, Baranchinsky village, Sverdlovsk region.
This master class is intended for children of preschool and primary school age, students of correctional schools and classes, defectologists, and educators. Purpose: interior decoration, gift.
Purpose: Production of volumetric applique, panels.
Objectives: - introduce methods of working with paper; - develop the ability to use a hole punch in work; — develop fine motor skills, improve graphic skills; — cultivate a desire to please others with your crafts. For work you need the following materials and tools: colored paper, cardboard, scissors, pencil, felt-tip pens, ruler, birdhouse template, glue. Work progress: Divide a sheet of white paper into 3 equal parts and cut it. It turned out to be 3 stripes. Let's roll each one into a tube. Use glue to secure the tubes. Glue the white paper tubes onto a colored sheet of base paper. We took blue. Using a black felt-tip pen, we will draw spots and stripes on the trunks of birch trees. Using the same felt-tip pen we will draw tree branches. Using the template, we cut out 2 birdhouses from colored cardboard. Using a hole punch, we will make a hole in the birdhouse. Let's glue birdhouses onto birch tree trunks. Fold a strip of green paper, 2 cm wide, into an accordion shape. Let's cut out the leaves. From a strip of yellow paper, 3 cm wide - “earrings” Decorate the branches of birch trees with leaves and earrings. Place the applique in a frame with a passe-partout. Application on the theme Autumn. DIY birch applique Do-it-yourself spring applique made of colored paper for children over 7 years old Paper tunnel on the theme: Spring. Master class with step-by-step photos DIY paper spring calendar. Master class with step-by-step photos
| Yulia Alekseevna Chernykh # April 11, 2015 at 07:11 pm 0 | ||||||
|
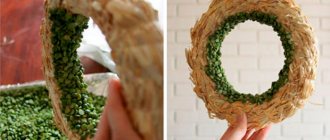
Wall panel
Birch bark panels are a great alternative to art paintings! It will not only decorate the wall of your home, but also bring an element of eco-style to the interior, giving a touch of freshness and unity with nature.
To create a panel you will need:
- thin birch bark blanks and birch bark chips;
- pencil and paper;
- cardboard (can be colored);
- scissors or knife;
- PVA glue and glue gun;
- wooden beads, beads for decoration (optional).
Stages of work:
- PVA glue is applied to the smooth side of the cardboard and birch bark chips are poured. If colored cardboard is used, the color should contrast with the birch bark. A good combination would be light bark and a blue, black or chocolate background.
- While the glue dries, elements of the plot of the future panel are drawn on a sheet of paper.
- They are then cut out and traced onto a birch bark blank.
- The resulting drawings are also cut out on birch bark.
- After that, they are glued with a glue gun, embodying the intended plot.
- To give the panel a 3D effect, it is best to use birch bark of different shades.
- If necessary, you can decorate your creation with decorative elements (beads, seed beads, etc.).
Paper birch craft
And here is another master class that tells how to make a three-dimensional appliqué so that white-trunked birch trees appear on a leaf.
Children will create such a wonderful work if they take:
- white album sheet;
- silver or blue cardboard;
- scissors;
- pencil;
- green and yellow napkins;
- watercolor paints with a brush;
- a sippy cup for water.
The children will surely enjoy the first stage of work.
You need to tear the napkins into pieces and roll them into lumps. To make a trunk, you need to cut a rectangle from a white sheet, wrap it around a pencil to make a tube. The side is sealed so that the figure does not unwind. Have your child glue birch trunks vertically onto silver or blue cardstock. Where the crown will be located, it is necessary to coat this area with glue and attach pieces of napkins to it. If the child is small, paint thin strokes of black paint on the trunk yourself. If he can handle it, then let him do this responsible job.
Such a craft will certainly be appreciated at the holiday, which is called I love the Russian birch.
This material also makes a beautiful tree, and not just one, but a whole birch grove. Prepare with your children:
- A3 cardboard, light blue or dark blue;
- white, green, red paper;
- glue;
- black paint with a brush.
Let the children roll strips of white paper into tubes.
You need to paint black lines on them with paint and then glue them to the base. If you don’t have blue or dark blue cardboard, then glue sheets of colored paper of that color to the existing one.
Children will draw twigs near the trunks and glue leaves cut out of green paper to them. Cut out a birdhouse from red cardboard together with them, glue it, as well as butterflies from colored paper onto the trunks of birch trees. You can decorate the applique with flowers, after which it will turn out so juicy and bright. To decorate the hall for a holiday dedicated to this wonderful tree, you need to make a birch tree and place it on the table. If the tree is large, then it is placed on a stand on the floor. Here's what they use in the process:
- White paper;
- cardboard tube;
- gouache and brushes;
- glue stick;
- small birch branches;
- scissors;
- awl.
Cut out birch leaves from white paper in advance so that the children can paint them.
Since this is a fall tree, let's use yellow and red paint. In this case, someone can paint it yellow, and when this blank dries, another person will make red highlights on it. If you don’t have a ready-made cardboard tube, roll it out of thick cardboard or even two sheets and glue it on the side. Now this trunk needs to be painted white, when it dries, black veins should be made.
The next stage of work is carried out by adults. Using an awl, they will make holes in the trunk, stick birch branches here, to which they need to glue leaves. The barrel is fixed to the board using plasticine, after which you need to put the remaining paper leaves on the stand, and also put the mushrooms. Children will be happy to fashion them themselves. You can decorate the room not only with a paper tree, but also make a birch tree from plastic bottles. It will be more durable. Such a tree can be placed not only in a kindergarten for a holiday, but also to decorate a house or summer cottage with it. From late autumn to early spring, when there are still no leaves on the trees, your dacha will be decorated with a picturesque Russian birch tree, which is resistant to cold, snow and wind.
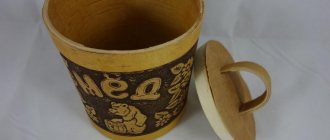
Birch bark body
The body is a multifunctional thing in the household! You can go to the forest with it to pick berries. Store bulk products. Or use it as an original pencil stand, for example. It would be a fantasy!
Before starting work, prepare:
- birch bark blank of suitable size;
- birch bark ribbon;
- pencil or pen;
- scissors, knife;
- awl;
- stationery clips or clothespins.
Stages of work:
- Cut a rectangle of the desired size from a birch bark blank and roll it into a cylinder so that the edges are on top of each other. Secure with clamps.
- Make holes along the seam with an awl.
- Pass a birch bark ribbon through them.
- Step back 10 cm from the bottom of the cylinder and make a mark. This is where the bottom of the box will be.
- To the mark, cut the edges of the birch bark in 4 places at equal distances and bend them inward.
- Then pierce the edges of the bends and fasten them with birch bark tape.
- You can make a lid for the box by cutting it out of bark of a suitable diameter.
- It is also easy to add a handle to the body if you make 1 hole from 2 opposite edges and stretch the tape.
How to make a cut applique?
To work you will need:
a sheet of blue cardboard for the base of the applique;
paper – green, black, white;
PVA glue or glue stick.
We carry out the birch using the cutting method, so scissors will not be useful.
- Take a white sheet of paper and carefully, making small tearing movements, tear off a strip 1.5-2 cm wide. The tearing surface should be on both sides of the trunk.
- Prepare 4 branches in the same way. Try to make them 2 times thinner than the trunk of the birch itself.
- Glue the trunk so that it vertically divides the blue cardboard in half.
- Then glue two branches on each side of the birch tree. On the blue field, arrange them proportionally. The branches should be 45 degrees from the trunk.
Take a black sheet of paper and tear small strips. They will become dashes on a snow-white birch tree. The strips should be glued along the outer line of the trunk, alternating sides (right-left) . Try to place the largest scraps at the bottom of the tree, gradually ascending the trunk, the lines should become smaller and smaller. Visually this will indicate the growth of the plant.
From green paper, tear out a lot of leaves, about twice the size of the lines.
Glue the leaves onto the branches and onto the blue field between them, creating a three-dimensional crown. The application is ready, this is a great gift.
Casket
There are so many little things that every woman has in her home. A birch bark box will be an excellent gift and a container for the most valuable treasures.
To bring the gift to life you will need:
- birch bark;
- cardboard;
- knife and scissors;
- glue;
- carbon copy;
- paper and pencil, ruler, compass;
- strong thread and needle.
Stages of work:
- Think about what your box will be like: shape, size, ornament.
- Draw on paper the parts of the required size (bottom, lid, sides).
- Cut out paired stencils and transfer them to cardboard.
- After the cardboard elements are ready, glue them together.
- On the bark, mark the location of the product elements based on the size of the cardboard ones with seam allowances.
- On the reverse side of the birch bark, apply the intended pattern through carbon paper.
- Cut out the pattern with a knife.
- Glue the paired birch bark blanks together and dry them.
- The box is almost ready. All that remains is to glue the bark parts onto the cardboard base. Or sew the birch bark elements with strong thread and insert the cardboard base inside.
Birch bark products are beautiful, safe and practical. Whatever DIY craft you decide to make yourself or with your child, it will delight you and your friends for a long time. And it will give you a feeling of warmth and unity with nature.
Making birch from plastic bottles: photo and description
To do this you need:
- deep green plastic bottle;
- copper wire;
- pliers;
- awl;
- flame;
- alabaster and a container for diluting with water;
- white and black paint;
- glue;
- green sponge.
Cut a plastic bottle into strips, draw a leaf on one of them, and cut it out.
It’s okay if it doesn’t turn out completely smooth, you’ll soon understand why. After all, at the next stage it will need to be scorched over a flame. In this case, the workpiece will bend slightly, the edges will take the correct shape. Using a hot nail or awl, make a hole in the top of the sheet. Pass a piece of wire through it that needs to be twisted. In the same way, attach pieces of wire to other sheets and twist them with the base. You need to make several of these trefoils from plastic bottles and wire, then twist three pieces together and connect several similar elements into a single branch. After completing several of these blanks, form a tree. Dilute alabaster with water, apply the solution to the branches and trunk. Make a birch stand out of it. When the alabaster is dry, cover it with white paint and draw black lines. We decorate the stand as follows - glue cut pieces of green sponge onto it. Here's a wonderful tree made from plastic bottles, instructions and step-by-step photos probably helped with this. If you don't have alabaster and have a glass bottle, use it as a base. The surface is covered with white paint and painted with black dashes. You can make a drawing in the center of the composition. Wrap branches from a plastic bottle and wire around the neck; you can also place them inside the container. This is such an original Russian birch tree.
You can make another one from a glass bottle. Here are the materials you will need:
- glass bottle with stopper;
- White paint;
- glue gun;
- some birch bark;
- black paint and brush;
- yellow or brown beads;
- needle and thread;
- small birch branches.