All representatives of the cat family are distinguished by extreme grace, dexterity and beautiful fur. But if you can’t touch a panther or a tiger, then domestic cats, although they also have a very proud disposition, are always at your service - contact with them improves a person’s mood and even the state of their health.
Children especially love cats, and these fluffy, gentle creatures usually reciprocate their love. Every girl would probably want to play the role of such a charming, tailed, mustachioed simpering girl at a New Year's party or some fancy dress event. So please her with an amazing cat costume, which you can beautifully make with your own hands without unnecessary costs and hassle, even without any special skills.
Paper cat
The ancient Chinese art of origami is still popular today. Its essence is to create real works of art from paper without using glue. In the video you can see examples of making cat crafts using plain paper.
For beginners and children, it won’t be too difficult to make a cat’s face out of paper - making it in full size is somewhat difficult, you can get confused. But a cute cat’s face can become a decoration for a postcard or just a pleasant surprise for parents.
- We take colored paper of any size, square shape. It's easy to make from a simple rectangular sheet by bending it diagonally and cutting off the excess strip. Bend the resulting square with the colored side facing out to form a triangle.
- Fold the resulting triangle in half and straighten it to create a vertical fold line.
- Place the triangle in front of you so that one vertex is at the top. Bend it in such a way as to “connect” the two lower vertices with the upper one - you should get a small rhombus. Bend it back into a triangle to maintain the fold line.
- Bend the “triangles” obtained from the last step so that both vertices are outside the edges of the main triangle. In appearance it should look like a tulip, but in fact, these are the ears of our future cat. Bend the third, middle, peak towards you so as to make the head of an animal. You can even apply a little glue to make everything stick better.
- Turn your workpiece over. The cat’s face is ready - all that’s left is to decorate it: draw the eyes and mouth, glue on the antennae, etc.
Pillows in the form of cats
Sewing a Cat pillow is not at all difficult, there are a lot of options. You can take any fabric, knitwear, and even burlap. The patchwork technique is well suited for this craft. This original pillow can be sewn without a pattern.
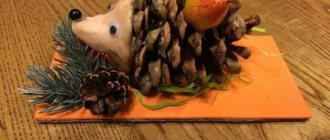
Cat made of cones
Cat crafts made from cones are especially beautiful - such a natural material is very popular in kindergartens and schools in the fall, when kids are asked to make any craft from fir cones, all they need is their imagination!
You will need:
- Fir and pine cones of different sizes,
- PVA glue,
- And also long pine needles,
- A little pink plasticine
- And two peas of black pepper.
Progress:
- To begin with, we will need a small pine cone, to which we will glue two spruce scales - in this way we will make ears on the top of our cat’s head. We use PVA glue for fastening, glue on eyes from black peppercorns, and also make mustaches from pine needles. The nose can be made from pink plasticine.
- The largest fir cone should be oblong - this will be the body of the cat. Using PVA glue we glue the finished head to it.
- You can make a cat’s tail from a spruce cone, which looks fuller - let the animal’s tail be fluffy. For better visualization, you can carefully peel back the scales to create a “fluffy” feeling. We also glue it with PVA glue.
- We make the paws from fir cones, approximately the same size, so that our cat stands firmly on her paws.
Because you have paws: we sew cute fleece mittens
Winter is already approaching, there’s even snow in some places, so it’s time to warm up! Today's master class will be devoted to the process of sewing cozy cat mittens, which will help everyone get their own paws. We will sew from fleece. The mittens will be double, thanks to which they retain heat perfectly even in cold weather, and due to the characteristic properties of the material, they will be very soft and pleasant to the body.
As usual, the pattern is included. It is designed to fit a typical average woman's hand. It does not take into account seam allowances; I recommend adding them when cutting the material. If your hand is miniature, you can cut without allowances.
The pattern was created by me for personal use, you can sell products created on its basis, but please do not distribute the pattern and any other parts of the master class on a commercial basis, such as: selling patterns, selling craft kits, master classes or otherwise. When copying any part of this material, you must provide a direct link to the source www.tulip-art.livemaster.ru
We print out the pattern and cut out all the necessary details. We will decorate the mittens with cats and paws, as usual, using my favorite sublimation thermal stickers.
We transfer images from thermal stickers to fleece using an iron. If you have never worked with such stickers before, you can find out more about what they are and how to use them here.
Let's start work by connecting the parts of the back, palm side of the mittens. The first step is to form the finger. To do this, we fold the parts with their right sides facing each other, as shown in the photo and fasten them with pins or clips. Pay attention to the mark; it must be transferred from the pattern to the material.
We sew a line as in the photo below. The end of the line should be right on the mark.
We do the same with all the details. We get 4 back sides with a shaped thumb. Seam allowances can be trimmed close to the seam. Fleece is a durable fabric that does not fray and is easy to work with.
Then we connect the front side of the mitten and the back, again folding the necessary parts with the right sides facing each other.
We sew a line around the perimeter and trim the allowances.
We carry out this operation with all the details.
All that remains is to connect the lining side of each mitten with the outer one. To do this, we put the inner mitten into the outer one (of course, “face” to “face”).
We sew the parts around the circumference of the cuffs, not forgetting to leave holes for turning them inside out.
All that remains is to turn the mittens inside out, straighten everything out, sew up the hole left and unscrew the cuffs. All is ready!
I wish you all pleasant creativity, warmth and home comfort!
Plasticine cat
This photo shows what wonderful cat crafts can be made from plasticine. This material is easy to use, and therefore something is often made from it during labor lessons in elementary school or kindergarten.
To work you will need:
- Only plasticine of different colors (depending on the color of the cat)
- And a stack for cutting.
Progress:
- We start making the cat from the head and body - roll two balls. Please note that the head should be round, but the body should be slightly oblong. Let's connect together.
- The legs and tail will be the same, so you need to roll five small balls of approximately the same size. From four we make “sausages”, and from the fifth we make a tail. Moreover, it should taper towards the end (the one that will be attached to the body).
- Now you need to attach the legs and tail to the body. It's easiest if the cat is in a standing position.
- To make the ears, you need to roll two small balls - slightly smaller in size than those from which the paws were made. Then we give them a triangular shape and attach them to the cat’s head.
- The base for the cat is ready. Then you can get creative with your child - make the eyes yellow or blue, stick multi-colored spots or strips of plasticine of a different color onto the “fur” of the animal, etc.
How to make “cat paw” gloves yourself? Patterns
Cat's paw mitts are sewn quickly and without any difficulties. Let's look at the main steps:
- A pattern is created. To do this, take old gloves, smooth them out, lay them out on paper and trace them with a pencil.
- Fabric is selected. Faux fur and lining fabric are taken.
- The required shape is cut out according to the drawing.
- Appliqués (cat pads) are cut out of leather substitute and sewn onto the fur. When choosing the color of the applique, you should remember that light fur goes harmoniously with dark applique and vice versa. So, brown “pads” will look good on beige fur, and brown (dark gray) fur will look good with pink, purple, light gray, light green shades of pads.
- The two mitten linings are sewn together.
- Then the fur mittens are sewn separately.
- Mittens made of lining fabric are inserted into a fur glove with the seams facing out. In the process of sewing the two parts together, a ribbon is inserted to tighten the mitten around the wrist.
Decorate your or your child's look with cute fingerless gloves that will highlight your individuality and help you stand out from the faceless gray mass.
Paper applique of a cat
Applique paintings are no less beautiful - there are several options: geometric (details in the form of geometric shapes), torn (pieces of paper come off) and others.
Both beginners and advanced students can make a cat craft in the form of an applique - in fact, everything is simpler than it seems at first glance.
Let's consider the simplest option - a geometric application, for which we will need:
- Colored cardboard (background),
- Glue,
- Scissors and colored paper blanks in the form of three small circles and two triangles.
Work progress:
- Take one of the circles and cut it in half with scissors. Glue half of the circle to the cardboard with the rounded side up. We glue the second half to the side on the left, slightly above the edge - this will be the tail of our cat.
- Next we glue the circle so as to “capture” a little bit of the semicircles - this is the body of the cat. We glue the last circle, placing it on the upper edge of the cat’s body circle - this is how we made the cat’s head.
- Triangle blanks are cat ears. We glue them on both sides of the head.
- In general, the cat applique is ready. Circles and triangles can be used in different colors to create the look of a motley cat. You need to draw a muzzle on the face with a felt-tip pen or pen, although the eyes can be glued on if you have special stationery - it will look very cool!
Cat paw gloves: what makes the accessory unique and why has it become so fashionable today?
Young fashionistas who love fluffy and cute mittens quickly fell in love with the cat paw gloves that recently appeared on the market. Fur products made in the shape of cat's paws look stylish and unique. A young fashionista with such an accessory will easily put on the image of a fluffy cat, which, by the way, appeals to many.
Cat gloves have a number of advantages - low price, ease of sewing, which allows you to sew the product at home, and a variety of materials that can form their basis.
For fashionistas who prefer only natural fur, cat paw fur gloves are offered on the market. For those looking for more budget-friendly options, products made from inexpensive fur knitwear are offered, which also look very impressive. The color of the product is available in a wide range.
What types of women's fingerless gloves are there? Models
Models of interesting fingerless gloves are available today for women with different income levels. A huge assortment of such products is today demonstrated by expensive boutiques in Russia, which offer options for both winter and autumn weather conditions.
- Insulated fingerless gloves can have faux or natural fur on the inside. More elegant models are made with silk lining.
- A sufficient selection of models is presented in knitted form.
- Summer options are often found in the form of a mesh.
- Well-known companies Eleganzza and Esmee enrich this accessory with beautiful curly cutouts and lace. Also, these branded manufacturers like to decorate their products with beads, flowers, skulls and crosses.
The main positive aspects of women's fingerless gloves are convenience, low price and the ability to add a special twist to a woman's look.
Leather mitts – why is this option attractive?
Fingerless leather mittens have always been at the peak of popularity. This is a favorite attribute of rockers and bikers. Women use them to enhance contrast in a woman's image. The demi-season accessory goes harmoniously with many types of outerwear. These gloves will perfectly complement both a rough leather jacket and a spacious drape coat.
When planning to buy leather mitts, you should understand that such an accessory will be expensive, but it could not be otherwise - after all, leather has always been sold at a high price.
What is special about knitted accessories?
- In recent years, there has been a special demand for knitted mitts. This is due to the fact that the stores offer a wide range of them. In addition, it is not difficult to knit them yourself.
- The main advantage of such models is their versatility and affordable price.
- A knitted model, unlike a leather one, does not set specific requirements and looks great with any coats, jackets and down jackets.
- Knitted models are sold in a chic assortment of colors and in a variety of designs.
- This type of product can be fully considered for both autumn and winter.
- The advantages of knitted fingerless gloves are ease of wear, warmth, and easy care (regular washing). They are aimed at children, teenagers and young adults. The disadvantage of the models is the ability to stretch.
Sock cat
For lovers of cutting and sewing, such a voluminous cat craft will be a particularly enjoyable experience. It's quite simple to do, but you need to be very careful.
For kindergarteners, it may be a little difficult to implement on their own, but younger schoolchildren can try their hand at sewing a new soft toy for themselves!
For this craft you will need:
- A pair of clean terry socks (to make the kitten soft and fluffy),
- Scissors,
- Cotton wool or synthetic winterizer,
- Needle and thread to match the socks,
- Stationery eyes (you can use buttons).
Progress:
- Terry socks should be placed in front of you with your heels up and your toes facing away from you. One heel will serve as the kitten's muzzle, and the second will serve as its back.
- We take one of the socks, cut off the sock into a crescent - later we will sew a tail from it. Cut the remaining sock vertically, thus making a body with legs out of it. Please note that the front legs should be slightly shorter than the hind legs.
- From the second sock we will make a head and a hat for the cat (the latter is optional). Carefully cut off the toe in the shape of a triangle, and on the opposite side just slightly cut off what is unnecessary. Thus, it turns out that our head comes from the middle of the sock, with triangular ears.
- We sew the legs on the wrong side so that the seams remain inside. We leave holes on the hind and front legs; we will need them to stuff the body with cotton wool or a special filler. We sew the ears on the head in the same way, making sure that the seams are inside, after which we turn the head and body inside out and stuff them with padding polyester or cotton wool.
- We sew up the muzzle completely, it should turn out round. Using the same principle, we “close” the holes in the paws, making sure that the kitten turns out plump and round. We sew the tail blank, after which we sew it and the head to the body. Please note that the kitten's front legs are shorter than the back legs! Don't get confused.
- The cat's face can be decorated by gluing eyes or sewing them with buttons. The nose can also be made from a button or bead, and the mustache can be made from thicker threads.
These cat crafts can be made from different materials - they are simple, but at the same time very beautiful, and even a child can easily make them.
Caring for cat paw pads
Contents hide
Some cat lovers looked at the title and were quite surprised: caring for paw pads? We hear the opinion that a healthy cat is quite capable of keeping its body clean, and its paw pads are no exception. Indeed, any cat lover watches with pleasure how his pet carefully moistens the pad with saliva and removes debris that accidentally gets between its fingers. Is it really necessary to help him?
Experts are inclined to give a positive answer - yes, it is necessary. Especially when you let your pet go outside. Cats are famous travelers, wherever they go. Whiskered animals walk, run, climb and jump a lot, and at the same time they touch not only soft carpets with their paws. Cuts, irritations, and foreign objects caught between the toes and causing discomfort are not uncommon.
And it’s not a sin to look after domestic cats. Are you sure the product you use to mop your floors or clean your furniture is pet-friendly? And cats walk on these surfaces, and then lick their paw pads with their tongues, the “chemistry” enters the body. The animal suddenly fell ill, and you (and your treating veterinarian) are completely at a loss as to what happened and what to treat it for. Quite often, completely unnecessary drugs are prescribed “for prevention” and are intended to treat completely different diseases.
We hope we managed to convince readers: you still need to wash the paws of your mustachioed friends. Maybe not every day, but from time to time, as needed. Our recommendation is especially relevant for cats in mixed housing.
What is "from time to time"? Each owner decides for himself. Suppose that upon returning from the street, your pet has a hearty lunch, and then decides to jump onto the owner’s lap, cuddle him, and at the same time wash himself. Don’t get lost: while stroking and scratching your pet, discreetly take the paw in your hand and inspect the condition of the paw itself and the pad. Many things should alert you: a cracked surface, blood, pus on the surface or between the fingers, suspicious lumps, tubercles and other compactions, wounds, cuts and other points. Let’s call them conventionally: “This didn’t exist before, and suddenly it appeared.” We won’t give a lecture on the anatomy of a cat’s paw, but let one main recommendation remain in your subcortex: vigilance has never harmed anyone. It is better to let the alarm turn out to be false than to subsequently have to treat an advanced disease. Fungus, skin cancer, and other dangerous and insidious ailments - all this occurs in our furry pets.
What do we have to do? Friends, we don’t want to “cause fear” and exaggerate things. In the vast majority of cases, the most ordinary, routine procedures will suffice. Take a clean and soft cloth (it’s better to immediately make several rags-towels), soak it in warm water and gently wipe the pad and the space between your fingers. If the pad is dry and cracked, use special moisturizing wipes, lotion or baby cream. Make sure (or to be sure, consult with your veterinarian) that the products used are pet-friendly, that is, safe for the animal. You can use a baking soda solution. If your cat walks on sidewalks that are heavily sprinkled with salt or deicing agents, add a drop of vinegar to the solution.
It should be emphasized that you need to work with your pet in a positive manner, in a great mood. Never use force or hold your pet. On the contrary, many cats love and appreciate a relaxing paw massage and purr with great pleasure during the process. At the same time, we advise you to take out special scissors and trim the claws a little. And don't forget about homemade scratching posts. Let there be many of them, good and different.
Material used: Should You Clean Your Cat's Paws? Author: Susan Dorling. Source: cuteness.com Photo: